Introduction
はじめに
This guide is intended to follow the official documentation for setting up a Goracle node, with a focus on security. I hope it will be helpful for the Goracle team and members of the GoraGang community.
This guide was created to enhance security and is recommended by the team. However, if you simply want to set up a node for now, you can skip to steps 1, 2, 5, 8, 9, and 10. I hope you can learn about security gradually as you proceed.
If you are interested in Goracle, please follow me on Twitter:
https://twitter.com/Moon1215i
【日本語】
このガイドは、Goracleノードの公式ドキュメントに沿って、セキュリティに焦点を当てて設定することを目的としています。このガイドがGoracleチームやGoraGangコミュニティのメンバーにとって役立つことを願っています。
このガイドはセキュリティを強化するために作成されたものであり、チームによって推奨されています。ただし、ノードを今すぐ設定するだけの場合は、手順を1、2、5、8、9、10だけを実行してもかまいません。徐々にセキュリティについて学んでいただければ幸いです。
Goracleに興味がある場合は、Twitterでフォローしてください:
https://twitter.com/Moon1215i

My Guide recommended by official sources.
- Goracleオフィシャルより推薦されました私のガイドです。
Official Site Reference 参照した公式サイト
Unofficial Site Reference 参照した非公式サイト
- Goracle Node Guide
- Tutorial — How to install a Algorand node — Testnet and Config the Goracle On same VPS.
- How to install Algorand Node in your VPS.
Setup Instructions:
セットアップ手順
Here is an example of how to do it. Please confirm the IP address, password, and SSH port with the provider you have contracted with. Also, when adding a username and password, and changing the SSH port number, be sure to change them according to your own preferences, rather than following the guide verbatim.
【日本語】
以下は手順の例です。ご契約のプロバイダーから IPアドレス、パスワード、および SSHポートを確認してください。また、ユーザー名とパスワードの追加、およびSSHポート番号の変更を行う場合は、本ガイドの指示通りにではなく、ご自分の環境に合わせて変更するようにしてください。
This guide provides the following example:
| LABEL | VALUE |
|---|---|
| IP Address | 12.34.56.78 |
| User | root |
| Password | Provided by the provider |
| SSH Port | 22 (default port number) |
The following will be added, created, or modified in this guide:
| LABEL | VALUE |
|---|---|
| User | GoraGang |
| Password | AlgorandOracle |
| Hostname | Goracle |
| SSH Port | 53814 |
| SSH Key Type | ed25519 |
| SSH Private Key | goracle_ed25519 |
| SSH Public Key | goracle_ed25519.pub |
| SSH Comment | goracle_ed25519_key |
【日本語】
このガイドでは、以下を例として操作します
| LABEL | VALUE |
|---|---|
| IPアドレス | 12.34.56.78 |
| ユーザー名 | root |
| パスワード | プロバイダから提供されたもの |
| SSHポート | 22 (デフォルトのポート番号) |
このガイドで追加、作成、または変更される内容は以下の通りです
| LABEL | VALUE |
|---|---|
| ユーザー名 | GoraGang |
| ユーザー名 | AlgorandOracle |
| ホスト名 | Goracle |
| ホスト名 | 53814 |
| SSHキーの種類 | ed25519 |
| SSH秘密鍵 | goracle_ed25519 |
| SSH公開鍵 | goracle_ed25519.pub |
| SSHコメント | goracle_ed25519_key |
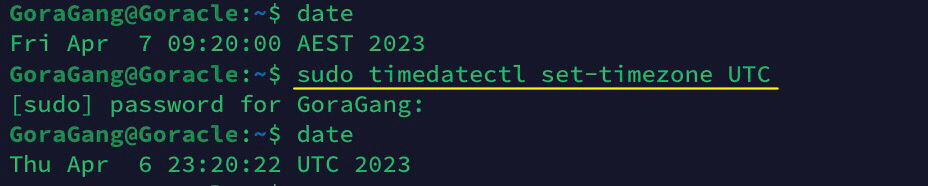
Setting Up Server Timezone to UTC
Additionally the use of UTC(Coordinated Universal Time) is recommended as the system time used by Docker. Therefore, I recommend setting the server time to UTC. To change the server time to UTC, run the following command.
【日本語】
サーバータイムゾーンをUTCに設定する
Dockerで使用されるシステム時間としてUTC(協定世界時)の使用をお勧めします。そのため、サーバーの時間をUTCに設定することをお勧めします。サーバーの時間をUTCに変更するには、次のコマンドを実行してください。
sudo timedatectl set-timezone UTC
1. Managing Packages on Linux with APT
1. APTを使用したLinuxパッケージの管理
These commands are used for updating and managing packages on a Linux system using the Advanced Package Tool (APT):
【日本語】
これらのコマンドは、Advanced Package Tool(APT)を使用してLinuxシステム上のパッケージを更新および管理するために使用されます。
sudo apt update -y && sudo apt upgrade -y
sudo apt install -y git nano curl wget
sudo apt autoremove -y
sudo apt autoclean -y
| Command | Description |
|---|---|
| sudo apt update | updates the list of available packages and their versions from the repository. |
| sudo apt upgrade | installs the updated packages. |
| sudo apt install | installs new packages. |
| sudo apt autoremove | removes packages that were installed as dependencies of other packages that are no longer installed on the system. |
| sudo apt autoclean | removes package files that can no longer be downloaded and are no longer needed. |
By running these commands, you can ensure that your system is up-to-date and has the latest security patches and bug fixes.
【日本語】
| コマンド | 説明 |
|---|---|
| sudo apt update | リポジトリから利用可能なパッケージとそのバージョンのリストを更新します。 |
| sudo apt upgrade | 更新されたパッケージをインストールします。 |
| sudo apt install | 新しいパッケージをインストールします。 |
| sudo apt autoremove | もはやシステムにインストールされていない他のパッケージの依存関係としてインストールされたパッケージを削除します。 |
| sudo apt autoclean | もはやダウンロードできず、不要なパッケージファイルを削除します。 |
これらのコマンドを実行することで、システムが最新のセキュリティパッチやバグ修正を含んでいることを確認できます。
2. Automatic Security Updates on Ubuntu
2. Ubuntuにおける自動セキュリティアップデート
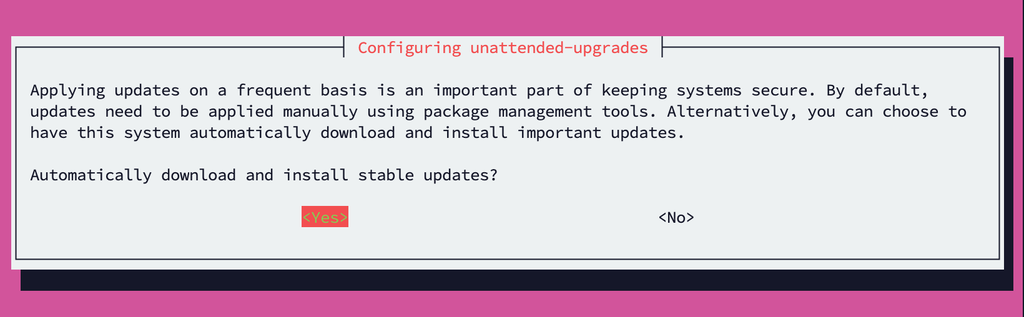
This is a command to install the "unattended-upgrades" package on Ubuntu system, which automatically applies security patches. The command also configures the package with low priority. Setting up unattended-upgrades minimizes system vulnerabilities. The dpkg-reconfigure command is used to modify package configurations. The --priority=low option sets the configuration priority of the unattended-upgrades package to low. Select 'yes' is a prompt to select the default settings.
【日本語】
これはUbuntuシステムに "unattended-upgrades"パッケージをインストールするコマンドで、セキュリティパッチを自動的に適用します。コマンドはまた、パッケージを低優先度で設定します。unattended-upgradesをセットアップすることで、システムの脆弱性を最小限に抑えることができます。dpkg-reconfigureコマンドは、パッケージの構成を変更するために使用されます。--priority=lowオプションは、unattended-upgradesパッケージの構成優先度を低く設定します。'yes'を選択するプロンプトは、デフォルトの設定を有効にするために選択します。
sudo apt install unattended-upgrades
sudo dpkg-reconfigure --priority=low unattended-upgrades
# Select `yes` / `yes`を選択
| Command | Description |
|---|---|
| sudo apt install unattended-upgrades | Installs the unattended-upgrades package, which enables automatic updates for the system. |
| sudo dpkg-reconfigure --priority=low unattended-upgrades | Reconfigures the unattended-upgrades package with low priority and prompts the user to select 'yes' to enable automatic updates. This will allow the system to automatically download and install security updates. |
【日本語】
| コマンド | 説明 |
|---|---|
| sudo apt install unattended-upgrades | システムの自動更新を有効にする unattended-upgradesパッケージをインストールします。 |
| sudo dpkg-reconfigure --priority=low unattended-upgrades | 低優先度で unattended-upgradesパッケージを再設定し、自動更新を有効にするには、ユーザーに 'yes' を選択するように促します。これにより、システムは自動的にセキュリティアップデートをダウンロードおよびインストールできるようになります。 |
3. Setting the Hostname: Optional
3. ホスト名の設定:オプション
The hostname is the name given to a computer or device on a network. It is used to identify the device and to connect to other devices on the same network. By default, Ubuntu assigns a hostname to your system based on your username.
| LABEL | VALUE |
|---|---|
| Hostname | Goracle |
【日本語】
ホスト名とは、ネットワーク上のコンピューターやデバイスに与えられる名前のことで、デバイスの識別や同じネットワーク上の他のデバイスとの接続に使用されます。Ubuntuでは、デフォルトでユーザー名に基づいてホスト名が割り当てられます。| ラベル | 値 |
|---|---|
| ホスト名 | Goracle |
sudo hostnamectl set-hostname Goracle
# Change the hostname to "Goracle"
# ホスト名を "Goracle" に変更する
You can change the hostname to something more meaningful or memorable by using the hostnamectl command.
【日本語】
hostnamectl コマンドを使用して、ホスト名を意味のあるものや覚えやすいものに変更できます。
sudo nano /etc/hosts
The /etc/hosts file is used to map IP addresses to hostnames. It is used by the system to resolve hostnames to IP addresses, and is an important part of network configuration. In this step, we use the nano text editor to edit the /etc/hosts file.
【日本語】
/etc/hosts ファイルは、IPアドレスをホスト名にマッピングするために使用されます。システムがホスト名をIPアドレスに解決するために使用され、ネットワーク構成の重要な部分です。このステップでは、テキストエディタ nano を使用して /etc/hosts ファイルを編集します。
12.34.56.78 Goracle
# Press "Ctrl" + "X", then "y", then "Enter" key.
# "Ctrl" + "X" → "y" → "Enter" キーを押します。
This command adds an entry to the /etc/hosts file that associates the IP address 12.34.56.78 with the hostname Goracle. This allows the system to resolve the hostname to the IP address.
【日本語】
このコマンドは、IPアドレス 12.34.56.78 とホスト名 Goracle を関連付けるエントリを /etc/hosts ファイルに追加します。これにより、システムはホスト名をIPアドレスに解決することができます。
To save the changes made to the file in nano, follow these steps:
- Press the
"Ctrl"and"X"keys on your keyboard at the same time. - Press the
"Y"key on your keyboard to confirm that you want to save the changes. - Press the
"Enter"key on your keyboard to exit the editor.
These steps will save the changes you made to the file and exit the nano editor.
【日本語】
nano で編集したファイルを保存する方法は、次の手順に従ってください:
- キーボードで
"Ctrl"キーと"X"キーを同時に押します。 - キーボードで
"Y"キーを押して変更を保存することを確認します。 - キーボードで
"Enter"キーを押してエディターを終了します。
これらの手順により、編集したファイルの変更が保存され、nanoエディターが終了します。
sudo reboot
# Verify that the hostname has been changed
# 再起動後にホスト名が変更されたか確認します
This command restarts the system. After the system has rebooted, verify that the hostname has been changed by using the hostnamectl command.
【日本語】
このコマンドはシステムを再起動します。システムが再起動した後、hostnamectl コマンドを使用して、ホスト名が変更されたかどうかを確認します。

Once restarted, you will see the following image.
【日本語】
再起動後、以下の画像が表示されます。

4. Setting up SSH Port and Firewall
| LABEL | VALUE |
|---|---|
| SSH Port | 53814 |
Changing SSH Port
To change the SSH port, run the following command to open the SSH configuration file:
sudo nano /etc/ssh/sshd_config
Note that the default SSH port is 22, but it is recommended to change it to a random number between 49513 and 65535 to avoid becoming a target of port attacks. Here, I will use 53814 as an example, but you can choose any other number within the range.
Once you have decided on the new port number, uncomment the following line in the configuration file and replace "22" with the new port number:
#Port 22
Port 53814

Save the changes to the file by pressing "Ctrl" + "X", then "y", and finally "Enter". Restart the SSH service to apply the changes:
sudo service ssh restart
Firewall Configuration
To allow traffic on the new SSH port, run the following command:
sudo ufw allow 53814/tcp
Next, enable the firewall and choose "yes" when prompted:
sudo ufw enable
This will configure the firewall to allow incoming traffic on the new SSH port.
sudo ufw status verbose
This command is used in Linux to check the current status of the firewall settings using Uncomplicated Firewall (UFW). "sudo" is used to run the command with administrative privileges. "ufw status verbose" is an option to display detailed information about the firewall, such as whether UFW is enabled or disabled, a list of open ports, and allowed IP addresses.

5. Adding a User
To add a new user to the system, follow these steps:
Choose a username and password. In this example, we will use "GoraGang" as the username and "AlgorandOracle" as the password.
| LABEL | VALUE |
|---|---|
| User | GoraGang |
| Password | AlgorandOracle |
Create a new group for the user with the following command:
sudo groupadd GoraGang
This will create a new group with the name "GoraGang".
Add the user to the system with the following command:
sudo useradd -p $(openssl passwd -6 AlgorandOracle) GoraGang -m -s /bin/bash -g GoraGang -G sudo
This command will create a new user with the username "GoraGang", a home directory, and a default shell of "/bin/bash". The user will be added to the "GoraGang" group and also to the "sudo" group, which will allow the user to perform administrative tasks.
Note that the "-p" option in the "useradd" command sets the user's password using the output of the "openssl passwd" command. The "-6" flag specifies that the password will be hashed using SHA-512. This ensures that the password is securely stored in the system's password database.

To confirm that the user was created successfully, open a new terminal window and log in with the new user's credentials:
ssh -p 53814 GoraGang@12.34.56.78
# Enter the password "AlgorandOracle" when prompted
This will establish an SSH connection to the server with the new user's account. If you can log in successfully, then the user was created and configured correctly.
6. Setting up SSH Keys
This section explains how to set up an SSH key on a remote server. An SSH key is used to log in to a remote server without entering a password.
-
First, open a terminal on your local machine and create an SSH key pair. This is used to authenticate with the remote server using the public key during SSH connections.
-
Next, copy the public key to the remote server. This step registers the public key on the remote server so that you can authenticate with it during SSH connections.
-
Finally, test the SSH connection. This will verify that the SSH key is set up correctly.
| LABEL | VALUE |
|---|---|
| SSH Key Type | ed25519 |
| SSH Private Key | goracle_ed25519 |
| SSH Public Key | goracle_ed25519.pub |
| SSH Comment | goracle_ed25519_key |
Open a terminal on your local machine (Mac, Windows, or Linux).
Create an SSH key pair using the Ed25519 algorithm with the following command:
ssh-keygen -t ed25519 -N '' -C "goracle_ed25519_key" -f ~/.ssh/goracle_ed25519
cd ~/.ssh && ls
# Confirm that "goracle_ed25519" and "goracle_ed25519.pub" exist
Here's a breakdown of the options used:
  -t ed25519                - Specifies that the Ed25519 algorithm should be used to generate the key pair.
  -N ''                     - Sets an empty passphrase for the key. This means that the key can be used without entering a password each time.
  -C                        - "goracle_ed25519_key": Adds a comment to the key to help identify it later.
  -f ~/.ssh/goracle_ed25519 - Specifies the filename and path for the private key. The public key will be saved in the same location with a .pub extension.
This command will generate two files in the "~/.ssh" directory: the private key ("goracle_ed25519") and the public key ("goracle_ed25519.pub"). The private key should be kept secret and protected with a strong passphrase, while the public key can be safely shared with remote servers for authentication purposes.
Copy the public key file "goracle_ed25519.pub" to the remote server (VPS).
ssh-copy-id -p 53814 -i ~/.ssh/goracle_ed25519.pub GoraGang@12.34.56.78
# Type "yes" to continue connecting, then enter the password "AlgorandOracle" for the GoraGang user account
This command is used to set up public key authentication for logging into a remote host. Specifically, it is composed of the following:
  ssh-copy-id                   - a command for copying SSH public keys to a remote machine
  -p 53814                      - specifies the SSH port number, which in this case is port "53814"
  -i ~/.ssh/goracle_ed25519.pub - specifies the path to the public key file, which in this case is "~/.ssh/goracle_ed25519.pub"
  GoraGang@12.34.56.78          - login information for the remote host, where "GoraGang" is the username on the remote host and "12.34.56.78" is the IP address or domain name of the remote host.
In summary, this command adds the public key in "~/.ssh/goracle_ed25519.pub" to the "authorized_keys" file for the user "GoraGang" on the remote host, and connects to the remote host using port number "53814". Once connected, this public key can be used to log into the remote host in the future without requiring a password, improving security.

Testing SSH Login with GoraGang User
To test whether the SSH key setup was successful, try logging into the VPS as the "GoraGang" user using the following command:
ssh -p 53814 -i ~/.ssh/goracle_ed25519 GoraGang@12.34.56.78
The permission of the remote host's ~/.ssh directory should be set to 700, which allows the owner to access the directory. This means that only the owner can have read, write, and execute permissions.
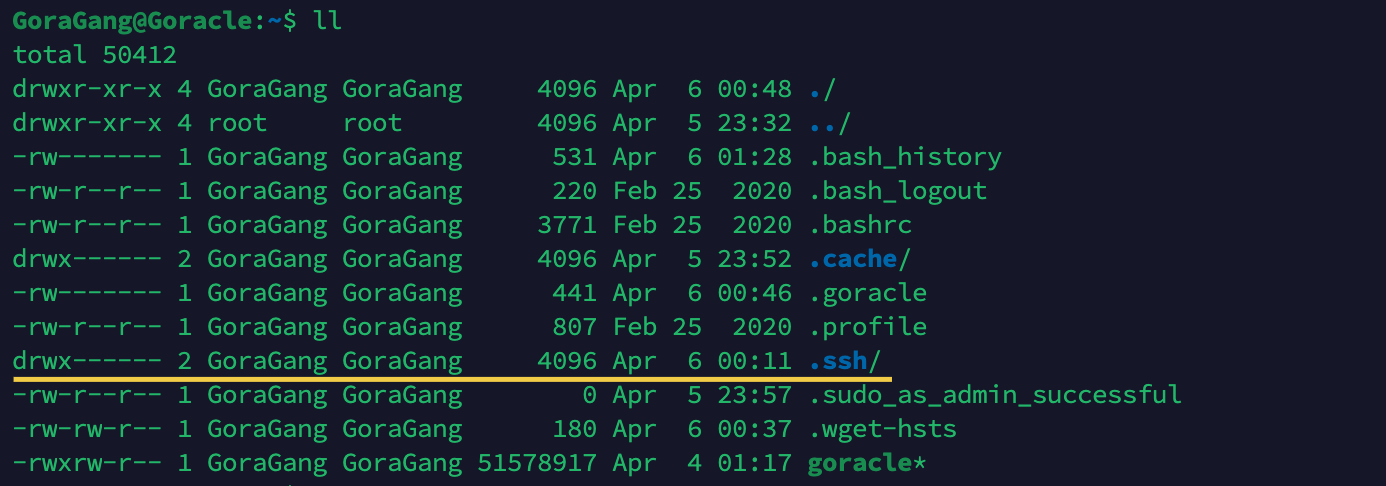
You can set this using the following command:
chmod 700 ~/.ssh
The permission of the authorized_keys file should be set to 600, which indicates that the file can only be read and written by the owner.

You can set this using the following command:
chmod 600 ~/.ssh/authorized_keys
If these permissions are not set, you can set them using the following command:
chmod 700 ~/.ssh && chmod 600 ~/.ssh/authorized_keys
These commands set the permission of the "~/.ssh" directory to 700 and the permission of the "authorized_keys" file to 600.
7. SSH Configuration and Verification
In this section, we will configure the SSH settings on the remote server to improve security and then verify that we can still connect to the server using SSH key authentication.
SSH Configuration
First, open the SSH configuration file using the following command:
sudo nano /etc/ssh/sshd_config
Then make the following changes to the configuration file:
Port 53814
AllowUsers GoraGang
PermitRootLogin no
PasswordAuthentication no
PermitEmptyPasswords no
ChallengeResponseAuthentication no
UsePAM no
# Uncomment the above line by removing the '#' symbol at the beginning.
# Save: Press `Ctrl + X` → Press `y` → Press `Enter`
These changes will do the following:
- Change the SSH port to 53814
- Allow only the GoraGang user to connect
- Disable root login
- Disable password authentication
- Disable empty passwords
- Disable challenge-response authentication
- Disable PAM
These changes will improve the security of our server by limiting the methods by which someone can gain access.


After making the changes, restart the SSH service using the following command:
sudo service ssh restart
SSH Verification
To verify that we can still connect to the server using SSH key authentication, open a new terminal window and run the following command to connect as the GoraGang user:
ssh -p 53814 -i ~/.ssh/goracle_ed25519 GoraGang@12.34.56.78
Make sure to replace 12.34.56.78 with the IP address of your server. If everything is configured correctly, you should be able to connect to the server without having to enter a password.
8. Installing Goracle Node on User GoraGang
Please make sure that the current user is GoraGang by running the following command if you are not sure:
sudo -i -u GoraGang
The next command downloads a file called goracle (Goracle CLI) from https://staging.dev.goracle.io/downloads/latest-staging/goracle and gives it executable permissions using chmod u+x.
Specifically, it does the following:
- Uses the
wgetcommand to download thegoraclefile from the specified URL. - Uses the
chmodcommand to grant execute permissions to the downloadedgoraclefile. - The
u+xoption means to grant execute permission to the file owner. - This makes the downloaded
goraclefile usable as an executable file, specifically as aGoracle CLItool.
If you follow the official Goracle documentation:
Goracle Node Runner User Manual: https://docs.goracle.io/technical-documentation/
cd ~/
wget https://staging.dev.goracle.io/downloads/latest-staging/goracle
chmod u+x ./goracle

According to the guide on the following site, it looks like this:
Goracle Node Guide: https://teletype.in/@ttimmatti/goracle-node
sudo wget -qP /usr/bin/ https://staging.dev.goracle.io/downloads/latest-staging/goracle
sudo chmod u+x /usr/bin/goracle
The difference between the two commands is the location where goracle is saved. In the first command, the goracle binary is downloaded to the home directory of the GoraGang user and made executable with chmod u+x. The ./ before goracle is required to run the goracle command because the current directory is not in the system PATH.
./goracle init
./goracle docker-start --background
./goracle docker-stop
In the second command, goracle is downloaded directly to /usr/bin/ and made executable with chmod u+x. This allows the goracle command to be run from any directory without needing to specify the path.
goracle init
goracle docker-start --background
goracle docker-stop
9. Installing Docker
Run the following command to install Docker:
bash <(wget -qO- https://raw.githubusercontent.com/ttimmatti/dependencies/main/docker.sh)

Creating Configuration for a New Goracle Node
After Docker is installed, run the following command to initialize Goracle:
./goracle init
# goracle init
Goracle Initialization Prompts
As of April 4th, 2023, the Goracle team recommends option B until option A becomes stable.
-- Prompt A --
→ your Goracle participation account using your Algorand wallet.Continue? y
→ Use Algonode Algorand API service (recommended)? [Y/n]? y
→ Enter Algonode API auth token or press enter for free-tier default: y
You should answer "y" to the first question to continue with setting up your Goracle participation account. For the second question, you can answer "y" to use the Algonode Algorand API service (recommended), or "n" to use another API service. If you choose to use the Algonode Algorand API service, you can enter your API auth token or leave it blank to use the free-tier default.
-- Prompt B --
Please register and obtain a Purestake API authentication key beforehand using the following website.

→ Use Algonode Algorand API service (recommended)? [Y/n]? n # Select "n" for now
→ Use a Purestake account for Algorand API service? [y/N]? y
→ Enter Purestake API authentication key: <Your Purestake API authentication key>
Enter your main Algorand account address: <Your main Algorand account address>
If you choose to not use the Algonode Algorand API service, you will be prompted with the above questions instead. Answer "n" to the first question, and "y" to the second question if you want to use a Purestake account for Algorand API service. Then, enter your Purestake API authentication key and main Algorand account address as prompted.
Participate in Oracle Consensus
The detailed steps for proceeding from here are described in steps 1.3 to 1.6 of the following guide. Please refer to it:
I would also like to express my gratitude to @ttimmatti for creating this guide and for his/her excellent work.
10. Adding user to docker group
This command is used to add the currently logged-in user to the docker group. The "$USER" is an environment variable that indicates the username of the currently logged-in user.
Users who belong to the docker group have permission to run the docker command, which allows them to run the docker command without using the sudo command. Here is the command to add the current user to the docker group:
sudo usermod -aG docker $USER
After running sudo usermod -aG docker $USER, you must log out of the current terminal session and then log back in for the changes to take effect.
exit
or
logout
Once you are logged back in, you can start the Goracle Docker container by running the following command:
./goracle docker-start --background
This command is used to start the Goracle Docker container in the background. The Goracle container is used to connect to a blockchain network using the Oracle Consensus protocol and enable database operations. The "--background" option specifies that the container should be run in the background.

docker logs -f goracle-nr
This command is used to monitor the logs of the Goracle Docker container.
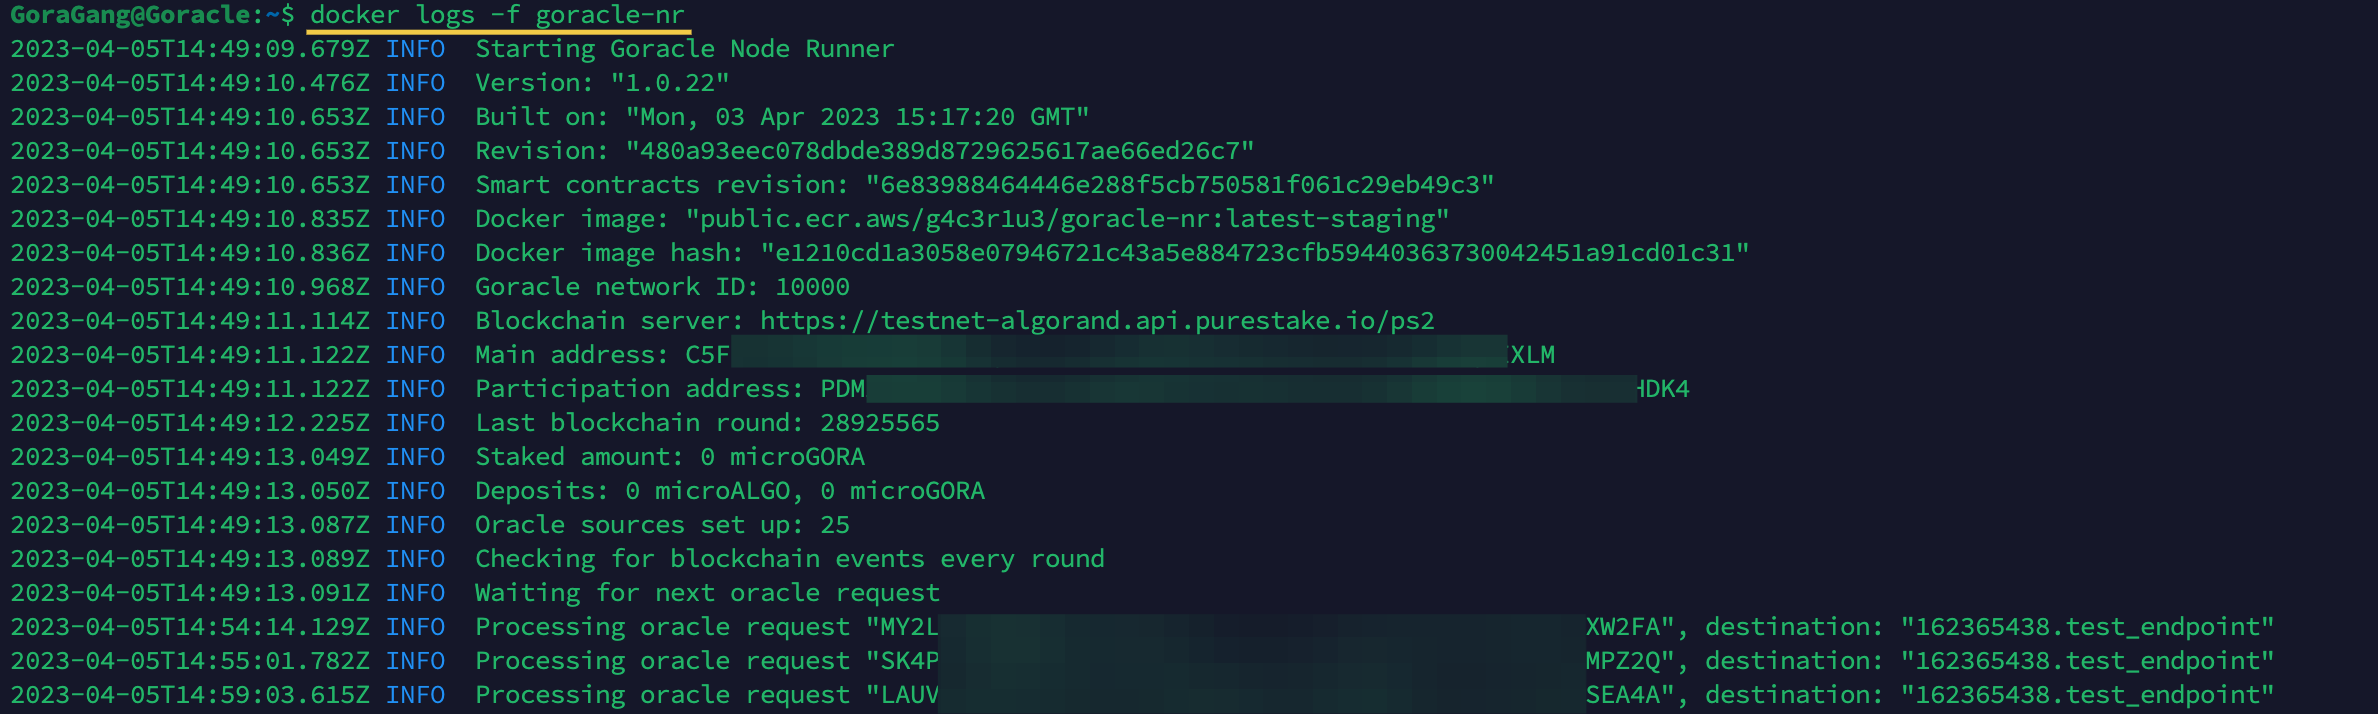
The "-f" option allows you to follow the logs in real-time, so you can see the output as it is generated. This can be useful for troubleshooting and debugging any issues that may arise while running the container.
docker ps
The "docker ps" command lists only the running containers. Therefore, by executing the "docker ps" command here, we can see that a Docker container named "goracle-nr" is up and running.

This command is very useful for monitoring and managing running applications.
11. Goracle CLI & Docker Command
  goracle help          - Show usage information
  goracle init          - Create configuration for a new node
  goracle info          - Display information on the configured Goracle network
  goracle update        - Check for updates, optionally installing them
  goracle docker-status - Show status of local docker instance
  goracle docker-start  - Start local docker instance
  goracle docker-stop   - Stop locally running docker container(s)
-
./goracle docker-start --background
11-2./goracle docker-start --background- Executes the Goracle binary file to start the Docker container.
- The
"--background"option specifies to run the container in the background. - Assumes that the Goracle binary file is located in the current working directory (which is often the home directory).
- This command starts a Docker container named
"goracle-nr".
-
goracle docker-start --background
11-3goracle docker-start --background- If the Goracle binary file is installed on the system path (
/usr/bin), this command starts the Docker container in a similar way. - The
"--background"option specifies to run the container in the background. - Assumes that the Goracle binary file is located in the
/usr/bin/goracledirectory. - This command starts a Docker container named
"goracle-nr".
- If the Goracle binary file is installed on the system path (
-
docker start goracle-nr
11-4./docker start goracle-nr # docker start goracle-nr- This command restarts a stopped Docker container named
"goracle-nr". The Docker container needs to have already been created in order to use this command.
- This command restarts a stopped Docker container named
-
docker stop goracle-nr
11-5./docker stop goracle-nr # docker stop goracle-nr- This command is a command to stop the Docker container named
"goracle-nr".
- This command is a command to stop the Docker container named
-
docker ps
11-6./docker ps # docker ps- This command is used to list all running containers. It displays information such as the container ID, image used to create the container, and the command that is currently running inside the container.
-
docker ps -a
11-7./docker ps -a # docker ps -a- This command is used to list all containers, whether they are running or not. It displays information similar to docker ps, but includes additional information such as the container's status (e.g. exited, restarting) and when it was created.
-
docker container prune
11-8./docker container prune # docker container prune- This command is used to remove all stopped containers. Stopped containers can accumulate on a system and take up disk space, so running this command periodically can help to keep the system clean.
-
# Restart Policy
In Docker, you can set the restart policy for a container. The restart policy specifies the action that the Docker engine should take when a container stops. There are several types of restart policies:
Restart Policy Description no Do not automatically restart the container when it exits. always Always restart the container when it exits, regardless of the exit status. on-failure Restart the container if it exits with a non-zero exit status. on-failure:N Similar to on-failure, but limits the number of times to attempt the restart to N times. If you don't specify N, Docker will keep trying indefinitely. unless-stopped Similar to always, but the container will not be restarted if it was stopped manually. You can specify the restart policy with the
--restartoption when you run thedocker runcommand. For example, you can start a container with thealwaysrestart policy like this:11-9docker run --restart always goracle-nrYou can also change the restart policy for a running container with the docker update command. For example, you can change the restart policy to on-failure with a maximum of 5 retries like this:
11-10docker update --restart on-failure:5 goracle-nr
12. Upgrading
./goracle docker-stop
This command will stop the Goracle Docker container running on your system.
After stopping the Goracle Docker container, you can update Goracle to the latest version using the following command:
./goracle update
This command will download and install the latest version of Goracle.
Once Goracle has been updated, you can start the Goracle Docker container again in the background using the following command:
./goracle docker-start --background
13. Installing Fail2ban
13. Fail2banのインストール
Fail2ban is an intrusion prevention system that monitors log files and watches for certain patterns of failed login attempts. If a certain number of login failures from a particular IP address are detected within a specified time frame, Fail2ban will block access from that IP address.
To install Fail2ban, run the following command:
【日本語】
Fail2banは侵入防止システムであり、ログファイルを監視し、失敗したログイン試行の特定のパターンを監視します。特定のIPアドレスからのログイン失敗が指定された時間枠内で一定数検出された場合、Fail2banはそのIPアドレスからのアクセスをブロックします。
Fail2banをインストールするには、以下のコマンドを実行してください。
sudo apt install fail2ban -y
To configure Fail2ban to monitor SSH logins, open the configuration file using the following command:
【日本語】
Fail2banがSSHログインを監視するように設定するには、次のコマンドを使用して設定ファイルを開きます。
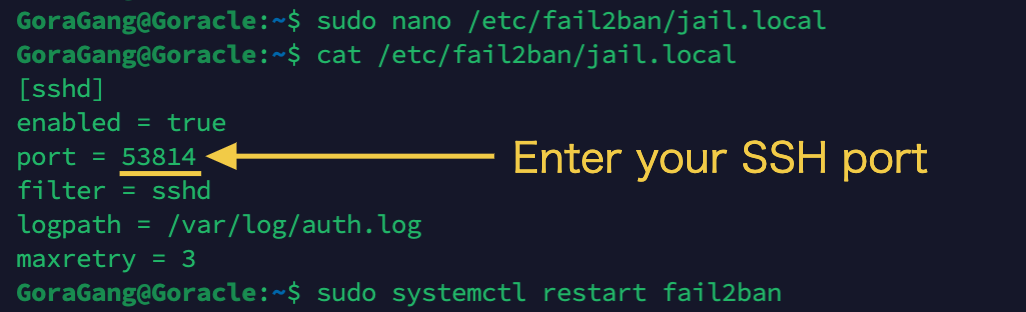
sudo nano /etc/fail2ban/jail.local
At the end of the file, add the following lines, replacing "(enter your SSH port)" with the SSH port number you set in step 4:
【日本語】
ファイルの最後に、以下の行を追加し、"(enter your SSH port)"をステップ4で設定したSSHポート番号に置き換えてください。その後、ファイルを保存して終了します。
[sshd]
enabled = true
port = 53814 # Enter your SSH port
filter = sshd
logpath = /var/log/auth.log
maxretry = 3
# Save: Press `Ctrl + X` → Press `y` → Press `Enter`
# 保存:`Ctrl + X` を押してから、`y` を押して、`Enter`を押します。
Save the file and exit.
The following configuration sets up Fail2ban to monitor SSH login attempts and block IP addresses that exceed the maximum number of login failures within a certain time period. The configuration is added to the file /etc/fail2ban/jail.local.
| Parameter | Description |
|---|---|
| [sshd] | The name of this section, indicating that this configuration is related to sshd. |
| enabled | Determines if the jail is enabled or not. Set to true to enable the jail. |
| port | The SSH port number. Sets the port used for SSH. Here, port number 53814 is used. |
| filter | This configuration monitors logs using a filter named sshd. The sshd filter is used to obtain the IP address of users attempting to connect via SSH. |
| logpath | The path to the monitored log file. Here, /var/log/auth.log is being monitored. This file contains information about user SSH connections. |
| maxretry | Sets how many failed logins are allowed before the IP address is blocked. Here, if there are 3 failed login attempts, access from that IP address will be blocked. |
【日本語】
以下の設定は、Fail2banがSSHログイン試行を監視し、一定時間内に最大ログイン失敗回数を超えたIPアドレスをブロックするように設定します。この設定は、ファイル/etc/fail2ban/jail.localに追加されます。
| パラメータ | 説明 |
|---|---|
| [sshd] | このセクションの名前で、この設定がsshdに関連していることを示します。 |
| enabled | ジェイルが有効かどうかを決定します。ジェイルを有効にするには、trueに設定します。 |
| port | SSHポート番号です。SSHに使用されるポートを設定します。ここではポート番号53814が使用されます。 |
| filter | この設定は、sshdという名前のフィルタを使用してログを監視します。 sshdフィルタを使用して、SSH経由で接続しようとするユーザーのIPアドレスを取得します。 |
| logpath | 監視されるログファイルへのパスです。ここでは、/var/log/auth.logが監視されています。このファイルには、ユーザーのSSH接続に関する情報が含まれています。 |
| maxretry | IPアドレスがブロックされる前に許可される失敗したログインの回数を設定します。ここでは、3回のログイン失敗試行がある場合、そのIPアドレスからのアクセスがブロックされます。 |

Restart Fail2ban to apply the new configuration:
【日本語】
新しい設定を適用するために、Fail2banを再起動してください。
sudo systemctl restart fail2ban
That's it! Fail2ban is now set up to monitor SSH logins and block IPs with a certain number of failed login attempts.
Fail2ban monitors /var/log/auth.log to collect information such as unauthorized access and authentication errors. The information about blocked and unblocked IP addresses by fail2ban is recorded in /var/log/fail2ban.log. Therefore, /var/log/fail2ban.log is a log file to check the actions taken by fail2ban.
You can view the fail2ban log file by using the command:
【日本語】
以上で完了です! Fail2banは、一定数のログイン失敗試行を行ったIPアドレスをブロックするように設定され、SSHログインを監視するように設定されました。
Fail2banは、 /var/log/auth.logを監視して、不正アクセスや認証エラーなどの情報を収集します。Fail2banによってブロックされたIPアドレスとアンブロックされたIPアドレスに関する情報は、/var/log/fail2ban.logに記録されます。したがって、/var/log/fail2ban.logはFail2banによって実行されたアクションを確認するためのログファイルです。
fail2banログファイルを表示するには、次のコマンドを使用します:
sudo cat /var/log/fail2ban.log
If you accidentally get banned by fail2ban, you can unban yourself by:
- Using a
VPNto access from a different IP address. - Editing the log file by removing the entry that contains your IP address using the following command:
13-6
sudo cat /var/log/fail2ban.log - Restarting fail2ban to apply the changes by running the following command:
13-7
sudo service fail2ban restart
【日本語】
もしFail2banによって誤ってあなた自身がBANされた場合は、以下の方法で自分自身をアンバンすることができます。
-
VPNを使用して別のIPアドレスからアクセスすること。 - 次のコマンドを使用して、あなたのIPアドレスを含むエントリを削除することによって、ログファイルを編集すること。
13-6
sudo cat /var/log/fail2ban.log - 変更を適用するために、Fail2banを再起動するために以下のコマンドを実行すること。
13-7
sudo service fail2ban restart
Author
If you are interested in Goracle, please follow me on Twitter:
It would be great if I could receive a comment on Twitter, even just a few words.