ACCESS Advent Calendar 2020 の21日目の記事です.
担当は @Momijinn です.
この記事では, タイトルでもある通り nginx の Docker イメージ を使って HTTP/2 対応の Web サーバーを立ててみる話をします.
ゴールはSSLセッションキャッシュ設定等の細かい設定は省き, devtools で HTTP/2 で通信していることを確認するまでとしています.
環境
Docker
  Docker version 20.10.0, build 7287ab3
Host
  macOS Catalina 10.15.7
とりあえず Docker を使って web サーバーを起動
いきなり HTTP/2 対応させる前に, デフォルトで起動させてみます.
Terminal で以下のコマンドを打ちます.
$ docker run --rm -p 80:80 nginx:1.19.6-alpine
その後,ブラウザで http://localhost/ を開くと Welcome to nginx! というメッセージが表示されます.
devtools をみるとデフォルトだと HTTP/1.1 で通信をしているようです.
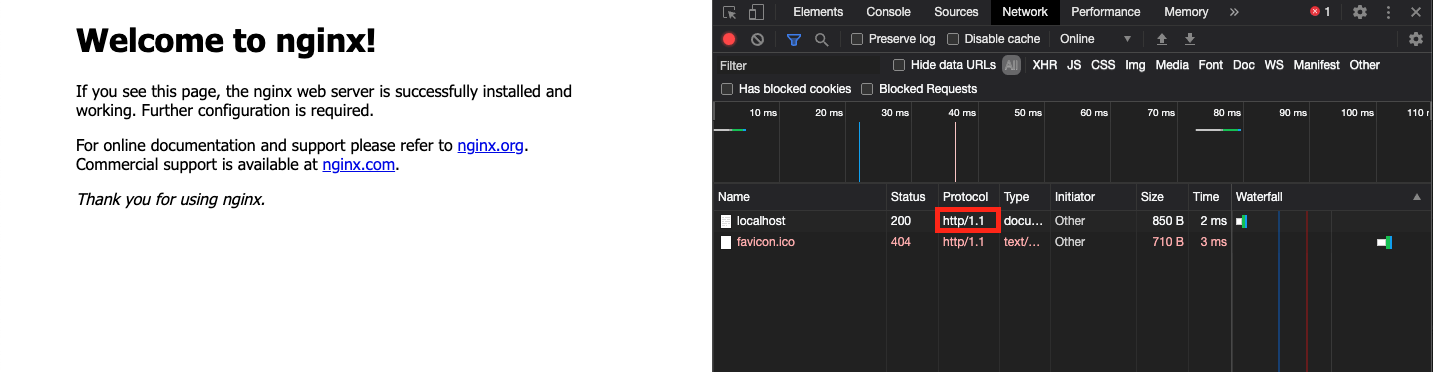
とりあえずこれで Web サーバーの作成 & 起動しました.✌️
オリジナルコンテンツを表示させる
nginx の歓迎メッセージだけでは味目ないのでオリジナルの html コンテンツを読み込ませることにします.
以下のような 世界にあいさつ(Hello World) する html コンテンツを作ります.
<!DOCTYPE html>
<html lang="ja">
<head>
<meta charset="UTF-8">
<meta name="viewport" content="width=device-width, initial-scale=1.0">
<title>テストコンテンツ</title>
</head>
<body>
<div>👨 < Hello World</div>
</body>
</html>
その後, 以下のようにして Docker を起動します.
# path/to の箇所は絶対パス
$ docker run --rm -p 80:80 -v path/to/html:/usr/share/nginx/html nginx:1.19.6-alpine
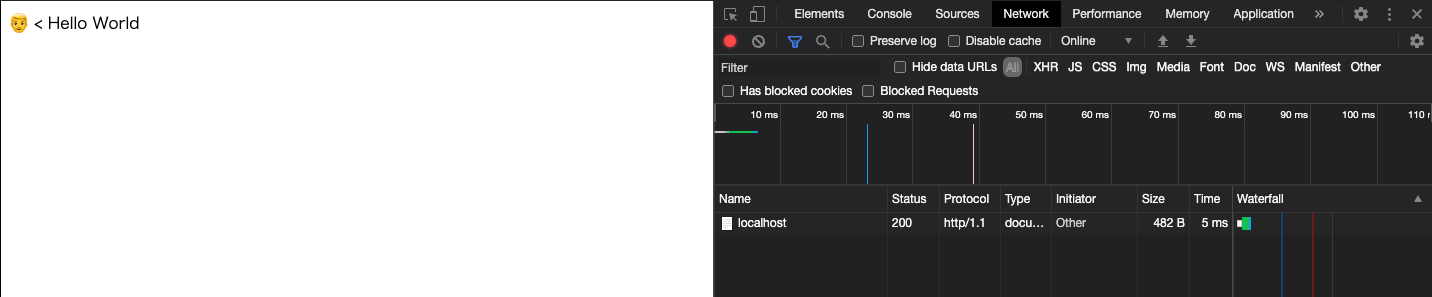
その後,ブラウザで http://localhost/ を開くと Hello World が表示されます.
表示されない場合は キャッシュを削除してリロードしてください.
hello world を表示するコンテンツを /usr/share/nginx/html にマウントした理由は, デフォルト設定で location ディレクティブがそのpathを参照しているためです.
詳しくは コンテナ 内をみるとわかります.
詳細情報はおりたたんでおきます.
$ docker run --rm -it --entrypoint '' nginx:1.19.6-alpine /bin/ash # Docker内に入る

/# cat /etc/nginx/nginx.conf
user  nginx;
worker_processes  auto;

error_log  /var/log/nginx/error.log warn;
pid        /var/run/nginx.pid;


events {
    worker_connections  1024;
}


http {
    include       /etc/nginx/mime.types;
    default_type  application/octet-stream;

    log_format  main  '$remote_addr - $remote_user [$time_local] "$request" '
                      '$status $body_bytes_sent "$http_referer" '
                      '"$http_user_agent" "$http_x_forwarded_for"';

    access_log  /var/log/nginx/access.log  main;

    sendfile        on;
    #tcp_nopush     on;

    keepalive_timeout  65;

    #gzip  on;

    include /etc/nginx/conf.d/*.conf; #どうやら /etc/nginx/conf.d/*.conf の設定ファイルが読み込まれてる
}

/# ls /etc/nginx/conf.d/ # ls でみると default.conf のみある
default.conf

/# cat /etc/nginx/conf.d/default.conf
server {
    listen       80;
    server_name  localhost;

    #charset koi8-r;
    #access_log  /var/log/nginx/host.access.log  main;

    location / {
        root   /usr/share/nginx/html; # <--- ここ
        index  index.html index.htm;
    }

    #error_page  404              /404.html;

    # redirect server error pages to the static page /50x.html
    #
    error_page   500 502 503 504  /50x.html;
    location = /50x.html {
        root   /usr/share/nginx/html;
    }

    # proxy the PHP scripts to Apache listening on 127.0.0.1:80
    #
    #location ~ \.php$ {
    #    proxy_pass   http://127.0.0.1;
    #}

    # pass the PHP scripts to FastCGI server listening on 127.0.0.1:9000
    #
    #location ~ \.php$ {
    #    root           html;
    #    fastcgi_pass   127.0.0.1:9000;
    #    fastcgi_index  index.php;
    #    fastcgi_param  SCRIPT_FILENAME  /scripts$fastcgi_script_name;
    #    include        fastcgi_params;
    #}

    # deny access to .htaccess files, if Apache's document root
    # concurs with nginx's one
    #
    #location ~ /\.ht {
    #    deny  all;
    #}
}
HTTP/2 対応ではこの default.conf をいじります.
HTTP/2 対応サーバーを作成する
Docker を使えば爆速で Web サーバーが立てられる話はここまでにして, 本題である HTTP/2 対応させてみます.
証明書の作成
Chrome や Firefox では HTTPS 通信でしか HTTP/2 できないとのことなので HTTPS に対応させるために証明書を発行します.
今回は, Docker を起動しているホスト側でオレオレ証明書を作成し, コンテナに証明書を渡す方法をとります.
証明書の発行に使うツールは mkcert を使いました.
openssl よりも大変楽に作成できます.
$ brew install mkcert

$ mkcert -install
Created a new local CA 💥
The local CA is now installed in the system trust store! ⚡️

$ mkdir cert
$ cd cert
$ mkcert localhost 127.0.0.1

Created a new certificate valid for the following names 📜
 - "localhost"
 - "127.0.0.1"

The certificate is at "./localhost+1.pem" and the key at "./localhost+1-key.pem" ✅

It will expire on 20 March 2023 🗓

$ tree
.
├── localhost+1-key.pem
└── localhost+1.pem
nginx 設定の変更
HTTP2 対応させるために default.conf を編集します.
こちらもホスト側で設定ファイルを編集し, Docker 起動時に default.conf を渡すようにしてあげます.
Docker 内で編集作業は大変しんどいのでこの方法をとりました.
最低限必要な箇所を編集.
server {
  listen       80;
  server_name  localhost;

  return 301 https://$host$request_uri;
}

server {
  listen       443 ssl http2; # http2 対応
  server_name  localhost;

  location / {
    root   /usr/share/nginx/html;
    index  index.html index.htm;
  }

  ssl_certificate /cert/localhost+1.pem;
  ssl_certificate_key /cert/localhost+1-key.pem;
}
HTTP/2 対応サーバーを起動してみる
諸々設定したので起動してみます.
以下のように Docker を起動.
# 443 ポートもポートフォワーディングしてあげるのがミソ
$ docker run --rm -p 80:80 -p 443:443 -v path/to/html:/usr/share/nginx/html -v path/to/cert:/cert -v path/to/default.conf:/etc/nginx/conf.d/default.conf nginx:1.19.6-alpine
ブラウザで http://localhost/ を開くとリダイレクトされて https://localhost/ で表示されます.
表示できていない場合はキャッシュを削除すると確認ができると思います.
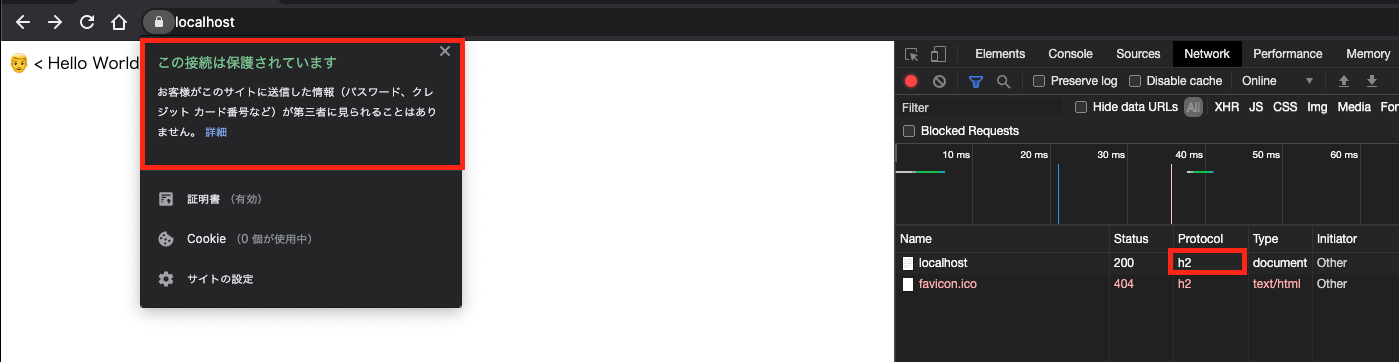
URLバーにある🔒マークを押すとちゃんとHTTPSで通信していることが確認できます.
また, devtools で開くと protcol で h2 という表示変わります.
HTTP/2 の仕様書を読むと, h2 は HTT/P2 の識別子とのことなので, ちゃんと HTTP/2 で通信できていることができました! 🎉
まとめ
かなり駆け足でしたが nginx の Docker イメージ を使って HTTP/2 対応の Web サーバーの構築方法を書きました.
もっとめんどくさいとおもていましたが,意外とすんなり HTTP/2 が実装できました.
雑に nginx の設定をして HTTP/2 化したのでリファレンス読んできっちり設定をしていきたいところです.
次回は @hnishi さんです.
なにか書くそうなのでとても楽しみです.
それでは よいクリスマス🎅 & よいお年を🎍!