ここでは、MESH (http://meshprj.com/jp/) の任意のセンサータグから、JavaScriptで処理を実装した自作のタグを起動する方法を紹介する。
MESH SDKの登録
MESH SDK (https://meshprj.com/signin/) のサイトにアクセスし、アカウントを作成する。
カスタムタグの作成
MESH SDKにログインし、「Create New Tag」から新しいカスタムタグを作成する。
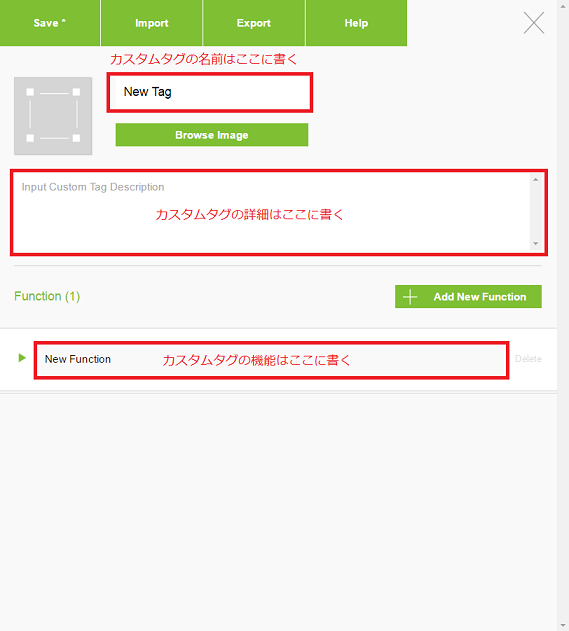
新しく作成したカスタムの「Edit」から、タグの名前や詳細などの情報を記述できる。
タグの機能の追加
「Edit」画面から、タグの機能を実装できる。
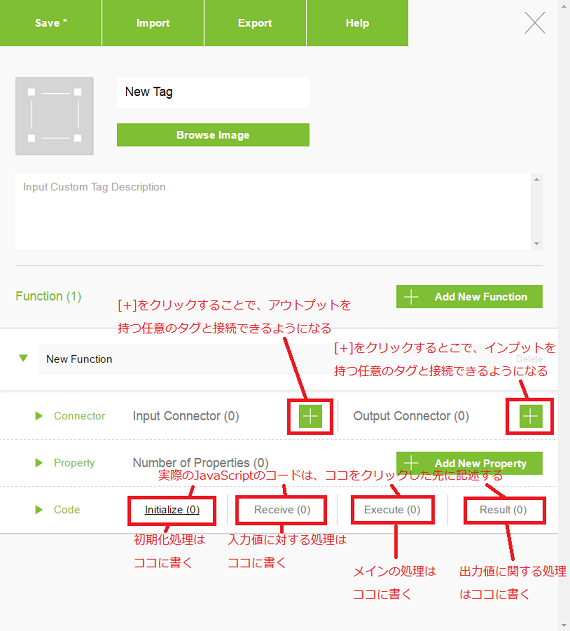
先ほど名前を付けたFunction(デフォルトではNew Function)の左側の「▶」をクリックし、機能を実装していく。
以下に、図を用いて実装の詳細を説明する。
詳細は、 https://meshprj.com/sdk/doc/ を参照のこと。
JavaScriptの記述
今回は、iPadの「MESH」アプリに表示される「Log」画面に「こんにちは!」が表示されるだけのコードを実装する。
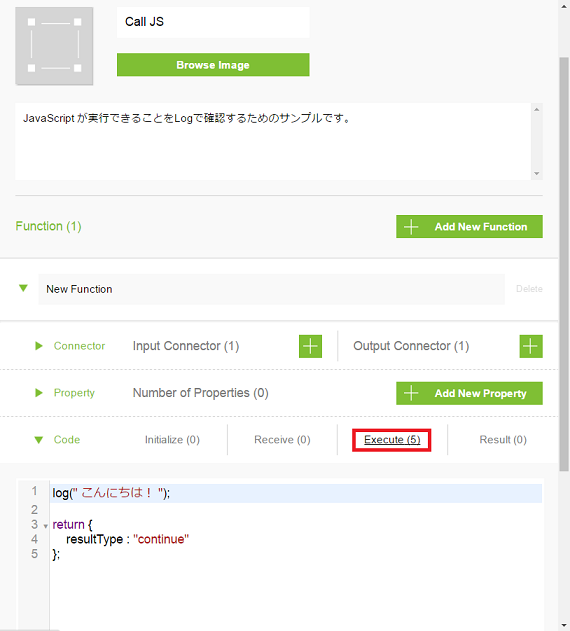
「Edit」の「Fuction」の「Execute」にて、以下のコードを追加する。
log(" こんにちは! ");

return {
    resultType : "continue"
};
(returnのresultType : "continue"とは、タグが実行された後に次のタグに自動的に遷移するための値設定であり、
MESH SDK固有のものである。
その他の値として、"stop"や"pause"がある。詳細は、 https://meshprj.com/sdk/doc/ を参照のこと。)
タグの動作確認
以下に、作成したタグをiPadの「MESH」アプリに取り込む方法を紹介する。
任意のレシピを開き、画面右上の設定から、「SDK」をタップし、先ほどカスタムタグを作成したMESH SDKのアカウントにてログインする。
レシピの右ペイン下方に表示されている「Custom」の「+」をタップすると、先ほど作成したタグが表示されるので、タップしてダウンロードを行う。
ダウンロードできたタグのインプットと任意のセンサーのアウトプットを繋ぐ。
「Custom」の「Log」をタップし、ログ画面を表示させている状態でセンサーを反応させると、「こんにちは!」の文字列が表示される。


