はじめに
Discord上でゲームなど遊べるDiscord Activityというサービスがあります。Discord Activityについては以下を参照してください。
そのDiscord Activityは、開発環境や方法が公開されており、誰でもアプリを作成してDiscord上で動かすことが出来ます。
今回Discord Activityのサンプルの1つのnested-messagesを動かしてみます。
最終的に改良を加えて、以下の動作するDiscordアプリを作成します。
環境
- Windows 11
- Node.js : v20
- Visual Studio Code
- ターミナル : Power Shell
動かすサンプルの紹介
今回動かすサンプルプロジェクトを以下になります。
このサンプルは、Discordでアプリの起動するために必要なDiscordSDKの設定やユーザー認証サーバーなど基本部分と、以下の特徴があります。
- 様々なフレームワーク(React、Unity)で作成されたWebアプリ、ゲームをiframeで起動させる
- iframeで起動するアプリをWindow.postMessageを使用して、DiscordSDKと連携する。このサンプルでは、DiscordSDKからマイクの音声感知の情報を取得します
例えば、Unityで作ったアプリをWebGLで出力したものをそのまま実行することが出来たりします。ただしDiscordSDKの機能を使うためには、呼び出し処理をUnity側での実装が必要になります。
Discordのデベロッパーページでアプリの作成
以下の公式ドキュメントをもとにアプリの構築を行います。
Discord上で動かすアプリの構築するため、以下のサイトのデベロッパーポータルにアクセスしてアプリを作成します。
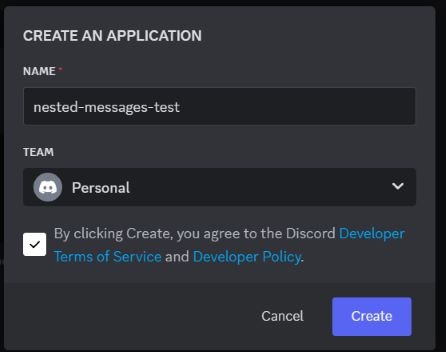
アプリ作成画面で任意のアプリ名をつけてアプリ作成を行います。今回はアプリ名を「nested-messages-test」とします。
次にアクティビティの開始設定をします。
アプリの設定画面サイドバーの"Getting Started"を選択し、画面下の"Enable"を押して開始します。
次にDiscordアプリ内で、ユーザー情報使用の認証設定に必要な設定をします。
OAuth2の"Redirects"をhttps://127.0.0.1に設定します。
これで最低限のアプリの構築が完了しました。
サンプルのダウンロード
今回使用する"nested-messages"を入手するために、"embedded-app-sdk-examples"をGitHubから落とします。
"embedded-app-sdk-examples"フォルダ内の"nested-messages"を使用するため今回は"nested-messages"をコピーして作業します。
環境構築
コードエディターは、Visual Studio Code(VSCord)で、JavaScriptの実行環境にNode.jsを使用します。
VSCordで"nested-messages"プロジェクトを開く。ターミナルを開き、パッケージのインストールを行います。
npm install
このインストールで、DiscordSDKのパッケージ"embedded-app-sdk"などが落ちてきます。
.envの設定
DiscordのアプリIDを環境変数に設定をします
- プロジェクト内の".example.env"ファイルをコピーして".env"ファイルを作成する
- Discord Developer Portalのアプリ設定サイトの"OAuth2"ページを開く
- "CLIENT SECRET"を生成する
- "CLIENT ID"と"CLIENT SECRET"の値をコピーする
- 作成した".env"ファイルを開き、"CLIENT_ID"と"CLIENT_SECRET"にそれぞれ設定する
ビルド設定の変更
scripts\build.jsを開きます。
.envで設定してる変数を取得する際に、Windows環境変数も取得してしまい、変数の値によってエラーが発生するので、今回使用したい変数のみ設定するようにします。
require('dotenv').config();
const { build } = require('esbuild');
const { glob } = require('glob');
const entryPoints = glob.globSync('./client/**/*.ts');

// Inject .env variables
const define = {};
for (const k in process.env) {
	if (['CLIENT_ID'].includes(k) || ['CLIENT_SECRET'].includes(k)) {
		define[`process.env.${k}`] = JSON.stringify(process.env[k]);
	}
}

build({
	bundle: true,
	entryPoints,
	outbase: './client',
	outdir: './client',
	platform: 'browser',
	external: [],
	define,
});
認証サーバーへのtokenパス修正
Discord Activityはセキュリティで外部URLにアクセスするにはお作法があり、以下ドキュメントになります。
今回使用したサンプルの参照URLの設定が古いままでしたので、それを修正します。
client\utils\initializeSdk.tsの29行目のapi/tokenへのアクセスパスを以下のように"/.proxy"を追加修正します。
-	const response = await fetch('/api/token', {
+	const response = await fetch('/.proxy/api/token', {
サンプルの表示改良
このサンプルは、ユーザーからマイクの通話の開始と終了をDiscordSDKから取得して、Logに出力する内容となってます。現状でも動作はしますが、動作情報の出力先がDevToolsのコンソールのため、わかりやすいように、画面に出力するように改良したいと思います。
本体のhtmlの表示領域を全体(100%)にし、ボーダーなど余分な表示を消します。
client\index.html
<html>
  <head>
    <style>
      html,
      :root {
        --sait: var(--discord-safe-area-inset-top, env(safe-area-inset-top));
        --saib: var(--discord-safe-area-inset-bottom, env(safe-area-inset-bottom));
        --sail: var(--discord-safe-area-inset-left, env(safe-area-inset-left));
        --sair: var(--discord-safe-area-inset-right, env(safe-area-inset-right));
      }
      body {
        background-color: #ffffff;
        margin: 0;
        padding-top: var(--sait);
        padding-bottom: var(--saib);
        padding-left: var(--sail);
        padding-right: var(--sair);
      }
    </style>
    <script src="index.js"></script>
  </head>
  <body>
    <iframe id="child-iframe" src="/.proxy/nested/" width="100%" height="100%" frameborder="0" style="border: none"></iframe>
  </body>
</html>
次にiframeに表示するnestedフォルダ内のindex.htmlに、ログ表示用のタグを追加します。
client\nested\index.html
<html>
  <head>
    <script src="/nested/index.js"></script>
    <title>Game</title>
  </head>
  <body>
    <button id="reload">Reload the page 🔁</button>
    <ul id="discordMessageList"></ul>
  </body>
</html>
次に参加者の通話状況を表示するために、ユーザー情報の取得と画面表示処理をいれます。
client\nested\index.ts
import { MessageInterface } from '../utils/MessageInterface';

const messageInterface = new MessageInterface();

// ユーザーの型を定義
type User = {
    id: number;
    username: string;
};

// ユーザーの連想配列を定義
const users: { [key: number]: string } = {};

// 新しいユーザーを追加する関数
function addUser(id: number, username: string): void {
    users[id] = username;
}

// ユーザー名を取得する関数
function getUsername(id: number): string | undefined {
    return users[id];
}
// ログの追加
function addLog(logMessage?: string): void {
    const discordMessageList = document.getElementById('discordMessageList');
    const newLog = document.createElement('li');
    const currentTime = new Date().toLocaleTimeString();
    newLog.textContent = `SDKメッセージ - ${logMessage}`;
	discordMessageList.insertBefore(newLog, discordMessageList.firstChild);
}


window.addEventListener('DOMContentLoaded', async () => {
	await messageInterface.ready();

	messageInterface.sendMessage({
		command: 'SET_ACTIVITY',
		data: {
			activity: {
				details: 'Set Activity from nested iframe',
				type: 0,
				state: 'Playing',
			},
		},
	});

	const parentQueryParams = new URLSearchParams(window.parent.location.search);
	const channelId = parentQueryParams.get('channel_id');

	messageInterface.subscribe(
		'SPEAKING_START',
		({ user_id }) => {
			addLog(`[通話開始] "${getUsername(user_id)}"`);
		},
		{ channel_id: channelId },
	);

	messageInterface.subscribe(
		'SPEAKING_STOP',
		({ user_id }) => {
			addLog(`[通話停止] "${getUsername(user_id)}"`);
		},
		{ channel_id: channelId },
	);
	messageInterface.subscribe(
		'ACTIVITY_INSTANCE_PARTICIPANTS_UPDATE',
		({ participants }) => {
			participants.forEach(({ id, username }) => {
				addUser(id, username);
				addLog(`[参加者更新] "${username}" Log In`);
			});
		},
		{ channel_id: channelId },
	);

	const reloadButton = document.getElementById('reload');
	reloadButton?.addEventListener('click', () => {
		console.log('reloading');
		window.location.reload();
	});
});
ビルドとアプリ起動
以下のコマンドをターミナルに入力して、ビルドを開始します。
npm run build
ビルドが完了したら、以下のコマンドで、http://localhost:3000/ にローカルサーバーが起動します。
npm run start
http://localhost:3000/ にアクセスすると "Cannot GET /.proxy/nested/" と表示されます。現状はこれで問題ないです。
Discordへの起動準備
ローカルサーバーで起動したアプリを外部公開するために、Cloudflareのツールを使用します。
以下のサイトからcloudflareをインストールします。
cloudflareのインストールが完了したら、新規ターミナルを作成し、新規ターミナルで以下のコマンドを実行します。
cloudflared tunnel --url http://localhost:3000
cloudflared tunnel を実行するとURLが発行されます。このURLはcloudflared tunnelが終了すると使えなくなります。再度外部公開したい場合は、再度URLの発行が必要になります。
Discord Developer Portalのアプリ設定サイトにアクセスします。サイドバーの"URL Mappings"を開き、"TARGET"に先ほど作成したURLを設定します。
Discordでアプリを試す
Discordアプリにアクセスして、ユーザー設定に移動します。詳細設定から、"開発者モード"をオンに設定します。
これで、アクティビティの一覧に作成したアプリが表示されます。
アプリを起動すると、最初にユーザー情報をアプリで使用するための認証を行います。
以下アプリの実行結果になります。
おまけ : UnityのWebGLアプリを呼び出す
私がUnityで作成したWebGLのサンプルアプリをDiscordに出したいと思います。出すだけなのでアプリ内でDiscordの機能は使えません、
方法としては、iframeに起動したいアプリのURLを指定して表示します。
外部URLのアプリを起動するために、"URL Mapping"を使用します。URL Mappingの仕様は以下のサイトを参照してください。
iframeに外部サイトを起動するために設定を行います。
client\index.html
<iframe id="child-iframe" src="https://1295727003814592513.discordsays.com/.proxy/unityUrl/index.html" width="100%" height="100%" frameborder="0" style="border: none"></iframe>
iframeに設定しているsrcのURLの"1295727003814592513"は、DiscordアプリのCLIENT_IDになります。アプリによってこの値が変わります。
次にDiscordで起動したいアプリのURLを設定します。
- Discord Developer Portalのアプリ設定サイトにアクセスする
- サイドバーの"URL Mappings"を選択する
- "Add Another URL Mapping"でURLマッピングを追加する
- "PREFIX"に"/unityUrl"を設定する
- "TARGET"にアプリのURLを設定する。今回は"miyakovsky.github.io/UnityWebGLCanvasFitScreen"と設定する
- "Save Changes"をして設定を保存する
編集が完了して、再度アプリにアクセスすると、設定したURLのアプリが表示されます。


