1. 概要
SharePointのリンク集リストをタイル表示にする方法は、インターネット上に数多く公開されているが、その殆どがアイコン登録列の種類を”ハイパーリンクまたは画像”としている。
アイコン登録列の種類が”ハイパーリンクまたは画像”の場合、アイコン画像をアップロード後、その画像のURLをフォームに入力するといったアイコン画像登録には複雑な操作を行う必要がある。一方アイコン登録列の種類が"イメージ"であれば、アイコン画像をフォームにドラッグアンドドロップのみの容易な操作でアイコン画像を登録ができる。
これらのことから、リストにリンクを追加する機会が多い場合は、アイコン登録列の種類を"イメージ"することが好ましい。
そこで、本記事では、アイコン登録列の種類を"イメージ"にしたタイル表示の書式設定を記載する。
2. 環境
App : Microsoft 365 Business Standard SharePoint (Plan 1)
OS : MacOS Big Sur
3. 実装方法
3-1. LISTの構成
以下の列からなるリストを作成する。
| 列名 | Titel | URL | Image |
|---|---|---|---|
| 形式 | 1行テキスト | 1行テキスト | イメージ |
列の作成後、アイテムを追加した。追加画面を図1に、アイテム追加後のリストを図2に示す。

右上のメニューから新しい"ビューを作成する"(図3)を選択した後、表示されたウィンドウにビュー名を入力する・(図4)
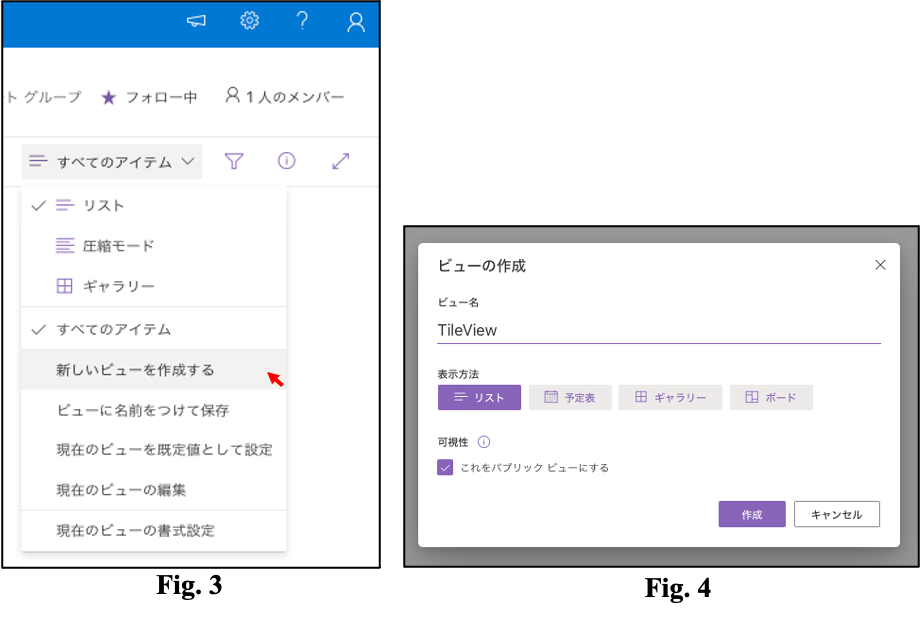
右上のメニューで先程作成したビューが選択されていることを確認して、現在のビューの書式設定を選択する。(図5)
選択後に表示されたウィンドウの下にある”詳細モード"をクリックする。(図6)
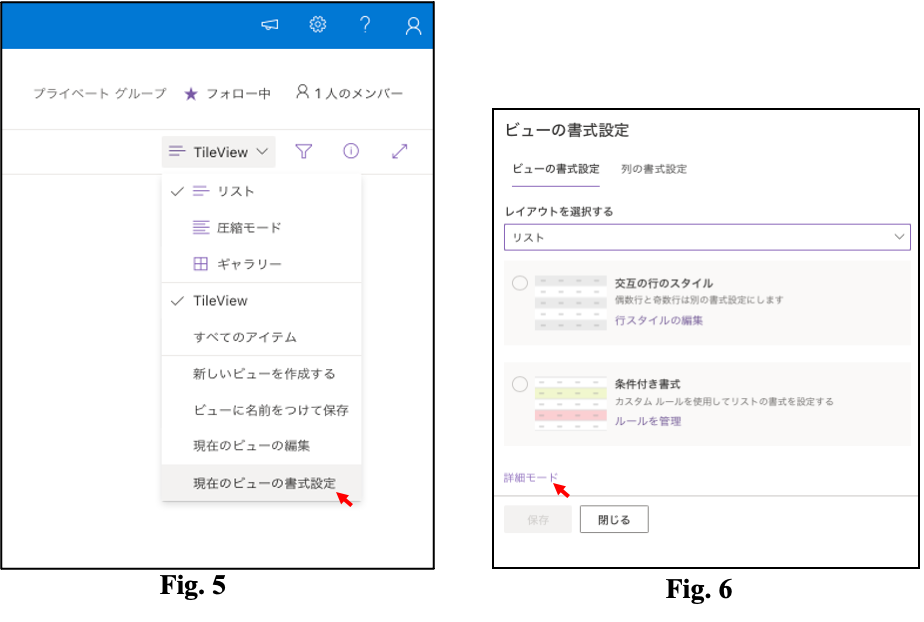
図7のソースコードを削除し、以下のソースコードを貼り付ける。

Tile View
{
  "$schema": "https://developer.microsoft.com/json-schemas/sp/v2/row-formatting.schema.json",
  "schema": "https://developer.microsoft.com/json-schemas/sp/view-formatting.schema.json",
  "hideSelection": "true",
  "hideColumnHeader": "true",
  "rowFormatter": {
    "elmType": "a",
    "attributes": {
      "href": "[$URL]"
    },
    "style": {
      "float": "left",
      "text-decoration": "none",
      "font-weight": "bold",
      "font-size": "18px",
      "color": "#48A7AB"
    },
    "children": [
      {
        "elmType": "div",
        "attributes": {
          "class": "ms-bgColor-neutralLighterAlt ms-bgColor-neutralQuaternary--hover "
        },
        "style": {
          "display": "table",
          "width": "100px",
          "height": "100px",
          "margin-right": "20px",
          "margin-top": "20px",
          "box-shadow": "2px 2px 4px darkgrey"
        },
        "children": [
          {
            "elmType": "div",
            "style": {
              "width": "100%",
              "height": "100%",
              "display": "table-cell",
              "vertical-align": "middle",
              "text-align": "center"
            },
            "children": [
              {
                "elmType": "img",
                "attributes": {
                  "src": "=getThumbnailImage([$Image], 100, 100)"
                },
                "style": {
                  "width": "50%",
                  "height": "50%"
                }
              },
              {
                "elmType": "div",
                "attributes": {
                  "class": "no-color-change"
                },
                "txtContent": "[$Title]"
              }
            ]
          }
        ]
      }
    ]
  }
}
実装画面
書式設定にのソースコードを
通常時(マウスアウト時)の挙動を図8(a)に、マウスオーバー時の挙動を図8(b)示す。

参考