ソースコードだけでGUIを作る(VisualStudio無し)
ちょっとC#をやってみようと思い立ってTo-Do-list を作ったのですが、
WEBでGUIを作成する方法を検索すると、VisualStudio を使用しますという情報が殆どで、コーディングだけで作るのに少々苦労しました。
素直に VisualStudio を使えよと思うかも知れませんが、頭の容量が足りない筆者にとっては新しいソフトを1つ学ぶのは正しい選択ではないのです。また、間にソフトを1つ挟むと余計な操作が増えてコーディングに集中出来ず、やたらと疲れたりします。
そんなこんなでどーしても新しいソフトを学びたくなかったので、コーディングだけでGUIを作成してみました。
ちなみに完成したToDoリストのコードはGithubにあります。
windows で c# を使って何か作るには、.CS 拡張子のファイルに記述すれば良いので、任意のファイル名.cs を好きな場所に作成してコーディングします。
そして、コンパイラは C:\Windows\Microsoft.NET\Framework\v4.0.30319\ など(vから始まるフォルダ)の中にある csc.exe を使います。
C:\Windows\Microsoft.NET\Framework\v4.0.30319\csc.exe /optimize /target:winexe ソースファイル名.cs
ですが、これだと毎回長文になるので PowerShell のプロファイルに、
function csc($name){
	$name = ".\" + $name + ".cs"
    C:\Windows\Microsoft.NET\Framework\v4.0.30319\csc.exe /optimize /target:winexe $name
	$name = $null
	[GC]::Collect()
}
などのファンクションを作成しておくと、
csc ソースファイル名
だけでコンパイルできる様になるのでお勧めです。
PowerShell のプロファイルについてはこちら
formsでGUIを作成
1.まずは、ザ・フォームから

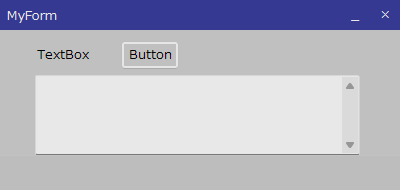
デフォルトのフォームです。
python の tkinter なんかと比べると今っぽい感じはしますが、
基本的には、クラス作って、アイテム作って、コントロールに追加するだけで、あんまり面白味はありません。
using System;
using System.Drawing;
using System.Windows.Forms;

namespace FormApp{

    // formクラスを作成
    public class MainForm:Form{
        public MainForm(){

            // formのサイズ、タイトル、開始位置を設定
            this.Size = new Size(400,190);
            this.Text = " MyForm";
            this.StartPosition = FormStartPosition.CenterScreen;
            this.Font = new Font("Meiryo UI",10,FontStyle.Regular);

            // マウスポイントを取得
            Point mousePoint = new Point();

            // ラベルの作成
            Label label = new Label();

            // テキストボックスの作成
            TextBox textBox = new TextBox();

            // ボタンの作成
            Button button = new Button();

            // ラベルのテキスト、位置、サイズなどを設定
            label.Text = "TextBox";
            label.TextAlign = ContentAlignment.TopLeft;
            label.ForeColor = Color.Black;
            label.Location = new Point(35,15);
            label.Size = new Size(60,15);

            // テキストボックスの位置、サイズ、背景色などを設定
            textBox.Multiline = true;
            textBox.Location = new Point(35,45);
            textBox.Size = new Size(310,80);
            textBox.ScrollBars = ScrollBars.Vertical;
            textBox.ForeColor = Color.Black;
            textBox.BackColor = Color.White;
            textBox.BorderStyle = BorderStyle.Fixed3D;

            // ボタンのテキスト、位置、サイズなどを設定
            button.Text = "Button";
            button.Location = new Point(120,10);
            button.Size = new Size(60,30);
            button.ForeColor = Color.Black;

            // ボタンの機能を追加(テキストボックスにHelloWorld!を表示させる)
            button.Click += delegate(object sender, EventArgs e){
                textBox.Text = "HelloWorld!";
            };

            // アイテムを全て追加
            this.Controls.Add(label);
            this.Controls.Add(textBox);
            this.Controls.Add(button);

            // GUIをマウスで移動出来るようにする
            this.MouseDown += delegate(object sender, MouseEventArgs e){
                if((e.Button & MouseButtons.Left) == MouseButtons.Left){
                    mousePoint = new Point(e.X,e.Y);
                }
            };
            this.MouseMove += delegate(object sender, MouseEventArgs e){
                if((e.Button & MouseButtons.Left) == MouseButtons.Left){
                    this.Left += e.X - mousePoint.X;
                    this.Top += e.Y - mousePoint.Y;
                }
            };
       }

        // メインvoid
        [STAThread]
        public static void Main(){
            Application.EnableVisualStyles();
            Application.Run(new MainForm());
        }
    }
}
2.カスタムすると
長くなるので簡単なところだけ載せます。
この時点ではあまり見た目が良くありませんが、かなり弄れるのでこちらは楽しいです。(筆者作成のToDoリストはこんな感じで進めました)
コレ↓↓
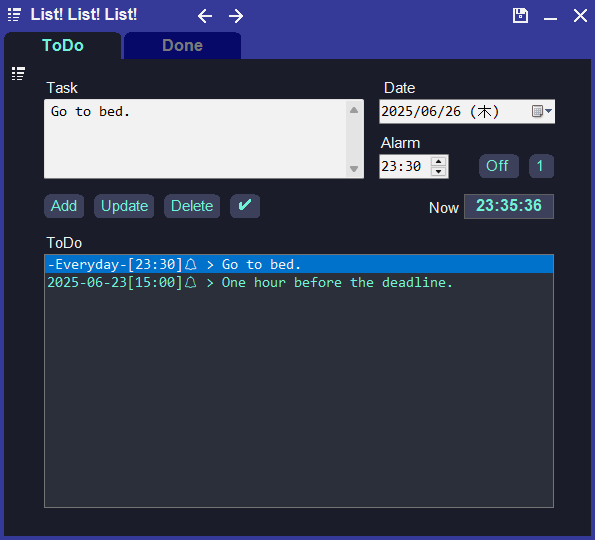
ただ、拘るとあっという間に時間が経ってしまうので、アプリの機能実装を先に済ませた方が良いかも知れません。
using System;
using System.Drawing;
using System.Windows.Forms;

namespace FormApp{
    public class MainForm:Form{
        public MainForm(){
            this.Size =new Size(400,190);

            // formを何もない状態にする
            this.FormBorderStyle = FormBorderStyle.None;

            // formのバックカラー、透明度を変更
            this.BackColor = Color.LightGray;
            this.Opacity = 0.90;

            this.StartPosition = FormStartPosition.CenterScreen;

            Point mousePoint = new Point();

            // フォントを代入
            Font font = new Font("Meiryo UI",10,FontStyle.Regular);

            // 標題部をラベルで作成
            Label title = new Label();

            Label label = new Label();

            Button button_min = new Button();
            Button button_close = new Button();
            Button button = new Button();

            TextBox textBox = new TextBox();

            // 標題部を1枚のラベルにする
            title.Text = " MyForm";
            title.Font = font;
            title.TextAlign = ContentAlignment.MiddleLeft;
            title.ForeColor = Color.White;
            title.BackColor = Color.FromArgb(56,60,159);
            title.Location = new Point(0,0);
            title.Size = new Size(400,30);

            label.Text = "TextBox";
            label.Font = font;
            label.TextAlign = ContentAlignment.TopLeft;
            label.ForeColor = Color.Black;
            label.Location = new Point(35,45);
            label.Size = new Size(60,15);

            // minボタンを自前で作成
            button_min.Text = "_";
            button_min.Font = font;
            button_min.FlatStyle =FlatStyle.Flat;
            button_min.FlatAppearance.BorderSize = 0;
            button_min.TextAlign = ContentAlignment.MiddleCenter;
            button_min.ForeColor = Color.White;
            button_min.Location = new Point(340,0);
            button_min.Size = new Size(30,30);
            button_min.Click += delegate(object sender,EventArgs e){
                this.WindowState = FormWindowState.Minimized;
            };

            // closeボタンを自前で作成
            button_close.Text = "×";
            button_close.Font = font;
            button_close.FlatStyle =FlatStyle.Flat;
            button_close.FlatAppearance.BorderSize = 0;
            button_close.TextAlign = ContentAlignment.MiddleCenter;
            button_close.ForeColor = Color.White;
            button_close.Location = new Point(370,0);
            button_close.Size = new Size(30,30);
            button_close.Click += delegate(object sender,EventArgs e){
                Close();
            };

            textBox.Multiline = true;
            textBox.Location = new Point(35,75);
            textBox.Size = new Size(325,80);
            textBox.ScrollBars = ScrollBars.Vertical;
            textBox.Font = font;
            textBox.ForeColor = Color.Black;
            textBox.BackColor = Color.White;
            textBox.BorderStyle = BorderStyle.Fixed3D;

            button.Text = "Button";
            button.Font = font;
            button.Location = new Point(120,40);
            button.Size = new Size(60,30);
            button.ForeColor = Color.Black;
            button.Click += delegate(object sender, EventArgs e){
                textBox.Text = "HelloWorld!";
            };

            // 標題部を追加
            this.Controls.Add(title);

            // 標題部にminとcloseのボタンを貼り付ける
            title.Controls.Add(button_min);
            title.Controls.Add(button_close);

            this.Controls.Add(label);
            this.Controls.Add(textBox);
            this.Controls.Add(button);

            this.MouseDown += delegate(object sender, MouseEventArgs e){
                if((e.Button & MouseButtons.Left) == MouseButtons.Left){
                    mousePoint = new Point(e.X,e.Y);
                }
            };
            this.MouseMove += delegate(object sender, MouseEventArgs e){
                if((e.Button & MouseButtons.Left) == MouseButtons.Left){
                    this.Left += e.X - mousePoint.X;
                    this.Top += e.Y - mousePoint.Y;
                }
            };

            // 標題部をクリックしてもウインドウを移動出来るようにする
            title.MouseDown += delegate(object sender, MouseEventArgs e){
                if((e.Button & MouseButtons.Left) == MouseButtons.Left){
                    mousePoint = new Point(e.X,e.Y);
                }
            };
            title.MouseMove += delegate(object sender, MouseEventArgs e){
                if((e.Button & MouseButtons.Left) == MouseButtons.Left){
                    this.Left += e.X - mousePoint.X;
                    this.Top += e.Y - mousePoint.Y;
                }
            };
       }

        [STAThread]
        public static void Main(){
            Application.EnableVisualStyles();
            Application.Run(new MainForm());
        }
    }
}
短い記事ですが、GUI作成のきっかけになればと思います。