エイチームフィナジーの@Minashoです。
本記事は、Ateam Finergy Inc. Advent Calendar 2020の2日目に公開された記事です。
はじめに
静的サイトジェネレーターHUGOを使って、ドキュメントサイト(wiki)を制作します。
はてなブログやWordPress等のCMS(Contens Management System)でもドキュメントサイトを作ることは可能です。
しかし、ブログ用CMSだとデザインの制約が大きいという問題があり、WordPressはサーバーとドメインを用意する必要があり、コストが発生します。
静的サイトジェネレーターであるHUGOは、学習コストはありますが、無料で利用できます。
GitHub Pages等のホスティングサービスで無料公開も可能です。
今回使用するテーマのデモサイト
静的サイトとは
まず、静的サイトとは、ユーザーのアクセスに対して用意してあるHTMLを返すだけのサイトです。
いつ誰が閲覧しても、同じページが表示されます。
したがって、ユーザーによって内容が変わらないwikiやブログ、コーポレートサイトが適しています。
私が所属しているエイチームフィナジーのコーポレートサイトも静的サイトです。
一方、掲示板やSNSなど、見るタイミングやユーザーによって表示内容が変わるサイトは動的サイトで実現できます。
サーバーにリクエストがあった時に、DB内のデータやテンプレートからHTMLファイルを生成し、ユーザーに返します。
静的サイトのメリットは、表示速度が早いこと。
デメリットは、1ページごとにHTMLファイルを用意する必要があり、手間がかかること。
このデメリットを解消してくれるのが、静的サイトジェネレーターになります。
静的サイトジェネレーターとは
名前の通り、静的サイトを生成してくれるツールです。
コンテンツを書いてビルドを実行すれば、ヘッダーやフッター、サイドバーなどを含んだHTMLファイルを自動で生成してくれます。
ブログサービス同様、コンテンツを書くことに集中できるというわけです。
HUGOとは
HUGOは静的サイトジェネレーターのひとつです。
GO言語で作られており、他の静的サイトジェネレーターよりもビルドが高速であるという特徴があります。
また、デザインテンプレートが豊富な印象です。
10分でサンプルサイトを制作する
それでは、HUGOを使って実際にドキュメントサイトを作っていきましょう!
HUGOをインストール
Homebrewをインストールしていない方は事前にインストールしておきます。
# Homebrewインストール
/bin/bash -c "$(curl -fsSL https://raw.githubusercontent.com/Homebrew/install/HEAD/install.sh)"
次はHUGOをインストールします。
# HUGOをインストール
$ brew install hugo
# バージョンを確認
$ hugo version
サイトを作成する
$ hugo new site sample_document
# 以下の構成でsample_documentディレクトリが生成されます
sample_document
├── archetypes
│   └── default.md
├── config.toml
├── content
├── data
├── layouts
├── static
└── themes
テーマを適応する
今回はtechdocというドキュメントのHUGO公式テーマを使用します。
HUGOの公式テーマはGitHubで管理されているので、アップデートに対応するためサブモジュールでcloneします。
# gitインストール
$ brew install git
# sample_document配下に移動
$ cd sample_document
$ git init
# themesにテーマをclone
$ git submodule add https://github.com/thingsym/hugo-theme-techdoc.git themes/hugo-theme-techdoc
続いて、HUGOの設定ファイルであるconfig.tomlを編集します。
テーマをcloneしたらthemes/hugo-theme-techdoc/exampleSite/にサンプルの記事や設定ファイルが置いてあるので、そちらを利用します。
サンプル用に編集した以下のコードをconfig.tomlにコピペしましょう。
今回使用しない変数や設定は#でコメントアウトしています。
(様々な機能が用意されているので慣れてきたら読んでみましょう)
baseURL = "https://example.com"

languageCode = "jp"
DefaultContentLanguage = "jp"
title = "サンプルドキュメント"
theme = "hugo-theme-techdoc"

hasCJKLanguage = true
metaDataFormat = "yaml"

defaultContentLanguage = "jp"
defaultContentLanguageInSubdir= false
enableMissingTranslationPlaceholders = false

[params]

    # Source Code repository section
    description = "これはサンプルドキュメントです"
    # github_repository = "https://github.com/thingsym/hugo-theme-techdoc"
    # version = "0.9.6"

    # Documentation repository section
    # documentation repository (set edit link to documentation repository)
    github_doc_repository = "https://github.com/thingsym/hugo-theme-techdoc"

    # Analytic section
    google_analytics_id = "" # Your Google Analytics tracking id
    tag_manager_container_id = "" # Your Google Tag Manager container id
    google_site_verification = "" # Your Google Site Verification for Search Console

    # Open Graph and Twitter Cards settings section
    # Open Graph settings for each page are set on the front matter.
    # See https://gohugo.io/templates/internal/#open-graph
    # See https://gohugo.io/templates/internal/#twitter-cards
    title = "Hugo Techdoc Theme"
    images = ["images/og-image.png"] # Open graph images are placed in `static/images`

    # Theme settings section
    # Theme color
    # See color value reference https://developer.mozilla.org/en-US/docs/Web/CSS/color
    custom_font_color = ""
    custom_background_color = ""

    # Documentation Menu section
    # Menu style settings
    menu_style = "open-menu" # "open-menu" or "slide-menu" or "" blank is as no sidebar

    # Date format
    dateformat = "" # default "2 Jan 2006"
    # See the format reference https://gohugo.io/functions/format/#hugo-date-and-time-templating-reference

    # path name excluded from documentation menu
    menu_exclusion = [
        "archives",
        "archive",
        "blog",
        "entry",
        "post",
        "posts",
    ]

    # Algolia site search section
    # See https://www.algolia.com/doc/
    algolia_search_enable = true
    algolia_indexName = "hugo-demo-techdoc"
    algolia_appId = "7W4SAN4PLK"
    algolia_apiKey = "cbf12a63ff72d9c5dc0c10c195cf9128" # Search-Only API Key

# Global menu section
# See https://gohugo.io/content-management/menus/
# [menu]
#   [[menu.main]]
#       name = "Home"
#       url = "/"
#       weight = 1
#
#   [[menu.main]]
#       name = "Twitter"
#       url = "https://twitter.com/thingsym"
#       weight = 2

# Markup configure section
# See https://gohugo.io/getting-started/configuration-markup/
[markup]
    defaultMarkdownHandler = "goldmark"
    [markup.goldmark.renderer]
        unsafe= true
    [markup.tableOfContents]
        startLevel = 2
        endLevel = 6
        ordered = false

[outputs]
    home = ["HTML", "RSS", "Algolia"]

# Algolia Search configure section
[outputFormats.Algolia]
    baseName = "algolia"
    mediaType = "application/json"
    isPlainText = true
    notAlternative = true

[params.algolia]
    vars = [
        "title",
        "summary",
        "content",
        "date",
        "publishdate",
        "description",
        "permalink",
        "keywords",
        "lastmod",
    ]
    params = [
        "tags",
        "categories",
    ]
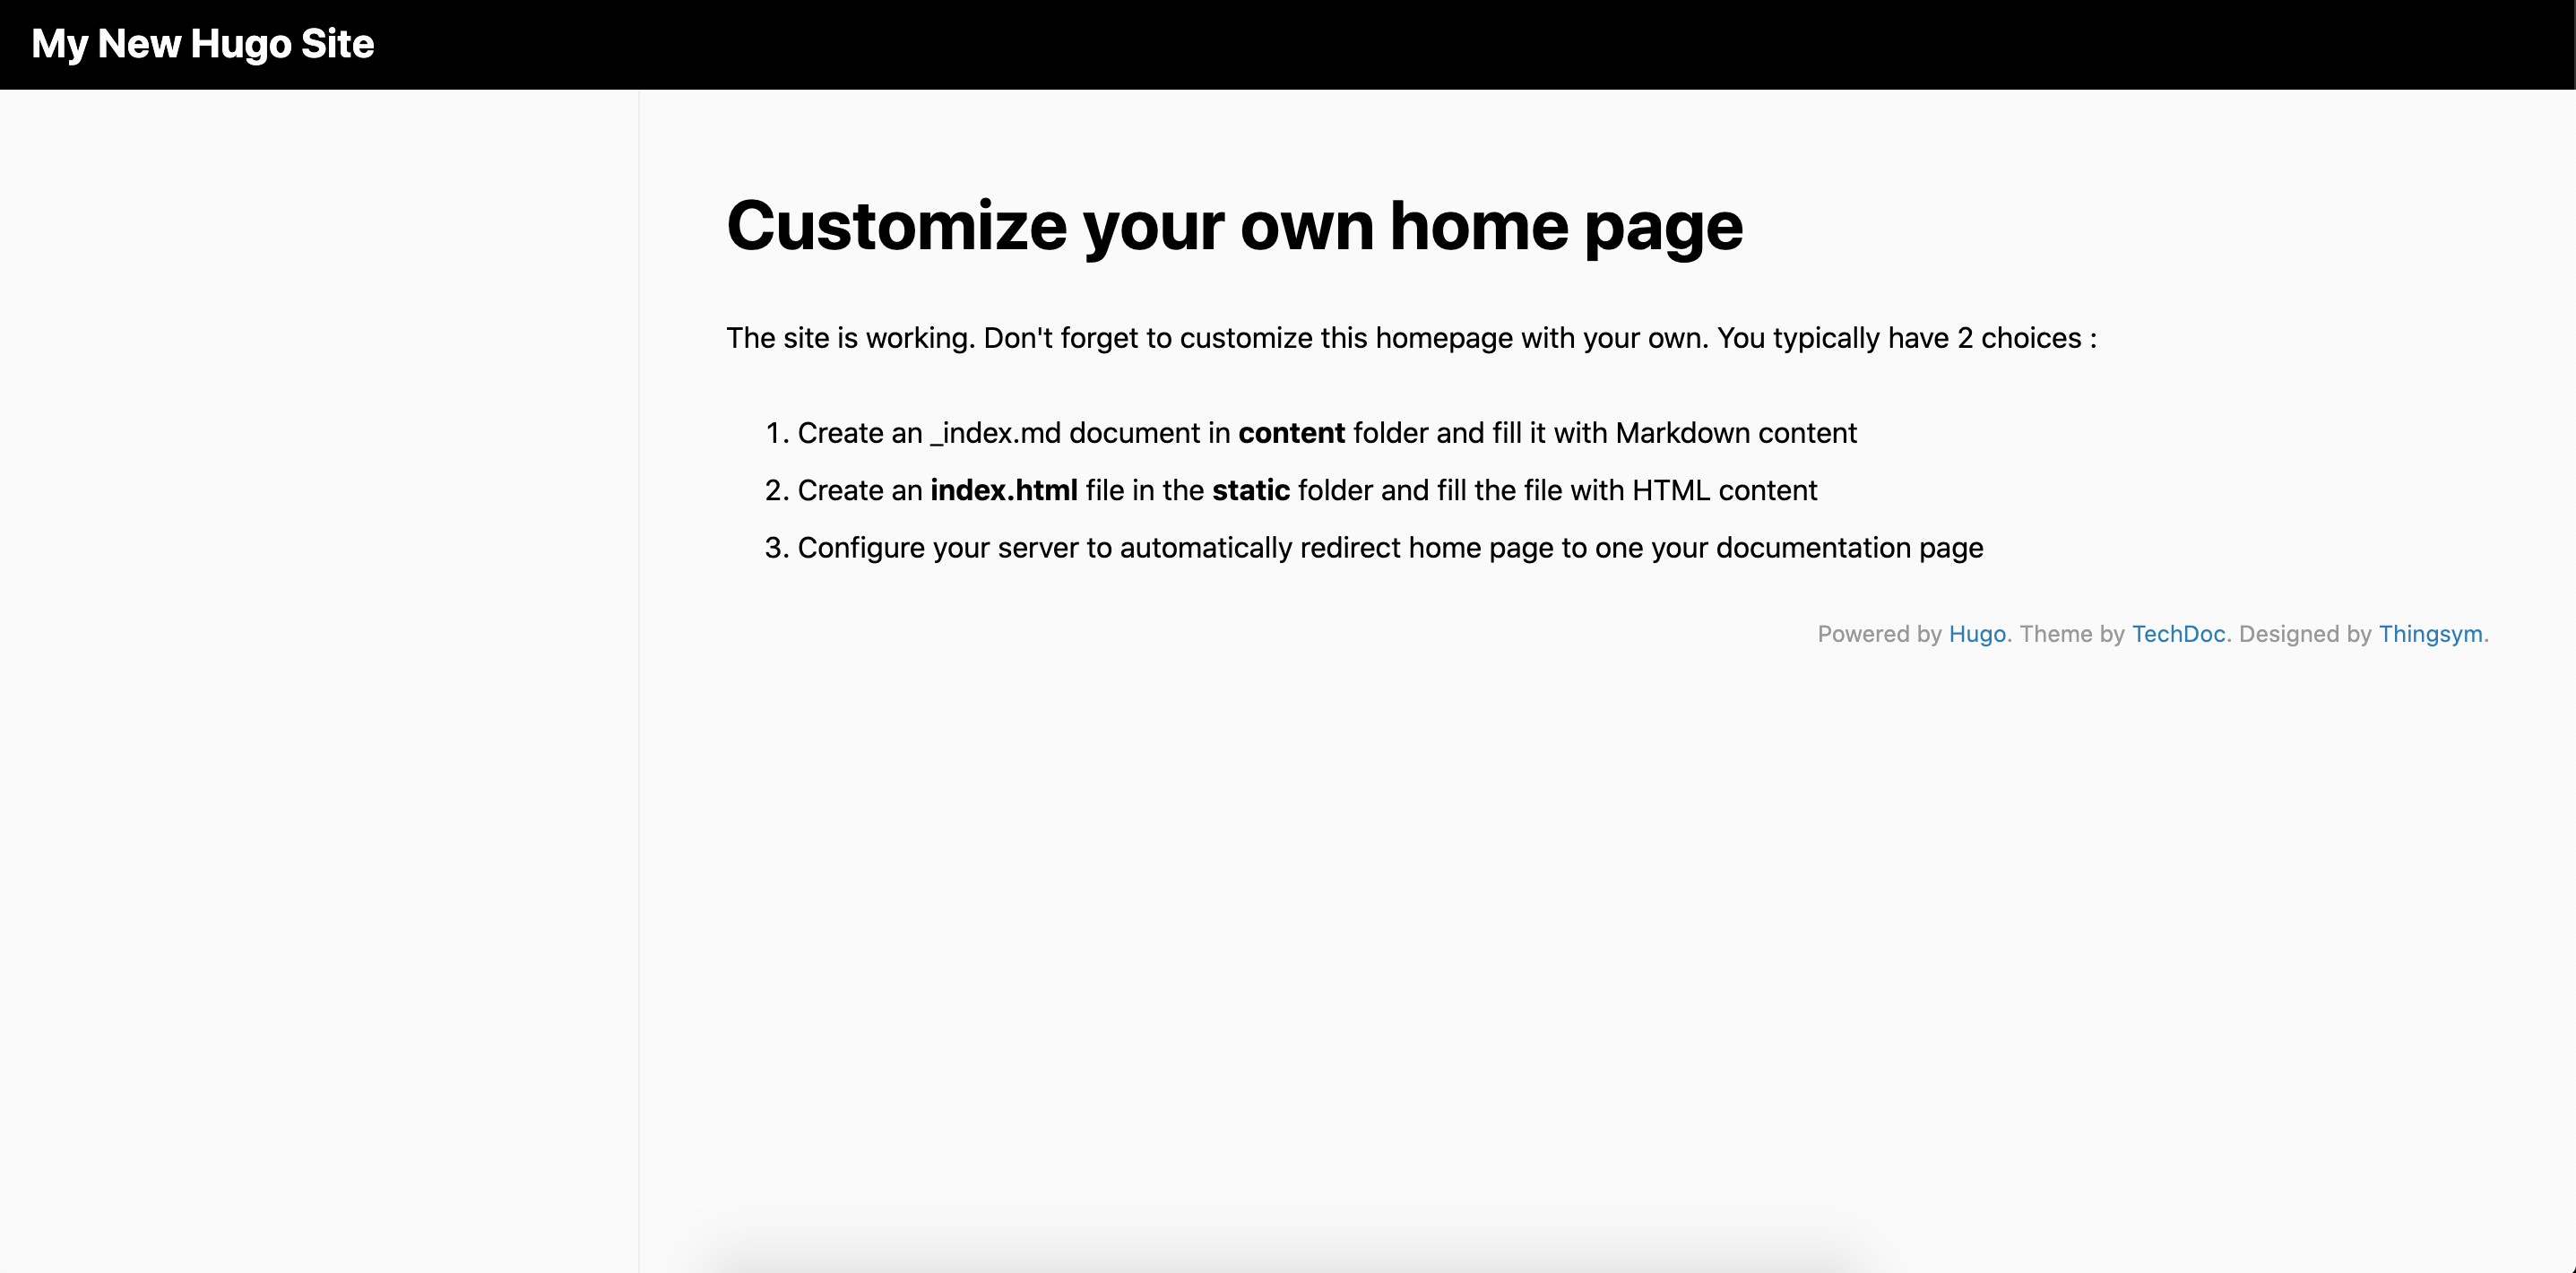
テーマを適応してHUGOを起動してみます。
$ hugo server -D
起動したら下記URLにアクセスしてみましょう!
http://localhost:1313/
Ctrl+Cで一旦サーバーをストップさせましょう。
コンテンツを追加する
コンテンツを追加していきましょう。
コンテンツはcontent配下に設置します。
ファイル冒頭の---で囲まれた部分は、Front Matterと呼ばれます。
様々な変数を扱えるのですが、ここではタイトル・日付・公開or非公開を扱います。
content
├── _index.md     # トップページ
└── chapter1      # 親要素
    ├── _index.md # /chapter1で表示
    └── 1.md      # /chapter1/1で表示
---
title: "Chapter 1"
date: 2020-11-29
draft: false # 非公開ならtrueにする
---

ここに内容を書く。
---
title: "Chapter 1-1"
date: 2020-11-29
draft: false
---

ここに内容を書く。
再びサーバーを起動してサイトを確認してみましょう。
$ hugo server -D
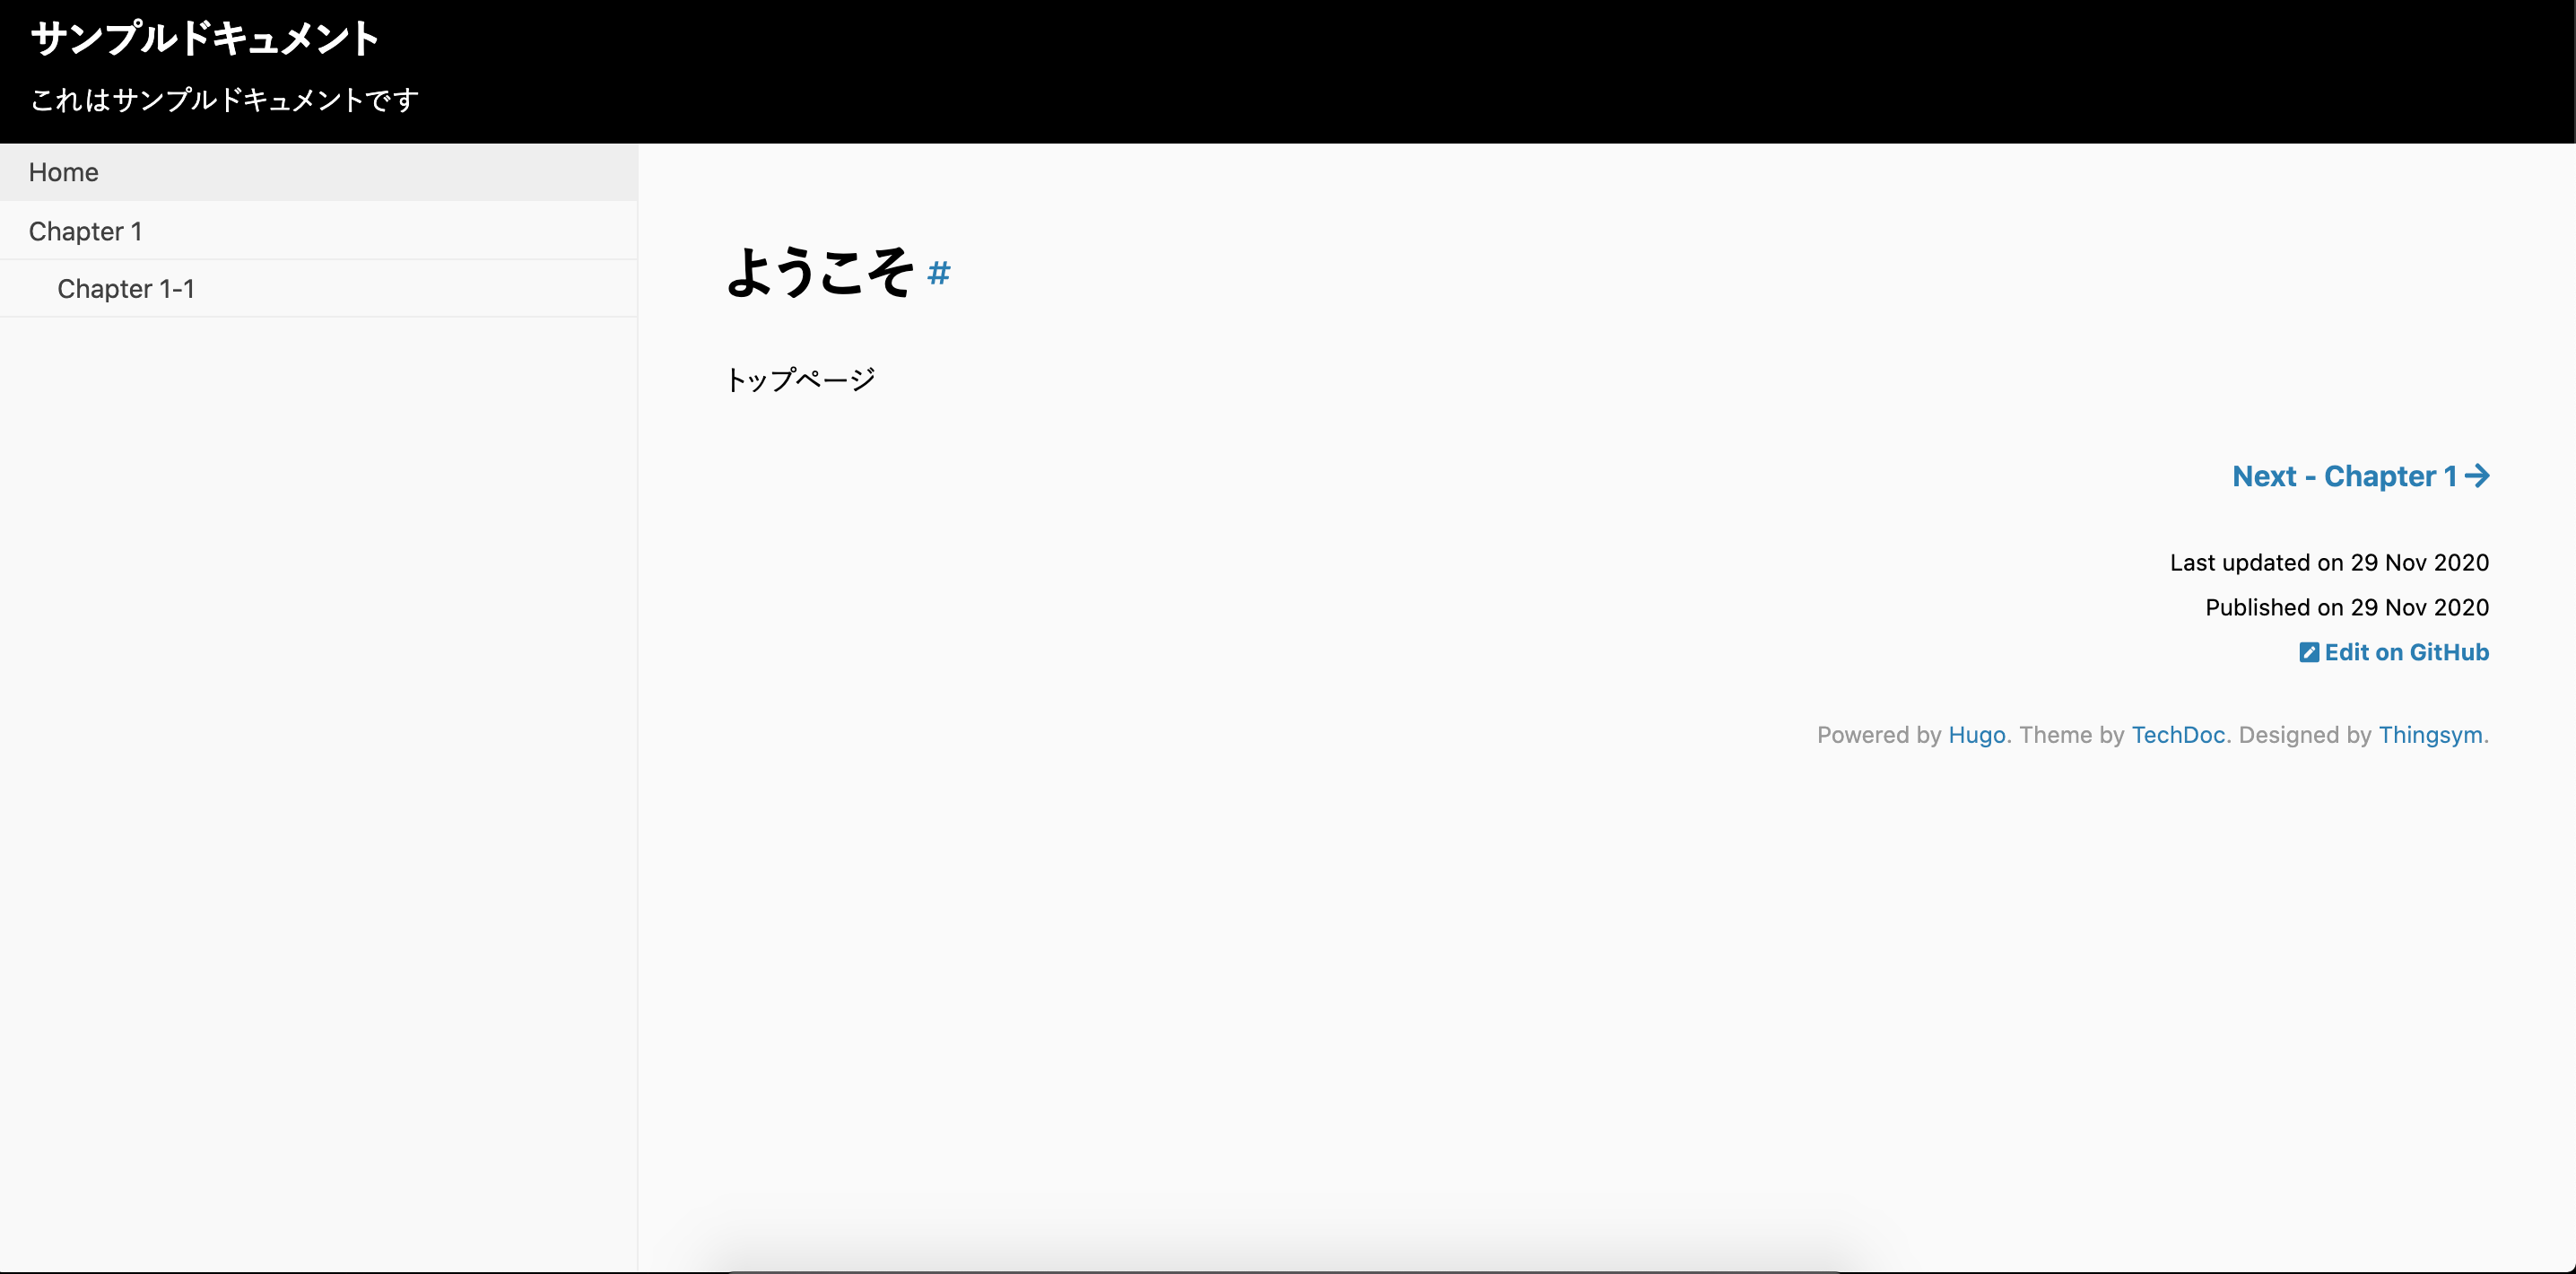
サイドバーにメニューが表示されました!
デザインを編集したい
サイトのデザインはsample_document/themes/hugo-theme-techdoc/layoutsで管理されています。
編集したい時は、sample_document/layouts以下に同じファイルをコピーして編集します。
すると、上位側のデザインが優先されて表示されます。
テーマのアップデートに備えて、themes配下のファイルは直接編集しないようにしましょう。
ホスティングサービスで公開する
GitHub Pages等で公開する場合、ビルド(HTMLファイルを生成する作業)が必要になります。
NetlifyはHUGOがインストールされており、連携したリポジトリにpushするだけでビルドもしてくれます。
ホスティングの方法に関しては、今回省略します。
# ビルドコマンドを実行
$ hugo
# public配下に全てのHTMLファイルが生成される
sample_document
└── public
    ├── 404.html
    ├── algolia.json
    ├── categories
    │   ├── index.html
    │   └── index.xml
    ├── chapter1
    │   ├── 1
    │   │   └── index.html
    │   ├── index.html
    │   └── index.xml
    ├── css
    │   ├── chroma.css
    │   ├── chroma.min.css
    │   ├── theme.css
    │   └── theme.min.css
    ├── index.html
    ├── index.xml
    ├── js
    │   └── bundle.js
    ├── sitemap.xml
    └── tags
        ├── index.html
        └── index.xml
おわりに
HUGOは公式テーマが豊富なので、初心者でも扱いやすい静的サイトジェネレーターだと思います!
ただ、設定ファイルの使い方などは、テーマによって大きく異なるので最初は苦戦するかもしれません。
テーマによっては、導入方法や使い方などが丁寧に説明してあるので安心です。
今回使用したテーマのデモサイト↓
https://themes.gohugo.io//theme/hugo-theme-techdoc/
参考
HUGO公式ドキュメント
https://gohugo.io/documentation/
Quick Start
https://gohugo.io/getting-started/quick-start/