ご覧いただきありがとうございます。
この記事は Qiita Advent Calendar 2017 iOS1 の第 21 日目の記事です。
前日は @fumiyasac@github さんの記事でした!
はじめに
みなさん Dynamic Type 対応されていますか?
私の知る限り対応しているアプリはあまり見かけません。。。
デザイナーさんやアプリ開発者の本音を言えば,
ただでさえ多くの端末サイズがあってデザイン対応が大変なのに
そこまで気にしてたまるかーっていう感じでしょうか。
以前の現場でレイアウトが崩れるというバグ(?)チケットを
対応した際に初めて意識するようになりました。
iOS 7 からの機能でとりわけ新しい内容でもありませんが
WWDC 17 で UI 系のセッション聞いていてよく登場していたので ,
いい機会と思い,一度調べてみようということで記事を書きます。
Building Apps with Dynamic Type2 というセッションを元に
しています。(途中まで WWDC17 の後に出そうと思って寝かせてた記事です・・・)
明日,所属会社の Advent Calendar で
【iOS 11】Dynamic Type でカスタムフォントに対応する3 という
タイトルで関連記事を投稿しますので合わせてご覧いただければ嬉しいです。
Dynamic Type とは
Dynamic Type は iOS 7 から導入されました。
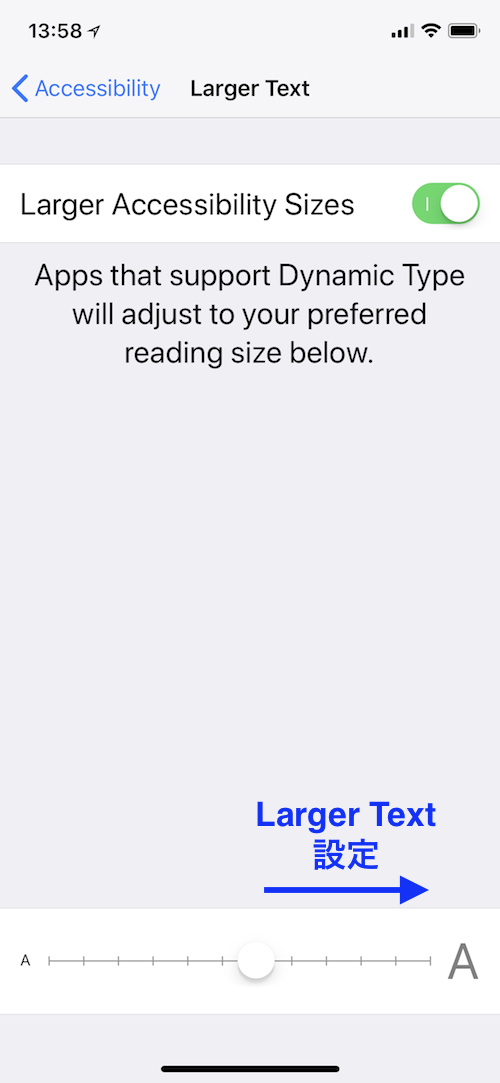
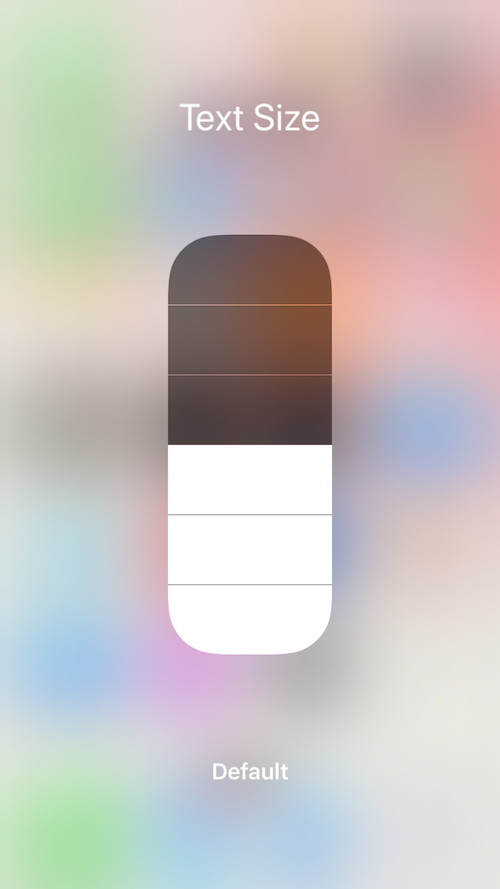
設定アプリ,iOS 11 からはコントロールセンターに追加することで
ユーザが好みのフォントサイズに変えられますよね。
ユーザが設定したフォントサイズに伴って
アプリ内のフォントサイズも変化させるというものです。
私は一番小さなフォントサイズ設定が好きです。
ただ,全ユーザがそうだとは限りません。
見やすい最適なフォントサイズはユーザによって異なるという意識を持つことが大事です。
Dynamic Type に対応させる
Storyboard などの IB の場合
何も意識せずに UI 部品を配置していった場合,
フォントサイズが決まっているのでそのままでは対応できません。
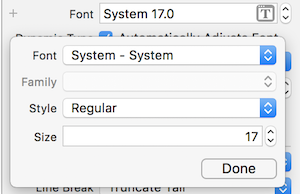
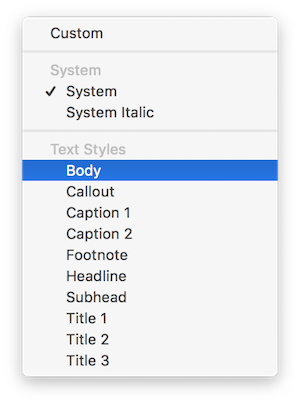
Font 部分で UIFontTextStyles を用いるようにします。
Xcode 9 では 10 種類ありますが,
iOS 7 からあったものと iOS 9 , 11から追加されたものがあります4。
| UIFontTextStyle | iOS | 用途 |
|---|---|---|
| .body | iOS 7~ | body text |
| .callout | iOS 9~ | callouts |
| .caption1 | iOS 7~ | standard captions |
| .caption2 | iOS 7~ | alternate captions |
| .footnote | iOS 7~ | footnotes |
| .headline | iOS 7~ | headings |
| .subheadline | iOS 7~ | subheadings |
| .largeTitle | iOS 11~ | large titles |
| .title1 | iOS 9~ | first level hierarchical headings |
| .title2 | iOS 9~ | second level hierarchical headings |
| .title3 | iOS 9~ | third level hierarchical headings |
最後に Automatically Adjusts Font 部分にチェックを入れておきます。
フォントサイズが変化すると自動で変更してくれます。
UIButton などは,Storyboard で上記の設定ができないので,
行折り返しやフォントサイズ自動変更対応はコードで
直接書く必要があります。下記のような感じになります。
button.titleLabel?.numberOfLines = 0 // 折り返せるように適切な値
if #available(iOS 10.0, *) {
    button.titleLabel?.adjustsFontForContentSizeCategory = true
}
iOS 10 以降の機能なので iOS 9 では別途監視して反映させたりの対応が必要で,
UIContentSizeCategoryDidChange の通知を受けて更新するようにします。
**実装例:クリックでコード表示**
// 適切な場所で
override func viewWillAppear(_ animated: Bool) {
    super.viewWillAppear(animated)
    // 通知を受けて更新する
    NotificationCenter.default.addObserver(forName: NSNotification.Name.UIContentSizeCategoryDidChange, object: nil, queue: nil, using: { _ in
        self.hogeLabel.font = UIFont.preferredFont(forTextStyle: .body)
    })
}

// 最後に通知を登録解除
deinit {
    NotificationCenter.default.removeObserver(self,
                                              name: NSNotification.Name.UIContentSizeCategoryDidChange,
                                              object: nil)
}
コードの場合
例えば, UILabel を考えると下記のようになります。
UIFontTextStyle 部分に適切な FontTextStyle(enum) を設定します。
iOS 9 の場合は先ほどと同様,通知を受けて更新するようにします。
label.font = UIFont.preferredFont(forTextStyle: UIFontTextStyle)
label.adjustsFontForContentSizeCategory = true
簡単な実装例で確認その1
環境
- iOS 10 and later
- Xcode 9.2
- 説明のため FatViewController でお送ります
サンプルコード
GitHub にサンプルプロジェクト5を作成しました。
適宜わかりにくいところあったら確認してください。
ここは間違っている・こう書いた方がクレバーだ!等
ありましたらご指摘お願いいたします。
実装例
例として下記のような文字列の Array と
UIFontTextStyle の Array を用意し,
TableView のセルに流し込んで textLabel.text に表示させてみます。
struct DynamicTypeSample {
    static let textArray: [String] =
        ["Body", "Callout", "Caption1", "Caption2", "Footnote",
         "Headline", "Subhead", "Title1", "Title2", "Title3"]
    static let styleArray: [UIFontTextStyle] =
        [.body, .callout, .caption1, .caption2, .footnote,
         .headline, .subheadline, .title1, .title2, .title3]
}
UITabelViewDataSource の実装だけ書くと下記のようになります。
**実装例:クリックでコード表示**
extension SystemFontViewController: UITableViewDataSource {

    func numberOfSections(in tableView: UITableView) -> Int {
        return 1
    }

    func tableView(_ tableView: UITableView, numberOfRowsInSection section: Int) -> Int {
        return DynamicTypeSample.textArray.count
    }

    func tableView(_ tableView: UITableView, cellForRowAt indexPath: IndexPath) -> UITableViewCell {
        let cell = tableView.dequeueReusableCell(withIdentifier: "dynamicTypeSystemFontListCell")
        cell?.textLabel?.text = DynamicTypeSample.textArray[indexPath.row]
        cell?.textLabel?.font = UIFont.preferredFont(forTextStyle: DynamicTypeSample.styleArray[indexPath.row])
        cell?.textLabel?.adjustsFontForContentSizeCategory = true
        cell?.selectionStyle = .none
        return cell!
    }

    func tableView(_ tableView: UITableView, titleForHeaderInSection section: Int) -> String? {
        return "System Font"
    }
}
Accessibility Inspector
Dynamic Type の動作確認で最も有効なのは,
Accessibility Inspector を使うことでしょう。
この機能を知ったのが,WWDC 17 のセッションを
現地で見てて,そんなのあったんかい!という感じでした。
それまで実機でフォントサイズを変えては
アプリを起動して確認してという面倒な確認をしていました。
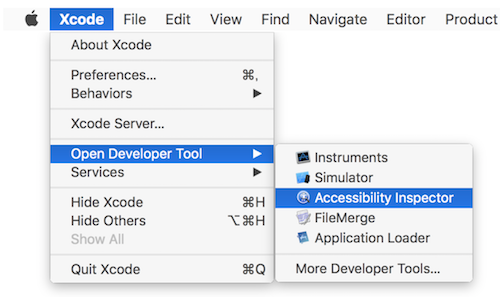
起動の仕方は下記です。
Xcode -> Open Developer Tool -> Accessibility Inspector
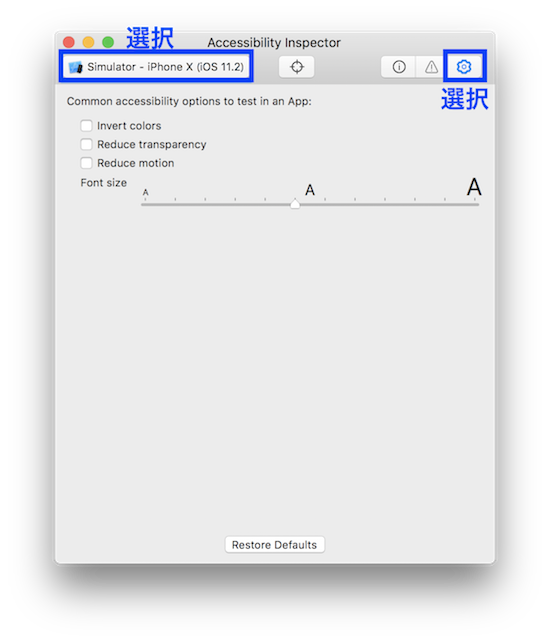
起動したら,使用するシミュレータを選び,設定ボタンを押します。
あとは Font size 部分のスライダを動かすことでリアルタイム確認できます。
中間の A のひとつ右が通常設定のフォントサイズ最大で,それ以降は
アクセシビリティで Larger Text を選択した場合のサイズのようです。
実機だと,コントロールセンターに追加するか(iOS 11 以降),
今まで通り設定アプリから変更することになると思います。
実行例
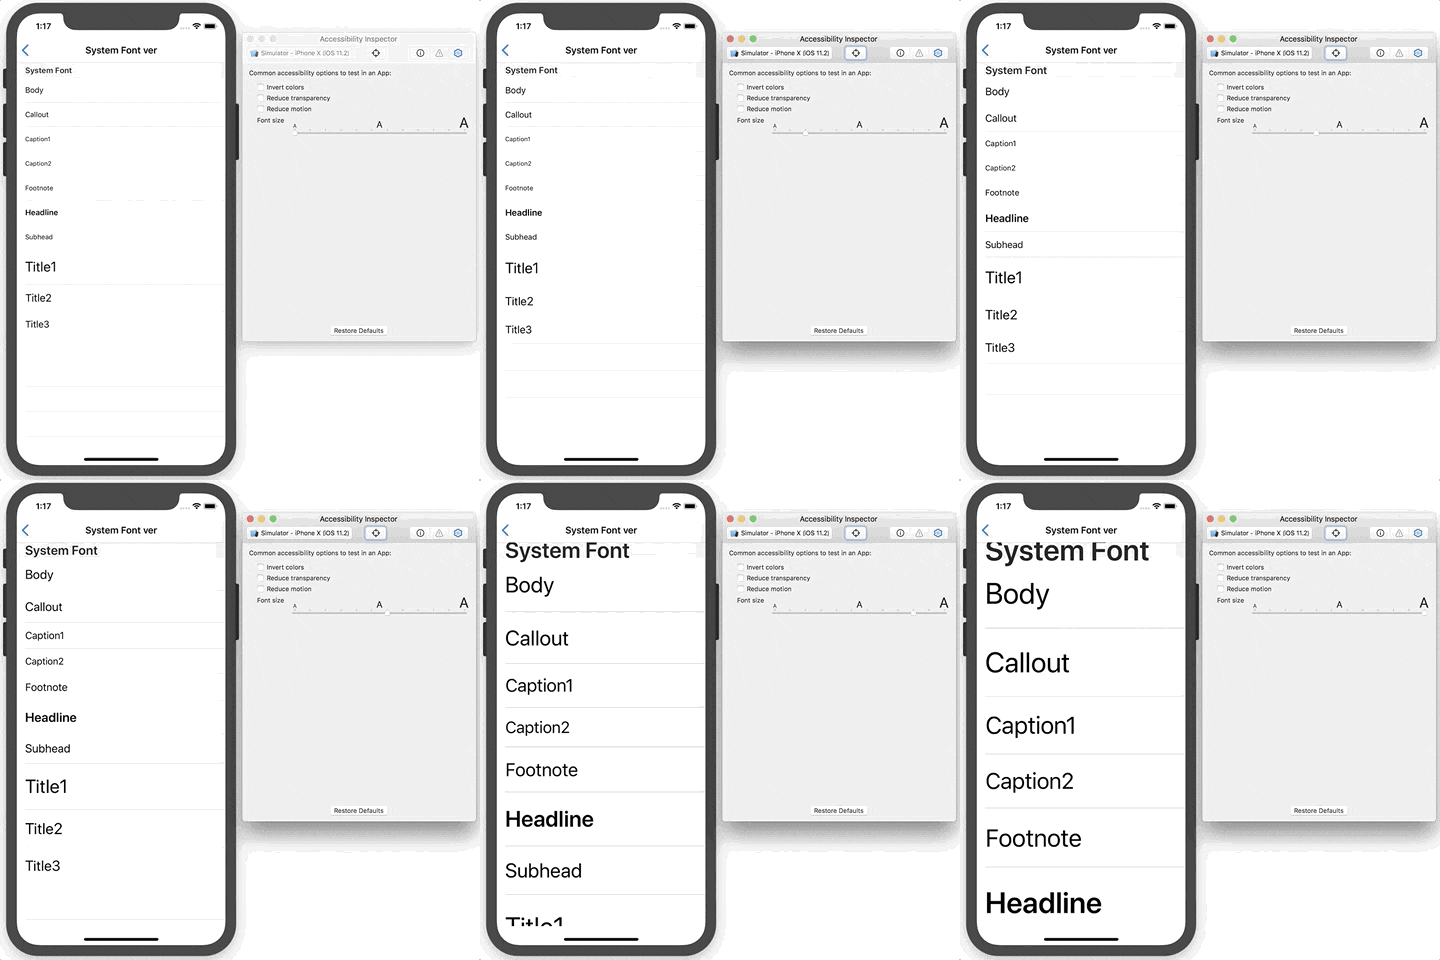
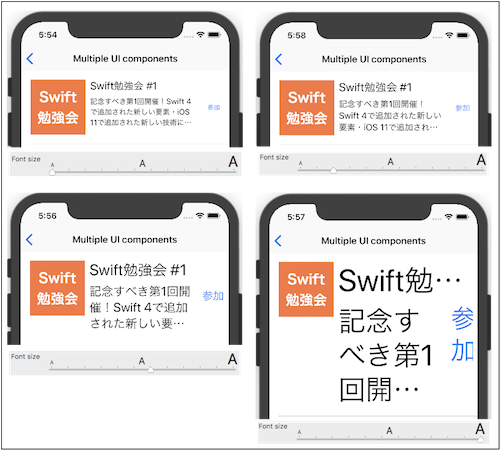
実行した例が下記になります。
各 UIFontTextStyle ごとにフォントサイズが
変わっていることがわかると思います。
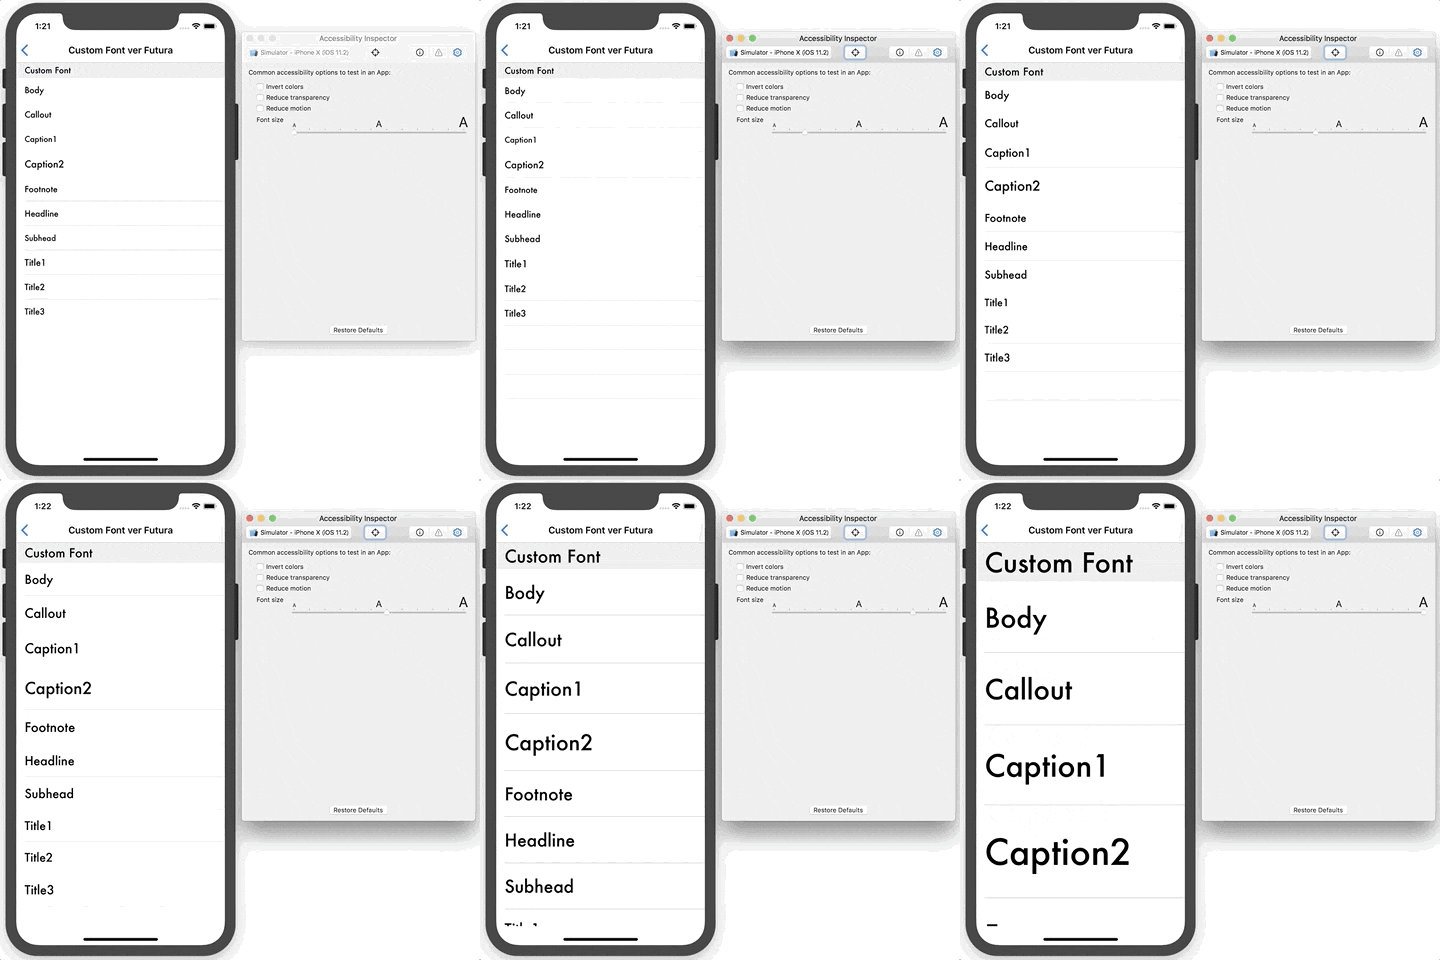
iOS 11 からは Custom Font も対応
iOS 11 からは Custom Font での Dynamic Type にも対応しました🎉
別の記事で書こうと思いますのでここでは割愛いたします。
→ 【iOS 11】Dynamic Type でカスタムフォントに対応する3
画像も合わせて大きくできる
@2x・@3x の代わりに pdf を使う
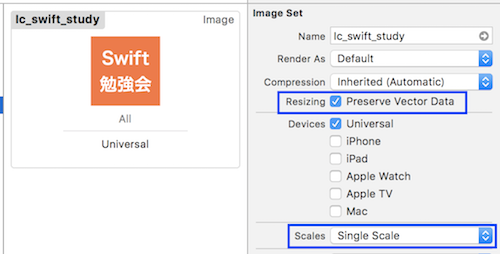
Xcode 6 からベクター形式のファイルを使用できるようになりました。
サンプルコードでは, ic_swift_study.pdf のファイルを
Keynote と ToyViewer で作成し,画像として使うようにしました。
アセット側では, Scale は Single Scale を選択し,
Resizing の Preserve Vector Data にチェックを入れます。
Dynamic Type に対応させる
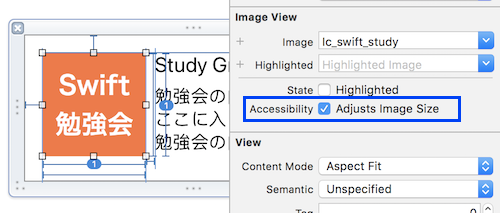
画像を使用する ImageView の設定では,
Accessibility の Adjusts Image Size にチェックを入れます。
コードで設定する際は
adjustsImageSizeForAccessibilityContentSizeCategoryを true にします。
imageView.adjustsImageSizeForAccessibilityContentSizeCategory = true
これで,フォントサイズが大きくなると同時に画像が大きくなります。
大きくなるのは全部で 5 段階だそうです。
当然ながら width や height を設定していると大きくなりません。
実際のアプリでどう対応するか考える
ここからが本題で,セッション2 の内容,
サンプルアプリのコードを読んで私なりにまとめてみます。
UILabel は行数を調整しよう
ご存知の通り UILabel の行数のデフォルトは 1 となっています。
numberOfLines の値を 0 にすると指定の文字列が入りきるまで
改行になり, 2 にすると最大 2 行になり,入りきれない場合は
三点リーダ表示になります。行数の設定がデフォルトのままだと
フォントサイズが大きくなると表示が見切れてしまう場合が
考えられるので折り返して表示させることが推奨されています。
よくある リストー詳細形式 のコンテンツで,
リスト画面側に表示する文言と同じ文言が詳細画面側にもある場合,
適切な行数制限をして文字列を切り捨てて三点リーダでの表示を
させても良いとのことで,なるほどこれで必要なスクロール量を
減らすことができます。
逆に言えば,他画面で補完できる文言がない場合,
numberOfLines は 0 に設定しておいた方が良い。
スクロール可能な設計にしよう
UITableView のように UIScrollView を継承している場合は
セルの高さが長くなってもスクロールできるので見切れるなど
おそらくないですが**[注]**,UIView に直接 Outlet 接続した場合,
文言が長くなりコンテンツが画面から見切れてしまうことが
考えられるのでスクロール可能にするのかどうか考える必要が出てきます。
3.5・4.0 インチの狭い画面用に最初からスクロール可能にする対応を
することも多いですが,UIScrollView をデフォルトで
下地に用意しておくのが良いかもしれません。
UILabel はあくまでも Label なので長くなる場合は UITextView など
Scrollable な UI 部品も考えるべきかもしれないですね。
[注]
UITableView の設定で estimatedRowHeight に適切な値を代入し,
rowHeight に UITableViewAutomaticDimension を代入して
Self-Sizing を有効にするのが大事です。
iOS 11 から UITableView の Self-Sizing は
デフォルト6 になりましたが,iOS 11 未満の対応のため
コードは書いておいた方がいいと思います。
複数の UI 部品が並ぶ場合は部品ごとに折り返し表示しよう
TableView のセルの中に
左から 画像ーラベルーボタン と並ぶ場合を考えます。
表示領域(width)が限られているのでラベルの文字列が大きくなると
折り返し改行ばかり,あるいは三点リーダ表示になってしまい
コンテンツ内容がわかりにくいなどが起こり得ます。
そこでこの場合は下記のようにそれぞれの部品を折り返して
表示するのが推奨されています。
画像
ラベル
ボタン
サンプル5を作ってみましたので次項をご覧ください。
簡単な実装例で確認その2
環境
- iOS 10 and later(実質 iOS11 のみ)
- Xcode 9.2
- Auto Layout のエラー消しまでできなかったです・・・
実装例
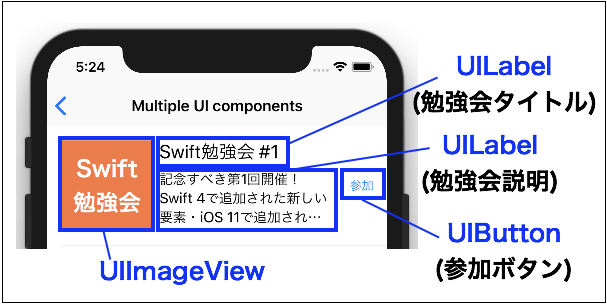
例として下記のような UITableView のセルの中に下記のように
左から 画像ーラベルーボタン と並ぶ場合を考えます。
※ この勉強会はフィクションです。
UILabel の改行は説明部分のみにしました。
セルのタップで詳細画面に遷移すると仮定して
3 行で三点リーダ表示になるように
numberOfLines は 3 を設定しました。
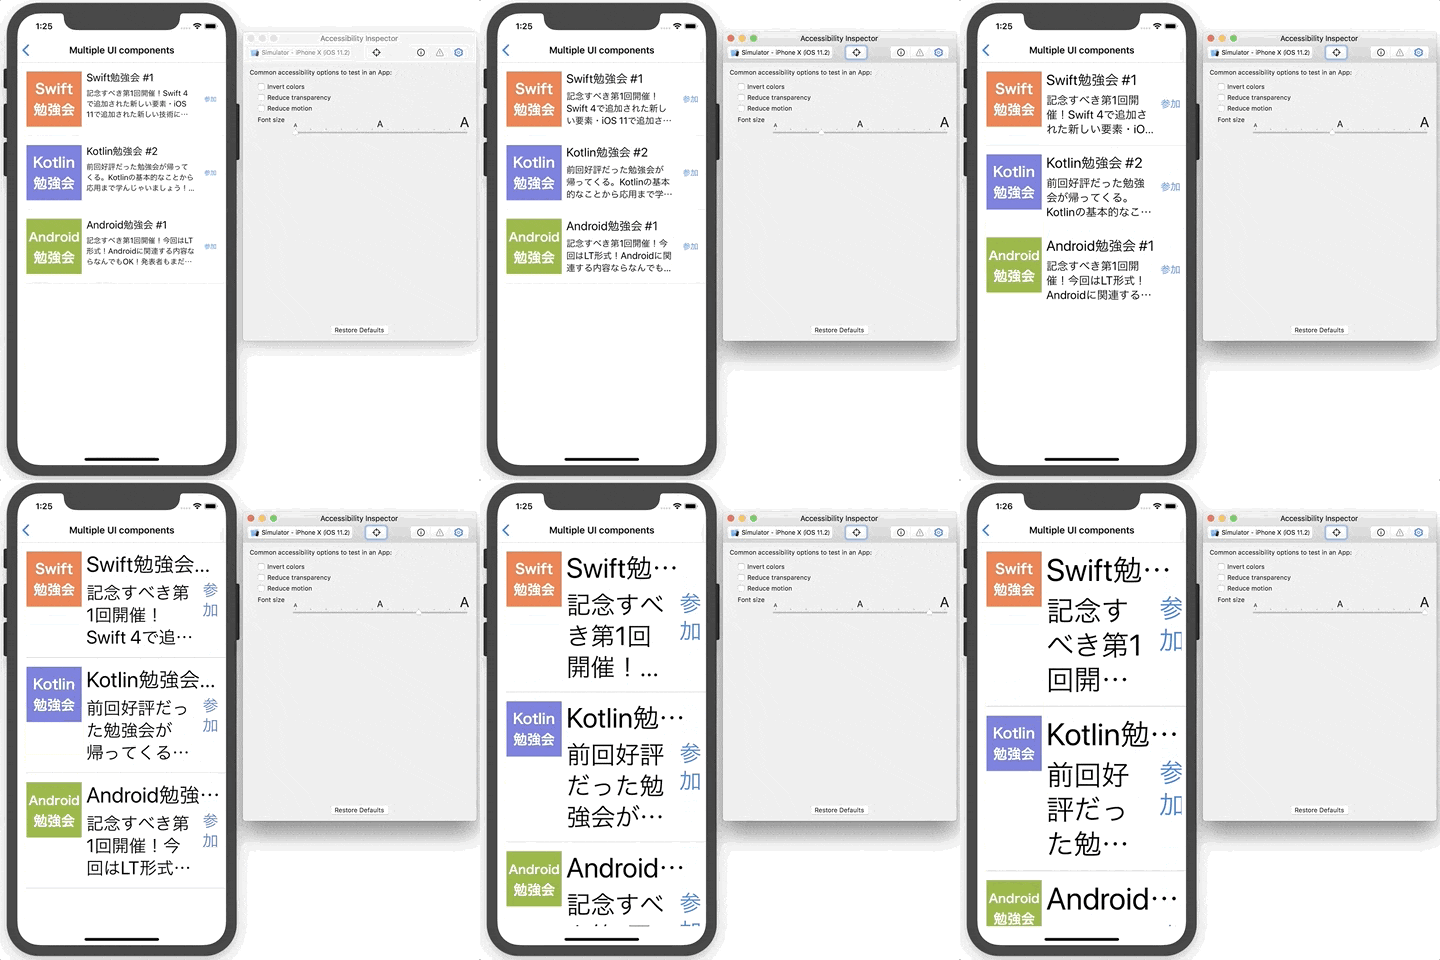
3列表示の実装例
今まで通りの説明で作りフォントサイズを変えると・・・
デフォルト設定で最も大きいフォントサイズでも内容が
物足りなく,Larger Text くらいになると
コンテンツ内容がさっばりわからないレベルです。
そこで通常設定でのフォントサイズでは今まで通り 3 列表示,
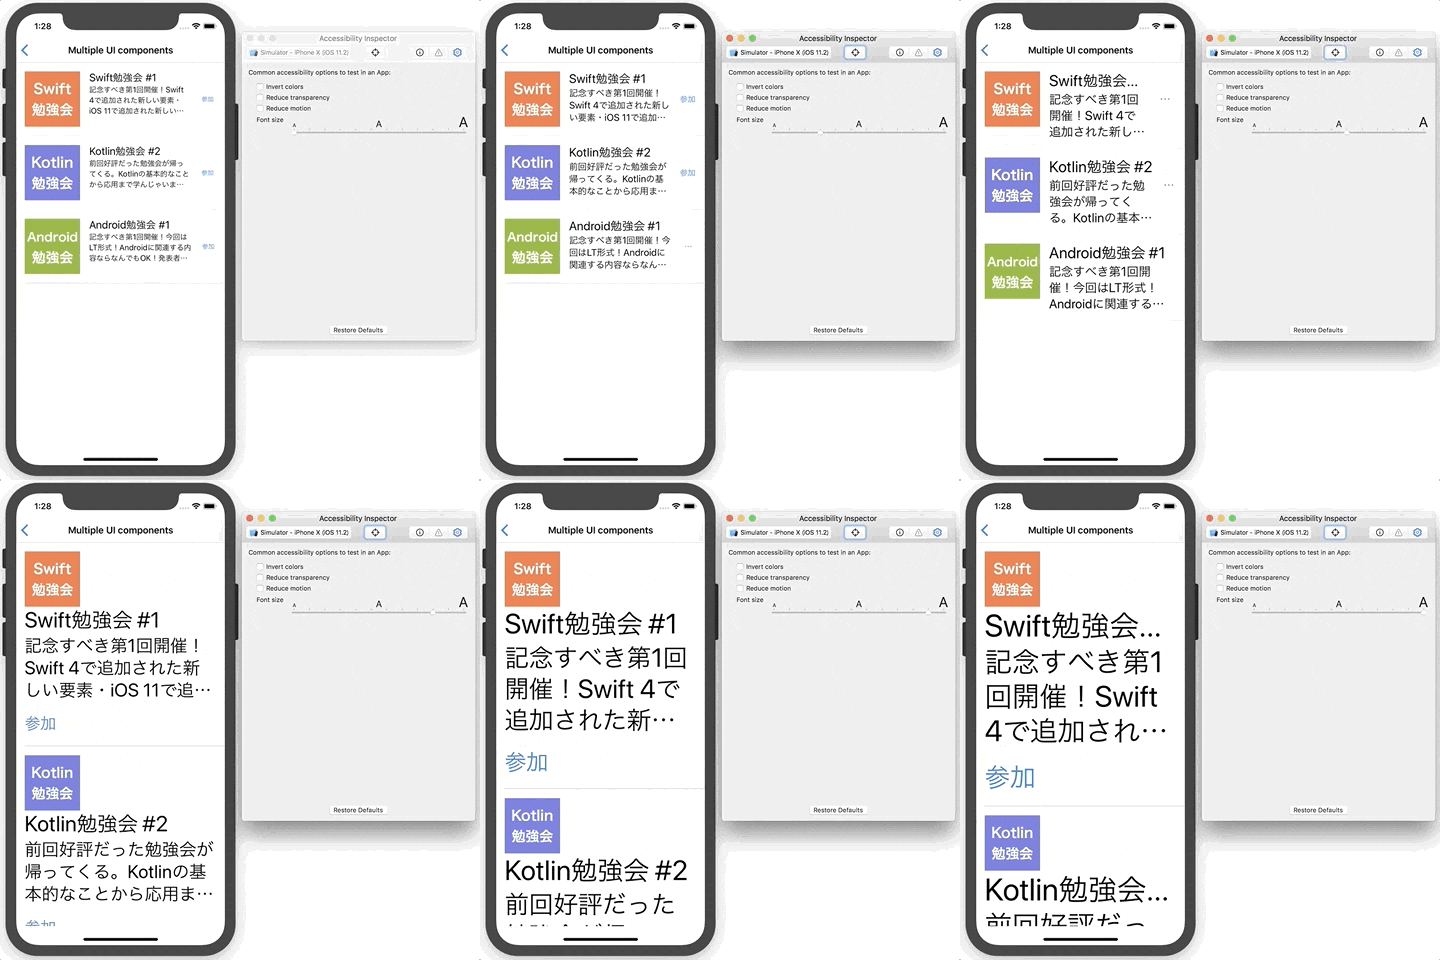
Larger Text が設定されている場合には下記のように 4 行表示されるように実装してみます。
画像
ラベル(勉強会タイトル)
ラベル(勉強会内容)
ボタン
4行表示の実装例
ざっくり言うと,通常設定でのフォントサイズの場合の
レイアウト制約と Larger Text が設定されている場合の
レイアウト制約を出し分ける感じです。
よって,Storyboard での対応を考えるとカオスになるので,
よくわかるAuto Layoutを 片手にセッションの
サンプルコードを参考にコードで書きます。
フォントサイズが変わると UITraitCollection7 が変わるので
traitCollectionDidChange: が呼ばれます。
このメソッドを override してその中で
Accessibility の Larger Text が有効になっているかを
判断してレイアウト制約を適用する形になります。
Larger Text が有効か無効化の調べ方
iOS 11 から UIContentSizeCategory の
isAccessibilityCategory のプロパティが用意されました8。
アクセシビリティに関連付けられているかを Bool で返す
プロパティでこのプロパティが true なら 4 行表示,
false なら 3 列表示のレイアウト制約を適用するようにします。
UITabelViewDataSource の実装だけ書くと下記のようになります。
モデルをセルに渡すだけです。
**実装例:クリックでコード表示**
extension StudyGroupAdvancedViewController: UITableViewDataSource {

    func numberOfSections(in tableView: UITableView) -> Int {
        return 1
    }

    func tableView(_ tableView: UITableView, numberOfRowsInSection section: Int) -> Int {
        return StudyGroupSample.iconNameArray.count
    }

    func tableView(_ tableView: UITableView, cellForRowAt indexPath: IndexPath) -> UITableViewCell {
        guard let studyGroupAdvancedCell = tableView.dequeueReusableCell(withIdentifier: "studyGroupAdvancedCell", for: indexPath) as? StudyGroupAdvancedTableViewCell else {
            fatalError()
        }
        let studyGroupModel = StudyGroup(imageName: StudyGroupSample.iconNameArray[indexPath.row], titleName: StudyGroupSample.titleArray[indexPath.row], contentsDescription: StudyGroupSample.contentArray[indexPath.row])
        studyGroupAdvancedCell.studyGroup = studyGroupModel
        return studyGroupAdvancedCell
    }
}
TableViewCell にUI部品の設定・レイアウト系のコードを書きました。
**セル実装例:クリックでコード表示**
class StudyGroupAdvancedTableViewCell: UITableViewCell {

    // 表示させるUI部品
    private let studyGroupGenreImageView = UIImageView()
    private let titleNameLabel = UILabel()
    private let contentsDescriptionLabel = UILabel()
    let attendButton = UIButton()

    // レイアウト制約群
    private var commonConstraints: [NSLayoutConstraint] = []
    private var regularConstraints: [NSLayoutConstraint] = []
    private var largeTextConstraints: [NSLayoutConstraint] = []
    private let verticalAnchorConstant: CGFloat = 16.0
    private let horizontalAnchorConstant: CGFloat = 16.0

    // モデルを受け取ってプロパティに代入
    var studyGroup: StudyGroup? {
        didSet {
            if let studyGroup = studyGroup {
                studyGroupGenreImageView.image = UIImage(named: studyGroup.imageName)
                titleNameLabel.text = studyGroup.titleName
                contentsDescriptionLabel.text = studyGroup.contentsDescription
            }
        }
    }

    override func awakeFromNib() {
        super.awakeFromNib()
        self.selectionStyle = .none
        // UI部品の初期設定
        setupLabelsAndButtons()
        // セルにUI部品をaddSubView
        contentView.addSubview(studyGroupGenreImageView)
        contentView.addSubview(titleNameLabel)
        contentView.addSubview(contentsDescriptionLabel)
        contentView.addSubview(attendButton)
        // レイアウト制約適用
        setupLayoutConstraints()
        updateLayoutConstraints()
    }

    /// 各UI部品の初期設定
    private func setupLabelsAndButtons() {

        // 画像の初期設定(今回は画像サイズ固定)
        studyGroupGenreImageView.translatesAutoresizingMaskIntoConstraints = false
        studyGroupGenreImageView.contentMode = .scaleAspectFit

        // 勉強会タイトルの初期設定
        // UIFontTextStyle は Title2 を指定・自動でフォントサイズが変わるように設定・1行にする
        titleNameLabel.font = UIFont.preferredFont(forTextStyle: .title2)
        titleNameLabel.adjustsFontForContentSizeCategory = true
        titleNameLabel.translatesAutoresizingMaskIntoConstraints = false

        // 勉強会内容説明の初期設定
        contentsDescriptionLabel.translatesAutoresizingMaskIntoConstraints = false
        // UIFontTextStyle は Body を指定・自動でフォントサイズが変わるように設定・3行にする
        contentsDescriptionLabel.font = UIFont.preferredFont(forTextStyle: .body)
        contentsDescriptionLabel.adjustsFontForContentSizeCategory = true
        contentsDescriptionLabel.numberOfLines = 3

        // 参加ボタンの初期設定
        attendButton.setTitle("参加", for: .normal)
        attendButton.setTitleColor(attendButton.tintColor, for: .normal)
        attendButton.backgroundColor = UIColor.clear
        attendButton.translatesAutoresizingMaskIntoConstraints = false
        // UIFontTextStyle は Subheadline を指定
        attendButton.titleLabel?.font = UIFont.preferredFont(forTextStyle: .subheadline)
        // 自動でフォントサイズが変わるように設定
        attendButton.titleLabel?.adjustsFontForContentSizeCategory = true
        attendButton.setContentHuggingPriority(UILayoutPriority.required, for: .horizontal)
    }

    /// Accessibility の Larger Text が有効になっている場合と通常設定の場合用にレイアウト制約を用意する
    private func setupLayoutConstraints() {

        let heightConstraint = studyGroupGenreImageView.heightAnchor.constraint(equalToConstant: 100)
        heightConstraint.priority = UILayoutPriority(rawValue: 999)

        // 共通のレイアウト制約
        commonConstraints = [
            studyGroupGenreImageView.leadingAnchor.constraint(equalTo: contentView.layoutMarginsGuide.leadingAnchor),
            studyGroupGenreImageView.topAnchor.constraint(greaterThanOrEqualTo: contentView.topAnchor, constant: verticalAnchorConstant),
            studyGroupGenreImageView.widthAnchor.constraint(equalToConstant: 100),
            heightConstraint
        ]
        // 通常設定の場合のレイアウト制約
        if #available(iOS 11.0, *) {
            regularConstraints = [

                studyGroupGenreImageView.bottomAnchor.constraint(lessThanOrEqualTo: contentView.bottomAnchor, constant: -verticalAnchorConstant),

                titleNameLabel.leadingAnchor.constraint(equalTo: studyGroupGenreImageView.trailingAnchor, constant: horizontalAnchorConstant),
                titleNameLabel.topAnchor.constraint(equalTo: studyGroupGenreImageView.topAnchor),
                titleNameLabel.trailingAnchor.constraint(equalTo: attendButton.leadingAnchor, constant: -horizontalAnchorConstant),

                contentsDescriptionLabel.firstBaselineAnchor.constraintEqualToSystemSpacingBelow(titleNameLabel.lastBaselineAnchor, multiplier: 1),

                contentsDescriptionLabel.leadingAnchor.constraint(equalTo: studyGroupGenreImageView.trailingAnchor, constant: horizontalAnchorConstant),
                contentsDescriptionLabel.bottomAnchor.constraint(lessThanOrEqualTo: contentView.bottomAnchor, constant: -verticalAnchorConstant),
                contentsDescriptionLabel.trailingAnchor.constraint(equalTo: attendButton.leadingAnchor, constant: -horizontalAnchorConstant),

                attendButton.centerYAnchor.constraint(equalTo: studyGroupGenreImageView.centerYAnchor),
                attendButton.trailingAnchor.constraint(equalTo: contentView.trailingAnchor, constant: -horizontalAnchorConstant)
            ]
        }

        // Accessibility の Larger Text が有効になっている場合のレイアウト制約
        if #available(iOS 11.0, *) {
            largeTextConstraints = [
                titleNameLabel.leadingAnchor.constraint(equalTo: studyGroupGenreImageView.leadingAnchor),
                titleNameLabel.topAnchor.constraint(equalTo: studyGroupGenreImageView.bottomAnchor),
                titleNameLabel.trailingAnchor.constraint(equalTo: contentView.layoutMarginsGuide.trailingAnchor),

                contentsDescriptionLabel.firstBaselineAnchor.constraintEqualToSystemSpacingBelow(titleNameLabel.lastBaselineAnchor, multiplier: 1),

                contentsDescriptionLabel.leadingAnchor.constraint(equalTo: studyGroupGenreImageView.leadingAnchor),
                contentsDescriptionLabel.bottomAnchor.constraint(equalTo: attendButton.topAnchor, constant: -verticalAnchorConstant),
                contentsDescriptionLabel.trailingAnchor.constraint(equalTo: contentView.layoutMarginsGuide.trailingAnchor),

                attendButton.leadingAnchor.constraint(equalTo: studyGroupGenreImageView.leadingAnchor),
                attendButton.bottomAnchor.constraint(lessThanOrEqualTo: contentView.bottomAnchor, constant: -verticalAnchorConstant)
            ]
        }
    }

    /// フォントサイズが変わると呼ばれる
    override func traitCollectionDidChange(_ previousTraitCollection: UITraitCollection?) {
        if #available(iOS 11.0, *) {
            let isAccessibilityCategory = traitCollection.preferredContentSizeCategory.isAccessibilityCategory
            if isAccessibilityCategory != previousTraitCollection?.preferredContentSizeCategory.isAccessibilityCategory {
                updateLayoutConstraints()
            }
        }
    }

    /// Accessibility の Larger Text が有効になっている場合と通常設定の場合用のレイアウト制約を適用する
    private func updateLayoutConstraints() {
        NSLayoutConstraint.activate(commonConstraints)
        if #available(iOS 11.0, *) {
            if traitCollection.preferredContentSizeCategory.isAccessibilityCategory {
                NSLayoutConstraint.deactivate(regularConstraints)
                NSLayoutConstraint.activate(largeTextConstraints)
            } else {
                NSLayoutConstraint.deactivate(largeTextConstraints)
                NSLayoutConstraint.activate(regularConstraints)
            }
        }
    }

    override func setSelected(_ selected: Bool, animated: Bool) {
        super.setSelected(selected, animated: animated)

    }
}
実行例
実行例は下記になります。
Large Text に入ると 4行表示になっています。
Larger Text に入る前ですでに色々よろしくないのでもっと考慮する必要がありそうです・・・
おわりに
今回は Dynamic Type の対応について実際にサンプルアプリを
作成することで確認してみてみました。
本コンテンツの実装と同時に Dynamic Type の対応も行う。
日々の業務の中で工数とって対応するのはなかなか厳しいかもしれません。
すでにリリースされているアプリで全体の対応するのは,
なかなか骨が折れそうな感じなので新規アプリこそは・・・
提案してもいいかなと思いました。(自社サービスじゃないと却下されそう)
新しい(&ユーザが幸せになる)技術をいち早く取り入れてます!
どんなユーザでも使いやすいようにユーザビリティの高いアプリ出してます!
と言えるようになりたい・・・
コードでほとんどレイアウト制約書かないので苦戦しました。
そして AutoLayout をもっと知ろうとしないとダメだなと。
よくわかるAuto Layout を手を動かしながら勉強しようと思いました。
長文となりましたが,ご覧いただきありがとうございました。
そして来年もよろしくお願いいたします!
明日は @tarappo さんの記事になります!!
