I would like to introduce providing data to the KENDO Datasource using Sharperlight Published Query. Sharperlight Published Query typically provides web report via the Sharperlight RESTful service. However, by differentiating the URL parameters, it can return data in JSON format. This time, we will utilize the data in JSON format.
Creating a Published Report for the KENDO DataSource
This will be a Published Query to supply data to the KENDO DataSource in JSON format. Launch the Publisher from the Sharperlight application menu.

General Items
Once the Publisher is launched, begin creating a new published query by clicking the New button.
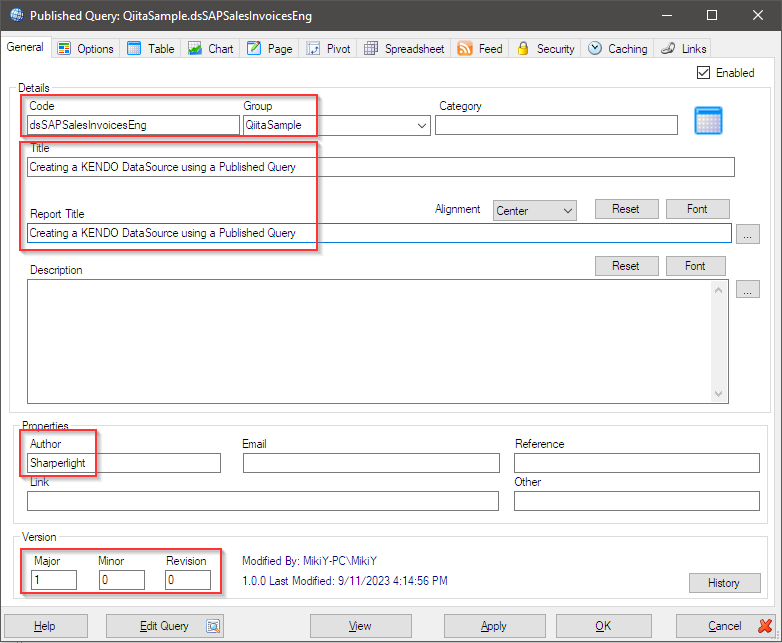
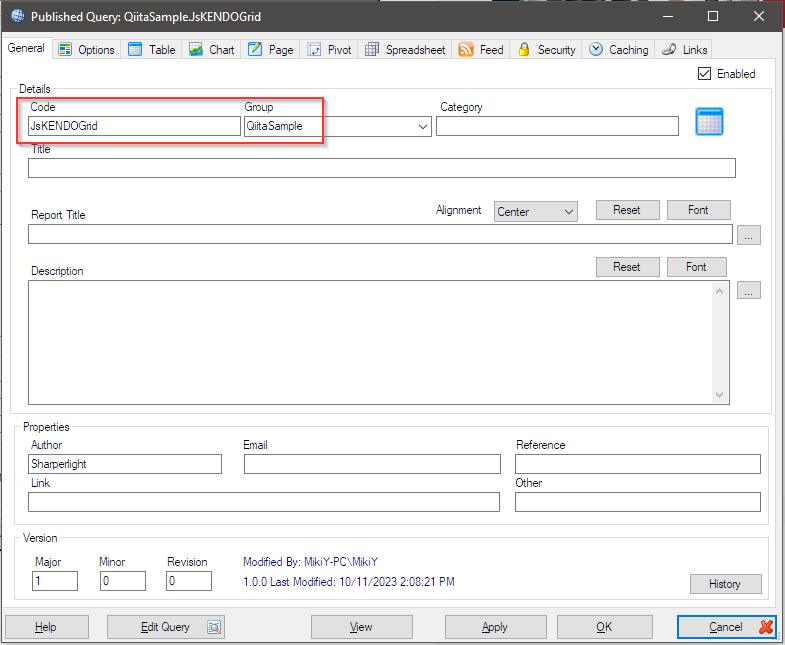
First, enter the values for Code and Group. This combination will form a unique ID.
Also, fill in the Title and Report Title. It's advisable to provide details like Author and Version, especially when multiple individuals or groups are involved in creating the published query.
Once you've completed this, try clicking the Apply button. You should see the following message.
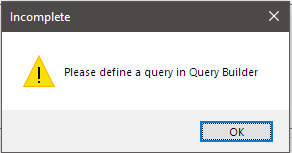
This is because there is a rule that one Query per Published Query. So, let's start creating the query by clicking the Edit Query button.
Query Creation
A common Query Builder shared across the Sharperlight applications will be launched. This user interface is also used in the Sharperlight Excel Add-in.
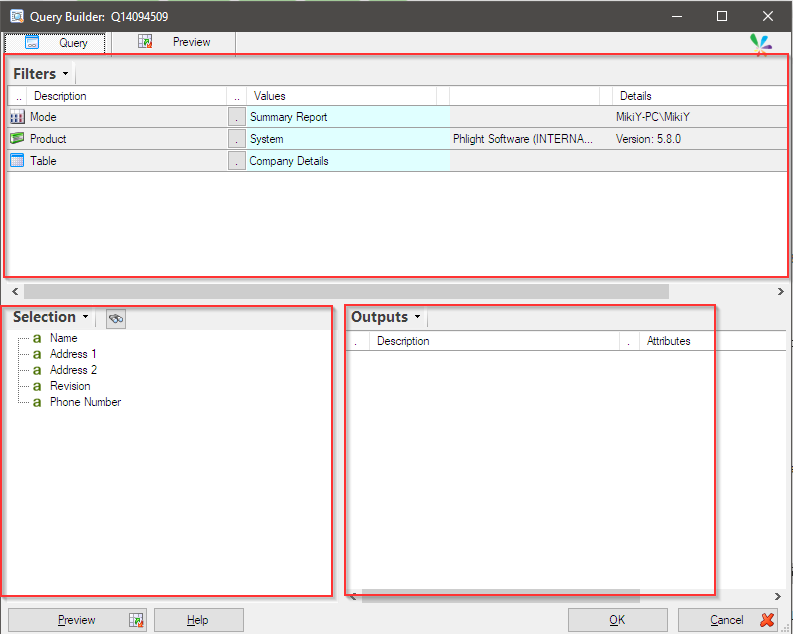
The user interface is structured into three areas: Filters, Selection, and Output.
Since the purpose of the Query Builder is SQL statement design, the Filters area corresponds to the FROM and WHERE clauses. The Output area is for designing the SELECT clause. The Selection area displays fields and JOIN information belonging to the specified table. You can choose fields from this area for filtering or output.
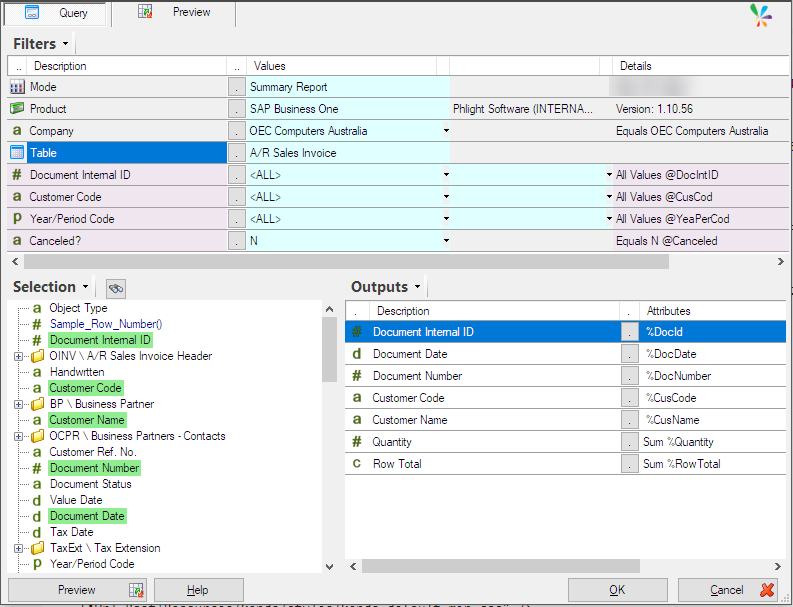
Now, let's start creating the query. Choose the Product (datamodel). This time, we will use SAP Business One datamodel.
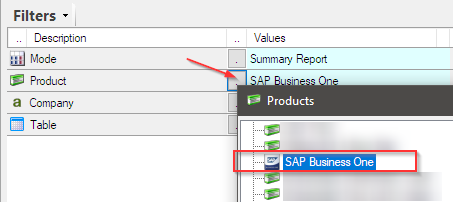
Specify OEC Computers AU for the Company. Next, select the Table. Similarly, choose A/R Sales Invoice from the search window.
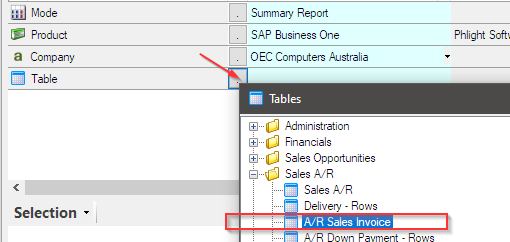
The Selection area will display the list of fields and JOIN information for the A/R Sales Invoice table.
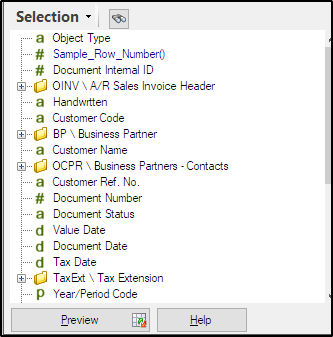
Also, four mandatory filters will be automatically displayed.

This is because when the A/R Sales Invoice table is selected, these four fields are designated as mandatory filters in the SAP Business One data model. This time, specify N (No) for the mandatory filter Canceled. Leave the other three mandatory filters as <ALL>.

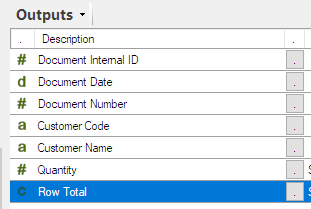
Next, define the output.
From the list of fields in the Selection area, double-click or drag & drop the following items to the Output area.
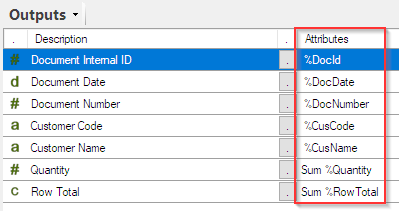
Finally, edit the output names (unique names used internally) for the seven fields you have set as output items.
Select Change Name from the right-click menu and make the necessary edits. After editing, it should look like this.
That completes it for this time.
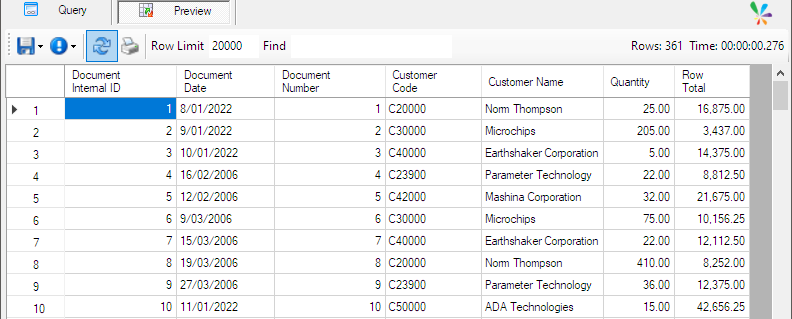
You can try running the query by using the Preview button.
Click the OK button to save the query and return to the Published Query dialog. Then, click OK again to save the published query. The query is now ready.
Creating HTML Using KENDO GRID and Datasource
The HTML code you are about to create is designed with the assumption that it will later embed another Sharperlight published query and make it accessible through the Sharperlight RESTful service. Therefore, it includes specific Sharperlight tags. I will guide you through the key points, including those related to Sharperlight-specific tags. The finalized HTML and JavaScript code looks like this.
<!DOCTYPE html>
<html>
<head>
<title>Order</title>
<meta charset="utf-8"/>
<base href="{*Url.Root}"/>
<link rel="shortcut icon" type="image/x-ico" href="favicon.ico"/>
<link rel="icon" type="image/x-ico" href="favicon.ico"/>
<link rel="stylesheet" type="text/css" href="{*Url.Root}Resources/kendo/styles/kendo.default.min.css" />
<link rel="stylesheet" type="text/css" href="{*Url.Root}Resources/kendo/styles/kendo.common.min.css" />
<link rel="stylesheet" type="text/css" href="{*Url.Root}Resources/kendo/styles/kendo.default.mobile.min.css" />
<link rel="stylesheet" type="text/css" href="{*Url.Root}Resources/kendo/styles/kendo.silver.min.css"/>
<link rel="stylesheet" type="text/css" href="{*Url.Root}Resources/kendo/styles/kendo.silver.mobile.min.css" />
<script type="text/javascript" src="{*Url.Root}Resources/jquery/jquery.min.js"></script>
<script type="text/javascript" src="{*Url.Root}Resources/kendo/js/kendo.all.min.js"></script>
<script type="text/javascript" src="{*Url.Root}Resources/kendo/js/kendo.timezones.min.js"></script>
</head>
<body>
<style type="text/css">
body {
height: 1500px;
font-family: Tahoma;
font-size: 11px;
}
</style>
<div id="grid" style="width: 1500px"></div>
<script type="text/javascript">
var gURL_Read = "{*Row.DatasourceURL.text}";
var gKGrid = null;
function _Feed_Data_To_Grid(dsURL){
try{
var dsItems = _Datasource_Create(dsURL);
if (dsItems != null){
dsItems.read().then(function (){
gKGrid.setDataSource(dsItems);
gKGrid.refresh();
});
}else{
console.log("_Feed_Data_To_Grid(): " + "No Dataset populated");
}
}catch (err){
console.log("_Feed_Data_To_Grid(): " + err.message);
}
};
function _Datasource_Create(dsURL){
try{
var ds = new kendo.data.DataSource({
serverFiltering: false,
transport: {
read: {
datatype: "jsonp",
url: dsURL
}
},
schema: {
model: {
id: "DocId",
fields: {
DocId: { type: "number" },
DocDate: { type: "datetime" },
DocNumber: { type: "string" },
CusCode: { type: "string" },
CusName: { type: "string" },
Quantity: { type: "number" },
RowTotal: { type: "number" }
}
}
}
});
return ds;
}catch (err){
console.log("_Datasource_Create(): " + err.message);
return null;
}
};
// Start from here ==================================================
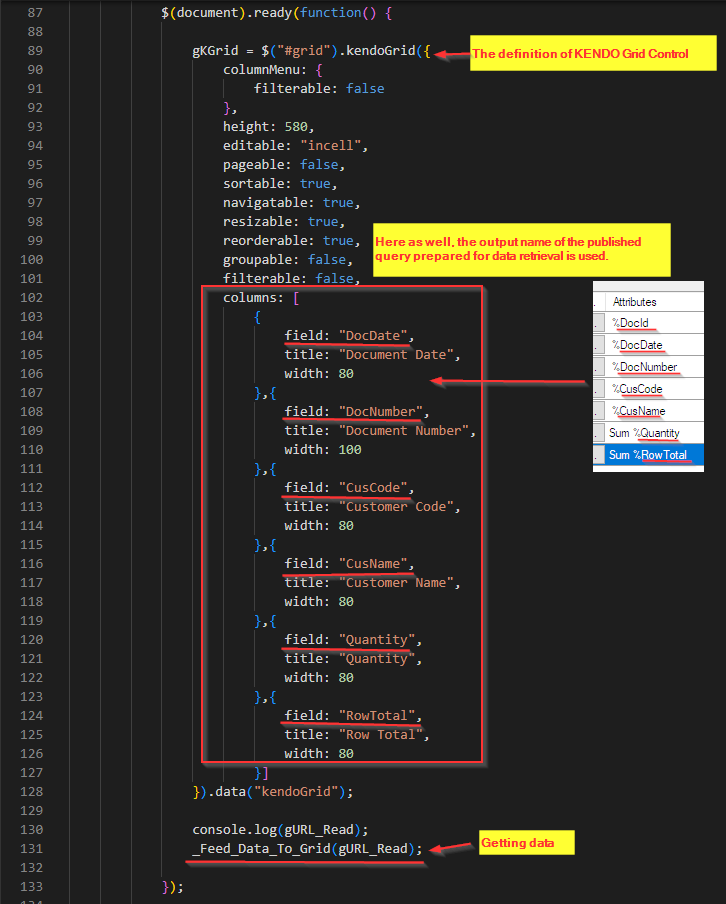
$(document).ready(function() {
gKGrid = $("#grid").kendoGrid({
columnMenu: {
filterable: false
},
height: 580,
editable: "incell",
pageable: false,
sortable: true,
navigatable: true,
resizable: true,
reorderable: true,
groupable: false,
filterable: false,
columns: [
{
field: "DocDate",
title: "Document Date",
width: 80
},{
field: "DocNumber",
title: "Document Number",
width: 100
},{
field: "CusCode",
title: "Customer Code",
width: 80
},{
field: "CusName",
title: "Customer Name",
width: 80
},{
field: "Quantity",
title: "Quantity",
width: 80
},{
field: "RowTotal",
title: "Row Total",
width: 80
}]
}).data("kendoGrid");
console.log(gURL_Read);
_Feed_Data_To_Grid(gURL_Read);
});
</script>
</body>
</html>
Certainly, let's go through the key points of the HTML and JavaScript code.
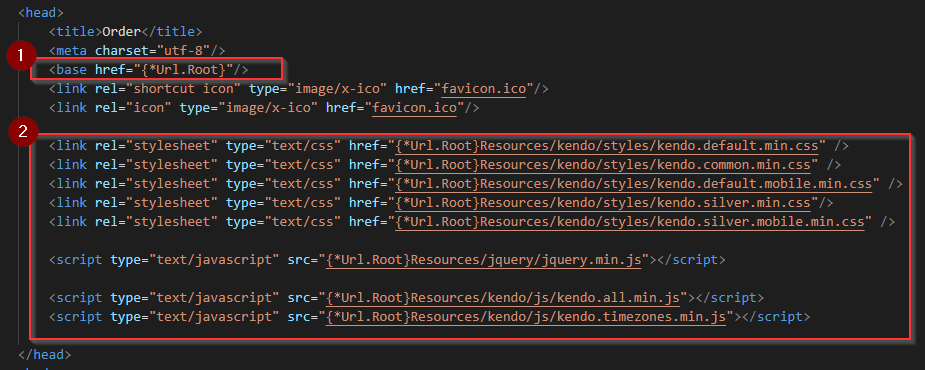
<head>
- The
{*Url.Root}tag: Replaced at runtime with the base URL of the Sharperlight RESTful service - Links to the JavaScript and CSS files packaged with Sharperlight
<body>
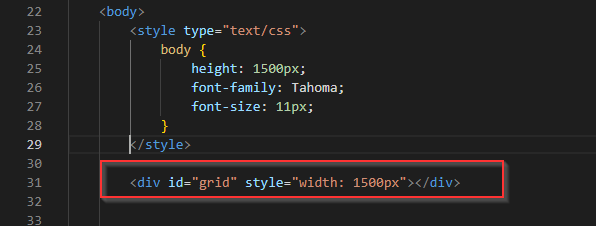
In the initial HTML code section, a div is prepared to create a KENDO Grid control.
In the script section, there are three components as follows:
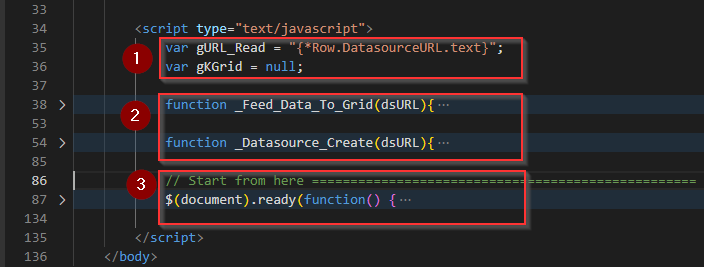
- Preparing the URL to retrieve a datasource through the Sharperlight RESTful service and the variable for the KENDO Grid control. The URL has been defined within the query definition of the published query where this HTML code is intended to be embedded.
{*Row.DatasourceURL.text}is the tag used to reference it


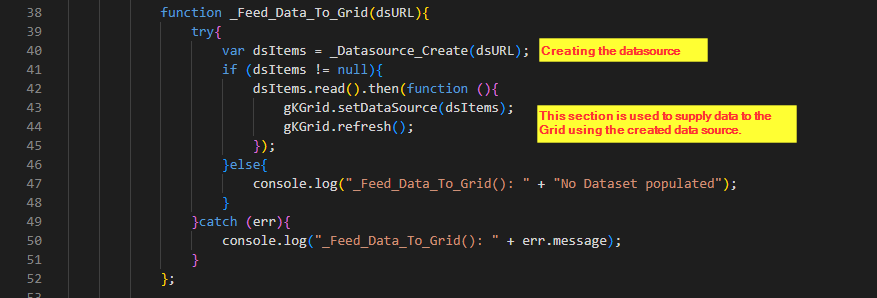
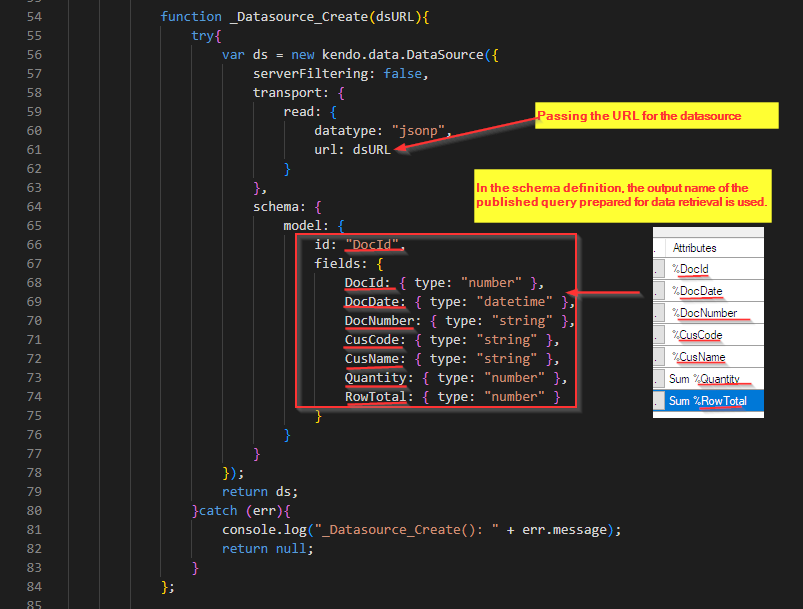
- There are two functions. _Feed_Data_To_Grid() is a function that supplies data to the KENDO Grid, and _Datasource_Create() is a function that creates a KENDO Datasource. _Datasource_Create() function is called from _Feed_Data_To_Grid() function.
- The familiar $(document).ready function where everything begins. Here, the definition of the KENDO Grid control and the call to the _Feed_Data_To_Grid() function are initiated.
_Feed_Data_To_Grid function
_Datasource_Create function
$(document).ready function
That's it. Save this HTML code as "xxxxxxxxx.html".
Creating a Published Query for hosting the HTML code
Launching Publisher from the Sharperlight application menu.
Starting the creation process by clicking the "New" button.
General
Code and Group entries are required at a minimum. You may choose your preferences for Titles, etc.
Embedding HTML code
Use these three options on the Options tab.
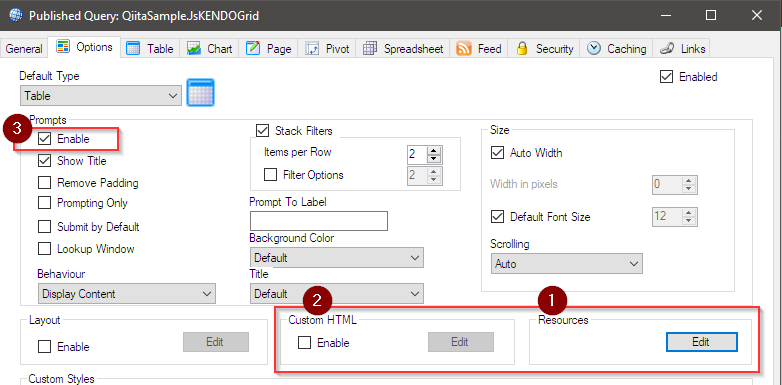
- In the context of
Resourceoptions, embed the HTML code (file) created earlier as a resource. Click theEditbutton to configure the resource settings.
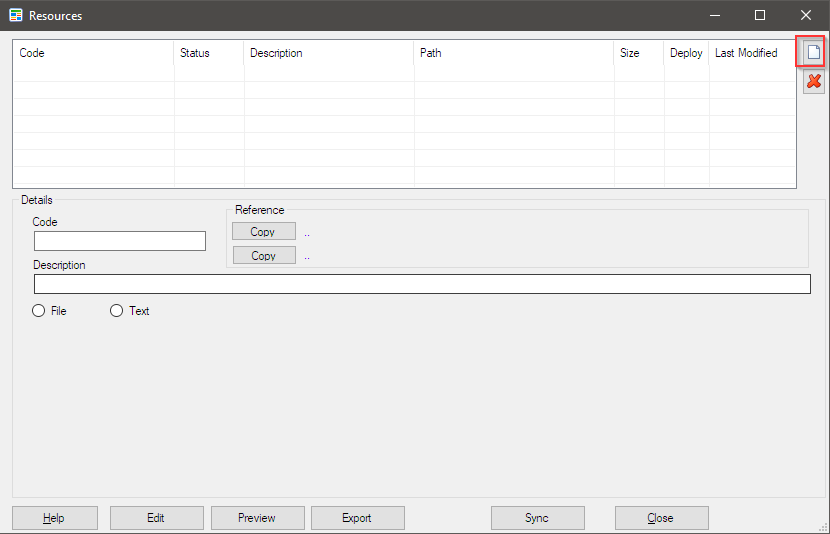
Begin embedding with theNewicon. A new item will be added to the top grid.
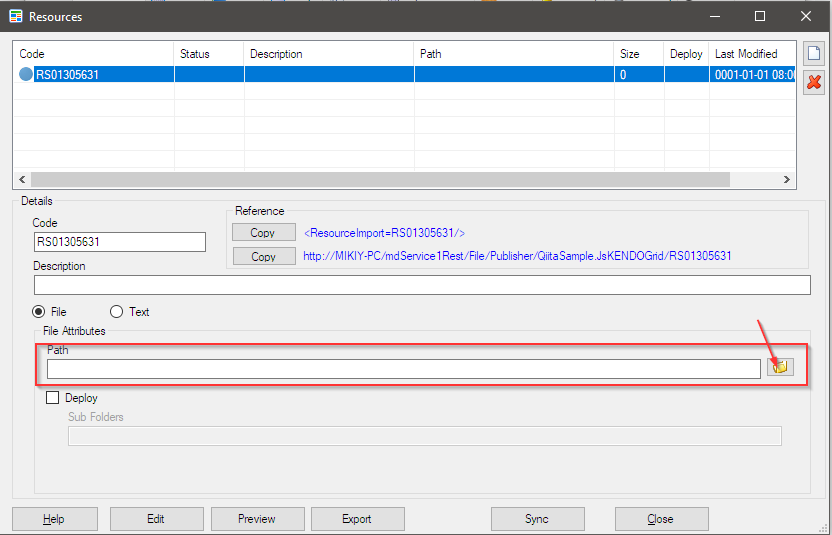
Specify the HTML file path here by using the browse icon.

Finally, copy the Resource Code Tag by clicking theCopybutton.

Confirm synchronization again with theSyncbutton, then save by clicking theClosebutton. - In the
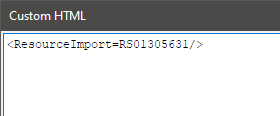
Custom HTMLoption, actually use the resource. Turn on theEnableoption and click theEditbutton.

The Custom HTML editor will open. Since there is already sample code, delete it all. Paste the Resource Code Tag that you copied to the clipboard earlier.
Embedding is now complete. Save by clicking theOKbutton.

Prompt display in the browser is not necessary, so turn off the prompts.

Definition of a query
This public query is simply a container for the previous HTML code, so a query is not necessary. However, as mentioned earlier, there is a rule of One Query per Published Query. Therefore, we will define a query.
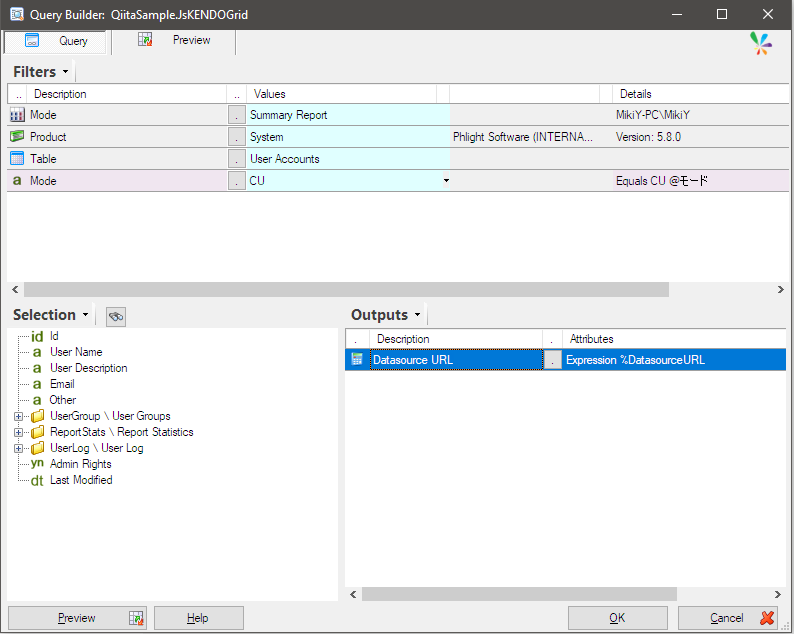
Firstly, it is preferable for the query to return as few records as possible. Therefore, we will define a query that returns only one record. It would be suitable to use the following products System and specify the User Account table for this query.
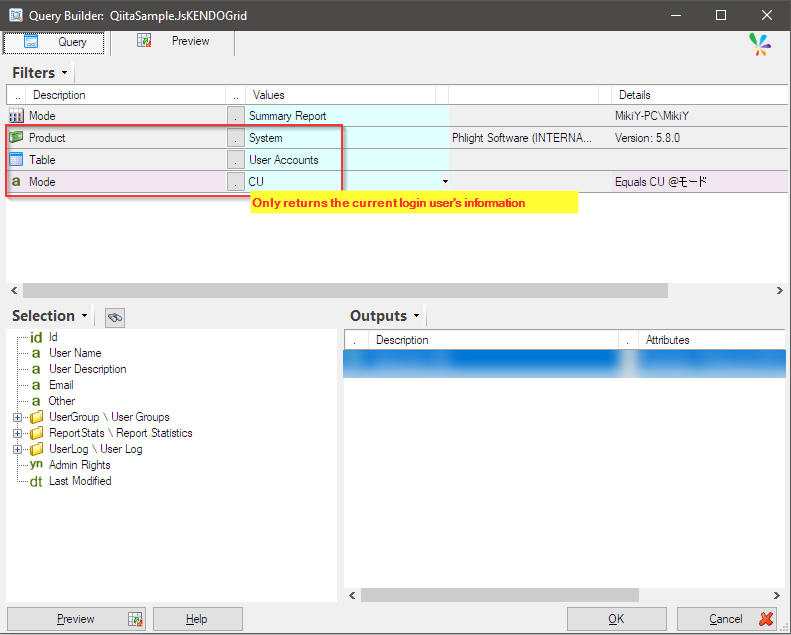
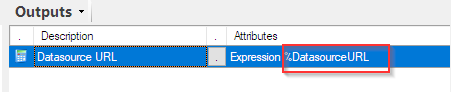
In the output area, specify constants or other values you want to pass to the embedded HTML code. Here, you will use Sharperlight Expression to specify the URL for the datasource. This corresponds to the part mentioned at the beginning of the <body> description.
Choose Add Expression from the right-click menu.
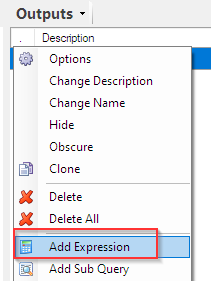
Search for the syntax using the keyword REST and transfer the found Service URL syntax to the top text editor.
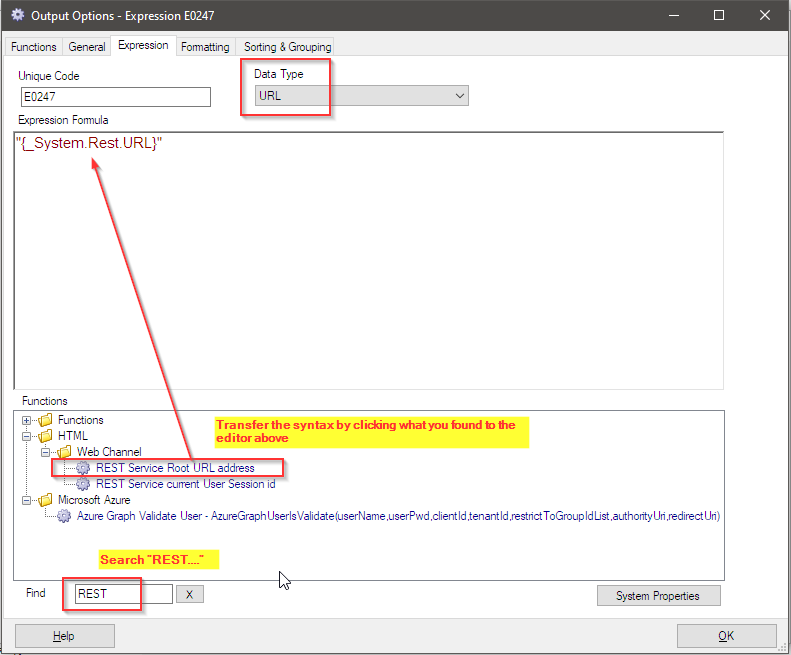
Further edit the syntax as follows:

Save by clicking the OK button. Edit the Description and Name as follows. Particularly, the Name is important. This name is referenced in the HTML code as {*Row.DatasourceURL.text}.
That's it. Save by clicking the OK button.
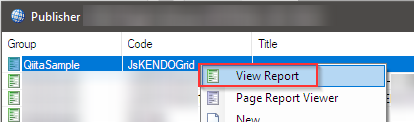
Save the published query as well by clicking the OK button. Now, select the saved published query, and choose "Show Report" from the right-click menu.
If the Sharperlight service is running, the published query will be displayed in your browser.
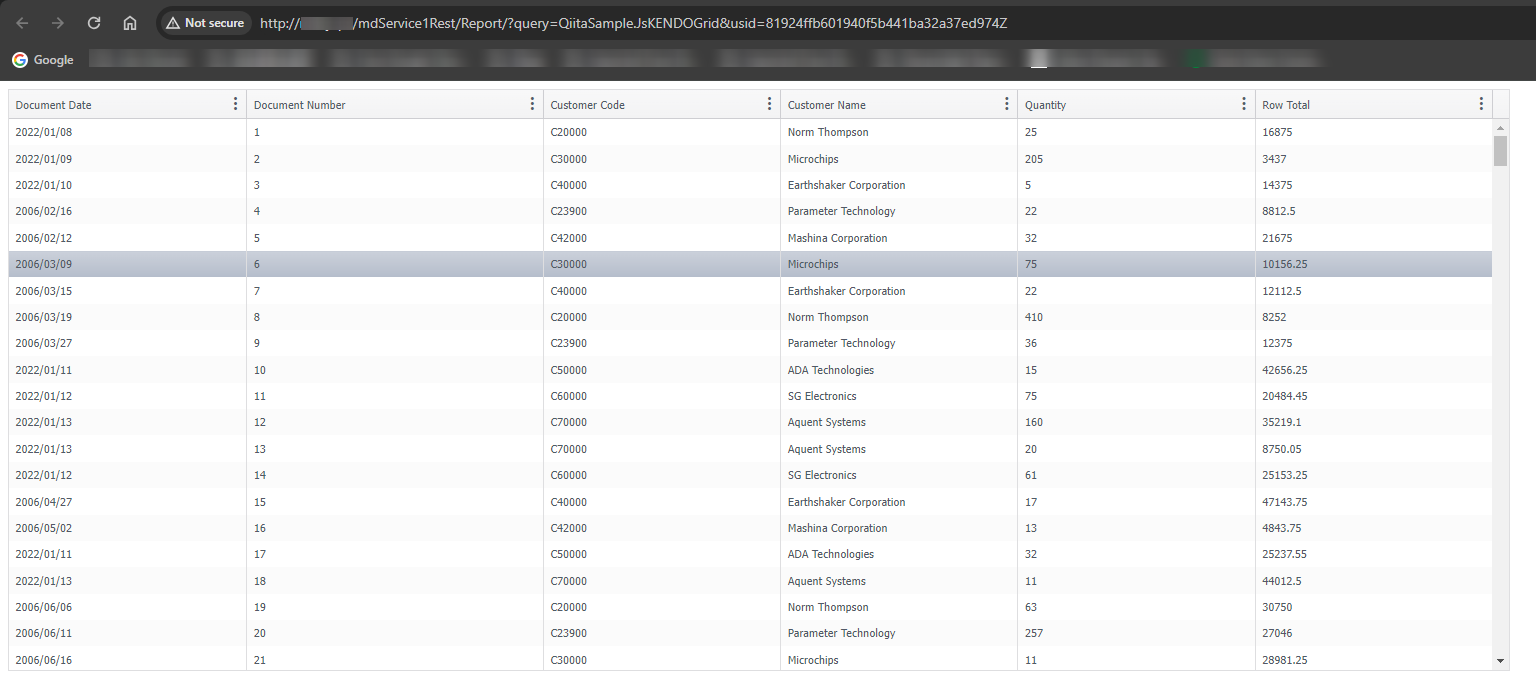
You can start the Sharperlight service either from the Sharperlight application menu or from the Windows Services dialog.