Introduction
This time, I will introduce the advanced edition of the WEB report.
We will use the standard prompts and table sections of Sharperlight and add custom elements to them.

The data filtered through the prompts will be displayed, creating an interactive web report where users can take actions on the displayed data. In this example, two buttons, Approve and Reject, are provided. JavaScript will be used to write the logic so that when each button is pressed, the corresponding processing is performed.
Creating a WEB Report
Launch the Publisher from the Sharperlight application menu.
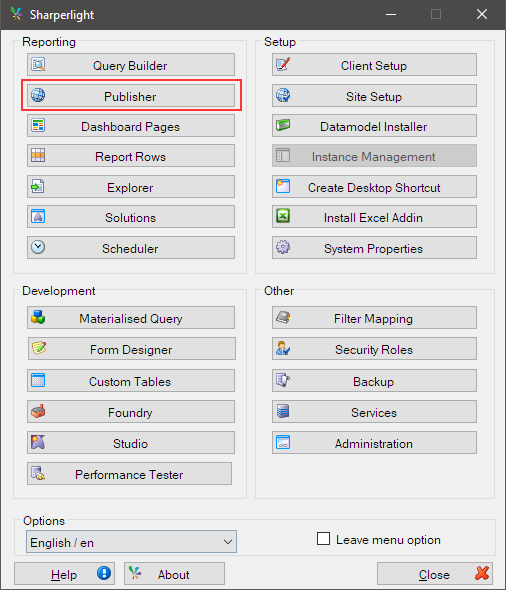
Begin creating a new web report by clicking the New button.
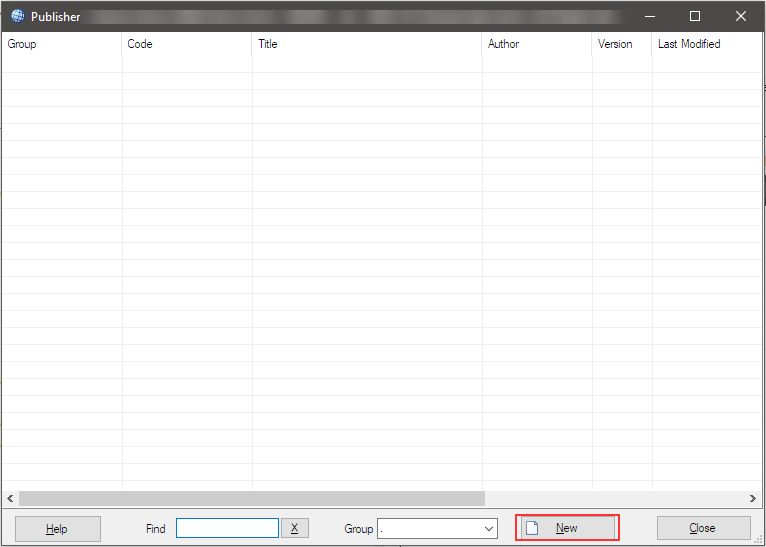
In the General tab, fill in the Unique Code (Group + Code), Title, and Report Title.

Define the query by clicking the Edit Query button at the bottom of the dialog.

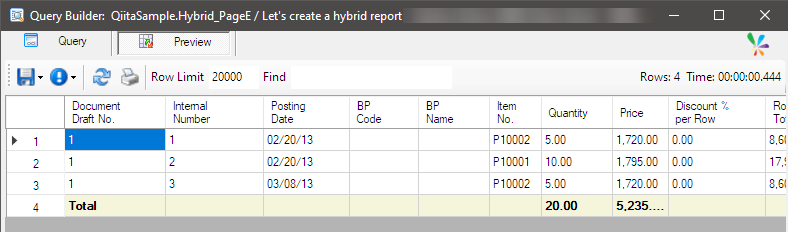
The Query Builder will open. I tried creating a query using the SAP Business One data model as shown in the figure below.

- Document Draft Number: This filter will be displayed as a prompt
- CurrentUser: Since you want to use this in JavaScript, define it as a prompt filter (it won't form part of the query's WHERE clause, but can prompt the user for input). Additionally, set it to Hidden if you don't want it to be displayed as a prompt
- Elements constituting the table
Verify the query's functionality by using the Preview button. It worked well.
Save the query by clicking the OK button, and then save the web report using the OK button as well.

Creating Custom HTML + JavaScript Code
Let's proceed with creating this section.

Created with HTML + JavaScript. Write with an editor such as Visual Studio Code.
The two buttons and the text area are defined like this.

The processing when the button is pressed is like this.
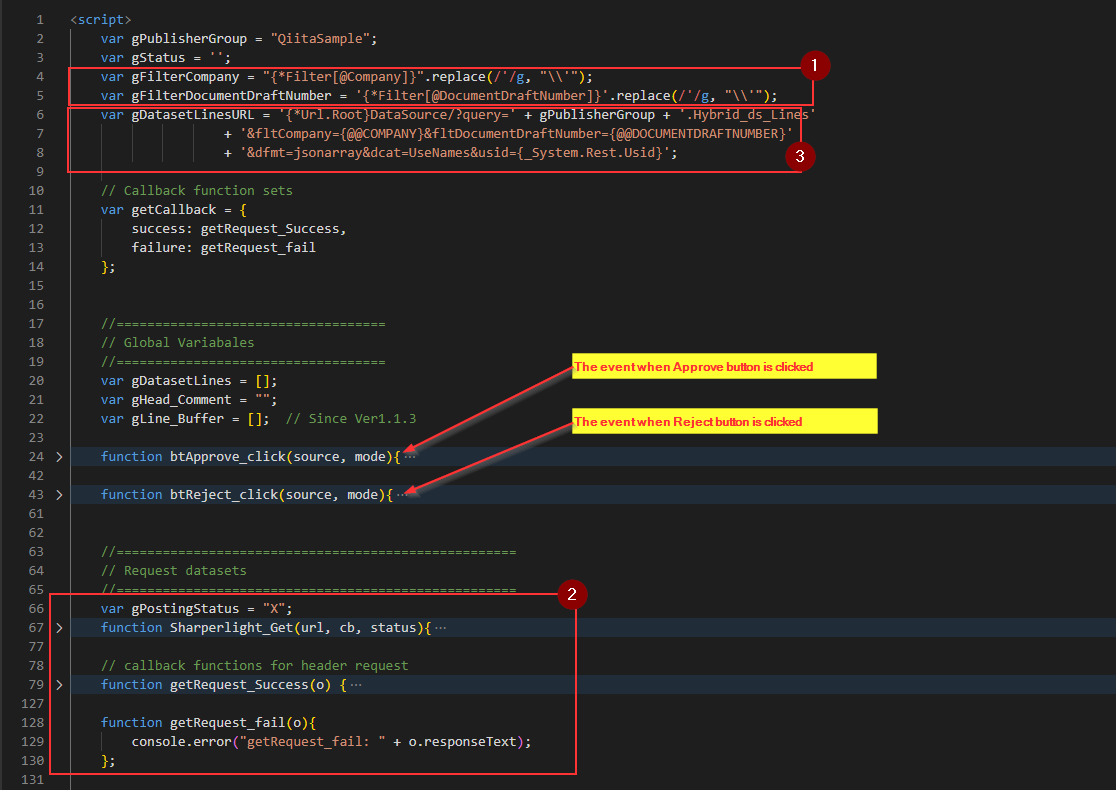
- This part receives filter information from the query of the embedded web report (previously created web report).
@Company,@DocumentDraftNumberare reference codes for the names of filters in the query

- This part sends a query to the Sharperlight RESTful service and receives a dataset. This code is used when buttons like
ApproveorRejectare pressed. It retrieves the same data currently displayed, plus additional information using a Sharperlight query. The retrieved data is then passed to the next processing step. For example, this code could be utilized to write back the data to another table using Sharperlight's Writeback feature. In this case, the retrieved data is only displayed on the screen.

- The URL request syntax for sending a query to the Sharperlight RESTful service in the step 2
is defined. This query (web report) has to be defined in the Publisher as well.
I will put all the code here.
<script>
var gPublisherGroup = "QiitaSample";
var gStatus = '';
var gFilterCompany = "{*Filter[@Company]}".replace(/'/g, "\\'");
var gFilterDocumentDraftNumber = '{*Filter[@DocumentDraftNumber]}'.replace(/'/g, "\\'");
var gDatasetLinesURL = '{*Url.Root}DataSource/?query=' + gPublisherGroup + '.Hybrid_ds_Lines'
+ '&fltCompany={@@COMPANY}&fltDocumentDraftNumber={@@DOCUMENTDRAFTNUMBER}'
+ '&dfmt=jsonarray&dcat=UseNames&usid={_System.Rest.Usid}';
// Callback function sets
var getCallback = {
success: getRequest_Success,
failure: getRequest_fail
};
//===================================
// Global Variabales
//===================================
var gDatasetLines = [];
var gHead_Comment = "";
var gLine_Buffer = [];
function btApprove_click(source, mode){
try{
gStatus = mode;
// Keep input value
gHead_Comment = $.trim($('textarea#ApprovalComment').val());
//====================================================
// Get approved documents detail
//====================================================
var dsUrl = gDatasetLinesURL.replace("{@@COMPANY}", gFilterCompany).replace("{@@DOCUMENTDRAFTNUMBER}",gFilterDocumentDraftNumber);
console.log(dsUrl);
Sharperlight_Get(dsUrl, getCallback, "A");
}catch (err){
console.error('Error on btSubmitAll_click(): ' + err.message);
}
}
function btReject_click(source, mode){
try{
gStatus = mode;
// Keep input value
gHead_Comment = $.trim($('textarea#ApprovalComment').val());
//====================================================
// Get approved documents detail
//====================================================
var dsUrl = gDatasetLinesURL.replace("{@@COMPANY}", gFilterCompany).replace("{@@DOCUMENTDRAFTNUMBER}",gFilterDocumentDraftNumber);
console.log(dsUrl);
Sharperlight_Get(dsUrl, getCallback, "R");
} catch (err){
console.error('Error on btReject_click(): ' + err.message);
}
}
//====================================================
// Request datasets
//====================================================
var gPostingStatus = "X";
function Sharperlight_Get(url, cb, status){
try {
if (url != ""){
gPostingStatus = status;
var request = YAHOO.util.Connect.asyncRequest('GET', url, cb);
}
} catch (err) {
console.error('Sharperlight_Get(): ' + err.message);
}
};
// callback functions for header request
function getRequest_Success(o) {
console.log("getRequest_Success: " + o.responseText);
gDatasetLines = JSON.parse(o.responseText);
if (gPostingStatus == "A"){
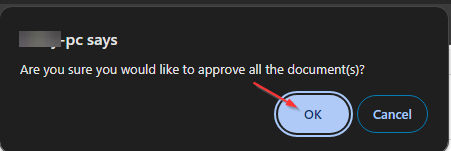
if (!confirm('Are you sure you would like to approve all the document(s)?')){
return;
}
}else if(gPostingStatus == "R"){
if (!confirm('Are you sure you would like to reject all the document(s)?')){
return;
}
}else{
alert("Posting Status was wrong.");
return;
}
if (gDatasetLines.length == 0) {
console.log('No document records found or the data already was processed');
window.parent.location.reload();
return;
}
gLine_Buffer = [];
for(var r=0; r<gDatasetLines.length; r++){
var rowItem = {
'CompanyBase': gFilterCompany,
'InternalNumber': gDatasetLines[r].InternalNumber,
'DocumentDraftNumber': gFilterDocumentDraftNumber,
'Answer': gPostingStatus,
'Authorizer': gDatasetLines[r].Authorizer,
'Date': gDatasetLines[r].Date,
'Comment': gHead_Comment
}
gLine_Buffer.push(rowItem);
}
// Post Remarks to the server
var message = "";
if (gLine_Buffer.length > 0){
for (var l=0; l<gLine_Buffer.length; l++){
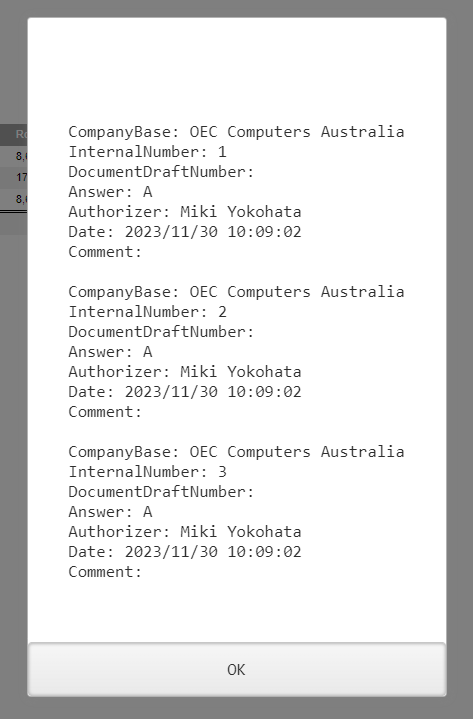
message +="CompanyBase: " + gLine_Buffer[l].CompanyBase + "</br>InternalNumber: " + gLine_Buffer[l].InternalNumber + "</br>DocumentDraftNumber: " + gLine_Buffer[l].DocumentDraftNumber + "</br>Answer: " + gLine_Buffer[l].Answer + "</br>Authorizer: " + gLine_Buffer[l].Authorizer + "</br>Date: " + gLine_Buffer[l].Date + "</br>Comment: " + gLine_Buffer[l].Comment + (l<gLine_Buffer.length ? "</br></br>" : "");
}
kendo.alert(message);
}
};
function getRequest_fail(o){
console.error("getRequest_fail: " + o.responseText);
};
</script>
<table style="width:100%">
<tr>
<td style="width:110px;">
<button id='btApprove' class="button button1" onClick='btApprove_click(this.id, "A")'>Approve</button>
<button id='btReject' class="button button2" onClick='btReject_click(this.id, "R")'>Reject</button>
</td>
</tr>
<tr>
<td colspan="2"><textarea id="ApprovalComment" maxlength="1000"></textarea></td>
</tr>
</table>
<div id="PostMessage" style="display: none">The post result message will be shown here.</div>
<script type="text/javascript">
$(document).ready(function() {
console.log("Page is ready");
});
</script>
Embedding HTML + JavaScript Code
Save the earlier HTML + JavaScript code as an HTML file.
Open the definition of the previously created web report.
Navigate to the Options tab and click the Edit button under Resources.

In the resource dialog, initiate the definition of a new resource by clicking on the New icon.
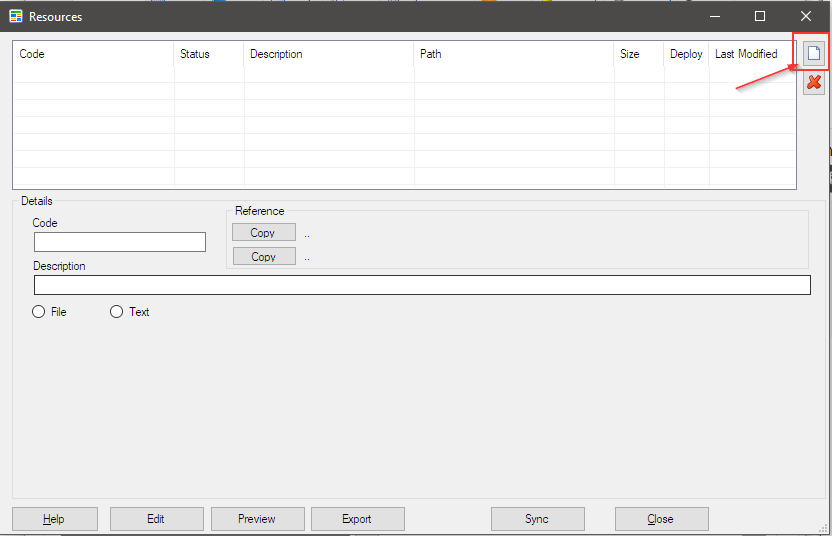
Next, use the file search icon for the path to specify the HTML file created earlier.

Once the file is specified, use the Copy button under Reference to copy the unique code to the clipboard.
Close the resource dialog.
Notice that the Edit button for resources has turned green. This means that the HTML file has now been attached as a resource.
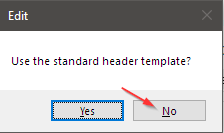
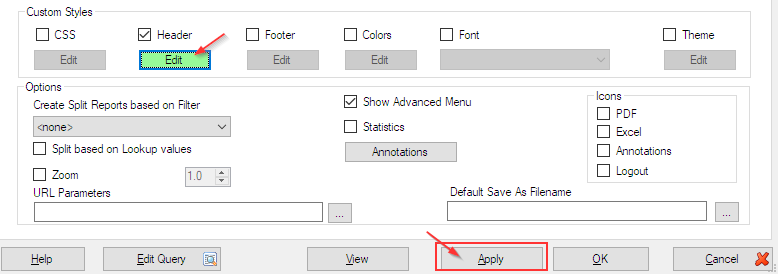
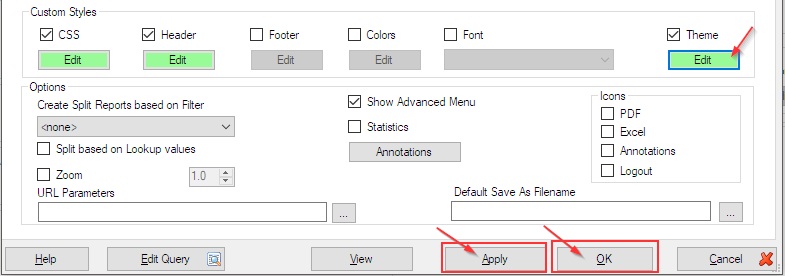
Check the Header checkbox under Custom Styles, and click the Edit button.

Proceed by selecting No.
The Custom HTML header dialog will open.

Keep only the ReportContentSectionBegin and ReportContentSectionEnd tags, and remove the others.
<!--ReportContentSectionBegin-->
<!--ReportContentSectionEnd-->
Paste the reference code of the embedded resource file copied to the clipboard earlier between the Begin and End tags.

Save by clicking the OK button. The embedding is now complete. The Edit button for the header has also turned green. Save the changes by clicking the Apply button.
Definition of Classes
Define the CSS used in the previously created HTML + JavaScript code for this web report.
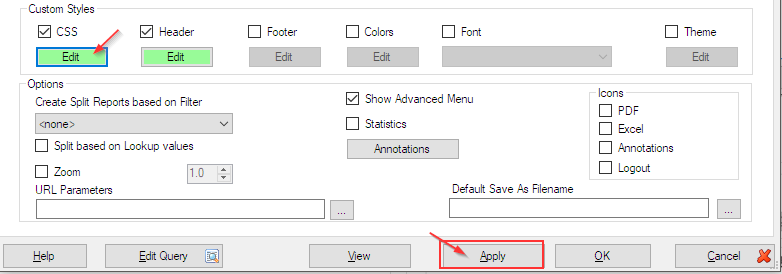
In the Options tab, under Custom Styles settings, check the CSS checkbox, and click the Edit button.

Paste the code below.
<style type="text/css">
	body{
		font-family: Monospace;
		font-size: 17px;
	}
	.button {
		margin-bottom: 15px;
		margin-left: 20px;
		display: inline-block;
		padding: 8px 25px;
		font-size: 15px;
		cursor: pointer;
		text-align: center;
		text-decoration: none;
		outline: none;
		color: #fff;
		border: none;
		border-radius: 7px;
		box-shadow: 0 6px #999;
	}
	.button1{
		background-color: #2F8272;
		width:	105px;
	}
	.button1:hover {
		background-color: #225e52;
	}
	.button1:active {
		background-color: #225e52;
		box-shadow: 0 5px #666;
		transform: translateY(4px);
	}

	.button2{
		background-color: #ED4C32;
		width:	105px;
	}
	.button2:hover {
		background-color: #bc2710;
	}
	.button2:active {
		background-color: #bc2710;
		box-shadow: 0 5px #666;
		transform: translateY(4px);
	}

	textarea {
		width: 650px;
  		height: 75px;
  		padding: 8px 8px;
  		box-sizing: border-box;
  		border: 2px solid #ccc;
  		border-radius: 4px;
  		background-color: #f8f8f8;
  		font-size: 16px;
  		resize: vertical;
	}
	#PostMessage{
		position: relative;
    		top: -6px;
    		margin-left: -40px;
	}
	.reviewedByLabel{
		display: inline-block;
    		margin-left: 15px;
    		position: relative;
    		top: -6px;
	}
	.reviewedBy{
		display: inline-block;
    		position: relative;
    		top: -6px;
		width: 200px;
	}
	.inspactor{
		width: 200px;
		height: 25px;
	}
	.inspactorValidationError{
		background-color: #eb8584;
	}
	.originalTotalLabel{
		display: inline-block;
    		margin-left: 15px;
    		position: relative;
    		top: -6px;
	}
	.originalTotal{
		display: inline-block;
    		position: relative;
    		top: -6px;
	}
	.newTotalLabel{
		display: inline-block;
    		margin-left: 15px;
    		position: relative;
    		top: -6px;
	}
	.newTotal{
		display: inline-block;
    		position: relative;
    		top: -6px;
	}
	#dash1Z{
		position: absolute;
		left: 888px;
	}
</style>
It is like this.

Save with the OK button. The Edit button in CSS has also turned green. Save the changes with the Apply button.
Theme Settings
Let's enhance the appearance of the table.
Go to the Options tab, check the Theme checkbox under Custom Styles, and press the Edit button.

Paste the following code into the URL parameter text box in the opened theme dialog.
&style=tmp2
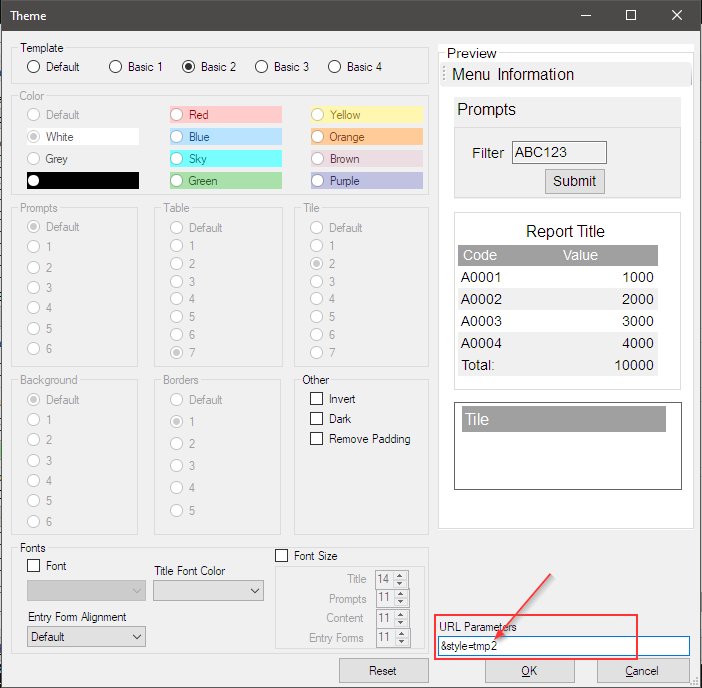
Save the settings with the OK button. The Edit button in the theme has also turned green. Save the changes with the Apply button. Furthermore, close the definition of the Web Report with the OK button.
The creation of the Hybrid Web Report is now complete.
Verification of Operation
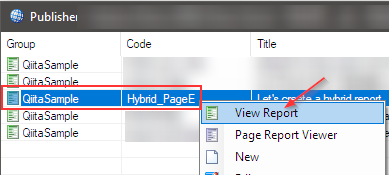
Now, let's proceed with the verification. Start the Sharperlight service from the Windows service or Sharperlight application menu. Select the Web Report you created earlier from the Publisher's report list, and choose View Report from the right-click menu.
The Web Report will open in your browser. Leave the Document Draft Number filter blank and execute the query by clicking the Submit button.

The table will be displayed along with the HTML + JavaScript components.
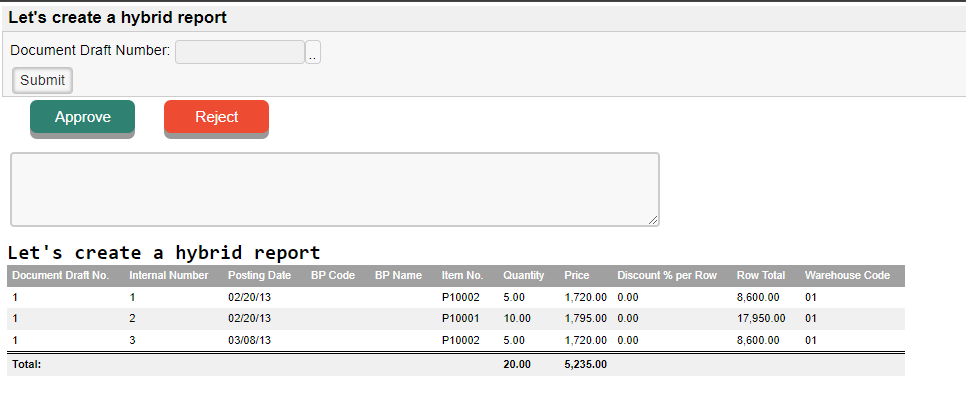
If you press the Approve button, a confirmation message will appear. Press OK, and if the next information is displayed, everything is functioning correctly.
Afterword
By entrusting the data access part to Sharperlight, we can focus on other aspects, can't we?