🎅kintone Advent Calendar 2018 20日目の記事です🎅
コマンドラインから kintone アプリを作成するプログラムを実装しました。
野望: Preview 版が使えるようになった暁には...AWS re:Invent 2018 で発表された OCR サービスの "Amazon Textract" と繋いで、帳票からコマンド操作で楽チンにアプリ作成できるようにしたい。
🌲目次
- できること
- 初期セットアップ
- プログラム実装
- ポイント解説
- プログラム実行
- おわりに
🌲やること
"ドラッグ & ドロップ" で簡単にアプリ作成できるのがポイントな kintone。
面倒くさがりな私はもっと楽したい!...ということで、本記事では コマンドラインから作成したいアプリを選択して、指定したドメインにサクッとアプリ作成ができるプログラムを実装 していきます。
検証開発用によく作るアプリがあるという方にもおすすめです👍

処理の順番
cybozu developer network内のアプリの作成と設定の変更を参考にして、以下の3ステップで kintone にリクエストしてアプリ作成をします。
- テスト環境にアプリを作成
- フィールドなどアプリの設定変更
- 運用環境にアプリを反映
🎄初期セットアップ
1. モジュールのインストール
まず コマンドプロンプト や ターミナル を開きます。
プログラムを置きたいディレクトリに移動して、npm や yarn で必要なモジュールをインストールしてください。
$ cd {作成ディレクトリのパス}
$ npm init
$ npm install request prompts --save
2. ファイル構成の確認
ファイル構成はこのようになります。
-- program
|-- node_modules
|-- package.json
|-- etc
|-- config.js (後で追加)
|-- deployApp.js (後で追加)
3. kintone 環境のログイン情報確認
REST API リクエストで必要な kintone 環境のログイン情報をメモしておきます。
- ドメイン名(https://{ドメイン名}.cybozu.com)
- ログイン名
- パスワード
🎄プログラム実装
以下の 2ファイルを 上記のファイル構成になるように program ディレクトリに追加します。
Github にもコミットしているので、ご参照ください。(deploy-app repository)
- config.js(アプリテンプレートの設計情報を記述)
- 今回は、「日報アプリ」 と 「新年会調整アプリ」 を準備
- deployApp.js(テスト環境にアプリ作成, フィールドなどアプリの設定変更, 運用環境にアプリ反映する関数と実行関数を記述)
const choices = [
    {
        'title': '日報',
        'value': '日報'
    },
    {
        'title': '新年会調整',
        'value': '新年会調整'
    }
];

const appTemps = [
    {
        'name': '日報',
        'fields': {
            '日付': {
                'type': 'DATE',
                'code': '日付',
                'label': '日付',
                'noLabel': false,
                'required': false,
                'unique': false,
                'defaultValue': '',
                'defaultNowValue': true
            },
            'ユーザー選択': {
                'type': 'USER_SELECT',
                'code': 'ユーザー選択',
                'label': '名前',
                'noLabel': false,
                'required': false,
                'entities': [],
                'defaultValue': []
            },
            'ドロップダウン': {
                'type': 'DROP_DOWN',
                'code': 'ドロップダウン',
                'label': '部署',
                'noLabel': false,
                'required': false,
                'options': {
                    '総務': {
                        'label': '総務',
                        'index': '0'
                    },
                    'サポート': {
                        'label': 'サポート',
                        'index': '1'
                    },
                    'マーケティング': {
                        'label': 'マーケティング',
                        'index': '2'
                    },
                    '営業': {
                        'label': '営業',
                        'index': '3'
                    },
                    '開発': {
                        'label': '開発',
                        'index': '4'
                    }
                },
                'defaultValue': ''
            },
            'ラジオボタン': {
                'type': 'RADIO_BUTTON',
                'code': 'ラジオボタン',
                'label': '目標達成度',
                'noLabel': false,
                'required': true,
                'options': {
                    '達成': {
                        'label': '達成',
                        'index': '0'
                    },
                    '未達': {
                        'label': '未達',
                        'index': '1'
                    }
                },
                'defaultValue': '達成',
                'align': 'HORIZONTAL'
            },
            '文字列__複数行_': {
                'type': 'MULTI_LINE_TEXT',
                'code': '文字列__複数行_',
                'label': '業務内容',
                'noLabel': false,
                'required': false,
                'defaultValue': ''
            },
            '文字列__複数行__0': {
                'type': 'MULTI_LINE_TEXT',
                'code': '文字列__複数行__0',
                'label': '所感、学び',
                'noLabel': false,
                'required': false,
                'defaultValue': ''
            },
            '添付ファイル': {
                'type': 'FILE',
                'code': '添付ファイル',
                'label': '添付ファイル',
                'noLabel': false,
                'required': false,
                'thumbnailSize': '150'
            },
        }
    },
    {
        'name': '新年会調整',
        'fields': {
            'ユーザー選択': {
                'type': 'USER_SELECT',
                'code': 'ユーザー選択',
                'label': 'お名前',
                'noLabel': false,
                'required': false,
                'entities': [],
                'defaultValue': []
            },
            '複数選択': {
                'type': 'MULTI_SELECT',
                'code': '複数選択',
                'label': '出席可能な日(複数選択可)',
                'noLabel': false,
                'required': false,
                'options': {
                    '11日(金)': {
                        'label': '11日(金)',
                        'index': '0'
                    },
                    '16日(水)': {
                        'label': '16日(水)',
                        'index': '1'
                    },
                    '18日(金)': {
                        'label': '18日(金)',
                        'index': '2'
                    },
                    '24日(木)': {
                        'label': '24日(木)',
                        'index': '3'
                    }
                },
                'defaultValue': []
            },
            '文字列__複数行_': {
                'type': 'MULTI_LINE_TEXT',
                'code': '文字列__複数行_',
                'label': 'コメント',
                'noLabel': false,
                'required': false,
                'defaultValue': ''
            }
        }
    }
];
exports.appTemps = appTemps;
exports.choices = choices;
const request = require('request');
const prompts = require('prompts');
const conf = require('./config.js');

(async() => {
    // Setting of argument from command line
    let questions = [
        {
            type: 'select',
            name: 'app',
            message: 'Choose app name you want to create.',
            choices: conf.choices,
            initial: 0
        },
        {
            type: 'text',
            name: 'domain',
            message: 'Input your kintone domain name.'
        },
        {
            type: 'text',
            name: 'user',
            message: 'Input your user name.'
        },
        {
            type: 'password',
            name: 'password',
            message: 'Input your password.'
        }
    ];

    let onCancel = prompt => {
        console.log('Please answer all question.');
        return true;
    }
    let response = await prompts(questions, { onCancel });

    // Config information of kintone env.
    const buffer = new Buffer.from(response.user + ':' + response.password);
    var base = buffer.toString('base64');

    const config = {
        domain: response.domain,
        headers: {
            'X-Cybozu-Authorization': base,
            'Content-Type': 'application/json'
        }
    };

    // Create app to test environment
    const createApp = () => {
        let objPreviewApp = {
            'name': response.app
        };

        let paramsPreviewApp = {
            url: 'https://' + config.domain + '.cybozu.com/k/v1/preview/app.json',
            method: 'POST',
            json: true,
            headers: config.headers,
            body: objPreviewApp
        };

        return new Promise((resolve, reject) => {
            return request(paramsPreviewApp, (error, respCreate, body) => {
                if (error) {
                    reject(error);
                    return;
                } else if (respCreate.statusCode !== 200) {
                    reject(respCreate.body.message + '(create app)');
                    return;
                }
                resolve(respCreate);
                console.log(' Create success: app(' + respCreate.body.app + '), ' + 'revision(' + respCreate.body.revision + ')');
            });
        });
    };

    // Add fields
    const addFields = (respCreate) => {
        let objAddFields;
        conf.appTemps.map((appTemp) => {
            if (appTemp.name === response.app) {
                objAddFields = {
                    "app": respCreate.body.app,
                    "properties": appTemp.fields
                }
            }
        });

        let paramsAddFields = {
            url: 'https://' + config.domain + '.cybozu.com/k/v1/preview/app/form/fields.json',
            method: 'POST',
            json: true,
            headers: config.headers,
            body: objAddFields
        };

        return new Promise((resolve, reject) => {
            return request(paramsAddFields, (error, respAdd, body) => {
                if (error) {
                    reject(error);
                    return;
                } else if (respAdd.statusCode !== 200) {
                    reject(respAdd.body.message + '(add fields)');
                    return;
                }
                resolve(respCreate, respAdd);
                console.log(' Add fields success: revision(' + respAdd.body.revision + ')');
            });
        });
    };

    // Deploy app
    const deployApp = (respCreate) => {
        let objDeployApp = {
            "apps": [
                {
                    "app": respCreate.body.app
                }
            ]
        };

        let paramsDeployApp = {
            url: 'https://' + config.domain + '.cybozu.com/k/v1/preview/app/deploy.json',
            method: 'POST',
            json: true,
            headers: config.headers,
            body: objDeployApp
        };

        return new Promise((resolve, reject) => {
            return request(paramsDeployApp, (error, respDeploy, body) => {
                if (error) {
                    reject(error);
                    return;
                } else if (respDeploy.statusCode !== 200) {
                    reject(respDeploy.body.message + '(deploy app)');
                    return;
                }
                resolve(respDeploy)
                console.log(' Deploy success: app(' + respCreate.body.app + ')');
                console.log(' ☆*:.。. o(≧▽≦)o .。.:*☆');
            });
        });
    };

    // Execute functions
    Promise.resolve()
        .then(createApp)
        .then(addFields)
        .then(deployApp)
        .catch((error) => {
            console.log('Error: ' + error);
        });
})();
🎄ポイント解説
config.js
テンプレートアプリのフィールドなど設計情報を記述しているファイルです。
📌テンプレートアプリの設計情報の取得
元となるアプリの設計情報は、フォームの設定の取得を参考にして取得し、その JSON を config.js で利用しました。
⚠️ API で追加できないフィールドあり(詳しくは、フォーム設定の変更)
📌変数呼び出しができるように記述
外部ファイルから変数を呼び出せるように、exports で記述します。
exports.appTemps = appTemps;
exports.choices = choices;
deployApp.js では、以下の通り呼び出し
const conf = require('./config.js');
deployApp.js
📌会話形式でのコマンドライン入力
prompts モジュールを利用することで、会話形式のコマンドライン入力/プログラムからの入力値の呼び出しができます。
⚠️ async 関数の中で定義する必要あり
⚠️ パスワードのように、入力値を隠したい場合は、password type を利用
💡会話形式ではなく、argv という引数渡しができるモジュールも活用可能(cli-kintoneのコマンド操作のイメージ)
const prompts = require('prompts');

(async() => {
    // Setting of argument from command line
    let questions = [
        {
            type: 'select',
            name: 'app',
            message: 'Choose app name you want to create.',
            choices: conf.choices,
            initial: 0
        },
        {
            type: 'text',
            name: 'domain',
            message: 'Input your kintone domain name.'
        },
        {
            type: 'text',
            name: 'user',
            message: 'Input your user name.'
        },
        {
            type: 'password',
            name: 'password',
            message: 'Input your password.'
        }
    ];

    let onCancel = prompt => {
        console.log('Please answer all question.');
        return true;
    }
    let response = await prompts(questions, { onCancel });
📌Promise で順番処理(直列実行)
処理ごとに関数を分けて記述して、最後に Promise...then で繋ぎ合わせます。
エラーハンドリングは、最後の catch の中で。
⚠️ 関数内でちゃんと Promise オブジェクトが返されているか要チェック
    // Execute functions
    Promise.resolve()
        .then(createApp)
        .then(addFields)
        .then(deployApp)
        .catch((error) => {
            console.log('Error: ' + error);
        });
🎄プログラムの実行
プログラムの準備が整ったので...いよいよ実行です。
$ node deployApp.js
あとは、会話形式で以下を選択/入力して Enter キーを押して実行します。
? Choose app name which you want to create.
 > 日報
 > 新年会調整

? Input your kintone domain name.

? Input your user name.

? Input your password.
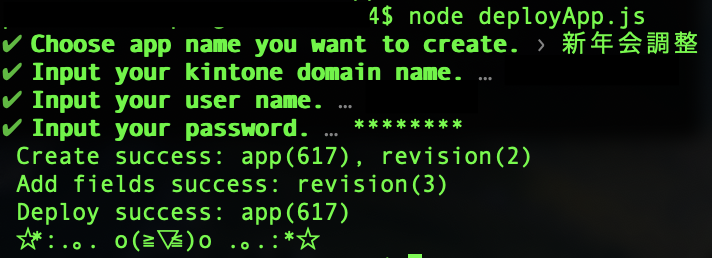
Mac のターミナルで実行すると、こんな感じです。


上手くいくと、以下のように関数が順番に実行されて、アプリが作成されます。
 Create success: app(615), revision(2)
 Add fields success: revision(3)
 Deploy success: app(615)
 ☆*:.。. o(≧▽≦)o .。.:*☆

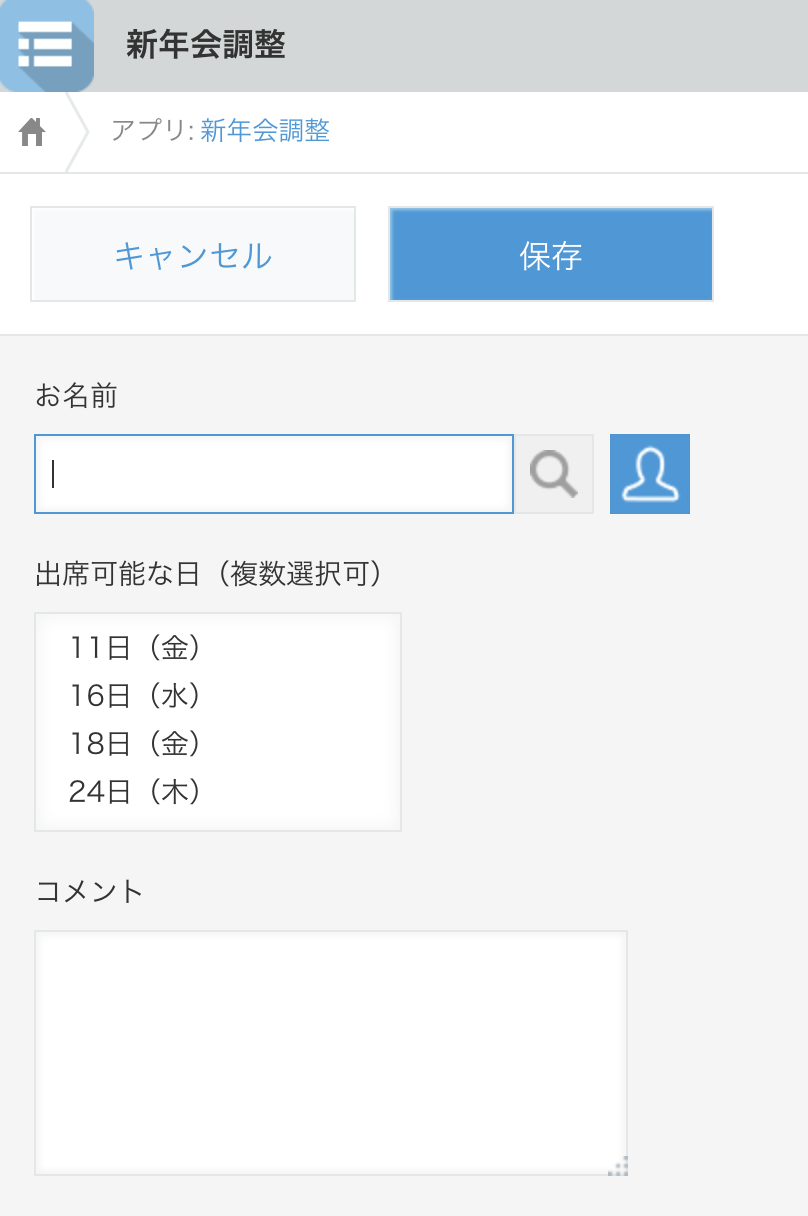
最後に、kintone にアクセスして、アプリが無事作成されているか確認しましょう。

🎍おわりに
今回はテンプレートアプリのフィールド構成を JSON で用意しました。
prompts モジュールを使えば、自分で配置したいフィールドタイプやフィールド名を選択しながらアプリ作成をすることもできそうです。(SDK欲しいな〜笑)
ぜひ色々触って、ひと工夫加えてみてください(`・∀・´)フィードバックも大歓迎です。
最後まで読んでくださり、ありがとうございました。
一足早いですが、Merry Christmas & Happy New Year!!!