はじめに
LINE Notifyは、2025年3月31日にサービスが終了する。
通知を送る代替方法として、LINE公式アカウントからメッセージを送信できるLINE Messaging APIを利用する。
LINE Messaging API: https://developers.line.biz/ja/services/messaging-api/
Messaging APIの料金: https://developers.line.biz/ja/docs/messaging-api/overview/#line-official-account-plan
毎月200メッセージまで無料なので、4人グループに送ると仮定すると、月50回のメッセージ送信まで無料の計算。無料枠で、使える場面も多い。
自分だけに送るのであれば、以下の記事の通り、ブロードキャストでよい。
https://qiita.com/jksoft/items/4d57a9282a56c38d0a9c
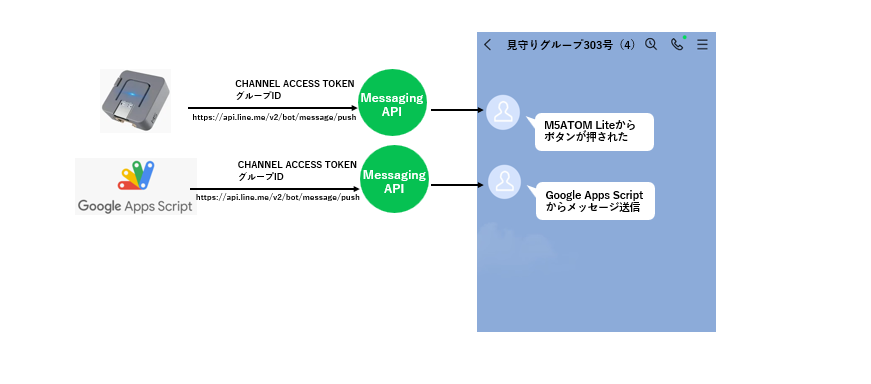
今回は、グループに送るための方法で、グループIDを取得するプロセスがある。グループIDを含めてプッシュメッセージで送る。
全体の流れのイメージ
- LINE Official Account Managerで公式アカウントを作成し、LINE Messaging APIをLINE Developerで設定する。
- LINEグループを作って、先ほどの公式アカウントを招待してグループに入れる。

3.LINEグループ内で、自分(本人)から任意のメッセージを送信することで
グループIDを取得する。
4.M5ATOM LiteまたはGoogle Apps Scriptから、CHANNEL ACCESS TOKENとグループIDを含めたデータをプッシュメッセージすることで、LINEグループにメッセージを送る。
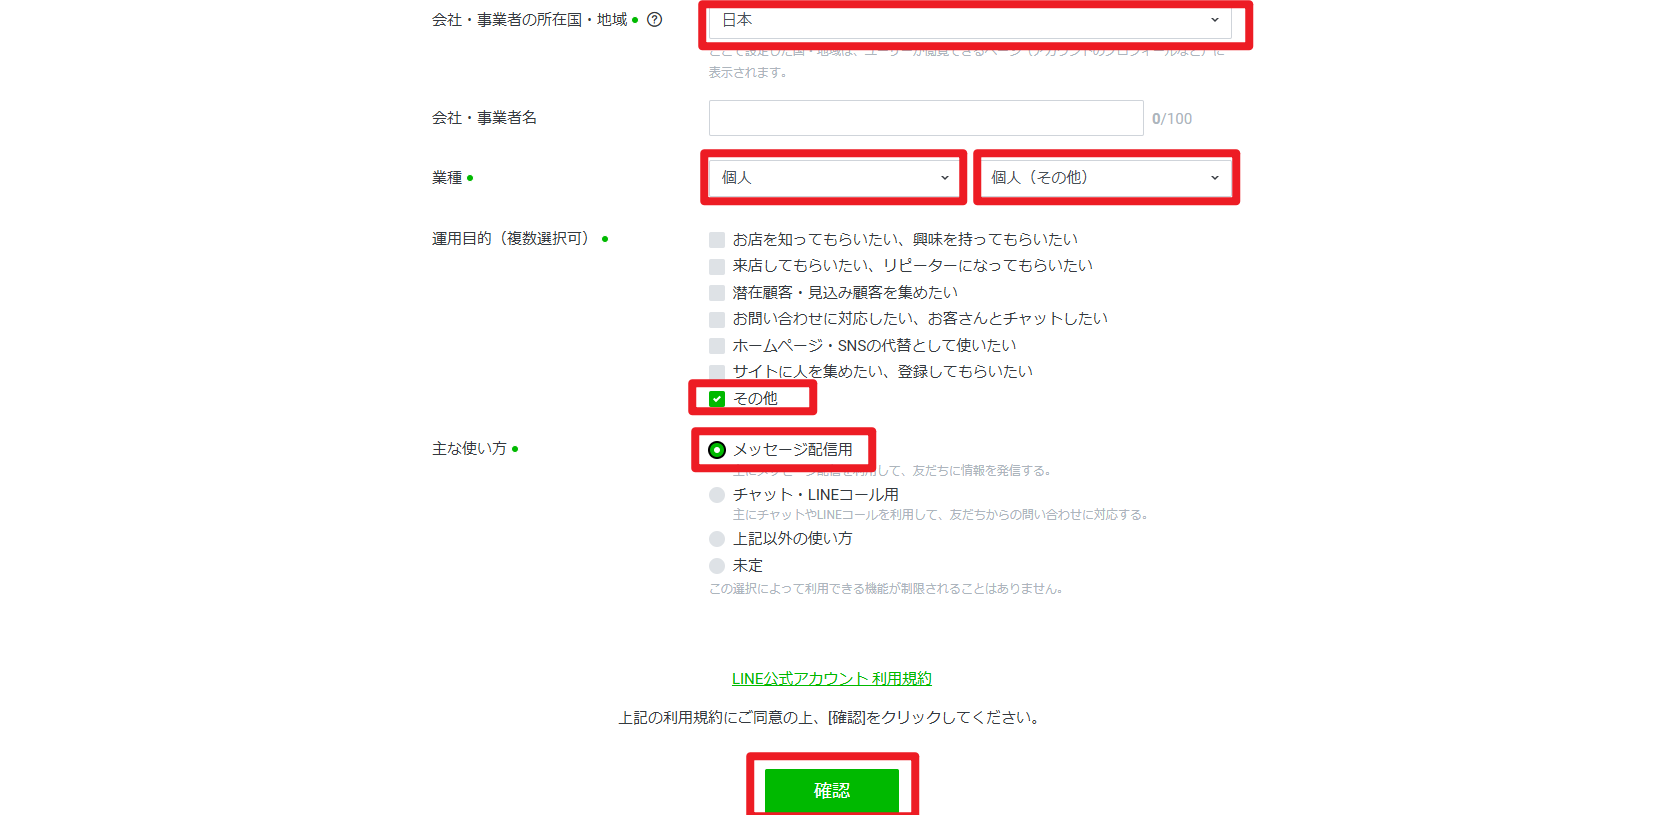
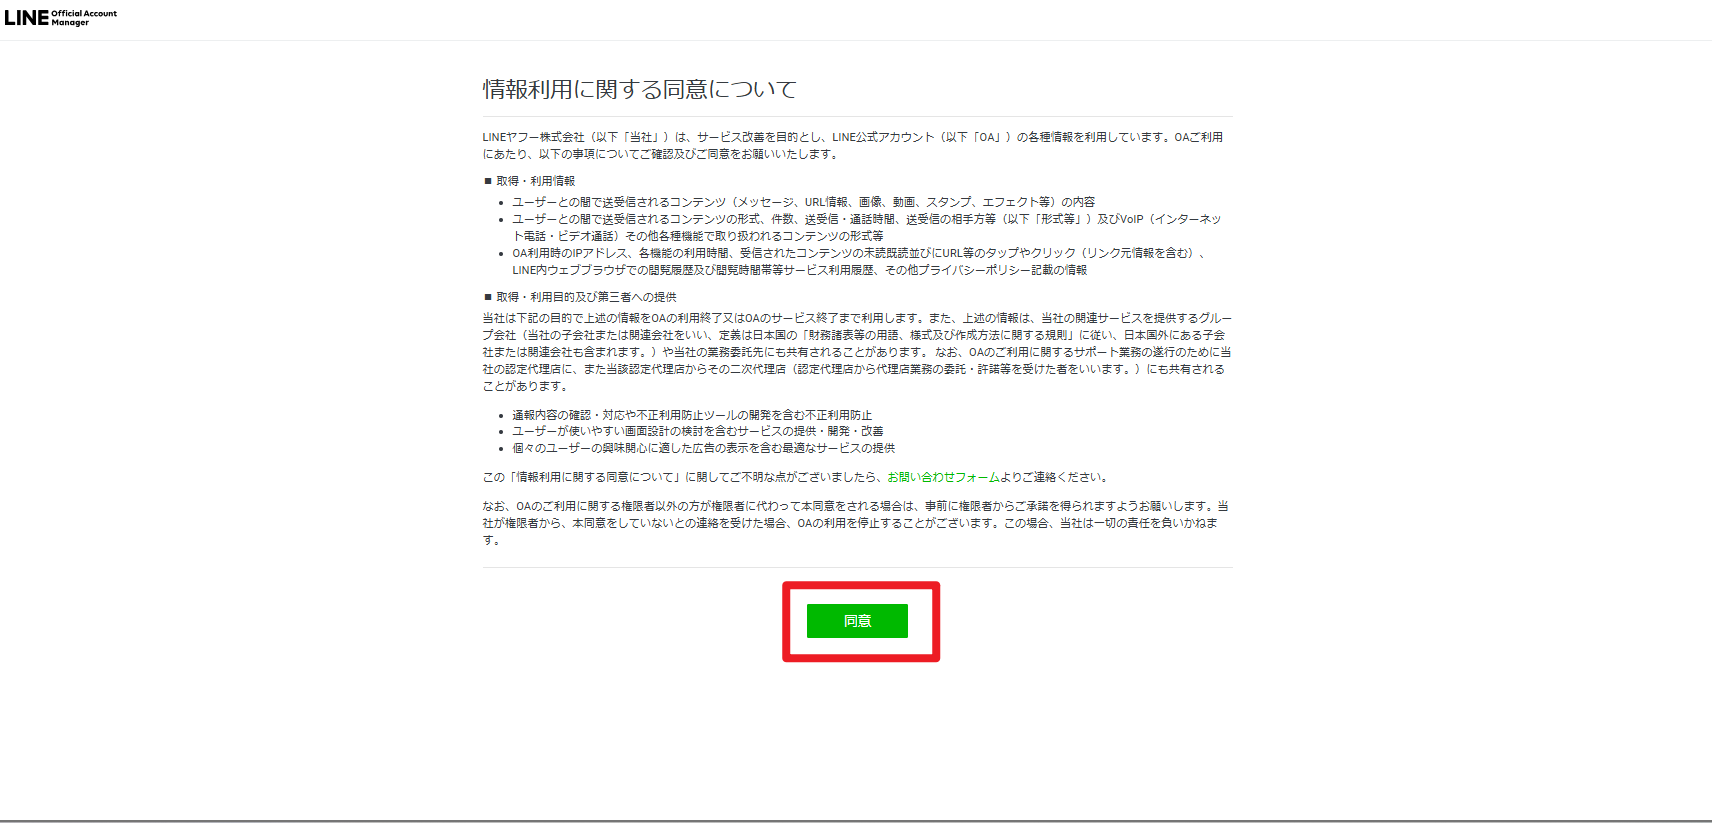
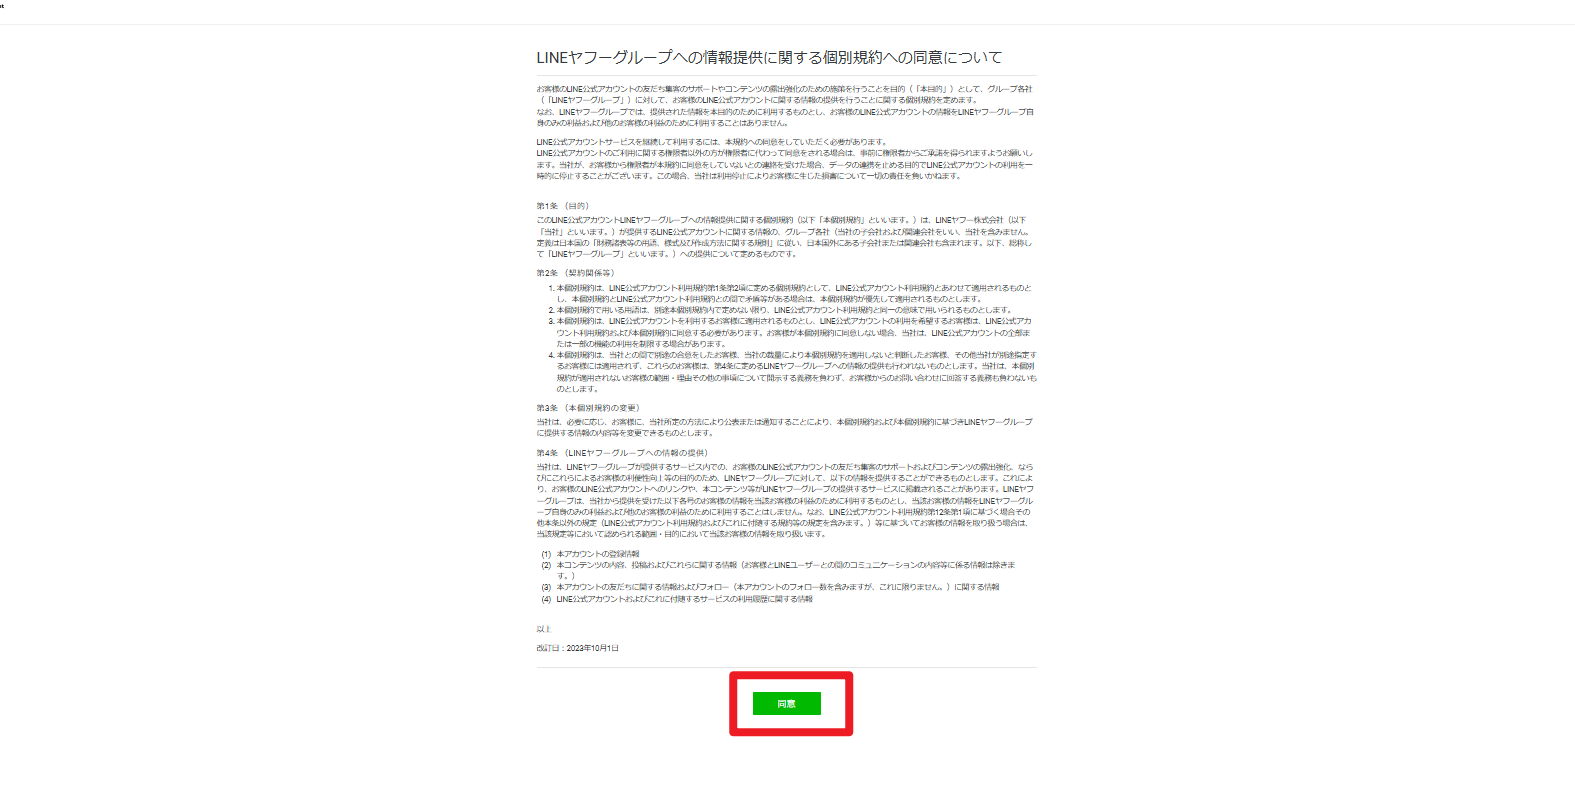
LINE Official Account Managerで公式アカウントを作成し、LINE Messaging APIをLINE Developerで設定する。
LINE MessagingAPIから公式アカウントを作成する。
LINE Official Account Manager https://manager.line.biz/
に、「LINEアカウントでログイン」でログインする。
LINE Official Account Managerボタンを押す。
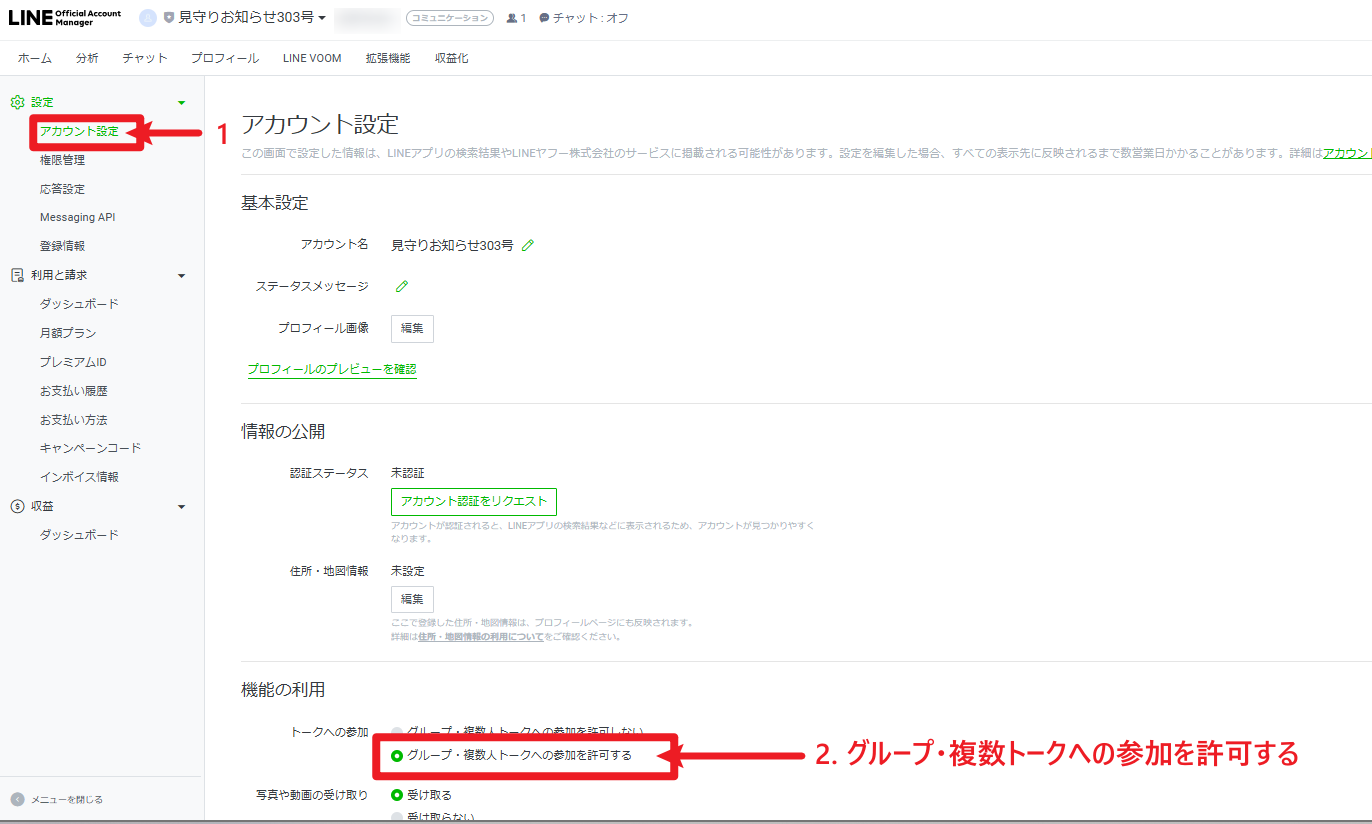
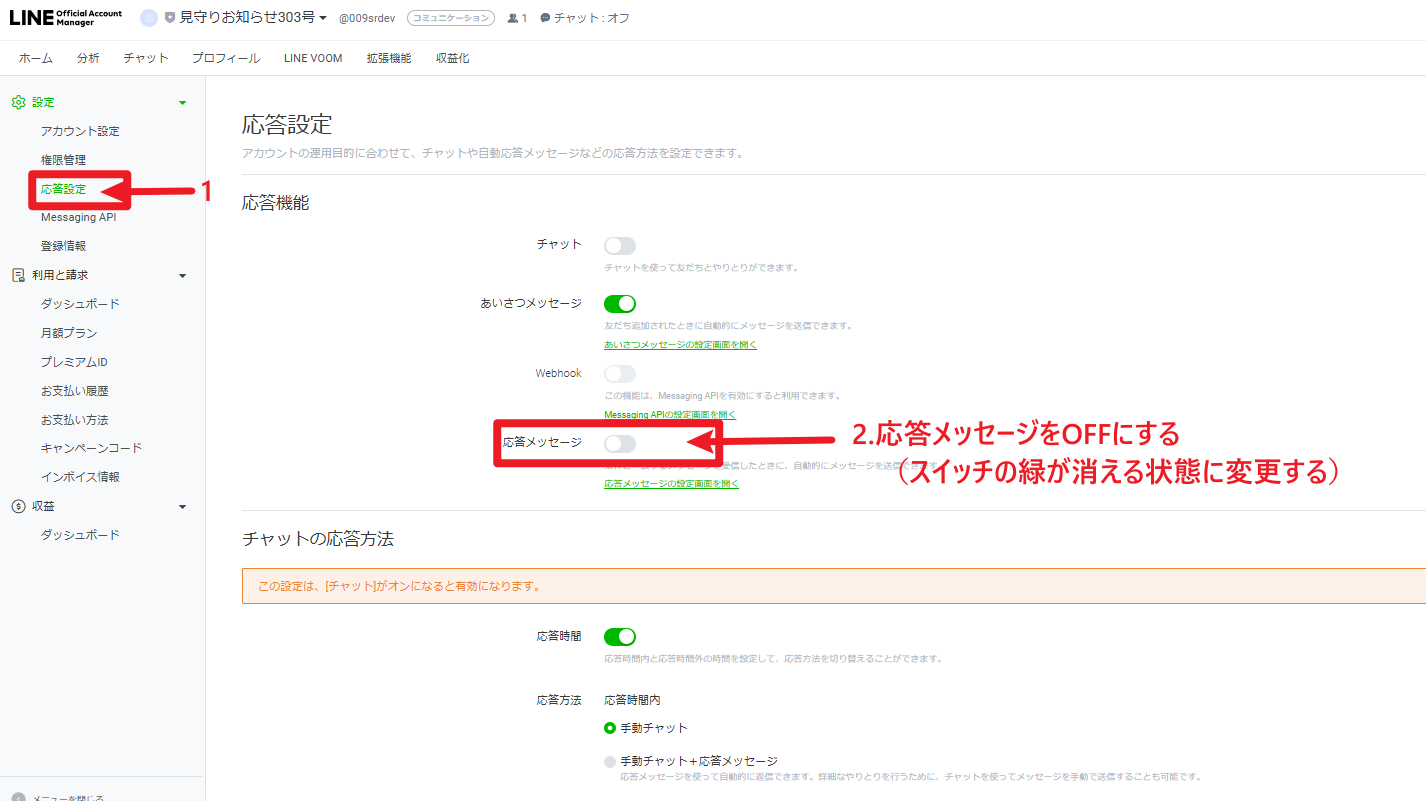
アカウント設定画面から
「グループ・複数トークへの参加を許可する」に変更
プロバイダーを選択する。
プロバイダーを作成するか、既存のプロバイダーを選ぶかのどちらか。

プライバシーポリシーと利用規約は空白でも大丈夫。
OKボタンを押す。
LINE Messaging APIをLINE Developerで設定する。
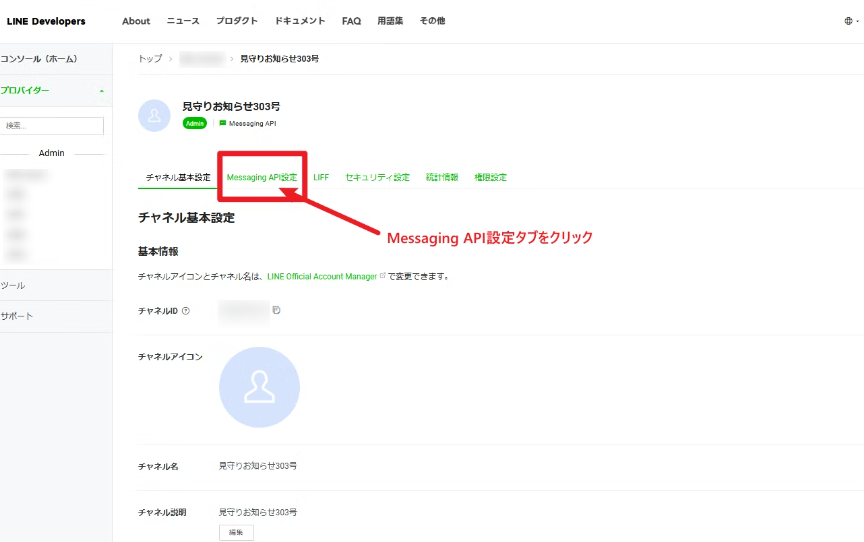
LINE Developersのリンクをクリックして、LINE Developersに移動する。
LINE Developersのトップページの右上のコンソールをクリック。

Messaging API設定の下にあるチャネルアクセストークン(長期)の発行ボタンを押す。
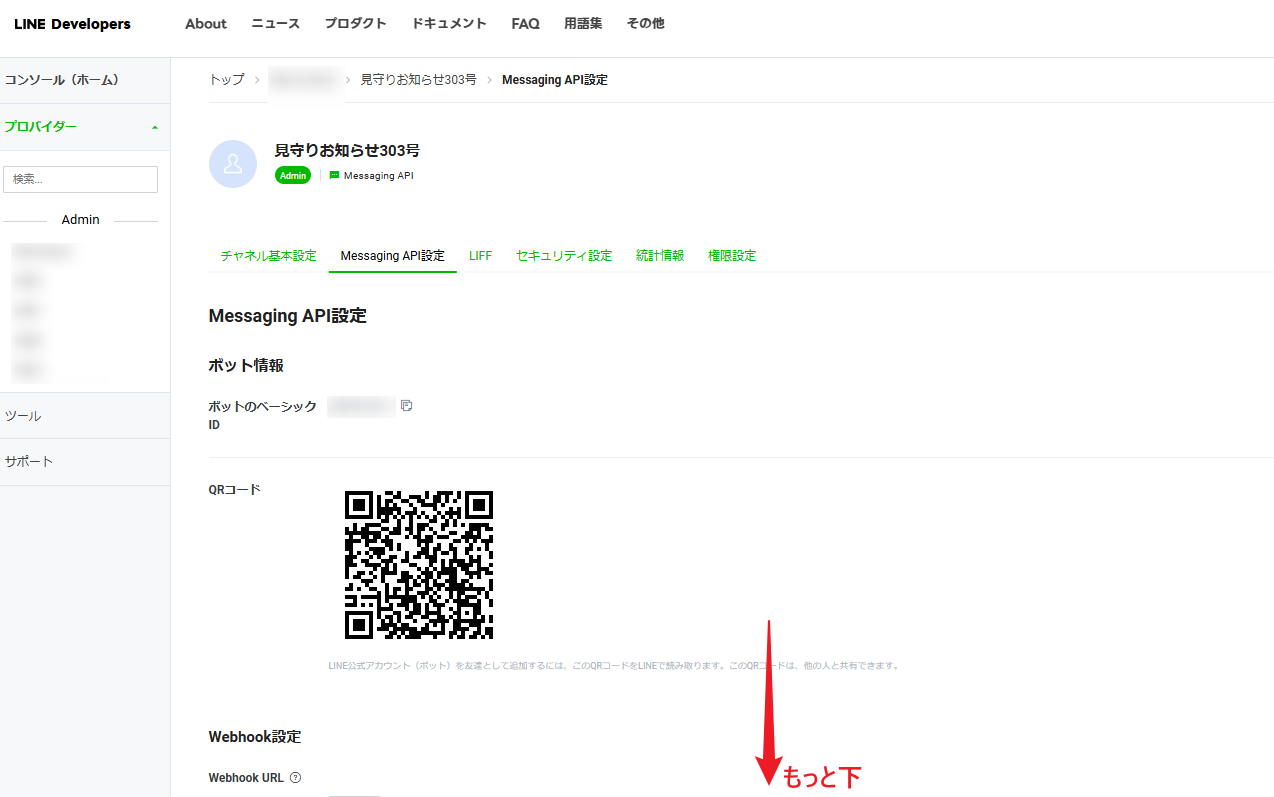
チャネルアクセストークンが発行された後に、
チャネルアクセストークンをコピーする。

ここでLINE Developersの中の操作はここまで。でも、ブラウザーは閉じずにおいておく。GASのデプロイ後のウェブURLを、LINE Developersのwebhookに設定する操作を、後に、行います。
LINEグループを作って、先ほどの公式アカウントを招待してグループに入れる。
LINEグループを作り、先ほど作成・設定した公式アカウントを招待する。
グループの作成法は以下の公式LINEのページを参照して作ってください。「友だちを選択する」の画面では、先ほど作成・設定した公式アカウントを招待してください。
LINEグループ内で、自分(本人)から任意のメッセージを送信することでグループIDを取得する。
Google SpreadSheet & GASを準備する。
Google spreadsheetを新しく作成する。
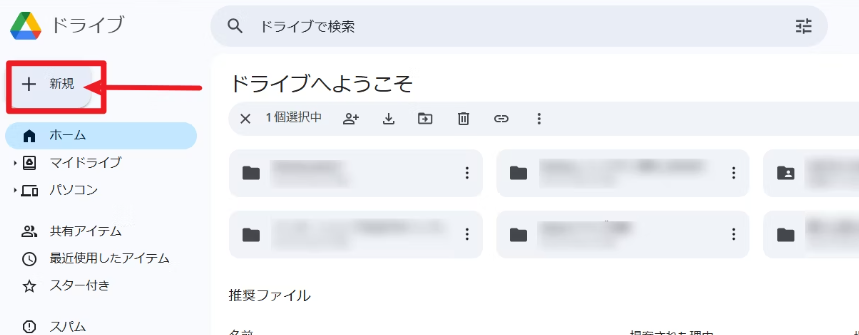
Google Driveに移動する。
左上の「+新規」ボタンを押して、spreadsheetを新規作成する。
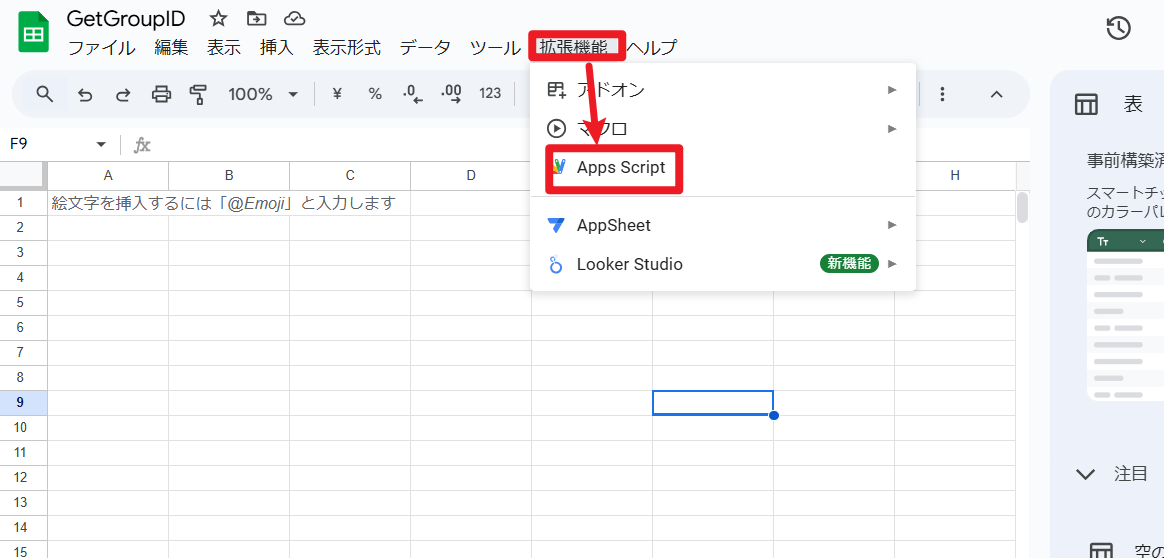
名前を変更(例:GetGroupID等)拡張機能-->Apps Scriptで

名前を変更する(例:GetGroupID等)
初期画面にデフォルトで入っているコードをdelete(消去)する。
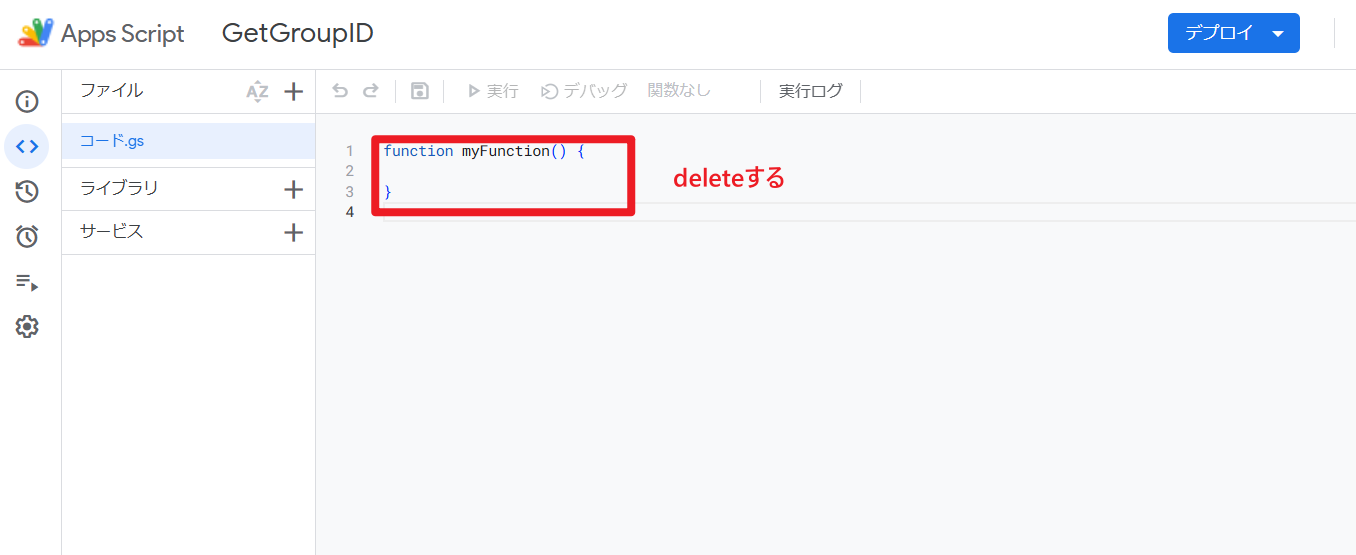
以下のコードをコピーペーストする。
スプレッドシートの URL から取得できます。スプレッドシート名が変わっても、スプレッドシート ID は変わりません。
スプレッドシートIDは、以下のSPREADSHEET_IDの部分です。
https://docs.google.com/spreadsheets/d/SPREADSHEET_ID/edit?gid=SHEET_ID#gid=SHEET_ID
スプレッドシートID(SPREADSHEET_ID)の以下のコードのスプレッドシートIDの部分に入れてください。両端の ' は残します。
function doPost(e) {
  var events = JSON.parse(e.postData.contents).events;
  events.forEach(function(event) {
    if (event.type === 'message' && event.source.type === 'group') {
      var groupId = event.source.groupId;

      // スプレッドシートに記録
      var sheet = SpreadsheetApp.openById('スプレッドシートID').getActiveSheet();
      sheet.appendRow([new Date(), groupId]);
    }
  });
  return ContentService.createTextOutput(JSON.stringify({ 'content': 'post received' }))
    .setMimeType(ContentService.MimeType.JSON);
}
//参考記事  https://zenn.dev/mojakun/articles/5443f647e49998
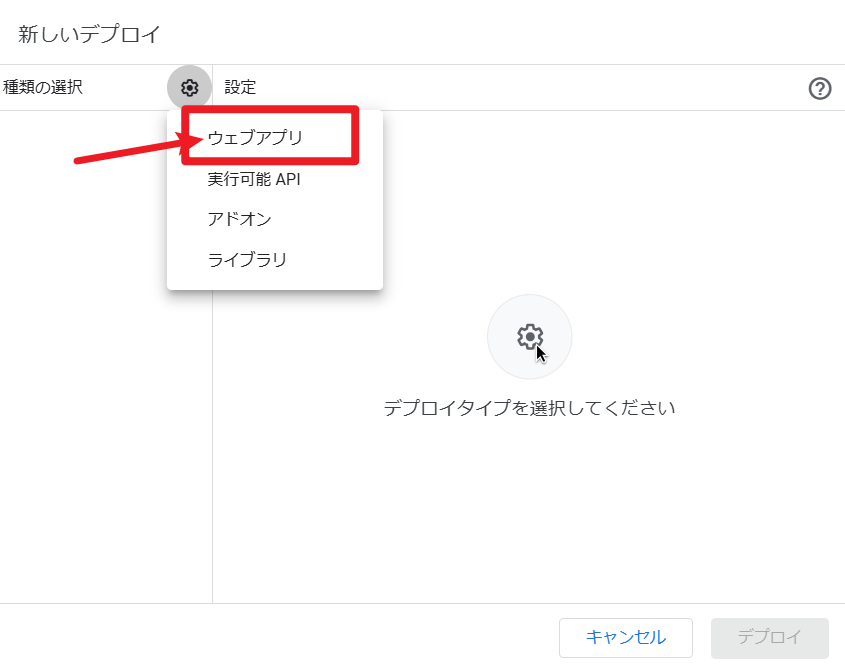
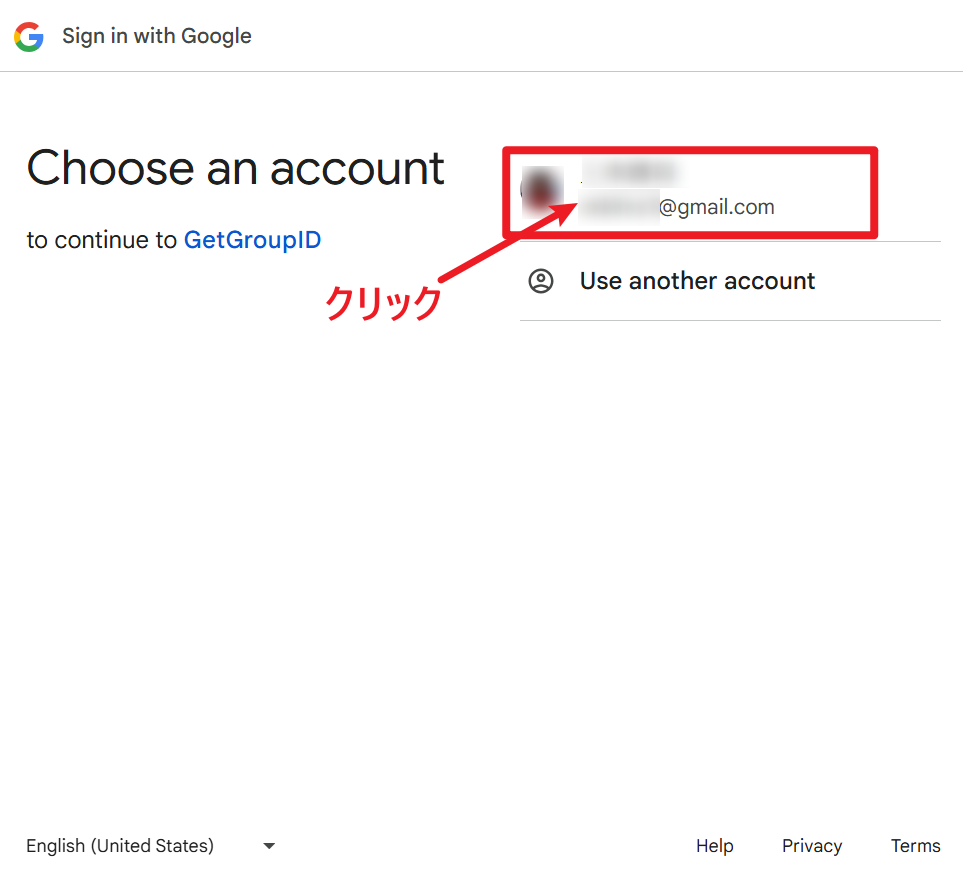
を書いて、デプロイする。
アクセスできるユーザーを「自分のみ」から「全員」に変更する。
その後、デプロイボタンを押す。
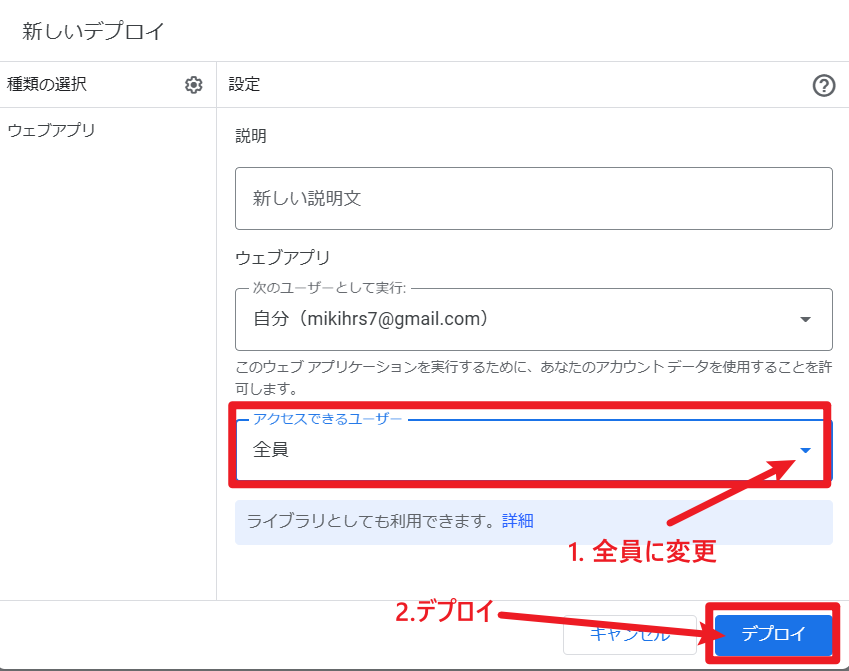
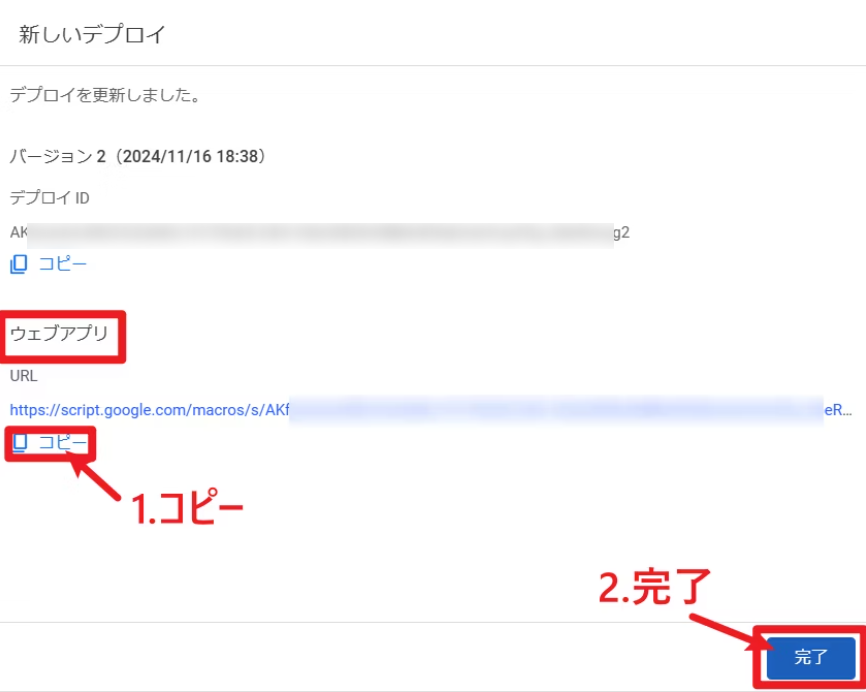
以下の画面が出たら、ウェブアプリURLをコピーして、メモ帳にペーストして保存する。
LINE DevelopersでWebhookを設定する
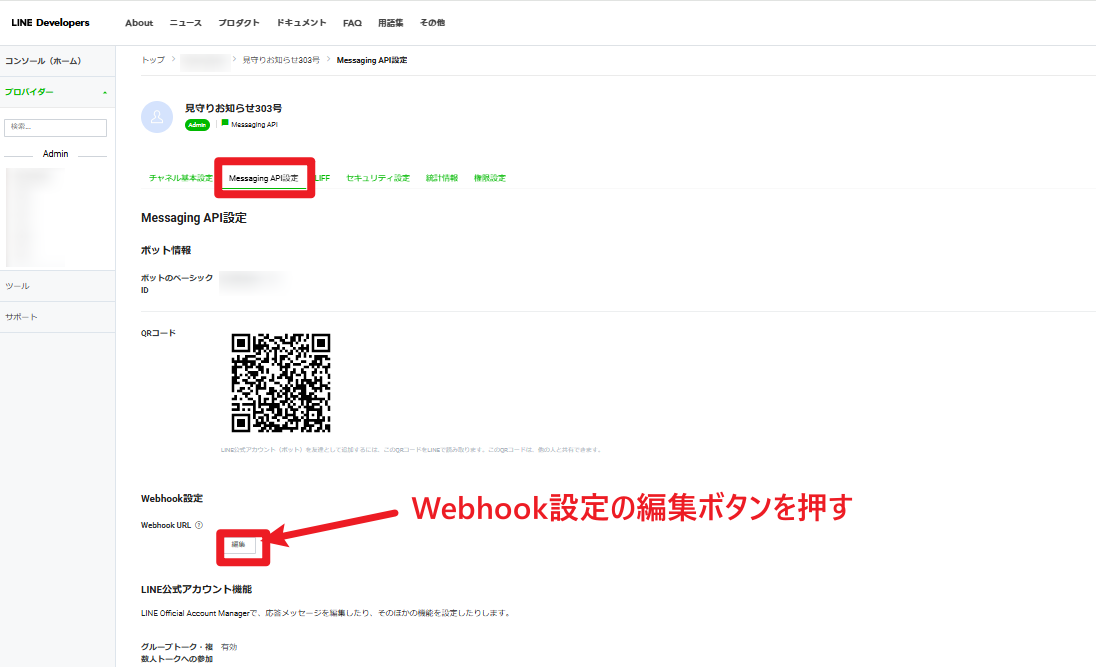
LINE Developersのサイトに行き、MessagingAPI設定のタブ画面のWebhookについて設定する。
Google Apps Script(GAS)でデプロイして発行したウェブアプリURLを入力して、
更新ボタンを押す。
LINE Official Account Managerに移る。
リロードボタンを押す。
リロードしたら、LINE Developersで入力設定したWebhookになるはず。確認し、保存ボタンを押す。
LINEグループからテストメッセージを送る
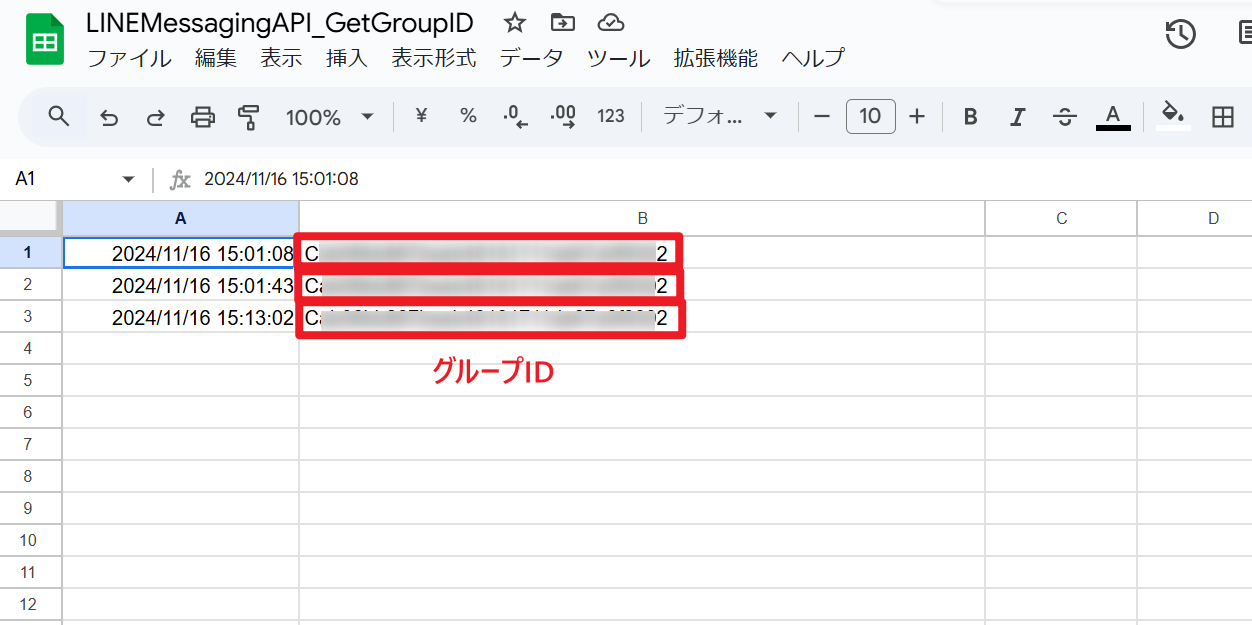
LINEグループIDの取得
LINEグループからテストメッセージを送ると この公式アカウントが参加しているLINEグループのグループIDが、Google Spreadsheetに記入される。
グループIDが取得できたら、LINE developersのMessaging API設定の画面で、「Webhookの利用」
のスイッチをOFFにする。

M5ATOM LiteまたはGoogle Apps Scriptから、CHANNEL ACCESS TOKENとグループIDを含めたデータをプッシュメッセージすることで、LINEグループにメッセージを送る。
M5ATOM Liteから送る。
以下のスケッチをM5ATOM LiteにArduino IDEから書き込む。
https://qiita.com/jksoft/items/4d57a9282a56c38d0a9c
の記事をベースにグループID指定とPUSH送信に変更したスケッチです。
#define CHANNEL_ACCESS_TOKEN "xxxxxxxxxxxxxxxxxxxxxxxxxxxxxxxxxxxxxxxxxxxxxxxxxxxxxxxxxxxxxxxxxxxxxxxxxxxxxxxxxxxxxxxxxxxxxxxxxxxxxxxxxxxxxxxxxxxxxxxxxxxxxxxxxxxxxxxxxxxxxxxxxxxxxxxxxxxxxxxxxxxxxxxxxxxx"

#include <M5Unified.h>
#include <WiFi.h>
#include <HTTPClient.h>

// Wi-FiのSSIDとパスワード
const char* ssid = "xxxxxxxxxxxxx";
const char* password = "xxxxxxxxxxxxxxxxx";

const char* authorization ="Bearer " CHANNEL_ACCESS_TOKEN;

// LINEグループID
const char* lineGroupID = "xxxxxxxxxxxxxxxxxxxxxxxxxxxxxxxxx";

// LINE Messaging API PUSH通知で通知
void notify(char* message) {
  HTTPClient http;
  http.begin("https://api.line.me/v2/bot/message/push");
  http.addHeader("Content-Type", "application/json");
  http.addHeader("authorization", authorization);
  char body[256];
  sprintf(body,"{\"to\":\"%s\",\"messages\":[{\"type\": \"text\",\"text\":\"%s\"}]}", lineGroupID, message);
  http.POST(body);
  Serial.println(http.getString());
  http.end();
}


void setup() {
  auto cfg = M5.config();
  M5.begin(cfg);
  Serial.begin(115200);
  // Wi-Fi接続
  WiFi.begin(ssid, password);
  while (WiFi.status() != WL_CONNECTED) {
    delay(1000);
    Serial.println("Connecting to WiFi...");
  }
  Serial.println("Connected to WiFi");
}


void loop() {
  M5.update();
  if (M5.BtnA.wasPressed()) {
  notify("ボタンが押された");
  }
}
LINEグループにメッセージ「ボタンが押された」が送られてきます。成功。
Microsoft Edge Copilotに教えてもらったスケッチ
Microsoft EdgeのCopilotに「ESP32を搭載したM5Stackから、LINE Messaging APIを使って、LINEグループにPUSH通知するスケッチを教えてください」と聞いたところ、以下のスケッチを教えてくれました。若干改良したけれど、骨格は変更していません。Copilotは神。
#include <M5Unified.h>
#include <WiFi.h>
#include <HTTPClient.h>

// Wi-FiのSSIDとパスワード
const char* ssid = "xxxxxxxxxxxxxxxxx";
const char* password = "xxxxxxxxxxxxxxxxx";

// LINE Messaging APIのチャネルアクセストークン
const char* lineAccessToken = "xxxxxxxxxxxxxxxxxxxxxxxxxxxxxxxxxxxxxxxxxxxxxxxxxxxxxxxxxxxxxxxxxxxxxxxxxxxxxxxxxxxxxxxxxxxxxxxxxxxxxxxxxxxxxxxxxxxxxxxxxxxxxxxxxxxxxxxxxxxxxxxxxxxxxxxxxxxxxxxxxxxxxxxxxxx=";

// LINEグループID
const char* lineGroupID = "xxxxxxxxxxxxxxxxxxxxxxxxxxxxxxxxx";

void sendLinePushNotification(const char* message) {
  if (WiFi.status() == WL_CONNECTED) {
    HTTPClient http;
    http.begin("https://api.line.me/v2/bot/message/push");
    // HTTPヘッダーの設定
    http.addHeader("Content-Type", "application/json");
    http.addHeader("Authorization", String("Bearer ") + lineAccessToken);
    // JSONペイロードの構築
    String payload = "{\"to\":\"" + String(lineGroupID) + "\",\"messages\":[{\"type\":\"text\",\"text\":\"" + String(message) + "\"}]}";
    // HTTP POSTリクエスト
    int httpResponseCode = http.POST(payload);
    // 応答の確認
    if (httpResponseCode > 0) {
      String response = http.getString();
      Serial.println(response);
    } else {
      Serial.println("Error sending notification: " + String(httpResponseCode));
    }
    // HTTP接続を終了
    http.end();
  } else {
    Serial.println("WiFi not connected");
  }
}

void setup() {
  auto cfg = M5.config();
  M5.begin(cfg);
  Serial.begin(115200);
  // Wi-Fi接続
  WiFi.begin(ssid, password);
  while (WiFi.status() != WL_CONNECTED) {
    delay(1000);
    Serial.println("Connecting to WiFi...");
  }
  Serial.println("Connected to WiFi");
}

void loop() {
  M5.update();
  if (M5.BtnA.wasPressed()) {
  sendLinePushNotification("ボタンが押された");
  }
}
LINEグループにメッセージ「ボタンが押された」が送られてきます。成功。
Google Apps Script(GAS)から送る。
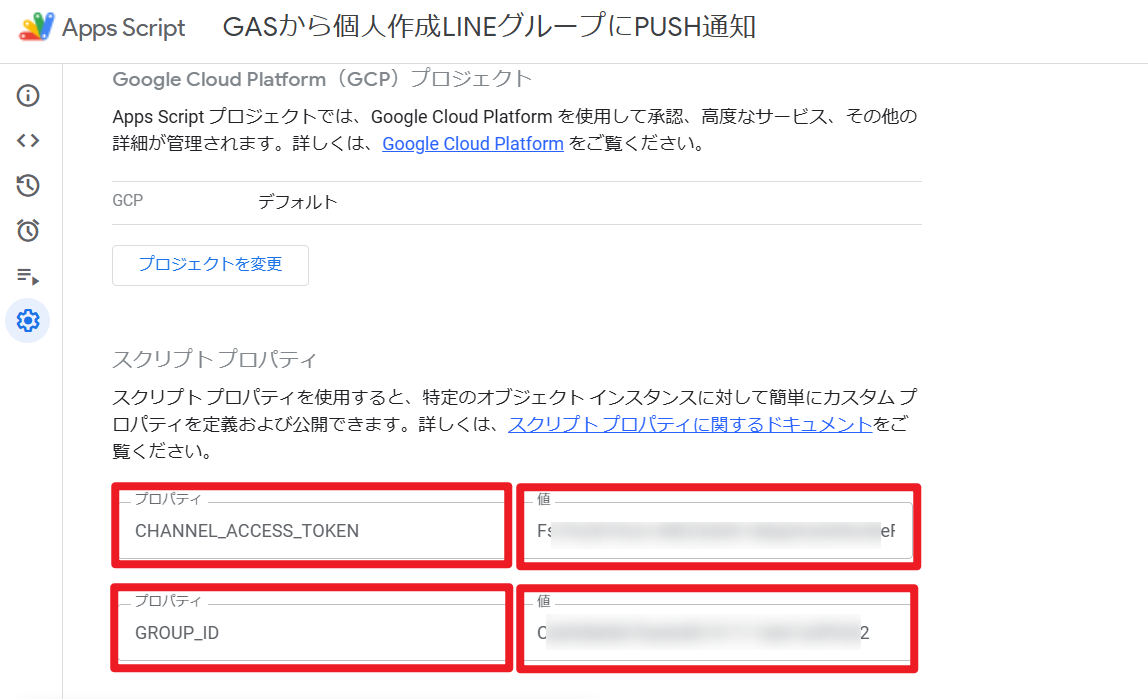
プロジェクトの設定==>スクリプトプロパティの欄で、CHANNEL_ACCESS_TOKEN とGROUP_ID を設定してください。
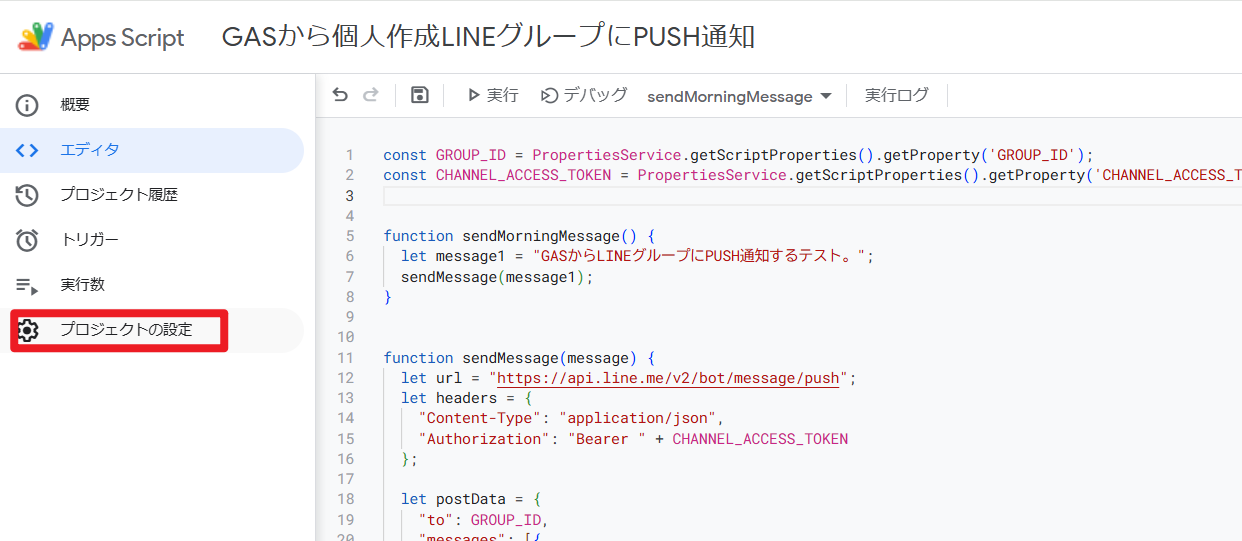
GASのエディタ部分に以下のスクリプトをコピーペーストして、
const GROUP_ID = PropertiesService.getScriptProperties().getProperty('GROUP_ID');
const CHANNEL_ACCESS_TOKEN = PropertiesService.getScriptProperties().getProperty('CHANNEL_ACCESS_TOKEN');


function send_text_Message() {
  let message1 = "GASからLINEグループにPUSH通知するテスト。";
  sendMessage(message1);
}


function sendMessage(message) {
  let url = "https://api.line.me/v2/bot/message/push";
  let headers = {
    "Content-Type": "application/json",
    "Authorization": "Bearer " + CHANNEL_ACCESS_TOKEN
  };

  let postData = {
    "to": GROUP_ID,
    "messages": [{
      "type": "text",
      "text": message
    }]
  };

  let options = {
    "method" : "post",
    "headers": headers,
    "payload" : JSON.stringify(postData)
  };

  UrlFetchApp.fetch(url, options);
}
保存して、function send_text_Message() を実行する。
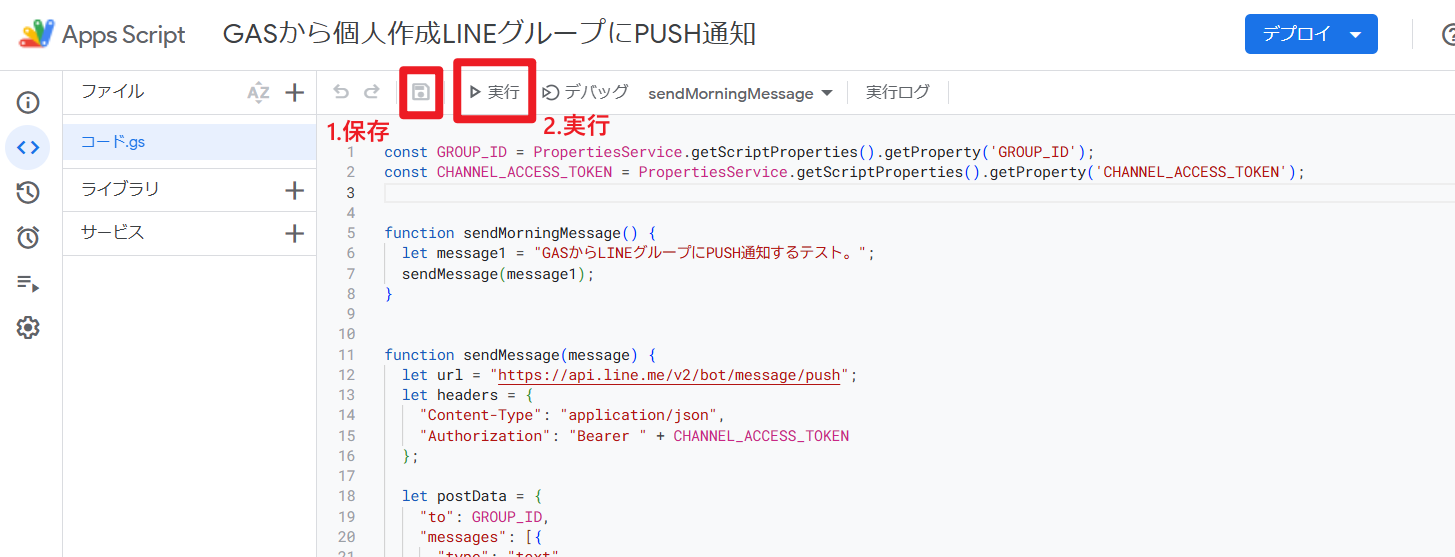
LINEグループにメッセージ「GASからLINEグループにPUSH通知するテスト。」が送られてきます。成功。
LINE Messaging APIを利用して、LINEグループに送られてきた。
一つ目のスケッチを入れたATOMLite、2つ目のスケッチを入れたATOMLite、Google Apps Script(GAS)からのメッセージがLINEに送られてきた画面はこちら。
おわりに
LINE Notifyサービスが終了になるのはとても残念だけれど、月200メッセージ以内の用途だとLINE Messaging APIが無料で使えるので、今後もLINEに大切なメッセージは送りたい。頻繁に見ていて、一番気づきやすいアプリだと思うので。
参考にした記事
https://zenn.dev/mojakun/articles/5443f647e49998
https://qiita.com/jksoft/items/4d57a9282a56c38d0a9c


