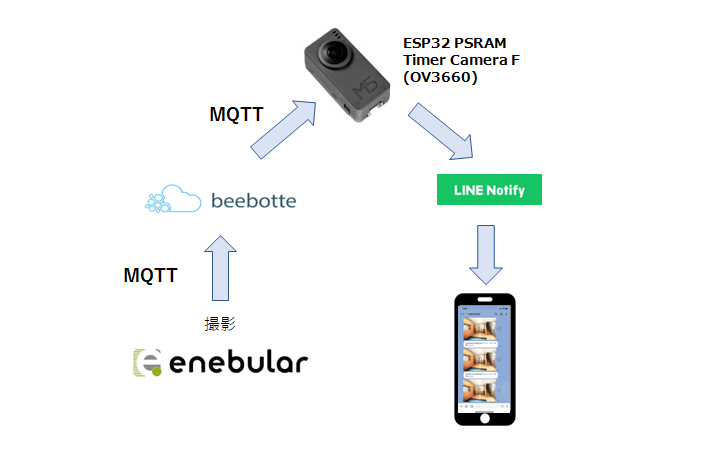
遠くからenebularでシャッターを押して、LINEに写真を送りたい。
遠くからの見守りを考えています。以下の方法で、見守りたいと考えました。
beebotteの準備
以下の記事を参考にBeebotte の MQTT ブローカーを立ち上げる
Beebotte の MQTT ブローカーと Node-RED の MQTT ノードでやり取りをするメモ
https://www.1ft-seabass.jp/memo/2022/02/28/connecting-beebotte-using-nodered/
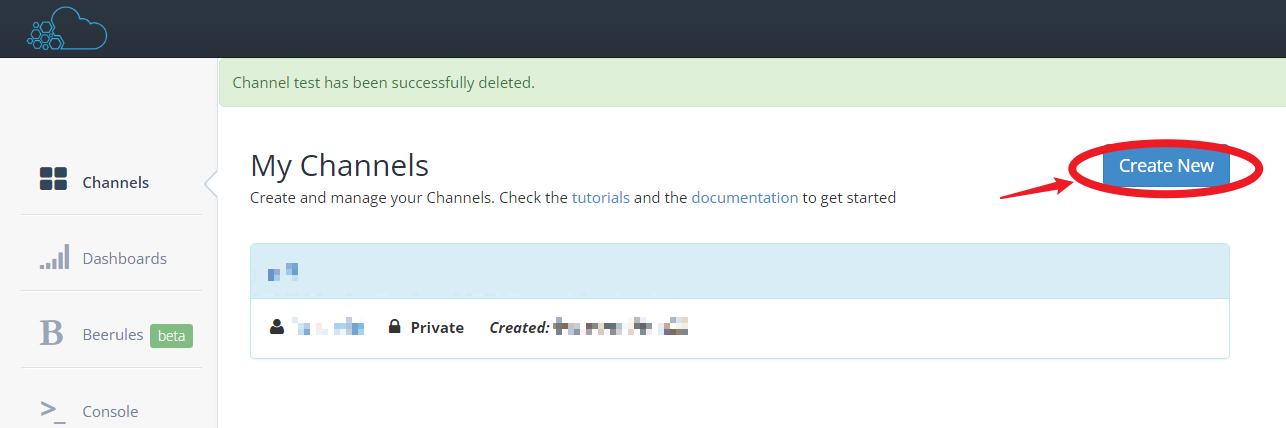
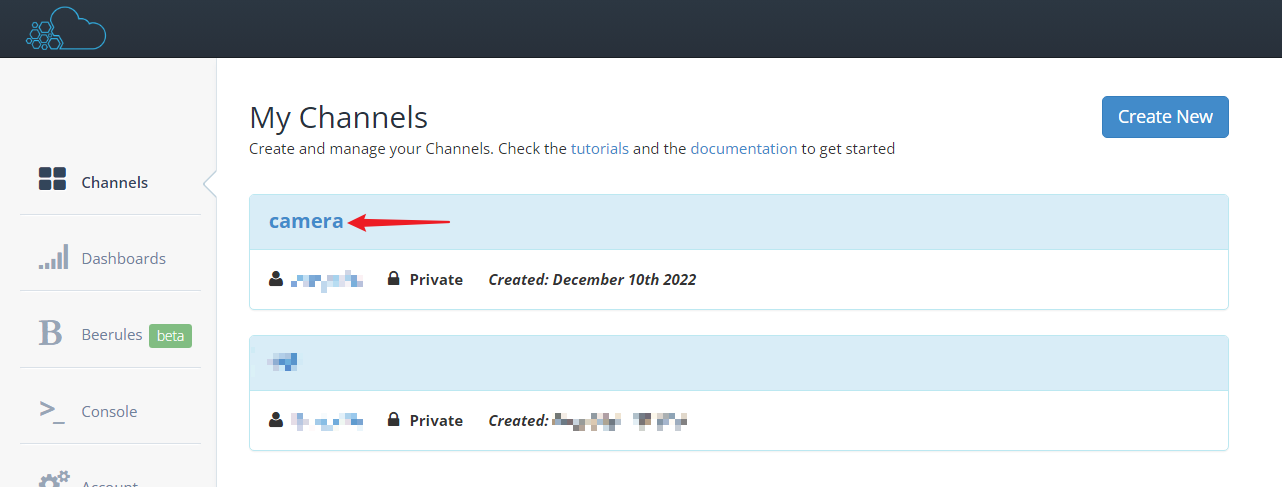
https://beebotte.com/ でアカウント登録後、チャンネルを作成する。「Create New」ボタンを押す。
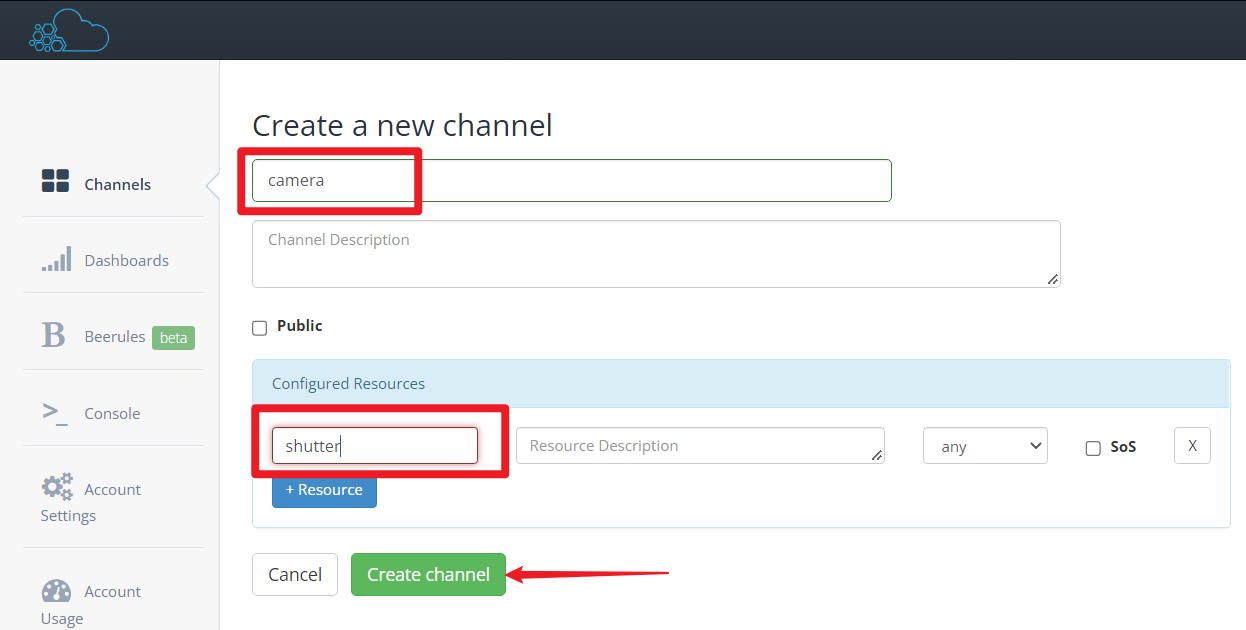
Create a new channelの画面内でChannel Name:camera, Resource name:shutter と入力する。後のスケッチと一致させるために、この名前を入力してください。Create channelを押す。
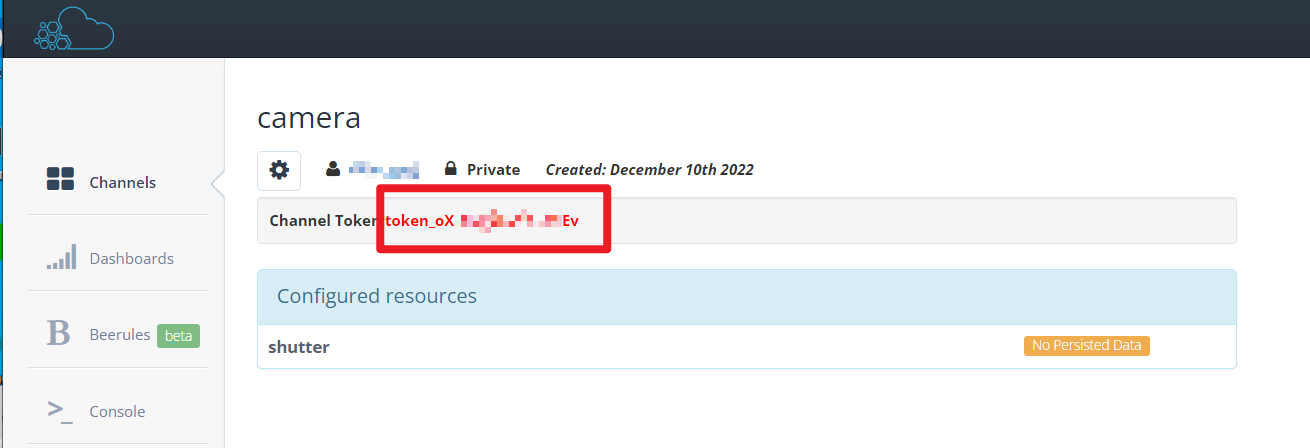
作ったcameraのチャネルを押す。
token_xxxxxxxxxxxxxxxxの部分をコピーして保管する。後のスケッチに書き込みます。
enebularの準備
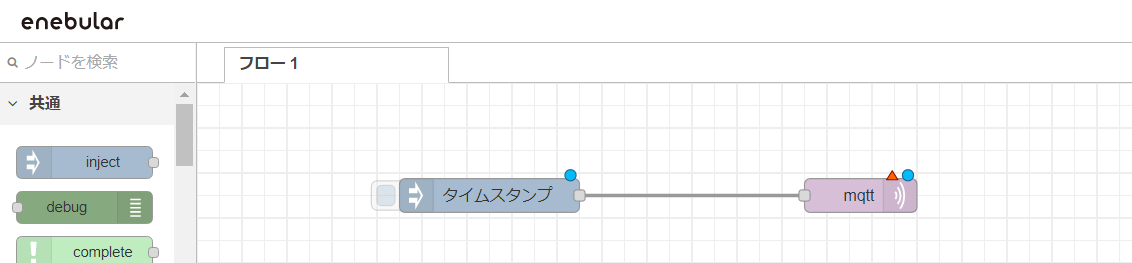
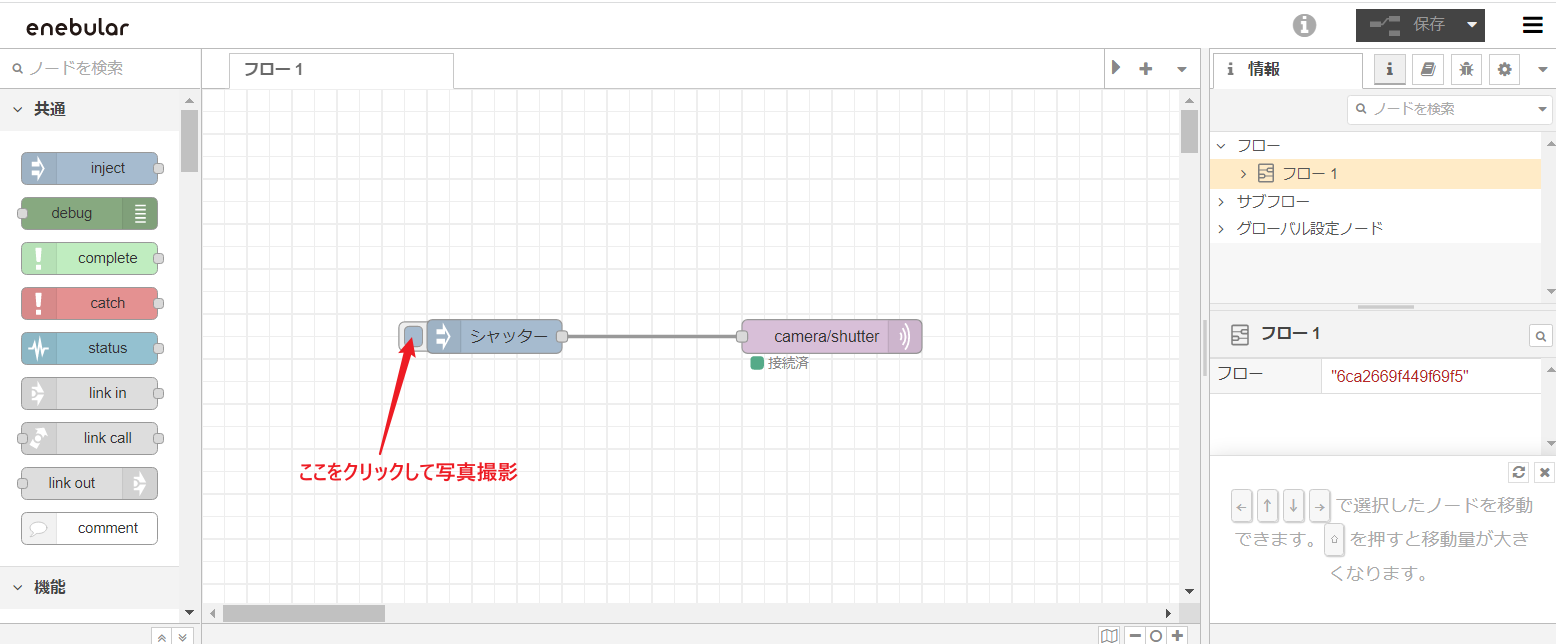
flowに、injectノードとmqtt outノードを置いて、線でつなぐ。
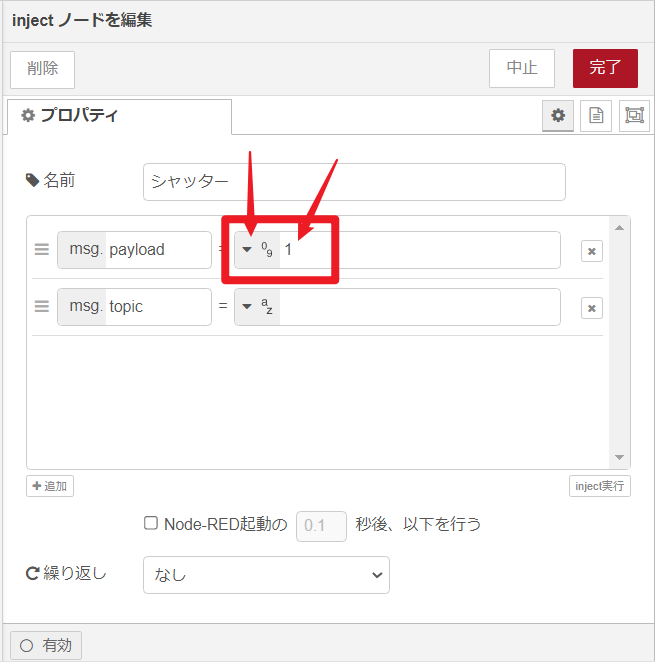
injectノードをダブルクリックして編集する。
msg.payload = の右欄について、まず数値を選択する。次にその右に数値の1を入力する。後のスケッチ内で数値の1を使うので、数値の1を入れてください。
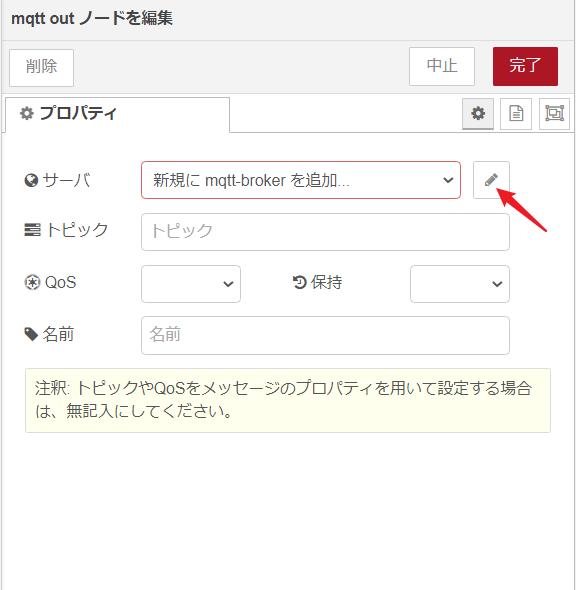
MQTT nodeをダブルクリック
新規にmqtt-brokerを追加のまま 右の鉛筆マークをクリック
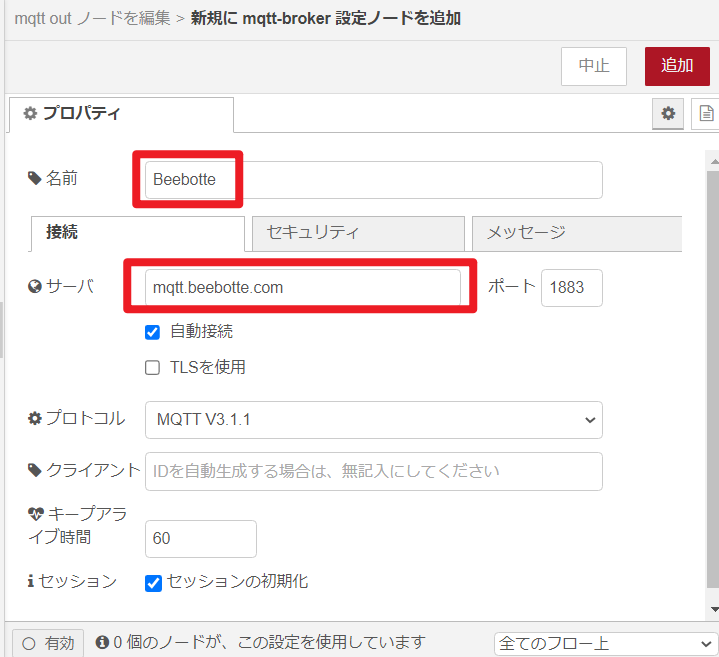
プロパティ内の名前を、Beebotte
接続タブ内で
サーバー:mqtt.beebotte.com
ポート:1883
自動接続:チェック
セッションの初期化:チェック
プロトコル:MQTT V3.1.1
セッションの初期化:チェック
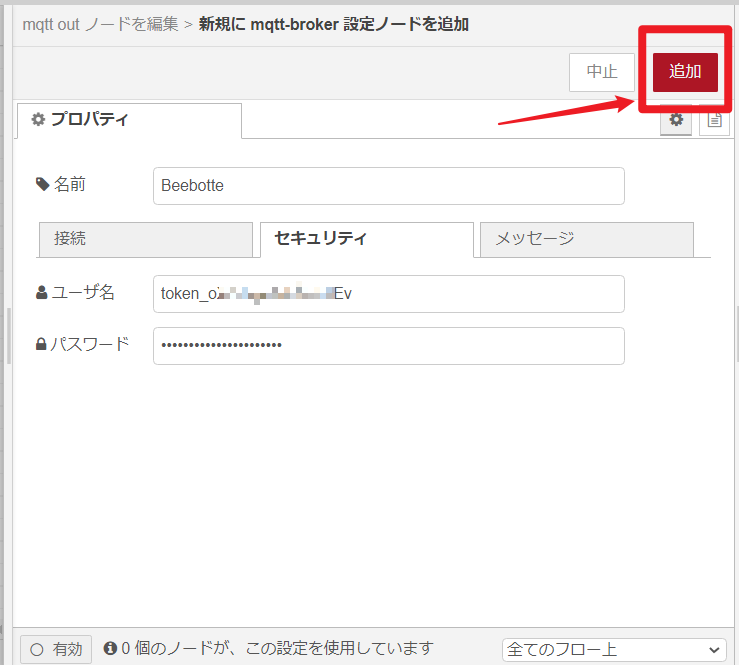
セキュリティタブな内で
ユーザー名:token_xxxxxxxxxxxxxxxxxxx (Beebotteのチャンネルからコピペ保管した)
パスワード:token_xxxxxxxxxxxxxxxxxxx (ユーザー名と同じものを入力)
メッセージタブは、デフォルトのまま。
右上の「追加」ボタンを押して、新規にmqtt-broker設定ノードを追加する
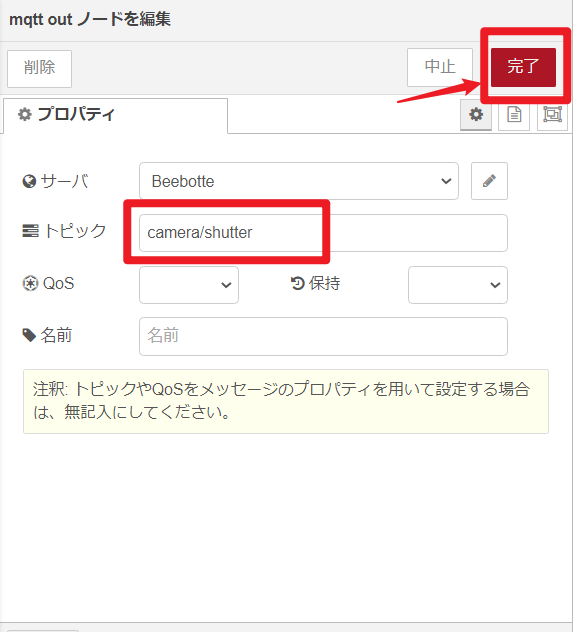
トピック欄に、camera/shutter (beebotteで設定したChannel Name/Resource name)を入力して、完了ボタンを押す。
flowの画面の右上の「保存」ボタンを押す。
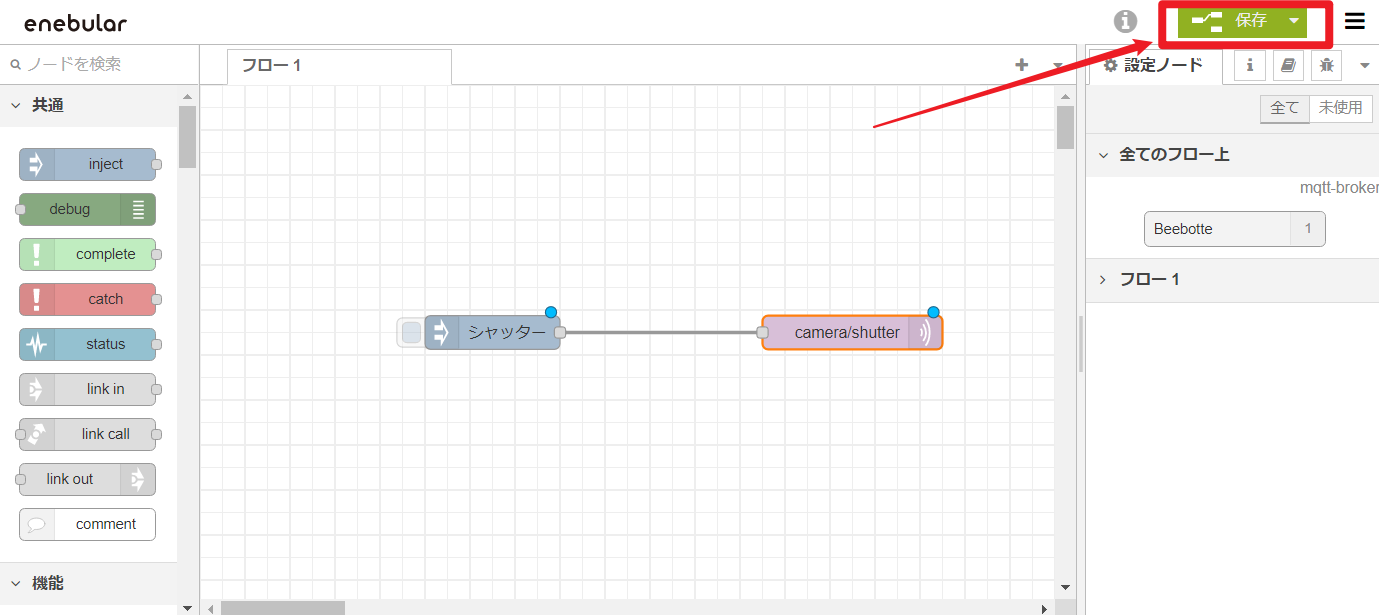
flowの画面の正面上に、「デプロイが成功しました」のメッセージが出るはず。

これでenebularの設定終了。
LINE Notifyを設定する
この記事を参考にしてトークンを発行して、発行したトークンをコピペで保存しておく。
https://zenn.dev/protoout/articles/18-line-notify-setup
TIMER CAMERA Fに書き込む
Arduino IDEの準備
新規にmqtt-brokerを追加のまま 右の鉛筆マークをクリック
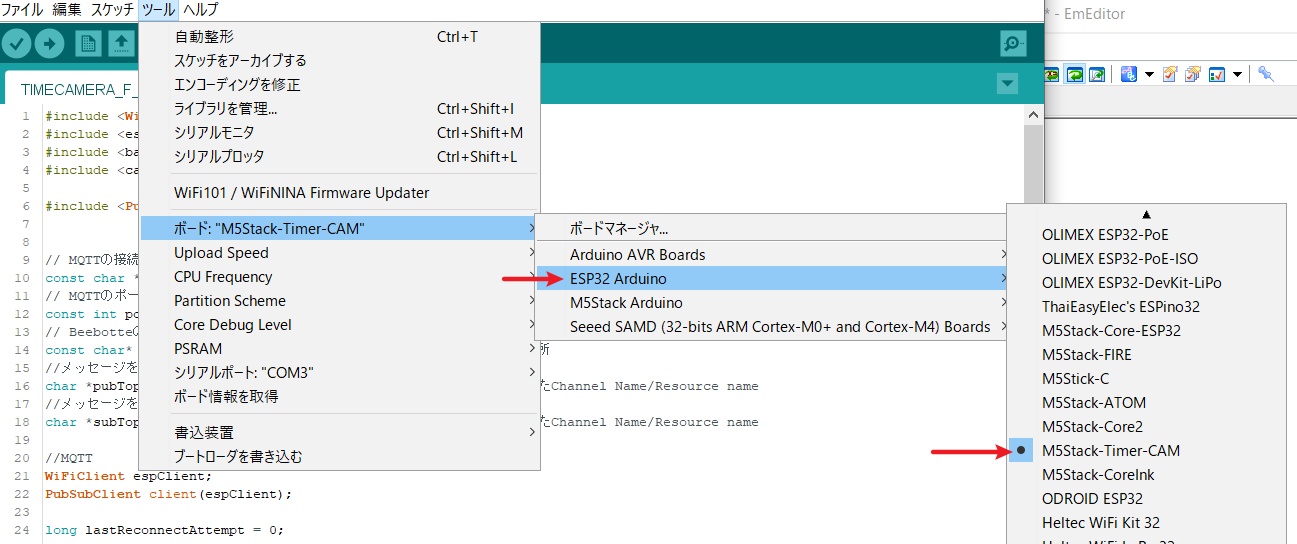
[ツール]メニューから[ボード]→[ESP32 Arduino]→[M5Stack-Timer-CAM]を選ぶ
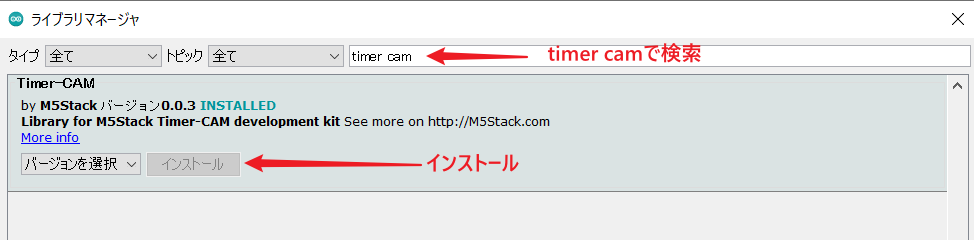
[スケッチ]メニューから[ライブラリをインクルード]→[ライブラリを管理]を選んでライブラリマネージャーを表示する
検索をフィルタのボックスに timer camを入力して、Timer-CAM by M5Stackをインストールする。今回インストールしたバージョンは0.0.3でした。
Arduino IDEから書き込む。
以下のスケッチ内に、以下項目を入力してから書き込む。
- WIFI_SSID
- WIFI_PASS
- LINE Notifyのアクセストークン
- Beebotteで取得したチャネルトークン
- Beebotteで設定したChannel Name/Resource nameをトピックとして。今回の場合はcamera/shutter
#include <WiFiClientSecure.h>
#include <esp_camera.h>
#include <battery.h>
#include <camera_pins.h>
#include <PubSubClient.h>
// MQTTの接続先(Beebotte)のURLを指定
const char *endpoint = "mqtt.beebotte.com";
// MQTTのポート番号を指定
const int port = 1883;
// Beebotteのチャネルトークンを指定
const char* channelToken = "token_xxxxxxxxxxxxxxxxx"; //←変更箇所
//メッセージを知らせるトピックを指定
char *pubTopic = "camera/shutter"; //←変更箇所 beebotteで設定したChannel Name/Resource name
//メッセージを待つトピックを指定
char *subTopic = "camera/shutter"; //←変更箇所 beebotteで設定したChannel Name/Resource name
//MQTT
WiFiClient espClient;
PubSubClient client(espClient);
long lastReconnectAttempt = 0;
const char chars[] = "abcdefghijklmnopqrstuvwxyzABCDEFGHIJKLMNOPQRSTUVWXYZ 1234567890";
char id[17];
// MQTTのクライアントID用としてランダムIDを生成
const char *generateID() {
randomSeed(analogRead(0));
int i = 0;
for(i = 0; i < sizeof(id) - 1; i++) {
id[i] = chars[random(sizeof(chars))];
}
id[sizeof(id) - 1] = '\0';
Serial.print("clientid: ");
Serial.println(String(id));
return id;
}
#define WIFI_SSID "xxxxxxxxx" //←変更箇所
#define WIFI_PASS "xxxxxxxxx" //←変更箇所
#define ACCESS_TOKEN "xxxxxxxxxxxxxxxxxxxxxxxxxxxxxxxxxxxxxxxxxxx" //←変更箇所 Line Notifyで取得したアクセストークンを入力する。
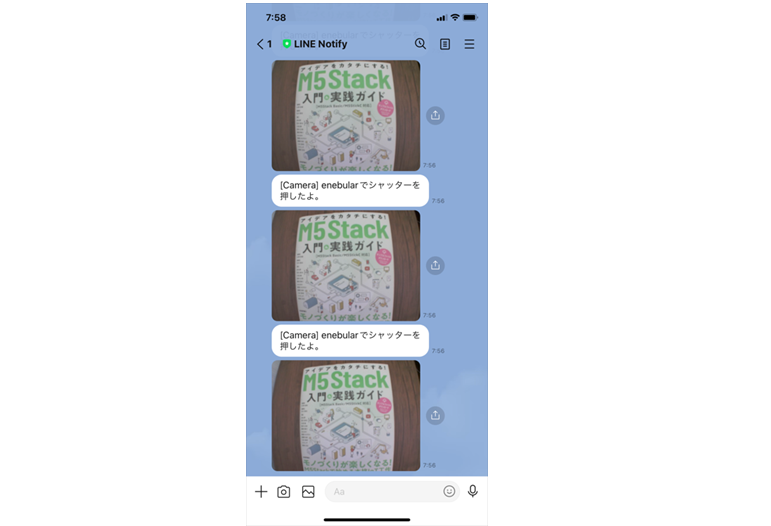
#define MESSAGE "enebularでシャッターを押したよ。" //←変更箇所 写真と共に送られるメッセージ
#define CAMERA_VFLIP 1 // カメラの設置向きで変更する(1:通常 0:逆さ)
#define CAMERA_DELAY 1000 // 写真を撮るまでの待ち時間(ミリ秒)
// 通知メッセージ作成用の部品
#define BOUNDARY "------------------------133747188241686651551404"
#define PARTS1 "\r\nContent-Disposition: form-data;"
#define PARTS2 " name=\"message\"\r\n\r\n"
#define BODY_MESSAGE "\r\n--" BOUNDARY PARTS1 PARTS2 MESSAGE
#define PARTS3 "\r\nContent-Disposition: form-data;"
#define PARTS4 " name=\"imageFile\"; filename=\"picture.jpg\""
#define BODY_IMAGEFILE "\r\n--" BOUNDARY PARTS3 PARTS4 "\r\n\r\n"
#define BODY_END "\r\n--" BOUNDARY "--\r\n"
//コールバック用の関数
void callback(char* topic, byte* payload, unsigned int length) {
Serial.print("Message arrived ["); //トピック名を出力
Serial.print(topic);
Serial.print("] ");
payload[length] = '\0'; //受信メッセージをString型に変換
String msg = String((char*) payload);
Serial.println(msg);
//M5.Lcd.setCursor(0, 0); //カーソル位置をx=0 y=0で初期化
//受信したメッセージの内容で分岐
if (msg == "1") {
Serial.println("Just send photo"); // ログに表示
delay(CAMERA_DELAY); // 少し待つ
sendPhoto(); // 写真を撮ってLINEに送る
}
}
//切断時に再接続する
boolean reconnect() {
//再接続を試行
if (client.connect(generateID(), channelToken, "")) {
//接続が完了したらpublish
client.publish(pubTopic, "hello from m5stack");
//サブスクライブする
client.subscribe(subTopic);
Serial.println("Connected to Beebotte MQTT");
//M5.Lcd.println("Connected to Beebotte MQTT");
}
return client.connected();
}
boolean triggerswitch = false; // ボタン状態フラグ
// カメラの初期化(参考:web_camのサンプルコード)
void initCamera() {
camera_config_t config;
config.ledc_channel = LEDC_CHANNEL_0;
config.ledc_timer = LEDC_TIMER_0;
config.pin_d0 = Y2_GPIO_NUM;
config.pin_d1 = Y3_GPIO_NUM;
config.pin_d2 = Y4_GPIO_NUM;
config.pin_d3 = Y5_GPIO_NUM;
config.pin_d4 = Y6_GPIO_NUM;
config.pin_d5 = Y7_GPIO_NUM;
config.pin_d6 = Y8_GPIO_NUM;
config.pin_d7 = Y9_GPIO_NUM;
config.pin_xclk = XCLK_GPIO_NUM;
config.pin_pclk = PCLK_GPIO_NUM;
config.pin_vsync = VSYNC_GPIO_NUM;
config.pin_href = HREF_GPIO_NUM;
config.pin_sscb_sda = SIOD_GPIO_NUM;
config.pin_sscb_scl = SIOC_GPIO_NUM;
config.pin_pwdn = PWDN_GPIO_NUM;
config.pin_reset = RESET_GPIO_NUM;
config.xclk_freq_hz = 20000000;
config.pixel_format = PIXFORMAT_JPEG;
config.frame_size = FRAMESIZE_UXGA;
config.jpeg_quality = 10;
config.fb_count = 1;
esp_err_t err = esp_camera_init(&config);
if (err != ESP_OK) {
Serial.printf("Camera init failed with error 0x%x", err);
return;
}
sensor_t *s = esp_camera_sensor_get();
s->set_vflip(s, CAMERA_VFLIP);
s->set_hmirror(s, !CAMERA_VFLIP);
}
// Wi-Fiの初期化
void initWiFi() {
WiFi.begin(WIFI_SSID, WIFI_PASS); // Wi-Fiに接続
Serial.print("Connecting"); // 接続中のログ表示
while (WiFi.status() != WL_CONNECTED) { // 繋がるまでループ
Serial.print("."); // ログに「.」を表示
delay(1000); // 1秒待つ
}
// 接続したSSIDをログに表示
Serial.println(String("\nConnected to ") + WiFi.SSID());
}
// 写真を撮ってLINEに送る
void sendPhoto() {
// 写真を撮影
camera_fb_t *fb = esp_camera_fb_get();
// ボディのサイズを計算
int content_len = strlen(BODY_MESSAGE) + strlen(BODY_IMAGEFILE)
+ fb->len + strlen(BODY_END);
// LINE Notify APIサーバーに接続し、POSTリクエストを送信
WiFiClientSecure client;
client.setInsecure(); // 証明書の検証をスキップする
client.connect("notify-api.line.me", 443);
client.println("POST /api/notify HTTP/1.0");
// ヘッダーを送信
client.println("Authorization: Bearer " ACCESS_TOKEN);
client.println("Content-Type: multipart/form-data; boundary=" BOUNDARY);
client.println(String("Content-Length: ") + content_len);
client.println();
// ボディを送信
client.write((uint8_t *)BODY_MESSAGE, strlen(BODY_MESSAGE));
client.write((uint8_t *)BODY_IMAGEFILE, strlen(BODY_IMAGEFILE));
uint8_t *send_pointer = fb->buf;
for (int remaining = fb->len; remaining > 0; remaining -= 10240) {
client.write(send_pointer, remaining > 10240 ? 10240 : remaining);
send_pointer += 10240;
}
// ボディの終了を送信
client.write((uint8_t *)BODY_END, strlen(BODY_END));
// サーバーからレスポンスが返ってきたら、ログに表示し接続を終了する
while (!client.available()) {
delay(10);
}
Serial.println(String("Sent request to LINE.\nResponse : ")
+ client.readStringUntil('\n'));
client.stop();
}
void setup() {
Serial.begin(115200); // シリアルモニタの通信速度
bat_init(); // バッテリーの初期化
bat_disable_output(); // USBが繋がっていない時は電源を切る
pinMode(2, OUTPUT); // LEDのGPIOを出力モードに設定
digitalWrite(2, HIGH); // LEDを点ける
pinMode(13, INPUT); // ドアスイッチのGPIOを入力モードに設定
initCamera(); // カメラの初期化
initWiFi(); // Wi-Fiの初期化
client.setServer(endpoint, port); //MQTT
client.setCallback(callback); //MQTT
}
void loop() {
if (digitalRead(13) == HIGH) { // BUTTONを押したとき
if (!triggerswitch) { // BUTTON状態確認
triggerswitch = true; // BUTTON_ON
Serial.println("Just send photo"); // ログに表示
delay(CAMERA_DELAY); // 少し待つ
sendPhoto(); // 写真を撮ってLINEに送る
}
} else {
triggerswitch = false; // BUTTON_OFF
}
//接続が切れてしまった場合に再接続を試行
if (!client.connected()) {
long now = millis();
if (now - lastReconnectAttempt > 5000) {
lastReconnectAttempt = now;
//再接続を試行
if (reconnect()) {
lastReconnectAttempt = 0;
}
}
} else {
//接続できている場合
client.loop();
}
delay(100); // 100ミリ秒待つ
}
動作確認
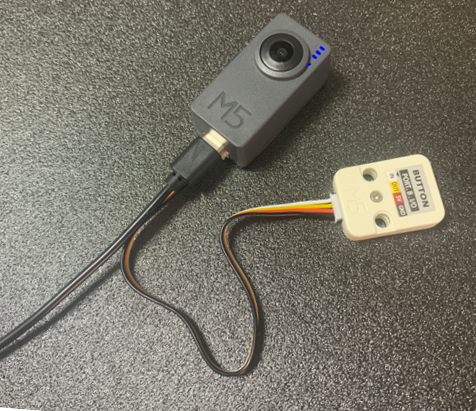
物理シャッターもあると便利。M5Stack用ボタンユニットをgroveケーブルで接続します。使わないときは外しておいてもいい。
enebularからシャッターボタンを押す。
LINE Notifyで写真が来た!
(参考にした技術書籍)
1.アイデアをカタチにする!M5Stack入門&実践ガイド(技術評論社) 4.7 M5Stack同士をMQTTで連携する
2.メイカーズ工作工房 M5StackではじめるIoT電子工作(伊藤浩之著)(Gihyo Digital Publishing) Chapter3 LINEに通知できる防犯カメラを作る
(使ったIoT・パーツ)
ESP32 PSRAM Timer Camera F (OV3660)
https://www.switch-science.com/products/6786?_pos=1&_sid=cdd68811e&_ss=r
商品コード: M5STACK-U082-F ¥3,267
なお、ESP32 PSRAM Timer Camera X (OV3660)でも同じスケッチで動作します。
M5Stack用ボタンユニット [U027]
https://www.switch-science.com/products/4047?_pos=5&_sid=059291001&_ss=r
商品コード: M5STACK-BUTTON-UNIT ¥385
最後に
これで、遠隔においたカメラのシャッターをenebularで押せて、LINEで写真が入手できてガッツポーズ!!
さらに
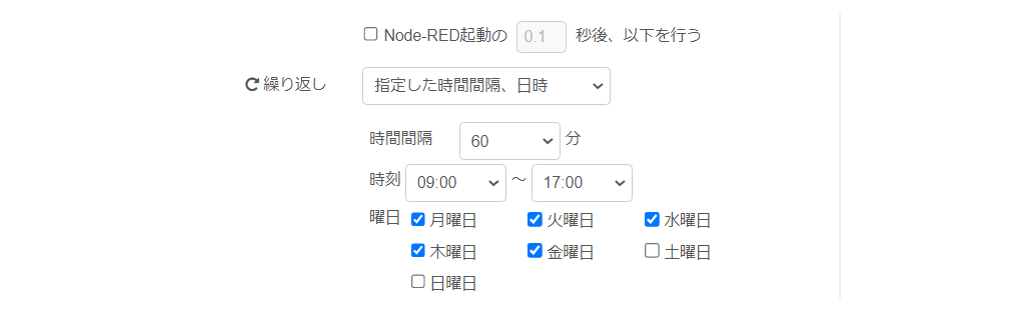
injectノード内の繰り返しを設定すれば、指定した時間間隔、日時で自動撮影して
LINEで写真が自動入手できて、さらにガッツポーズ!!