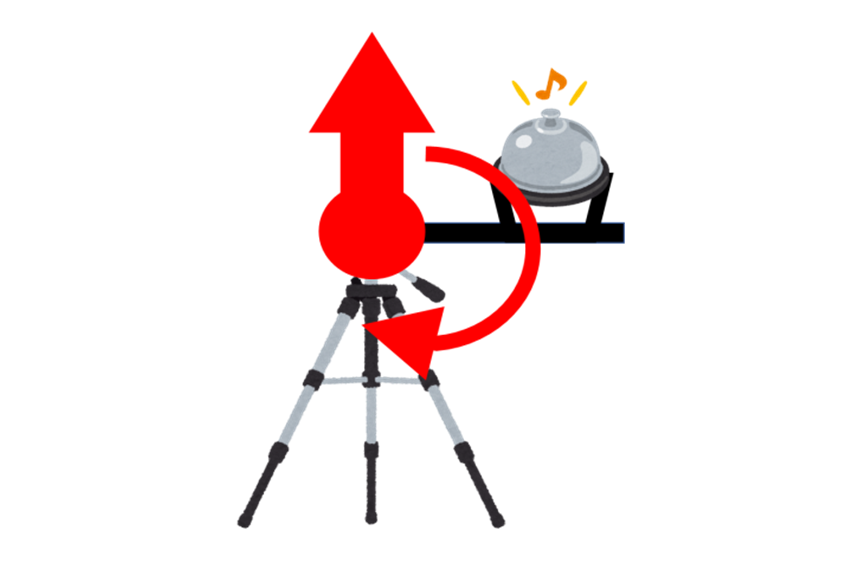
プレゼンの時間、守られていないこと多いですね
時間厳守を主張するプレゼンタイマーを作りました
動作説明
M5StackとBLEペアリングしてLINE Things連携したら、Obnizがステッピングモーターとソレノイドバルブを動かす仕組みになっています。
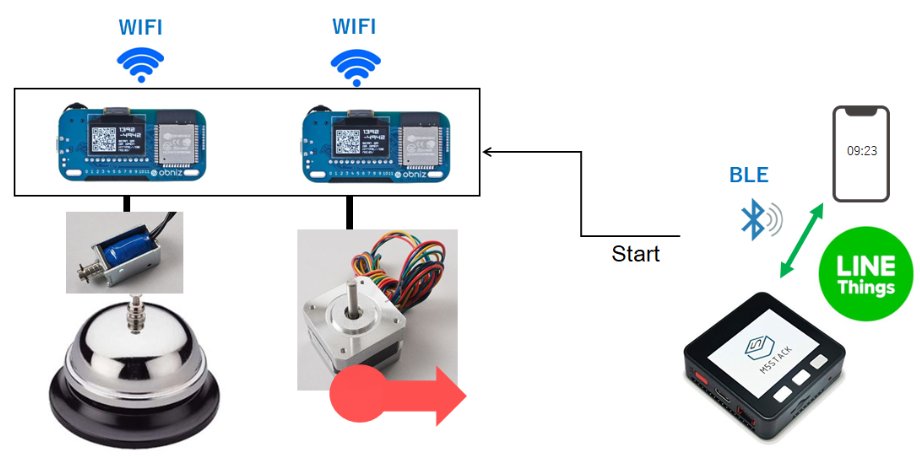
M5stackとLINE Things連携
準備
-
Arduinoダウンロード
https://www.arduino.cc/ -
Git
特にWindowsで初めての人はダウンロード
https://gitforwindows.org/ -
Arduinoのボードマネージャーの URLに以下を追加
URL: https://dl.espressif.com/dl/package_esp32_index.json
ツール -> ボード -> ボードマネージャ
esp32 と打ち込んで インストール
ツール -> ライブラリを管理
M5Stack とと打ち込んで M5Stackのライブラリをインストール
- USB-UARTドライバをインストール
https://www.silabs.com/products/development-tools/software/usb-to-uart-bridge-vcp-drivers
Messaging APIでチャネル作成する
LINEにログイン
https://developers.line.biz/ja/
LINE Messaging APIの作成
新規チャネル作成
Messaging APIでチャネル作成する
LIFFをクリック
LIFFアプリを作成
LIFFの追加画面で
名前: presentation_timer
サイズ: Full
エンドポイント: https://xxxxxx.xxxx.xx.xx/timer_start.html
(timer_start.htmlをエンドポイントとする)
オプション: BLE feature [ON]
こうして作ったLINE botを自分のスマホのLINE上から友達申請
LINE Thingsのプロダクト登録
LINE Thingsを利用するためにプロダクトと呼ばれるものをLINE側に登録する必要がある。
1.アクセストークンを取得する。
2.プロダクト登録は、LINE Things Scenario-Set Generator(永遠のβ版)(n0bisukeさん作)を使う。
https://n0bisuke.github.io/linethingsgen/
2-1. Setting -> アクセストークンで先ほどのアクセストークンを設定します。
2-2. Create Product -> LIFFアプリを選択で先程つくったLIFFアプリを選択します
トライアルプロダクトは後でも表示されるので、「(自分の名前)-M5Stack(デバイス名)」とかにして自分のデバイスを見つけやすく設定する。
2-3. シナリオセットを登録。
(シナリオセットとは、端末が動作したときに「LINE側で何を行うのか」を決めるもの)
トライアルプロダクト: さきほど登録したもの
自動切断: OFF
トリガー: BLE_NOTIFICATION
アクション: すべて空
このシナリオは「端末側から通知を受け取ったら、LINE側はなにもしない」というシナリオ。
ArduinoでLINE Things用ファームウェアをM5Stackに書き込む
ArduinoでLINE Thingsに対応したファームウェアをM5Stackに書き込みます。
LINE Things Starter
LINE Things用のサンプルのArduinoコードを使う。
https://github.com/line/line-things-starter
クローンするかダウンロード
クローンする場合
$ git clone https://github.com/line/line-things-starter
ダウンロードする場合
githubの画面右上のClone or downloadボタン
M5StackをUSBケーブルでPCとつなげる
ボードから M5Stack-Core-ESP32 を選択
シリアルポートにCOM1のような情報が表示されているか確認して選択。
さきほど、cloneあるいはダウンロードしてきたline-things-starterのフォルダを開いて
以下のパスのファイルを開く。
line-things-starter/m5stack/arduino/sample/sample.ino
以下の3点を書き換える
// Device Name: Maximum 30 bytes
 // 「(自分の名前)-M5Stack(デバイス名)」にするMy Name
 #define DEVICE_NAME "MyNameM5Stack"

 // User service UUID: Change this to your generated service UUID
 // このサービスIDは先程記録したServiceUUID を登録
 #define USER_SERVICE_UUID "xxxxxxxxx-xxxx-xxxxx-xxxx-xxxxxxxxxxxx"

 // User service characteristics
 // これは今回使わないので変更しない!
 #define WRITE_CHARACTERISTIC_UUID "E9062E71-9E62-4BC6-B0D3-35CDCD9B027B"

 // このUUIDを先程記録したものを登録
 #define NOTIFY_CHARACTERISTIC_UUID "xxxxxxxx-xxxx-xxxx-xxxx-xxxxxxxxxxxx"
これでコンパイル、動作確認。
「Ready to Connect」という画面になったらOK。
スマホとのBLE接続を待っている状態なので、LINEとつなげる。
ここからはスマホ上で、実際にM5Stackと接続していく。
うまくいっていれば、画面上にさきほど「トライアルプロダクト登録」で登録したプロダクト名が表示されているはず。
画面上で、すべて「接続」や「許可」を押して行って接続する。
マイデバイスにデバイスが追加されていればOK。
これで、M5StackデバイスとBLEでLINE Things連携したときに、LIFF設定画面で設定したエンドポイント https://xxxxxx.xxxx.xx.xx/timer_start.html が立ち上がることになります。
ということで、LIFF本来の機能を全く使わずに、このエンドポイントの起動のみを使ったものとなっています。
2つのObnizを使ってステッピングモーターとソレノイドバルブを動かす
<html>
<head>
  <meta charset="utf-8">
  <script src="https://obniz.io/js/jquery-3.2.1.min.js"></script>
  <script src="https://unpkg.com/obniz@2.2.0/obniz.js" crossorigin="anonymous"></script>
</head>

<div id="obniz-debug"></div>
<h1>主張するプレゼンタイマー</h1>
<img src="https://xxxxxx.xxxx.xx.xx/fig/xxxx.jpg" alt="Stepping_motor" width="310" align="left">
<br>
<h1><div id="print"></div></h1>
<br>
<h1 align="center">アナログタイマーをスタートした!</h1>


<script>

var obniz = new Obniz("XXXX-XXXX");
var waitTime = 40000;

obniz.onconnect = async function () {

  obniz.display.clear();
  obniz.display.print("motor start!!");

//
var motor = obniz.wired("StepperMotor", {a:0, aa:1, b:2, bb:3});
motor.stepType('1');
motor.speed(6.6);
await motor.stepWait(267);
motor.speed(200);
await motor.stepWait(-266);
motor.speed(200);
await motor.stepWait(267);
motor.speed(6.6);
await motor.stepWait(68);
motor.speed(200);
await motor.stepWait(-333);
motor.speed(200);
await motor.stepWait(333);
motor.speed(6.6);
await motor.stepWait(66);
motor.speed(200);
await motor.stepWait(400);
motor.speed(200);
await motor.stepWait(-400);
motor.speed(200);
await motor.stepWait(1200);


 // display
obniz.display.clear();
obniz.display.print("Stepping Start");
};

var obniz2 = new Obniz("YYYY-YYYY");
obniz2.onconnect = async function () {

obniz2.display.clear();
obniz2.display.print("bell start!");

var solenoid = obniz2.wired('Solenoid', {gnd:0, signal:1});

await obniz2.wait(waitTime);

solenoid.click();
solenoid.off();
await obniz2.wait(11000);

solenoid.click();
solenoid.off();
await obniz2.wait(1000);
solenoid.click();
solenoid.off();
await obniz2.wait(10000);

solenoid.click();
solenoid.off();
await obniz2.wait(1000);
solenoid.click();
solenoid.off();
await obniz2.wait(1000);
solenoid.click();
solenoid.off();

// displayに反映
obniz2.display.clear();
obniz2.display.print("bell end.");
};

</script>

<body>
  <h1 align="center">発表時間1分</h1>
</body>

</html>
上記timer_start.htmlをどこかのサーバーに置く。https://xxxxxx.xxxx.xx.xx/timer_start.html
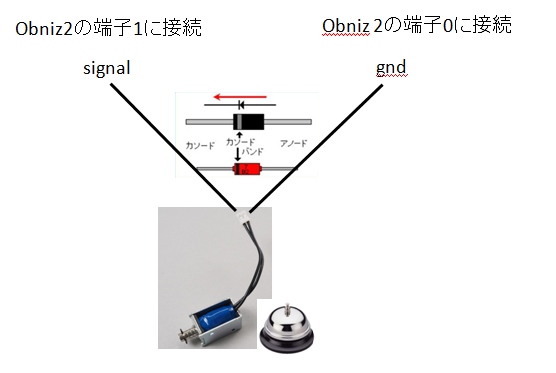
obnizとステッピングモーターとソレノイドバルブを接続する
obniz の端子とステッピングモーターの接続
0:ステッピングモーターの黒
1:ステッピングモーターの緑
2:ステッピングモーターの赤
3:ステッピングモーターの青
obniz2 の端子とソレノイドバルブの接続
ソレノイドが戻らない事象が多発した。調べたところ「ソレノイドは電流を切った際にそれまでの電流を維持しようとして逆起電力を発生する」「回路保護のための対策としてダイオードを使用する方法がある」という記事を見て回路にダイオード入れた(ブレッドボード使用)。こうすることで、ソレノイドが戻らない事象が減った。
動作
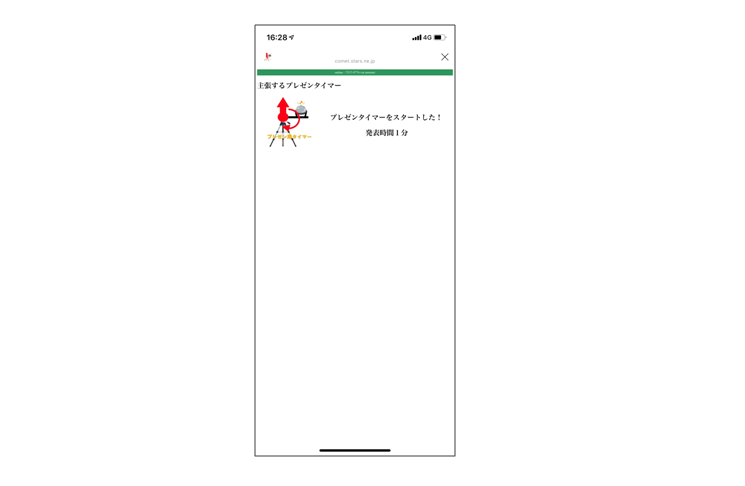
LINE Things連携したときのスマホ画面はこれ
動画はこちら
なぜobnizを2つ使ってるの?
開発途中に、ステッピングモーターとソレノイドバルブという電流をたくさんつかうやつを2つ動かすからobniz1つでは無理と判断して2つで組みました。しかし、開発途中はコードが無茶苦茶であったために、1つのobnizでは動かなかった可能性もあります。
そこで、再度、落ち着いてからhtmlが正しいことを確認して、動作を検証しました。
1つのobnizで動くようにしたhtmlはこれ。
<html>
<head>
  <meta charset="utf-8">
  <script src="https://obniz.io/js/jquery-3.2.1.min.js"></script>
  <script src="https://unpkg.com/obniz@2.2.0/obniz.js" crossorigin="anonymous"></script>
</head>

<div id="obniz-debug"></div>
<h1>主張するプレゼンタイマー</h1>
<img src="https://comet.stars.ne.jp/fig/1284.jpg" alt="Stepping_motor" width="310" align="left">
<br>
<h1><div id="print"></div></h1>
<br>
<h1 align="center">プレゼンタイマーをスタートした!</h1>


<script>

var obniz = new Obniz("XXXX-xxxx");
obniz.onconnect = async function () {

//for 40sec, 50sec, 60sec
var motor = obniz.wired("StepperMotor", {a:0, aa:1, b:2, bb:3});
var solenoid = obniz.wired("Solenoid", {gnd:4, signal:5});

//start from 0sec to 40sec
motor.stepType('1');
motor.speed(6.6);
await motor.stepWait(267);

//at 40sec one bell ring

solenoid.click();
solenoid.off();

//at 40sec stepping motor reverse

motor.speed(200);
await motor.stepWait(-266);


motor.speed(200);
await motor.stepWait(267);

//from 41sec to 50sec

motor.speed(6.6);
await motor.stepWait(68);

//at 50sec two bells ring

solenoid.click();
solenoid.off();
await obniz.wait(1000);
solenoid.click();
solenoid.off();

//at 50sec stepping motor reverse

motor.speed(200);
await motor.stepWait(-333);


motor.speed(200);
await motor.stepWait(333);

//from 51sec to 60 sec
motor.speed(6.6);
await motor.stepWait(66);

//at 60sec three bells ring

solenoid.click();
solenoid.off();
await obniz.wait(1000);
solenoid.click();
solenoid.off();
await obniz.wait(1000);
solenoid.click();
solenoid.off();

//at 60 sec stepping motor speed up and reverse

motor.speed(200);
await motor.stepWait(400);
motor.speed(200);
await motor.stepWait(-400);
motor.speed(200);
await motor.stepWait(1200);


// displayに反映
obniz.display.clear();
obniz.display.print("end.");

};

</script>

<body>

  <h1 align="center">発表時間1分</h1>

</body>
</html>
ひとつのObnizで動作するかの検証結果
結果として、はじめのステッピングモーターは動くのですが、ソレノイドバルブが動作する瞬間に、電流が流れすぎて、Obnizの電源が切れます。
Obnizの電源が切れる動作はこれ。
https://youtu.be/0xYymtiDB6I
この構成(ステッピングモーターとソレノイドバルブ)では、やはり、2つのObnizがやはり必要でした。
一つのhtmlの中で2つのObnizを制御するいい経験になりました。
あれっ? html? LINE Thingsなくてもいいですね。