はじめに
作業効率化のために、環境にあまり依存せず、どこでも動くツールを作りたいときがあります。そんなとき、ターミナルで動くTerminal-based User Interface (TUI)は非常に有用です。
TUIを楽に開発するために、言語ごとにオープンソースのフレームワークが公開されています。
ここでは、PythonでCSSを使ったリッチかつインタラクティブ(マウスで操作可能)なTUIを作れるtextualというライブラリを紹介します。
リポジトリ: https://github.com/Textualize/textual
準備
textualをインストール。
pip install textual
Widgetを表示する
Appクラスを継承したクラスを作成。そして、表示したいWidgetをcomposeメソッドに記載する。
このAppクラスのオブジェクトで、run()を実行すると、ターミナルにWidetが表示される。
from textual import on
from textual.app import App, ComposeResult
from textual.widgets import Static, Header, Footer, Button

class IntroductionApp(App):
    """Introduction to Textual."""

    def compose(self) -> ComposeResult:
        # "yield Widgetのクラス"で、ターミナルにWidgetを表示する
        yield Header("Introduction to Textual")
        yield Static("Hello, World!", id="hello")
        yield Button("Click me", id="click_me")
        yield Footer()

if __name__ == "__main__":
    app = IntroductionApp()
    app.run()
上記のコードでできたTUI
特徴1: CSSを適用できる
Widgetや画面全体に対し、CSSでスタイルを設定できる。
CSSは、Widgetのクラス名・ID・クラス名のいずれかで設定する。
from textual import on
from textual.app import App, ComposeResult
from textual.widgets import Static, Header, Footer, Button

class IntroductionApp(App):
    """Introduction to Textual."""

    CSS = """
    Screen {
        align: center top;
    }
    .hello{
        background: blue 50%;
    }
    #hello{
        background: red 50%;
    }
    Static{
        border: heavy white;
    }

    """

    def compose(self) -> ComposeResult:
        yield Header("Introduction to Textual")
        yield Static("Hello, World!")
        yield Static("Introduction ID=hello", id="hello")  # idを設定
        yield Static("Introduction CLASS=hello", classes="hello")  # class名を設定
        yield Button("Click me", id="click_me")
        yield Footer()

if __name__ == "__main__":
    app = IntroductionApp()
    app.run()
上記のコードでできたTUI
Appクラス内のCSSというクラス変数にCSSを記載する。
CSSは以下のように指定する。
- Widget全体に適用する:
PythonでのWidgetのクラス名 {cssの内容}- 例ならStatic Widgetに
Static {align: center top;}で適用
- 例ならStatic Widgetに
- Class名を指定してWidgetに適用する:
.クラス名 {cssの内容}- 例ならclass名にhelloを持つWidgetに
.hello {background: blue 50%;}で適用
- 例ならclass名にhelloを持つWidgetに
- ID名を指定してWidgetに適用する:
#ID名 {cssの内容}- 例ならID名にhelloを持つWidgetに
#hello {background: red 50%;}で適用
- 例ならID名にhelloを持つWidgetに
特徴2: キーバインド・ボタンのイベントをメソッドで設定できる
from textual import on
from textual.app import App, ComposeResult
from textual.widgets import Static, Header, Footer, Button

class IntroductionApp(App):
    """Introduction to Textual."""

    CSS = """
    Screen {
        align: center top;
    }
    Static{
        border: heavy white;
    }
    .hello{
        background: red 50%;
    }
    .hello2{
        background: blue 50%;
    }
    """

    BINDINGS = [("ctrl+u", "update_hello", "Update Hello"), ("c", "change_color", "Change Color")]

    def compose(self) -> ComposeResult:
        yield Header("Introduction to Textual")
        yield Static("Hello, World!")
        yield Static("Introduction", id="hello")
        yield Static("Introduction", classes="hello")
        yield Button("Click me", id="click_me")
        yield Footer()

    def action_update_hello(self) -> None:
        """ctrl+u のキーイベント。IDにhelloを持つWidgetの文字を Updated Hello! に変える"""
        self.query_one("#hello").update("Updated Hello!")

    def action_change_color(self) -> None:
        """c のキーイベント。class名がhelloのWidgetのclass名を、hello2に変える"""
        element = self.query_one(".hello")  # query_oneは、CSSセレクタのように指定する。
        element.remove_class("hello")  # remove_classでは、"-クラス名"で指定する。
        element.add_class("hello2")

    @on(Button.Pressed, "#click_me")
    def on_click_me(self) -> None:
        """ID名がclick_meのボタンがクリックされたときのイベント。画面の背景を緑にする。"""
        self.app.screen.styles.background = "green 50%"  # cssはstyles.{}の形でも設定できる。

if __name__ == "__main__":
    app = IntroductionApp()
    app.run()
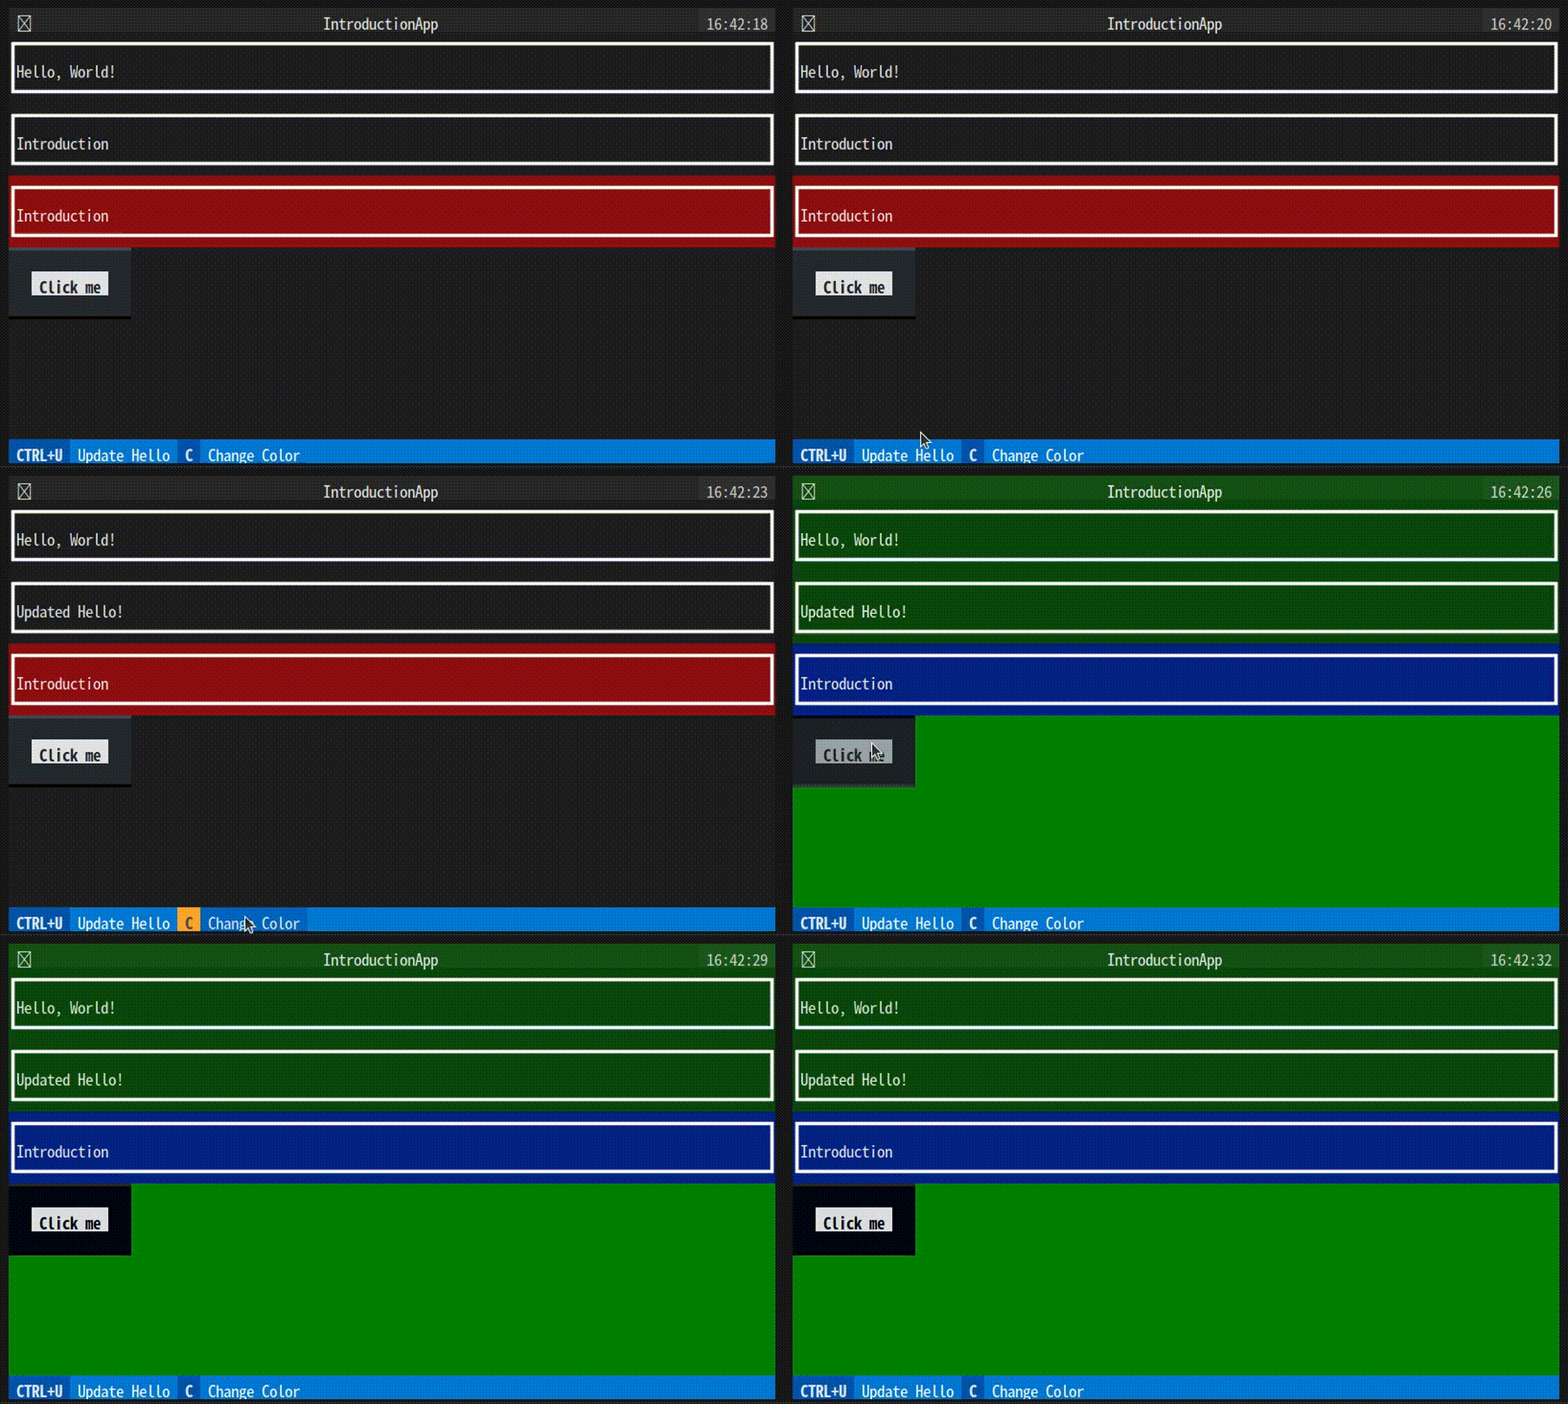
上記のコードでできたTUI
キーバインド
AppクラスのBINDINGSというクラス変数で設定する。
BINDINGS = [("バインドしたいキー", "メソッド名", "説明文")] で設定する。
キーのイベントは、action_{BINDINGSで記載したメソッド名}というメソッドで設定する。説明文はFooterに表示される。
- 例のctrl+uの場合、
BINDINGS = [("ctrl+u", "update_hello", "Update Hello")]とaction_update_helloで設定している。
ボタンをクリックしたときのイベント
イベントとして呼び出すメソッドに@on(Button.Pressed, {ボタンのID名})というデコレータをつける。
- 例のID名がclick_meのボタンの場合、
on_click_me(self)というメソッドにボタンを押したときのイベントを設定し、@on(Button.Pressed, "#click_me")というデコレータをつけている。
特徴3: Markdownも表示できる
from textual import on
from textual.app import App, ComposeResult
from textual.widgets import Static, Header, Footer, Button, MarkdownViewer
from textual.containers import VerticalScroll, Horizontal, Vertical
from textual.screen import ModalScreen

# 表示するMarkdown。Textualのレポジトリから拝借した。
EXAMPLE_MARKDOWN = """\
# Markdown Viewer

This is an example of Textual's `MarkdownViewer` widget.


## Features

Markdown syntax and extensions are supported.

- Typography *emphasis*, **strong**, `inline code` etc.
- Headers
- Lists (bullet and ordered)
- Syntax highlighted code blocks
- Tables!

## Code Blocks

Code blocks are syntax highlighted, with guidelines.

```python
class ListViewExample(App):
    def compose(self) -> ComposeResult:
        yield ListView(
            ListItem(Label("One")),
            ListItem(Label("Two")),
            ListItem(Label("Three")),
        )
        yield Footer()
```
"""

# IntroductionAppから呼び出すモーダル画面
class MarkdownScreen(ModalScreen):
    """Simple Help screen with Markdown and a few links."""

    CSS = """
    MarkdownScreen MarkdownViewer{
        background: black;
        margin: 5 5;
        border: heavy blue;
        height: 100%;
    }
    """

    BINDINGS =[("escape", "dismiss")]

    def compose(self) -> ComposeResult:
        mv = MarkdownViewer(EXAMPLE_MARKDOWN, show_table_of_contents=True)
        mv.border_subtitle = "Click ESCAPE"
        yield mv


class IntroductionApp(App):
    """Introduction to Textual."""

    CSS = """
    Screen {
        align: center top;
    }
    MarkdownViewer{
        border: heavy red;
        border-title-style: bold;
    }
    """

    def compose(self) -> ComposeResult:
        yield Header("Introduction to Textual")
        # With containers で、レイアウトを設定する。
        with Horizontal():
            with Vertical():
                yield Button("Show markdown", id="show_markdown")
                yield Button("Show markdown in a modal screen", id="show_markdown_modal")
            with VerticalScroll():
                mv = MarkdownViewer()
                mv.border_title = "Markdown Viewer"  # 枠線上に表示されるタイトル
                yield mv
        yield Footer()

    @on(Button.Pressed, "#show_markdown")
    def on_show_markdown(self) -> None:
        """ID名がshow_markdownのボタンがクリックされたときのイベント。
        MarkdownViewerのMarkdownを更新する。"""
        self.query_one(MarkdownViewer).document.update(EXAMPLE_MARKDOWN)

    @on(Button.Pressed, "#show_markdown_modal")
    def on_show_markdown_modal(self) -> None:
        """ID名がshow_markdown_modalのボタンがクリックされたときのイベント。
        画面上にモーダルの画面を表示する。"""
        self.push_screen(MarkdownScreen())


if __name__ == "__main__":
    app = IntroductionApp()
    app.run()
上記のコードでできたTUIが冒頭のもの。
まとめ
このように、Textualを使えば楽にインタラクティブなTUIを作成できます。
Subprocessと連携すれば、インタラクティブな操作でコマンド実行ができると思います。
ここで紹介した特徴はほんの一部です。特に、Widgetはもっといろんなものが提供されています。
Widget一覧: https://textual.textualize.io/widget_gallery/ サンプルコードもあってわかりやすい。


