概要
GUIの試験を自動化できるFriendlyというライブラリについて、使用する際に知っておくと役に立ちそうな知識やサイト、そのほか簡単なサンプルコードを自身の勉強も兼ねてまとめてみました。
- 個人的にわかる範囲で記載しています。
- 自分はWPFアプリケーションの自動テストで使用していましたので、それをベースに記載しています。
目次
Friendlyとは
株式会社Codeer様が作成、公開している、GUIのアプリを自動で操作できるライブラリです。GUIテストを自動化したいときなどに便利です。
GUIを自動操作するアプリケーションをFriendlyを使用して作成し、そのアプリから対象のアプリを操作するイメージです。
導入方法
Visual Studioのnugetで「Codeer.Friendly」と検索すると関連するdllが表示されるので、そこからインストールできます。
以下辺りを導入すると良さそうです。
- Codeer.Friendly
※Windowsアプリを操作するときに必ず使うライブラリ - Codeer.Friendly.Windows
※Windowsアプリを操作するときに必ず使うライブラリ - Codeer.Friendly.Grasp
※このライブラリについては開発者のブログのこちらを参照 - Codeer.Friendly.KeyMouse
※このライブラリについては開発者のブログのこちらを参照 - Codeer.Friendly.NativeStandardControls
このライブラリについては開発者のブログのこちらを参照
自分はWPFアプリの自動テストを行いたかったので、上記に加えて
- RM.Friendly.WPFStandardControls
というライブラリも導入しました。
Friendlyの設計方針
上記にも記載しましたが、自動テストはGUIを自動操作するアプリケーションを別に作成し、そのアプリから対象のアプリを自動操作する形になります。そのGUIを自動操作するアプリの設計方針は、Driver/Scenarioパターンという考え方で実装する方針が基本になります。Driver/Scenarioパターンについては以下に解説があります。
サンプルコード
めちゃくちゃ簡単ですが、サンプルを作成してみました。
テスト対象の画面
以下の画面をテスト対象とします。
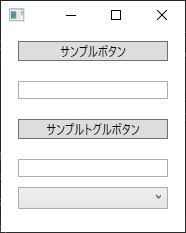
一番上のサンプルボタンを押すと、ボタンすぐ下のテキストボックスに文字が表示されます。

サンプルトグルボタンを選択状態にすると、ボタンすぐ下のテキストボックスに文字が表示されます。
未選択状態にすると、テキストボックスの文字が消えます。

コンボボックスは下記のように選択肢が格納されています。
※一番上の選択肢は空文字にしています。

コード
以下のように3つのプロジェクトを作成してテストをしてみました。
Sampleプロジェクトはテスト対象のプロジェクト、DriverとScenarioプロジェクトはテスト用のプロジェクトです。

Sampleプロジェクト
テスト対象のプロジェクトです。ビルドしてできたexeファイルを実行するとテスト対象の画面が起動します。
WPFで記載しています。
View
<Window x:Class="Sample.SampleView"
        xmlns="http://schemas.microsoft.com/winfx/2006/xaml/presentation"
        xmlns:x="http://schemas.microsoft.com/winfx/2006/xaml"
        xmlns:d="http://schemas.microsoft.com/expression/blend/2008"
        xmlns:mc="http://schemas.openxmlformats.org/markup-compatibility/2006"
        xmlns:vm="clr-namespace:Sample"
        mc:Ignorable="d"
        Height="240" Width="200">
    <Window.DataContext>
        <vm:SampleViewModel />
    </Window.DataContext>
    <StackPanel>
        <Button Margin="10"
                Content="サンプルボタン"
                Width="150"
                Command="{Binding SampleButtonCommand}"/>
        <TextBox Margin="10"
                 Text="{Binding SampleButtonText}"
                 Width="150"/>
        <ToggleButton x:Name="SampleToggle"
                      Margin="10"
                      Content="サンプルトグルボタン"
                      Width="150"
                      Command="{Binding SampleToggleButtonCommand}"
                      IsChecked="{Binding IsCheckedToggleButton}"/>
        <TextBox Margin="10"
                 Text="{Binding SampleToggleButtonText}"
                 Width="150"/>
        <ComboBox Width="150">
            <ComboBoxItem Content=""/>
            <ComboBoxItem Content="選択肢1"/>
            <ComboBoxItem Content="選択肢2"/>
            <ComboBoxItem Content="選択肢3"/>
            <ComboBoxItem Content="選択肢4"/>
        </ComboBox>
    </StackPanel>
</Window>
using System.Windows;

namespace Sample
{
    public partial class SampleView : Window
    {
        public SampleView()
        {
            InitializeComponent();
        }
    }
}
ViewModel
using Prism.Commands;
using Prism.Mvvm;
using System.Windows.Input;

namespace Sample
{
    public class SampleViewModel : BindableBase
    {
        /// <summary>
        /// サンプルボタン用のテキストボックスのテキスト
        /// </summary>
        public string SampleButtonText { get => _sampleButtonText; set => SetProperty(ref _sampleButtonText, value); }
        private string _sampleButtonText;

        /// <summary>
        /// サンプルボタン押下時のコマンド
        /// </summary>
        public ICommand SampleButtonCommand => _sampleButtonCommand ?? (_sampleButtonCommand = new DelegateCommand(() =>
        {
            SampleButtonText = "ボタンが押されました";
        }));
        private ICommand _sampleButtonCommand;

        /// <summary>
        /// サンプルトグルボタン用のテキストボックスのテキスト
        /// </summary>
        public string SampleToggleButtonText { get => _sampleToggleButtonText; set => SetProperty(ref _sampleToggleButtonText, value); }
        private string _sampleToggleButtonText;

        /// <summary>
        /// サンプルトグルボタン押下時のコマンド
        /// </summary>
        public ICommand SampleToggleButtonCommand => _sampleToggleButtonCommand ?? (_sampleToggleButtonCommand = new DelegateCommand(() =>
        {
            SampleToggleButtonText = IsCheckedToggleButton ? "トグルボタンが押されました" : string.Empty;
        }));
        private ICommand _sampleToggleButtonCommand;

        /// <summary>
        /// サンプルトグルボタンの選択状態
        /// </summary>
        public bool IsCheckedToggleButton { get; set; }
    }
}
Driverプロジェクト
SampleViewにアタッチして操作するためのクラスです。
Driverは後述するTest Assistant Proを使用すると作成しやすさが格段にアップします。
SampleView.xamlやSampleViewModel.csに定義していたバインド対象のプロパティ名やコマンド名を使用して、画面にあるそれぞれのコントロールを辿っています。
SampleToggleButtonはSampleView.xamlにx:Nameで名前が定義されているので、Core.Dynamic().SampleToggle;みたいな形で名前で辿れています。
using Codeer.Friendly;
using Codeer.Friendly.Dynamic;
using Codeer.Friendly.Windows;
using Codeer.Friendly.Windows.Grasp;
using Codeer.TestAssistant.GeneratorToolKit;
using RM.Friendly.WPFStandardControls;

namespace Driver
{
    [WindowDriver(TypeFullName = "Sample.SampleView")]
    public class SampleViewDriver
    {
        public WindowControl Core { get; }

        /// <summary>
        /// サンプルボタン
        /// </summary>
        public WPFButtonBase SampleButton => Core.LogicalTree().ByBinding("SampleButtonCommand").FirstOrDefault()?.Dynamic();

        /// <summary>
        /// サンプルボタン用のテキストボックス
        /// </summary>
        public WPFTextBox SampleText => Core.LogicalTree().ByBinding("SampleButtonText").FirstOrDefault()?.Dynamic();

        /// <summary>
        /// サンプルトグルボタン
        /// </summary>
        public WPFToggleButton SampleToggleButton => Core.Dynamic().SampleToggle;

        /// <summary>
        /// サンプルトグルボタン用のテキストボックス
        /// </summary>
        public WPFTextBox SampleToggleButtonText => Core.LogicalTree().ByBinding("SampleToggleButtonText").FirstOrDefault()?.Dynamic();

        /// <summary>
        /// コンボボックス
        /// </summary>
        public WPFComboBox ComboBox => Core.LogicalTree().ByType("System.Windows.Controls.ComboBox").FirstOrDefault()?.Dynamic();

        public SampleViewDriver(WindowControl core)
        {
            Core = core;
        }

        public SampleViewDriver(AppVar core)
        {
            Core = new WindowControl(core);
        }
    }

    public static class SampleViewDriverExtensions
    {
        [WindowDriverIdentify(TypeFullName = "Sample.SampleView")]
        public static SampleViewDriver AttachSampleView(this WindowsAppFriend app)
            => app.WaitForIdentifyFromTypeFullName("Sample.SampleView").Dynamic();
    }
}
コントロールの拡張メソッド用のクラスです。
今回はコンボボックスの表示値を取得するための拡張メソッドのみを定義しています。
using Codeer.Friendly.Dynamic;
using RM.Friendly.WPFStandardControls;

namespace Driver
{
    public static class ControlsExtensions
    {
        public static string GetText(this WPFComboBox comboBox) => comboBox.Dynamic().Text;
    }
}
Scenarioプロジェクト
実際にテストシナリオを記載するプロジェクトです。
今回はテストエクスプローラからテストを実行したいので最初からあるMSTestを使用していますが、他にもNunit等、Visual Studioで使用できるテストフレームワークなら好きなものを使用できると思います。
また、トグルボタンをClick()するためにCodeer.Friendly.KeyMouseを使用しています。
using Codeer.Friendly.Windows;
using Codeer.Friendly.Windows.KeyMouse;
using Driver;
using Microsoft.VisualStudio.TestTools.UnitTesting;
using System.Diagnostics;

namespace SampleTest
{
    [TestClass]
    public class Scenario
    {
        [TestMethod]
        public void TestMethod1()
        {
            // 操作対象プロセスの起動
            var process = Process.Start("Sample.exeまでのパス");

            // WindowsAppFriendでラップ
            var app = new WindowsAppFriend(process);

            // サンプル画面にアタッチ
            var driver = app.AttachSampleView();

            // 以下、操作

            // サンプルボタン用のテキストの値が空か確認
            string expected = driver.SampleText.Text;
            Assert.AreEqual(expected, string.Empty);

            // サンプルボタンを押下
            driver.SampleButton.EmulateClick();

            // サンプルボタン用のテキストに「ボタンが押されました」と表示されているか確認
            expected = driver.SampleText.Text;
            Assert.AreEqual(expected, "ボタンが押されました");

            // サンプルボタン用のテキストの値が空か確認
            expected = driver.SampleToggleButtonText.Text;
            Assert.AreEqual(expected, string.Empty);

            // サンプルボタン用のテキストに直接入力する
            driver.SampleText.EmulateChangeText("直接入力しました");

            // サンプルボタン用のテキストの値が変わっているか確認
            expected = driver.SampleText.Text;
            Assert.AreEqual(expected, "直接入力しました");

            // サンプルトグルボタンを押下 選択状態にする

            // EmulateCheckだと、トグルボタンが押下状態になるが、
            // 紐づいたViewModelのCommandは走らなかった
            //driver.SampleToggleButton.EmulateCheck(true);

            // NugetからCodeer.Friendly.KeyMouseをインストールするとトグルボタンもクリック可能
            // Click()だとViewModelのCommandも走った
            driver.SampleToggleButton.Click();

            // サンプルトグルボタン用のテキストに「トグルボタンが押されました」と表示されているか確認
            expected = driver.SampleToggleButtonText.Text;
            Assert.AreEqual(expected, "トグルボタンが押されました");

            // サンプルトグルボタンを押下 未選択状態にする
            driver.SampleToggleButton.Click();

            // サンプルトグルボタン用のテキストの値が空か確認
            expected = driver.SampleToggleButtonText.Text;
            Assert.AreEqual(expected, string.Empty);

            // コンボボックスのテキストの値が空か確認
            expected = driver.ComboBox.GetText();
            Assert.AreEqual(expected, string.Empty);

            // コンボボックスの値を変更
            driver.ComboBox.EmulateChangeSelectedIndex(2);

            // コンボボックスの選択肢が「選択肢2」となっているか確認
            expected = driver.ComboBox.GetText();
            Assert.AreEqual(expected, "選択肢2");

            // 後処理
            // これをしないとテスト終了後もアプリが起動状態のままになってしまう
            app.Dispose();
            process.Kill();
        }
    }
}
基本的には上記のように、GUI自動操作アプリの処理でProcessクラスのStart()メソッドを使用して操作対象のアプリを起動し、そのprocessをFriendlyのWindowsAppFriendクラスを使用してラップしてから、自動操作を行っていく形になるのかなと思います。
テストを実行した際、同じテストケースでも対象アプリケーションが通信不能な状態になったか、 シリアライズ不可能な型のデータを転送しようとした可能性があります。というエラーが出て時々失敗となったり、その中でも再度実行すると時々成功したりする場合がありました。
その場合は、Visual Studioのテストエクスプローラからデバッグで実行すると、必ず成功するようになりました。
私の場合はCodeer.Friendly.Windows.KeyMouse.dllのSendKeys()を使用したり、RM.Friendly.WPFStandardControls.dllのEmulateChangeText()を使用した直後にエラーが発生する時がありました。
PCのスペックがよいとこの現象は発生せず、PCのスペックがあまりよくない場合だと発生することがあったため、スペックも関係していたかもしれません。
もしかしたら現象が発生した低スペックPCでも現象が発生しないよう根本的に解決する方法があったのかもしれませんが、一旦参考まで。
知識面で役に立つサイト
ささいなことですが
Friendlyの開発者の日記です。
下記に、覚えたてのころに私がよく確認していたページをまとめてみました。
Friendly ハンズオン
- Frienldy いまさら概要と学習計画
- Friendlyハンズオン 1.用意
- Friendlyハンズオン 2.アタッチ
- Friendlyハンズオン 3.操作対象プロセスに内部APIを実行させる
- Friendlyハンズオン 4.操作対象プロセスに内部APIを実行させる - 続き
- Friendlyハンズオン 5.DLLインジェクション
- Friendly ハンズオン6 GUI操作・・・あれ?
- Friendly ハンズオン7 WinForms用上位ライブラリ
- Friendly ハンズオン8 Friendly.Windows.Grasp - .Netアプリ操作でよく使う機能 -
- Friendlyハンズオン9 Win32用上位ライブラリ
- Friendly ハンズオン 10 .Netアプリで出てくるネイティブウィンドウ対応
- Friendly ハンズオン 11 WPF用上位ライブラリ
- Friendly ハンズオン 12 TestAssistant(キャプチャリプレイもできますw)
- Friendly ハンズオン 13 アプリケーションドライバ -その1-
- Friendly ハンズオン 13 アプリケーションドライバ -その2-
- Friendly ハンズオン 13 アプリケーションドライバ -その3-
- Friendly ハンズオン 13 アプリケーションドライバ -その4-
- Friendly ハンズオン 13 アプリケーションドライバ -その5-
- Friendly ハンズオン 14 -準備- テストシナリオ共通部分抽出
- Friendly ハンズオン 14-2 テストシナリオ実装
内部的な知識
- Friendlyの処理実行~プロセス、スレッド、同期、非同期~ その1
- Friendlyの処理実行~プロセス、スレッド、同期、非同期~ その2
- Friendly なんで別プロセス操作できるの?
- Friendly 操作対象プロセス内のインスタンス
- 世界が驚いた!Friendlyマジック - 種明かし編
予備知識
- Friendlyを作った理由 その1
- Friendlyを作った理由 その2
- Friendly GUI操作用上位ライブラリの必要性と思想
- Friendly、ラムダ送れるってよ
- Windowsアプリテスト自動化でのキーエミュレートはありなのか?
- Friendlyでx64のプロセスからx86のプロセスを操作する
- FriendlyでWPFアプリをテストするときのコツ
Friendlyのdllについて
かずきのBlog
様々なことが記載されていますが、その中でFriendlyのことも記載されています。
Test Assistant Pro
Test Assistant Proとは
Friendlyを使用した自動テストの作成の、作業効率をぐんと上げてくれるツールです。
こちらがCodeer様のTest Assistant Proのページです。
また、Test Assistant Proは有料になります。
下記にインストール方法を記載していますが、まずはライセンス契約が必要です。
インストール方法
- Visual Studioの拡張機能から「Test Assistant Pro」と選択してダウンロードできます。ダウンロードした後はVisual Studioを一度閉じてください。
- VisiualStudioを閉じるとインストールが始まり、modifyかcancelか選択を聞かれるのでmodifyを選択します。
ライセンスのアクティブ方法
インストール方法の続きです。
- Visual Studioが起動したら上部のメニューバーから 「ツール」 → 「TestAssistantPro」 → 「Licence Information」 を選択します。
- 表示されたダイアログで「Licence Key」と「Developer Name」を入力後、「Activate」を選択します。
※「Developer Name」はライセンスサーバーで識別するために付けるもののため、任意の値で大丈夫です。 - 成功すると、「Licence activation scuceeded」というダイアログが表示されます。
もし「The Maximum number of licensed users has been reached.」というメッセージが表示された場合は、ライセンスサーバーからアカウントを削除してもう一度試すと成功すると思います。
使用方法
個人的には画面のDriverを作成する際によく使用していました。
Driverの作成の他にも、画面の操作を元にシナリオのコードを自動で生成してくれる機能等、色々な機能があります。
下記にマニュアルがあります。
具体的な使用方法については下記にまとめられています。
以下もご参考に。
WPFの自動テストを行っていた私の経験からだと、Test Assistant Proの操作方法については
- 「AnalzeWindow」の表示方法
- Driverの作成方法
- Scenario作成の補助機能である「Capture」機能の使い方
辺りを覚えておけばまずは大丈夫かと思いました。
終わりに
別プロセスから別プロセスを操作するというFrienldyの仕組みが面白いと思っています。
簡単な自動テストなら少し慣れれば記載できると思いますが、スピード感をもってがっつりプロジェクトに自動テストを組み込むなら、Test Assistant Proがあった方がかなり効率があがると思いました。