
はじめに
Prometheus自体にも簡易的な可視化ツールがありますが、Grafanaのダッシュボードと比べると見劣りすることは否めません。それゆえ、PrometheusとGrafanaを一緒に使用することは、インフラストラクチャを監視する方法として大変オススメの組み合わせです。 この記事では、PrometheusをGrafanaと接続する方法と、Prometheusが他のツールと異なる点について説明します。
Prometheus運用の難しさを感じている方へ
MetricFireの製品であるHosted Prometheusは、Grafanaダッシュボードを備えたPrometheusを即座に実行出来、社内で行うのは難しいデータの長期保管とスケーラビリティーを実現できます。 自分でこれらの設定やメンテナンスを行うのことが負担が大きくなっている方は、是非MetricFireで何ができるかをデモを予約して確認してください。
Prometheus
Prometheusは、2012年にSoundCloudによって開発されたオープンソースのアラートおよび監視ツールです。Prometheusのさまざまなコンポーネントは次のとおりです。
- Prometheusサーバー
- プッシュゲートウェイ
- エクスポーター
- Alertmanager
次の図は、Prometheusのアーキテクチャを示しています。

Prometheusのより詳細な紹介に興味がある場合は、Prometheusアーキテクチャとその設定方法を説明する以下の記事をご参考ください。
Grafana
Grafanaは非常に用途の広い視覚化ツールです。 さまざまなデータソースからデータを読み取り、グラフ、ゲージ、世界地図、ヒートマップなどの多様な視覚化オプションを使用してプロットできます。「Grafanaを基礎から解説 〜実際に導入までしてみる〜」という記事を是非参考にしてみてください。
セットアップ
このセクションでは、Prometheusを使用してデータを処理することにより、cAdvisorとRedisからの情報を視覚化し、Grafanaで可視化します。 まずは、dockerを使用して、GrafanaとPrometheusのテスト環境をセットアップします。 DockerHubで入手可能なGrafanaとPrometheusの公式Dockerイメージを使用し、cAdvisorとRedisのDockerイメージを使用する必要があります。 cAdvisorは、実行中のコンテナーに関するメトリックを収集し、Prometheusフォーマットを含むさまざまなフォーマットでメトリックを公開するGoogleのツールです。 Redisコンテナーからメトリックを収集し、Grafanaで視覚化するようにcAdvisorを構成します。
version: '3.2'
services:
 prometheus:
   image: prom/prometheus
   ports:
     - "9090:9090"
   volumes:
     - ./prometheus.yml:/etc/prometheus/prometheus.yml

 grafana:
   image: grafana/grafana
   ports:
   - "3000:3000"

 cadvisor:
   image: google/cadvisor:latest
   container_name: cadvisor
   ports:
   - 8080:8080
   volumes:
   - /:/rootfs:ro
   - /var/run:/var/run:rw
   - /sys:/sys:ro
   - /var/lib/docker/:/var/lib/docker:ro
   depends_on:
   - redis

 redis:
   image: redis:latest
   container_name: redis
   ports:
   - 6379:6379
また、docker-compose.ymlとともにデフォルトのprometheus.ymlファイルを作成します。 この構成ファイルには、Prometheusに関連するすべての構成が含まれています。 以下の構成は、Prometheusに付属するデフォルトの構成です。
# my global config
global:
 scrape_interval:     15s # Set the scrape interval to every 15 seconds. Default is every 1 minute.
 evaluation_interval: 15s # Evaluate rules every 15 seconds. The default is every 1 minute.
 # scrape_timeout is set to the global default (10s).

# Alertmanager configuration
alerting:
 alertmanagers:
 - static_configs:
   - targets:
     # - alertmanager:9093

# Load rules once and periodically evaluate them according to the global 'evaluation_interval'.
rule_files:
 # - "first_rules.yml"
 # - "second_rules.yml"

# A scrape configuration containing exactly one endpoint to scrape:
# Here it's Prometheus itself.
scrape_configs:
 # The job name is added as a label `job=<job_name>` to any timeseries scraped from this config.
 - job_name: 'prometheus'

   # metrics_path defaults to '/metrics'
   # scheme defaults to 'http'.

   static_configs:
   - targets: ['localhost:9090']
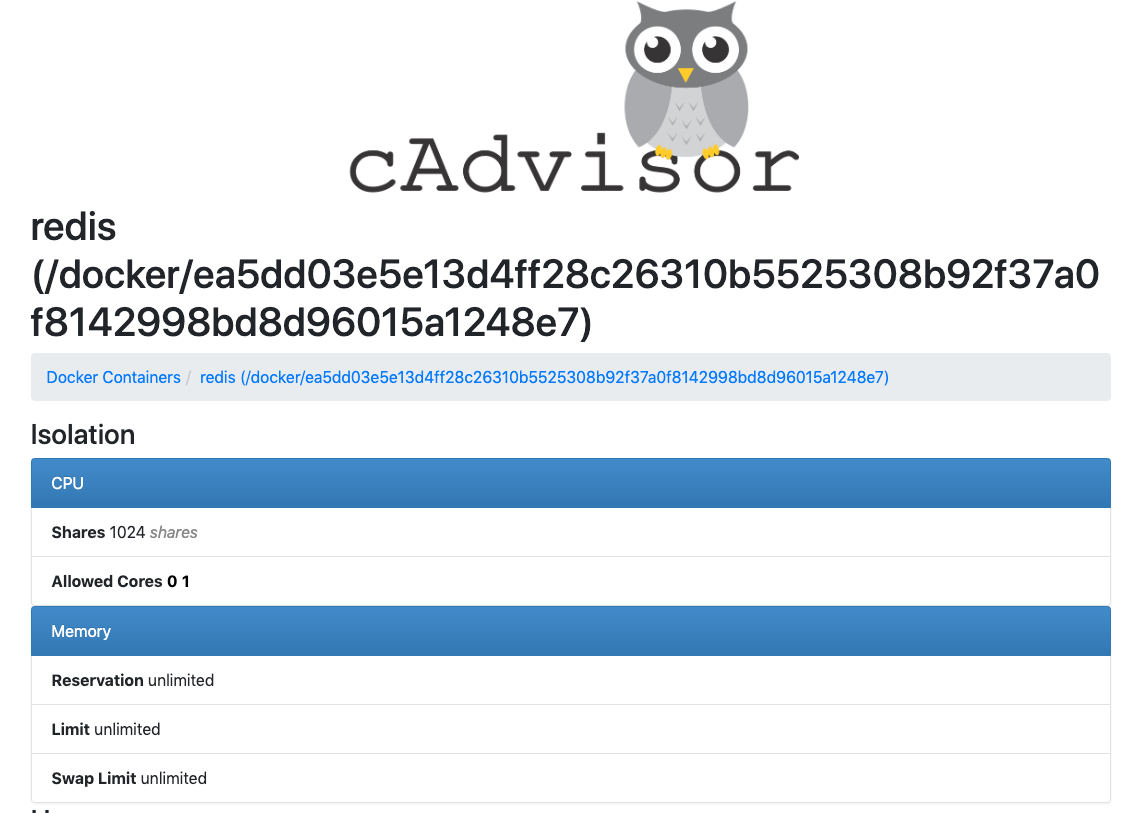
http:// localhost:8080 / docker / redis にアクセスすると、Redisコンテナーのメトリックを確認できます。
以下のスクリーンショットは、cAdvisorがRedisから収集できる情報を示しています。
ここで、cAdvisorからのこれらのメトリックをPrometheusにフィードする必要があります。 これを行うには、prometheus.ymlを次のように変更します。
global:
 scrape_interval:     15s # Set the scrape interval to every 15 seconds. Default is every 1 minute.
 evaluation_interval: 15s # Evaluate rules every 15 seconds. The default is every 1 minute.
 # scrape_timeout is set to the global default (10s).

# Alertmanager configuration
alerting:
 alertmanagers:
 - static_configs:
   - targets:
     # - alertmanager:9093

# Load rules once and periodically evaluate them according to the global 'evaluation_interval'.
rule_files:
 # - "first_rules.yml"
 # - "second_rules.yml"

# A scrape configuration containing exactly one endpoint to scrape:
# Here it's Prometheus itself.
scrape_configs:
 # The job name is added as a label `job=<job_name>` to any timeseries scraped from this config.
 - job_name: 'prometheus'

   # metrics_path defaults to '/metrics'
   # scheme defaults to 'http'.

   static_configs:
   - targets: ['localhost:9090']
  - job_name: 'cadvisor'
   static_configs:
   - targets: ['cadvisor:8080']
     labels:
       alias: 'cadvisor'
cAdvisorという新しいジョブを追加したことに注意してください。 Prometheusは、cAdvisorからメトリックを定期的にプルするようになりました。 Prometheus構成ファイルの変更を反映するには、「docker-composerestartprometheus」で再起動する必要があります。
http:// localhost:9090 / targets のPrometheuswebuiで2つのジョブを確認できるはずです。 以下のスクリーンショットは、cAdvisor用とPrometheus自体用の2つのジョブを示しています。

Grafanaに接続する
コンテナメトリックをPrometheusにフィードできるようになったので、Grafanaで視覚化するときが来ました。 以下に示すように、http:// localhost:3000 を参照し、admin / adminを使用してログインし、Prometheusのデータソースを追加します。
注:この記事で説明されているようにdockerを使用している場合、URLはhttp:// prometheus:9090 になります。 これは、Grafanaがブラウザのフロントエンドではなくバックエンド(Access:Serverと表示されている場所)からPrometheusに接続するためです。 Grafanaコンテナの場合、Prometheusの場所は http:// prometheus:9090 であり、予想どおり http://127.0.0.1:9090 ではありません。

それでは、簡単なGrafanaダッシュボードを作成して、簡単なグラフを追加しましょう。 非常に簡単です。 トリッキーな部分は、データソースの構成とクエリの提供です。
PrometheusデータソースからRedisコンテナのメモリ使用量を視覚化します。 クエリのドロップダウンボックスで、データソースとしてPrometheusを選択すると、以下に示すように、メトリックとしてcontainer_memory_usage_bytes {name = "redis"}が使用されます。

まとめ
Grafanaは、Prometheusデータソースに接続するためのシームレスな方法を提供し、クエリを通じて優れた視覚化を提供することを確認しました。Grafanaをチェックして試してみたい方は、MetricFireにご連絡ください。
また、自分でセットアップしたり、自社運用の難しさを感じ始めている方は、是非MetricFireのデモを予約して直接お問い合わせください。 お客様の会社の監視ニーズについて、いつでも喜んでお助けいたします。