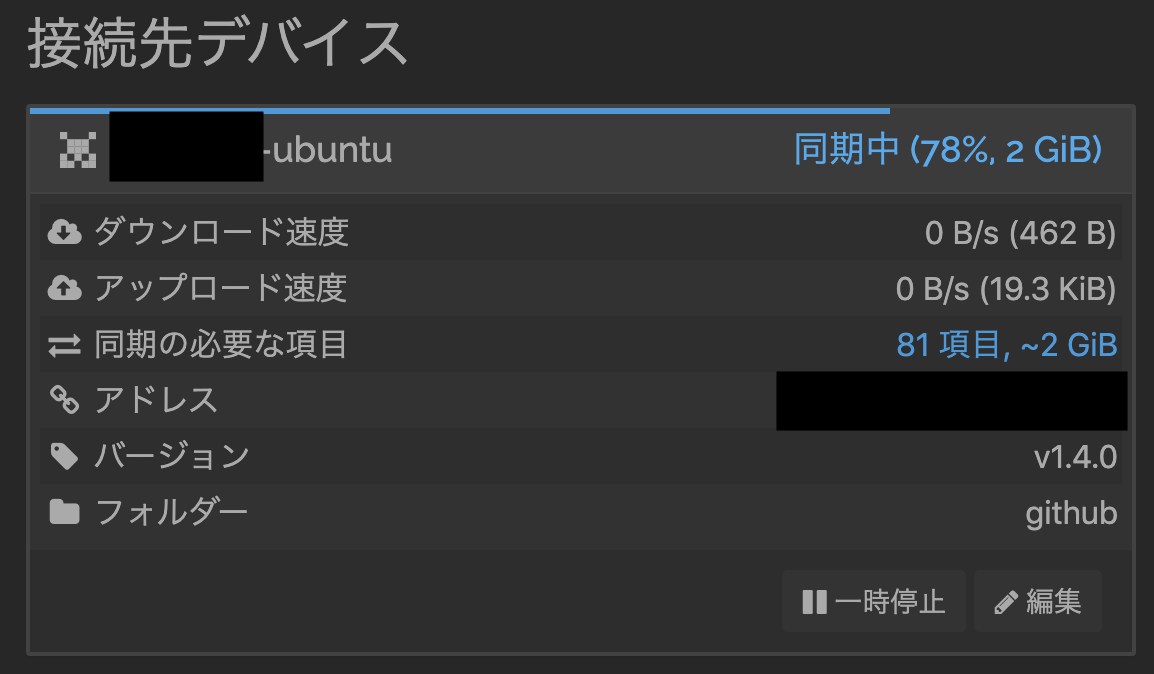
複数のPCでgit pushせずにファイル共有をしたかったため、会社で紹介していただいたSyncthingを試してみました!
Syncthingとは?
公式リポジトリ
https://github.com/syncthing/syncthing/
Syncthing is a continuous file synchronization program. It synchronizes files between two or more computers. (公式リポジトリより)
直訳で、「2台以上のPC間でファイルを共有する」とのことです。
DropBoxやOneDriveと似たようなイメージですが、これらと違ってサーバー上にファイルがアップロードされません。
対応OS等
2024年7月時点では以下が対応しています。
インストール
手元にMacとUbuntuがあるので、こちらの2台で試してみます。
はじめにGUIでの設定手順について記載しますが、CLIだけでもできるみたいなので後半に記載します。
Ubuntu
参考
# 2024年時点ではkeyを追加しなくてもインストールできます。
# curl -s https://syncthing.net/release-key.txt | sudo apt-key add -
# echo "deb https://apt.syncthing.net/ syncthing stable" | sudo tee /etc/apt/sources.list.d/syncthing.list

sudo apt update && sudo apt install syncthing
# 実行→ブラウザが立ち上がる
syncthing &
Mac
brew install syncthing
# 実行→ブラウザが立ち上がる
syncthing
Windows
CentOS / その他Linux
環境がないので確かめていませんが、以下のサイトのようにバイナリインストールも行えるみたいです。
Android
こちらも環境がないので確かめていませんが、ストアにアプリがあります。
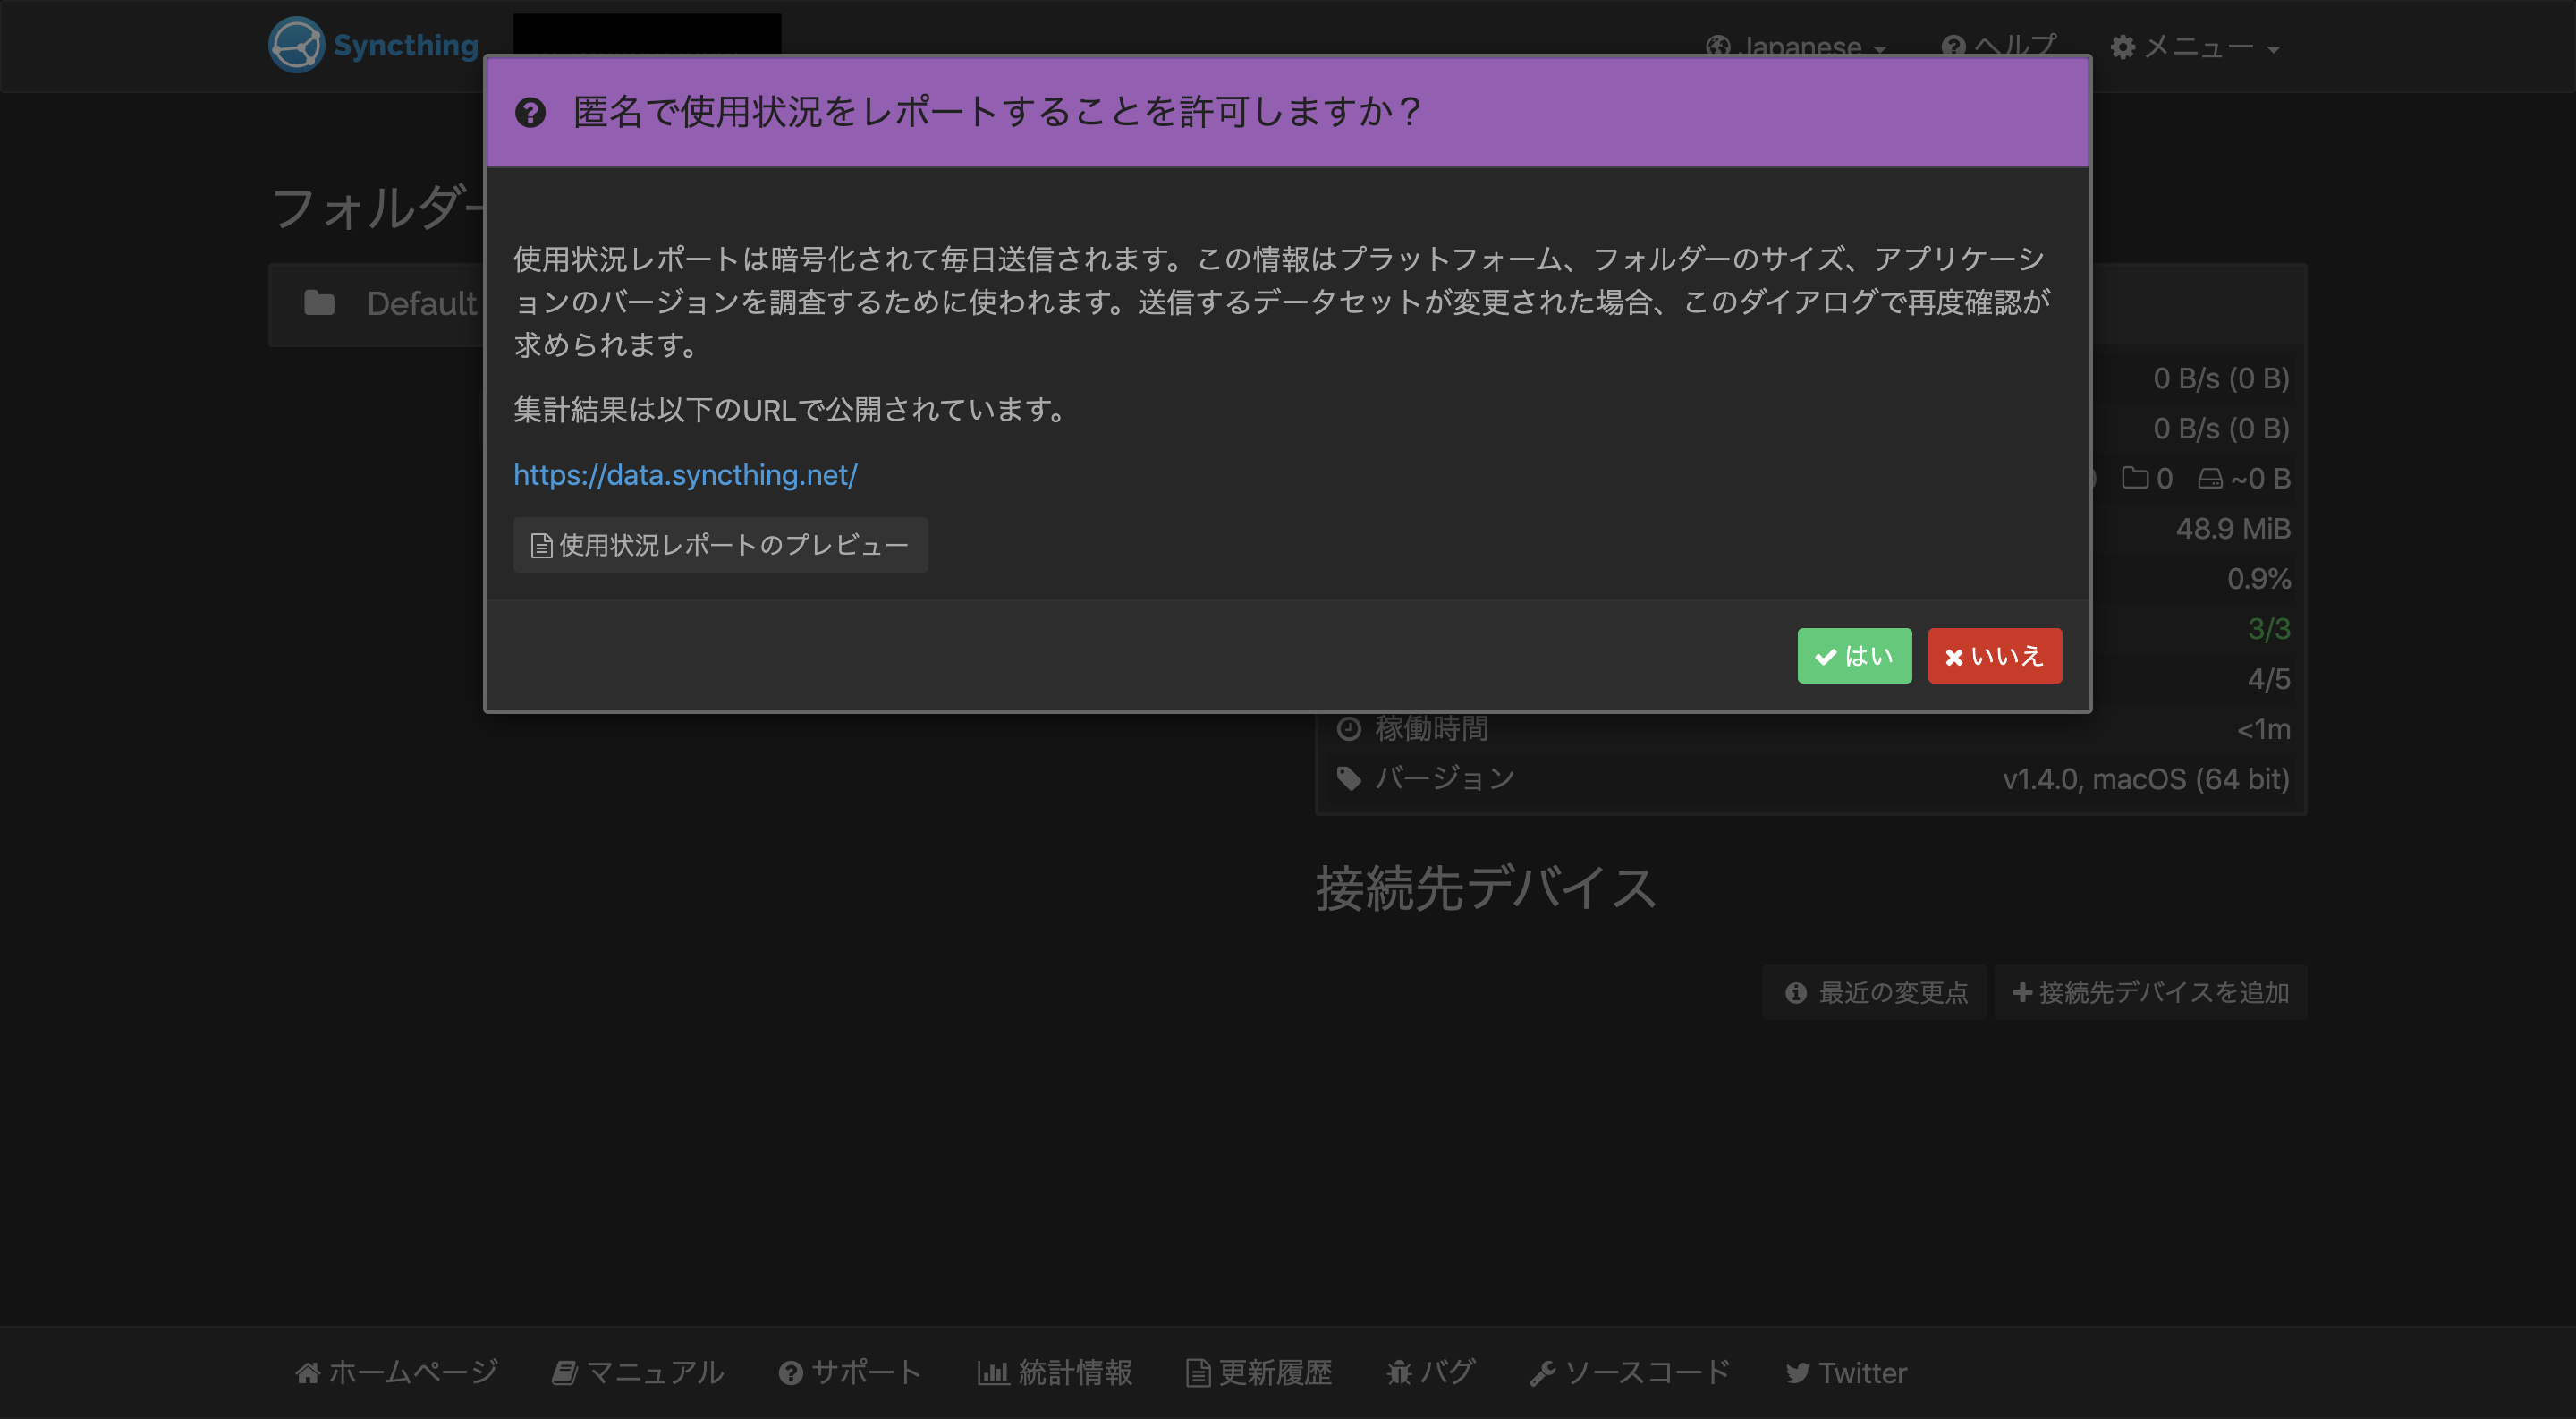
syncthingコマンドを実行するとブラウザが立ち上がり、以下の画面が表示されます。
サービスとして登録・実行
上記の手順通りにsyncthingコマンドで実行すると、コンソールを立ち上げっぱなしにしないと同期が行えないため、サービスとして登録します。
Ubuntu
sudo systemctl enable syncthing@${USER}.service
sudo systemctl start syncthing@${USER}.service
Mac
brew services start syncthing
Macの場合、Syncthingは立ち上がりますが、Web GUIが見れませんでした・・・
設定済みであれば同期はちゃんと行われます。
MacでWeb GUIを立ち上げたい場合は別途syncthing -browser-onlyコマンドを使用します。
同期設定
同期するまでの手順は以下のステップがあります。
- 同期したい端末全てで
syncthingを立ち上げる - 「接続先デバイス」を登録する
- 同期するフォルダを追加する
- 共有フォルダ設定
- 同期が完了するのを待つ
1.は完了しているので、2.から説明します。
「接続先デバイス」を登録する
ブラウザに表示されている画面の右下に「接続デバイスを追加」ボタンがあるので、押下します。
すると、以下のポップアップが表示されます。
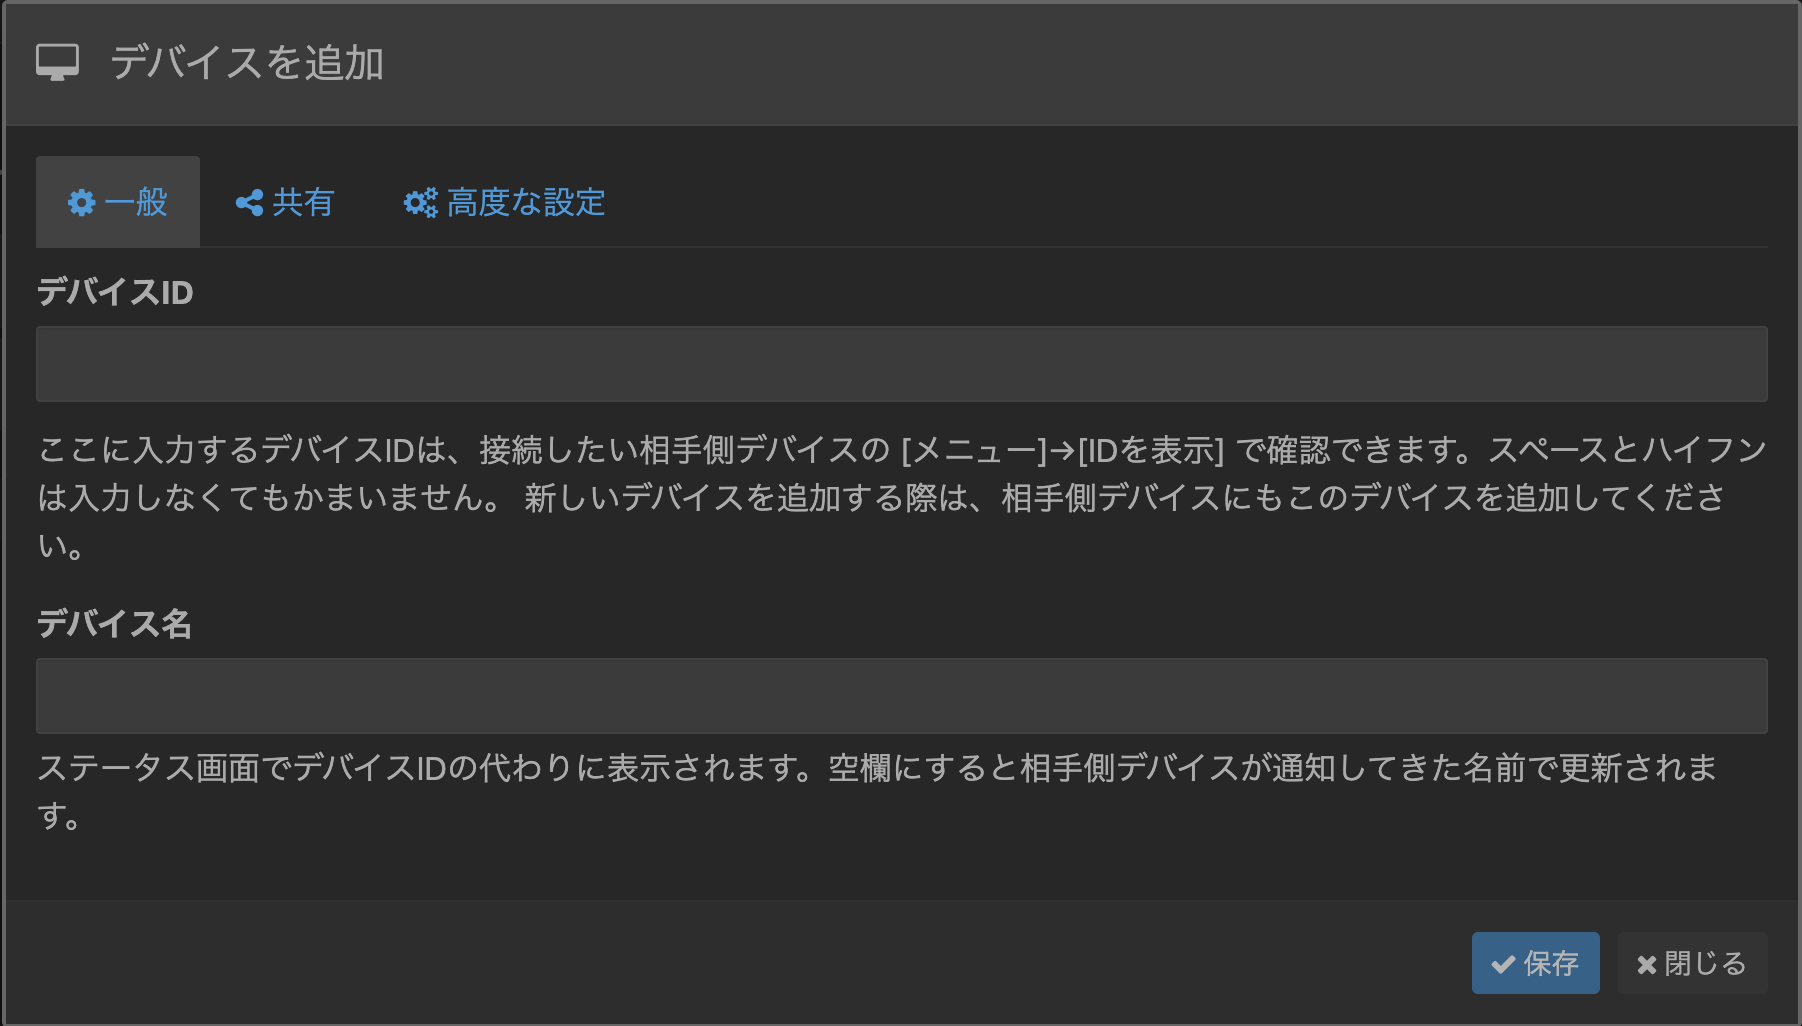
同期するデバイス同士がsyncthingが立ち上がっている状態で、同一ネットワーク上に存在する場合は
もう一方の端末のデバイスIDが自動的に表示されますので、そちらを選択するだけでOKです。
同一ネットワークに存在しない場合はデバイスIDを調べて入力する必要があります。
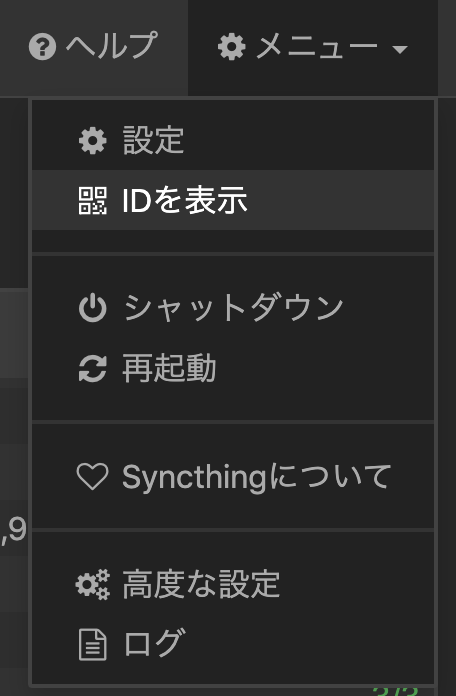
デバイスIDの調べ方
画面右上のメニュ→IDを表示でデバイスIDを確認することができます。
上記の設定を2台分設定します。
同期するフォルダを追加する
今回はUbuntuの~/githubフォルダを同期してみます。
同期元(Ubuntu)の設定
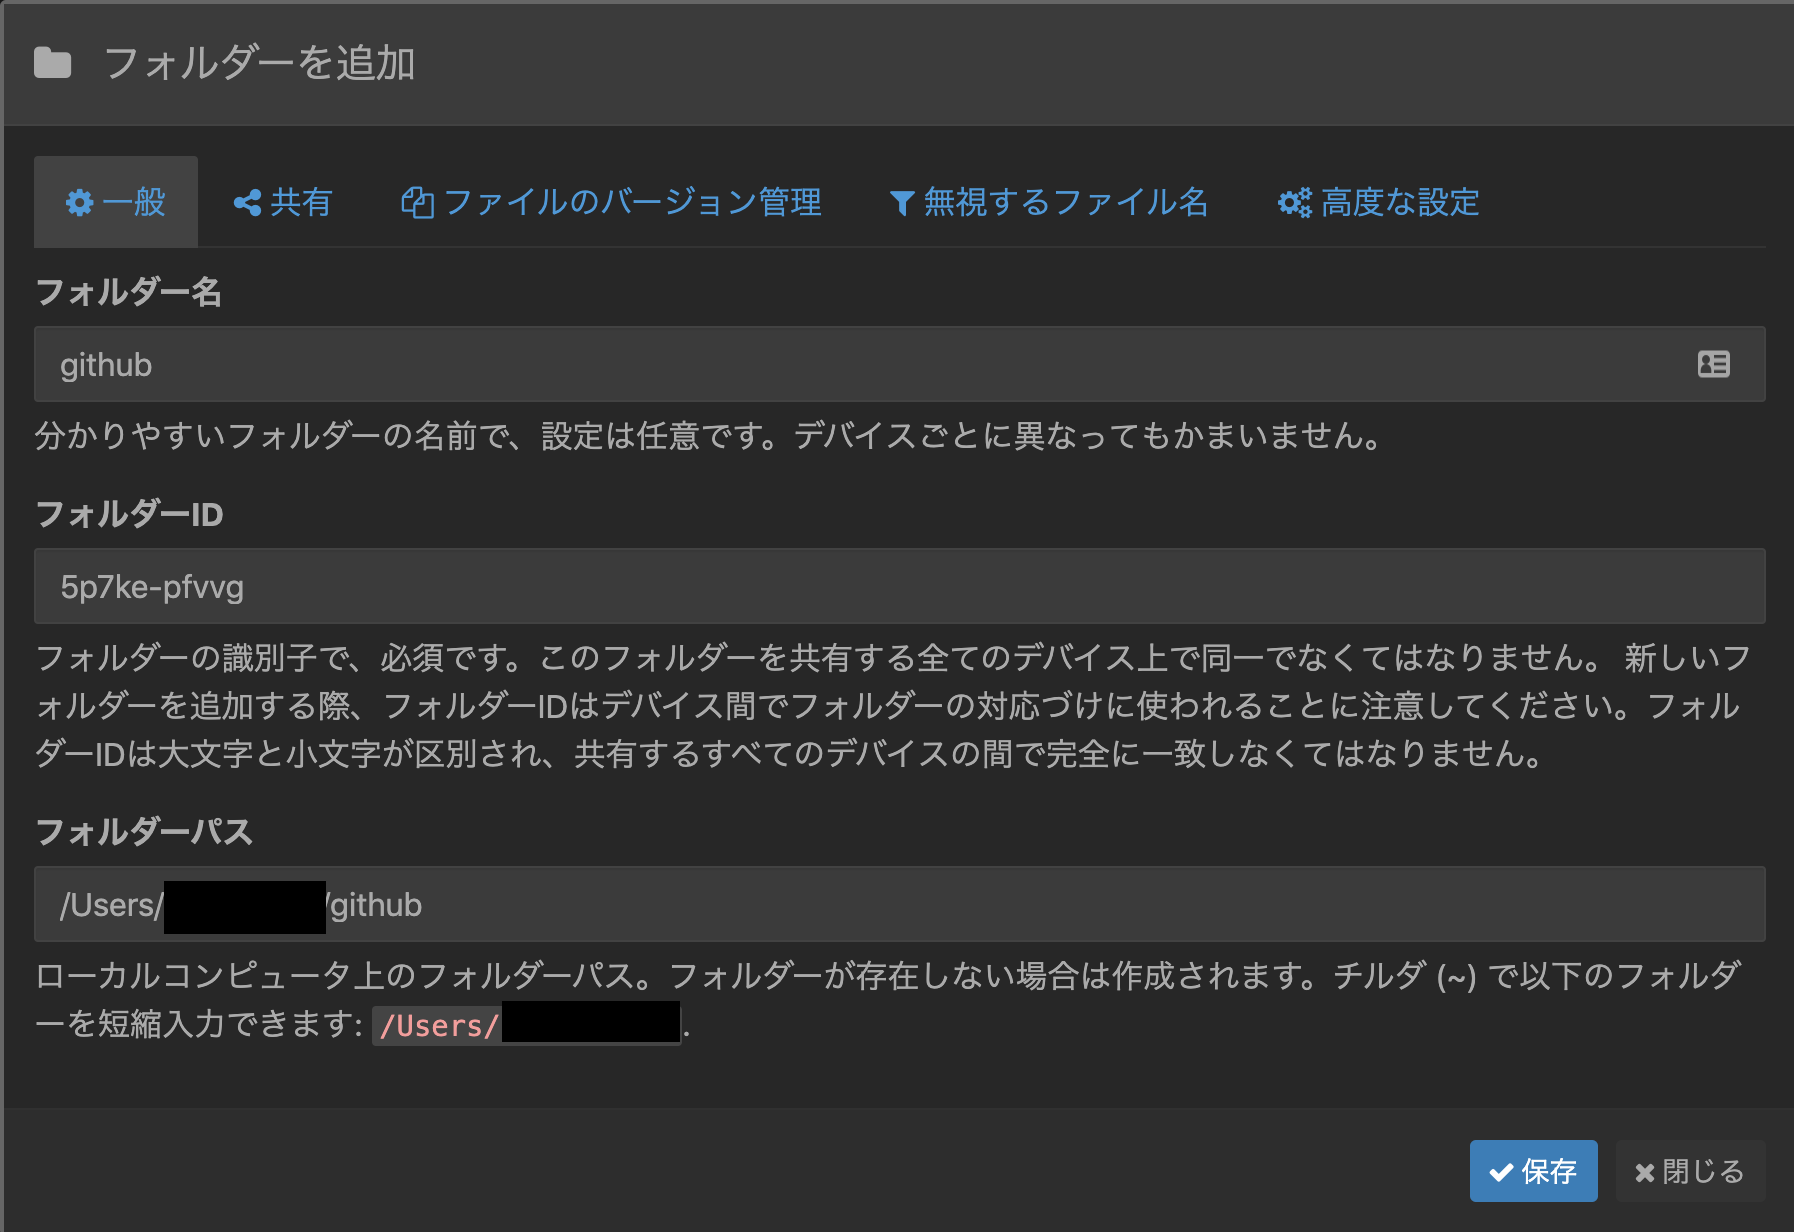
同期元のブラウザの左側に「フォルダを追加」ボタンがあるので、押下します。

すると、以下のようなポップアップが表示されます。
フォルダー名に共有したいフォルダを指定します。
私はたまたまホームディレクトリのフォルダだったのでこのままでOKですが、それ以外の場合はフォルダーパスも設定してください。
こちらのフォルダーIDは重要ですので、控えておいてください。
ポップアップ上に無視するファイル名のタブがあるので、共有したくないファイルはこちらで除外が可能です。
私は直接設定ファイルで行いました。
同期先(Mac)の設定
同期先でも同様の設定を行います。
ポイントとしては、フォルダーIDを同じにすることです。
共有フォルダ設定
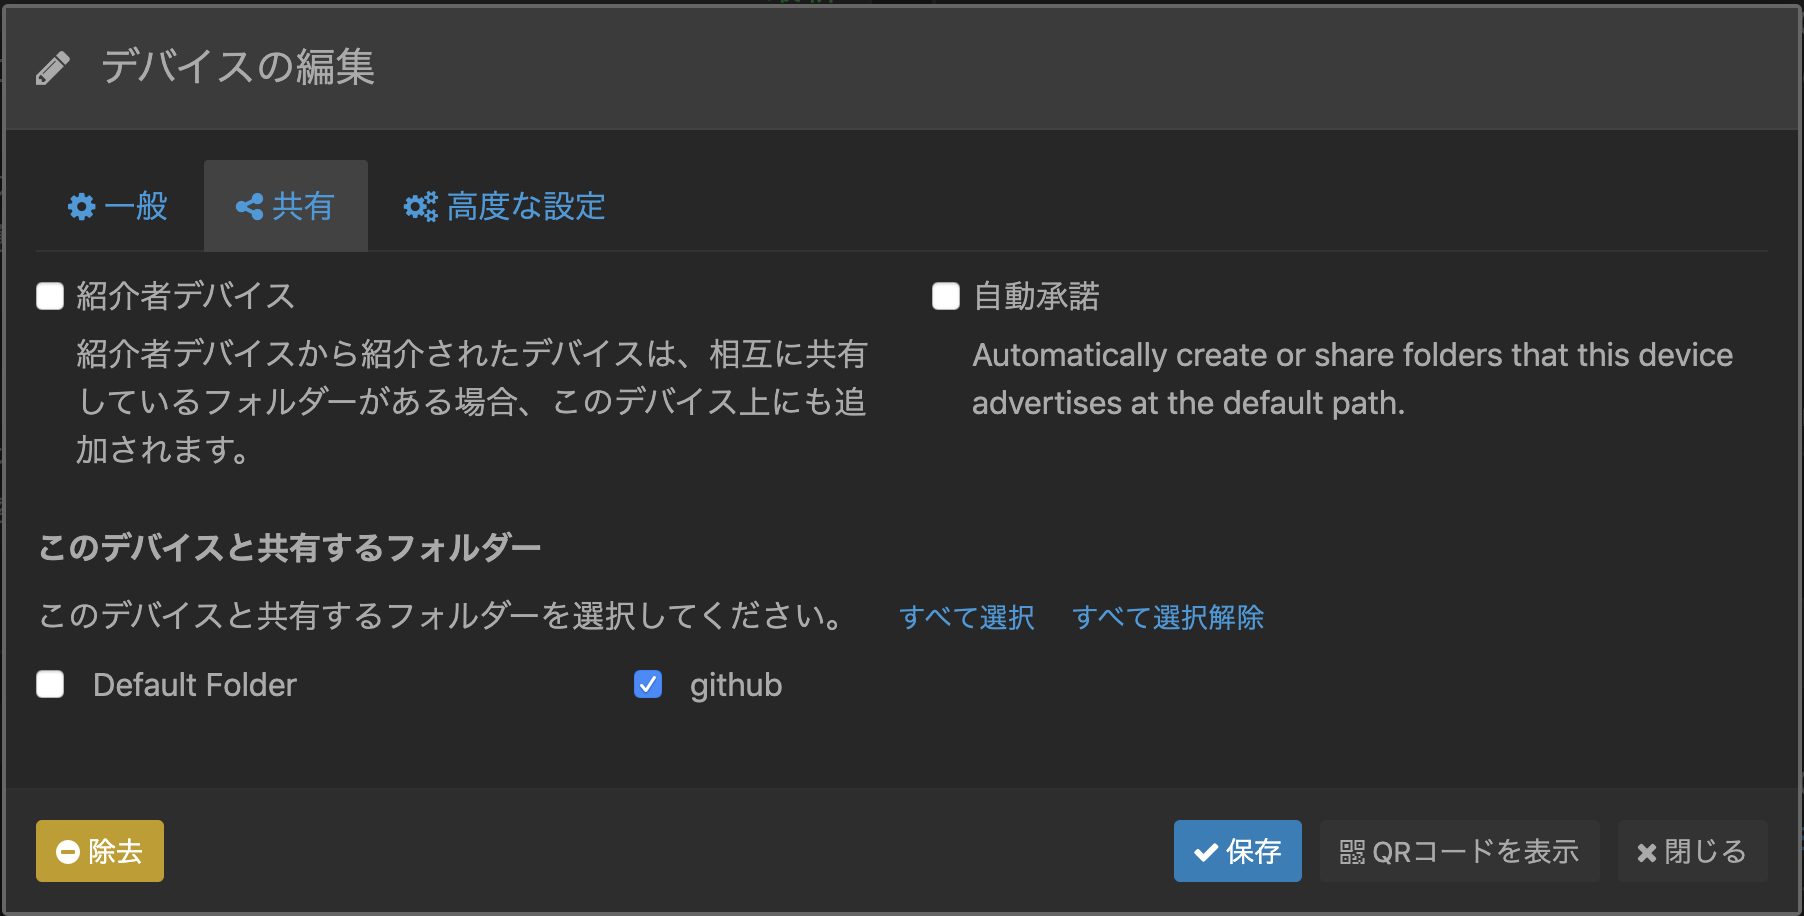
表示されたポップアップの共有を押下し、このデバイスと共有するフォルダーの共有したいフォルダにチェックを入れ、保存します。
同期が完了するのを待つ
同期設定に成功すると、以下のように同期が開始されるのであとは待つだけです!

CLIだけの環境で同期を行う
デフォルトの設定だとlocalhostからしかWeb GUIの画面を開くことができません。
そこで、設定を変更して外部からもWeb GUIを表示できるようにするとCLIだけの環境でも楽に設定が行えます。
しかし、VPSやEC2などパブリックな環境ですと誰からでも設定を変更できてしまうため、必ずパスワードを設定してください。
設定ファイルの編集
環境によって設定ファイルの場所が異なります。
- Linuxの場合
# ver. 1.27.0以降
~/.local/state/syncthing/config.xml

# ver. 1.26.0以前
~/.config/syncthing/config.xml
- Macの場合
~/Library/ApplicationSupport/Syncthing/config.xml
GUIの設定があるので、以下のように修正します。
<gui enabled="true" tls="false" debugging="false">
    <address>127.0.0.1:8384</address>
    <apikey>aNw6DrLYWukHvLK22Ed7M5hoR5tixPJG</apikey>
    <theme>dark</theme>
</gui>
<gui enabled="true" tls="false" debugging="false">
    <!-- ここを0.0.0.0に修正 -->
    <address>0.0.0.0:8384</address>
    <apikey>aNw6DrLYWukHvLK22Ed7M5hoR5tixPJG</apikey>
    <theme>dark</theme>
</gui>
syncthingを起動している場合はsyncthingを再起動してください。
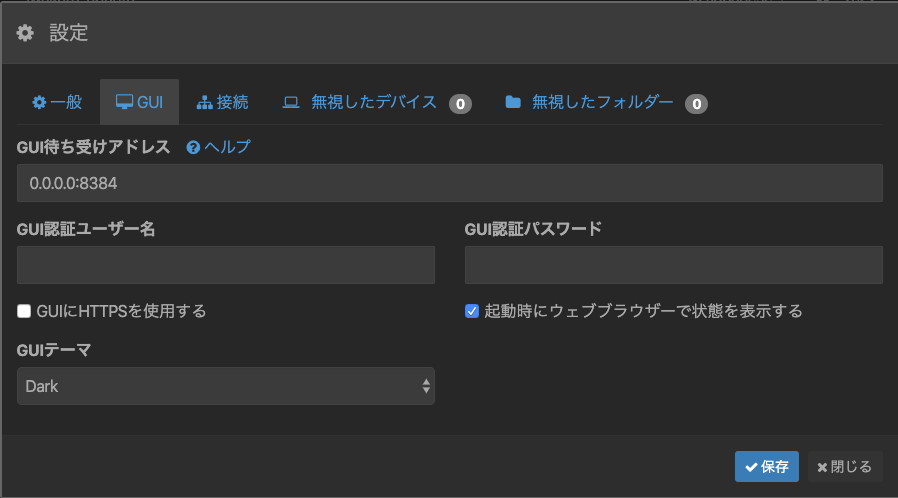
これで外部から見れるようになりますが、上記で述べたようにパブリックな状態なので、警告が表示されます。

右下の設定ボタンを押下し、GUIのユーザーとパスワードを設定してください。
完全にCLIだけで同期設定を行いたい
config.xmlを設定するだけで完全にコマンドラインだけで設定することも可能でした。
しかし、直接XMLを編集する必要がある & 複数の端末全てに記載が必要なので、ちょっと面倒でした。
軽くですが、設定方法を記載します。
インストール
インストールの手順は上記と全く同じです。
デバイスの登録
deviceタグがあると思いますので、こちらの内容をコピーして真下に設定します。
deviceのidに同期したいデバイスのIDを設定します。
<device id="XXXXXXXXX" name="xxx-ubuntu" compression="metadata" introducer="false" skipIntroductionRemovals="false" introducedBy="">
     <address>dynamic</address>
     <paused>false</paused>
     <autoAcceptFolders>false</autoAcceptFolders>
     <maxSendKbps>0</maxSendKbps>
     <maxRecvKbps>0</maxRecvKbps>
     <maxRequestKiB>0</maxRequestKiB>
</device>
デバイスIDはsyncthingコマンド実行時に表示されるログか、GUIの場合はWEB画面、サービス(デーモン)実行している場合は
以下のコマンドから確認してください。
syncthing -device-id
フォルダの登録
config.xmlの最上部にfolder id="default"のタグがあるので、こちらを全てコピーして真下に設定します。
<folder id="default" label="Default Folder" path="/Users/xxxx/Sync" type="sendreceive" rescanIntervalS="3600" fsWatcherEnabled="true" fsWatcherDelayS="10" ignorePerms="false" autoNormalize="true">
    <filesystemType>basic</filesystemType>
    <device id="XXXXXXXXX" introducedBy=""></device>
    <minDiskFree unit="%">1</minDiskFree>
    <versioning></versioning>
    <copiers>0</copiers>
    <pullerMaxPendingKiB>0</pullerMaxPendingKiB>
    <hashers>0</hashers>
    <order>random</order>
    <ignoreDelete>false</ignoreDelete>
    <scanProgressIntervalS>0</scanProgressIntervalS>
    <pullerPauseS>0</pullerPauseS>
    <maxConflicts>-1</maxConflicts>
    <disableSparseFiles>false</disableSparseFiles>
    <disableTempIndexes>false</disableTempIndexes>
    <paused>false</paused>
    <weakHashThresholdPct>25</weakHashThresholdPct>
    <markerName>.stfolder</markerName>
    <copyOwnershipFromParent>false</copyOwnershipFromParent>
    <modTimeWindowS>0</modTimeWindowS>
</folder>
コピーした設定の以下の部分を書き換えます。
- folder
- id: フォルダーIDを設定(他の端末で生成済みの場合はそのIDを設定、未作成の場合は適当なIDを設定)
- label: フォルダ名を設定
- path: 同期するフォルダパスを設定
- device
- コピーしたdeviceには自身の設定が記載されているため、このままでOK
- 他のデバイスを登録するため、こちらをコピーしてidを同期する端末のデバイスIDに変更
設定変更後、syncthingを再起動してください。
設定例
<folder id="github-folder-id" label="github" path="/Users/xxxxx/github" type="sendreceive" rescanIntervalS="3600" fsWatcherEnabled="true" fsWatcherDelayS="10" ignorePerms="false" autoNormalize="true">
    <filesystemType>basic</filesystemType>
    <device id="デバイスID1" introducedBy=""></device>
    <device id="デバイスID2" introducedBy=""></device>
    <device id="デバイスID3" introducedBy=""></device>
    <minDiskFree unit="%">1</minDiskFree>
    <versioning></versioning>
    <copiers>0</copiers>
    <pullerMaxPendingKiB>0</pullerMaxPendingKiB>
    <hashers>0</hashers>
    <order>random</order>
    <ignoreDelete>false</ignoreDelete>
    <scanProgressIntervalS>0</scanProgressIntervalS>
    <pullerPauseS>0</pullerPauseS>
    <maxConflicts>-1</maxConflicts>
    <disableSparseFiles>false</disableSparseFiles>
    <disableTempIndexes>false</disableTempIndexes>
    <paused>false</paused>
    <weakHashThresholdPct>25</weakHashThresholdPct>
    <markerName>.stfolder</markerName>
    <copyOwnershipFromParent>false</copyOwnershipFromParent>
    <modTimeWindowS>0</modTimeWindowS>
</folder>
以上です。
しばらく使用してみて、使い勝手も確認してみます。
