5
1

Delete article

Deleted articles cannot be recovered.

Draft of this article would be also deleted.

Are you sure you want to delete this article?

More than 5 years have passed since last update.

【Unity】UIの透過をスクリプトからまとめて調整するCanvasGroup

Last updated at Posted at 2020-04-26

環境

Unity 2019.3.7f1

はじめに

ボタンの透過率を変更しても
ボタンに付けているテキストの透過率は一緒に変化しません。

まとめて透過率を変更したいときはCanvasGroupが便利です。

手順

1.透過値を変更したいUIを適当オブジェクトにまとめる
2.まとめたオブジェクトにCanvasGroupコンポーネントを追加
3.スクリプトからCanvasGroupコンポーネントを取得しアルファ値を変更する
 CanvasGroup型の変数.alpha=0f~1f;

具体例

3つのボタンの透過値を実行後50%に変更していきます。

1.ボタンを3つ作成
image.png
 
2.CanvasにCanvasGroupコンポーネントを追加
image.png

CanvasGroupコンポーネントが追加されました。
image.png

3.スクリプト作成
スクリプトを新規作成します。スクリプト名はCanvasTestとしました。

CanvasTest
using System.Collections;
using System.Collections.Generic;
using UnityEngine;
using UnityEngine.UI;//UIを使うとき追加

public class CanvasTest : MonoBehaviour
{
    [SerializeField] private CanvasGroup a;//CanvasGroup型の変数aを宣言 あとでCanvasGroupをアタッチする
        
    void Start()
    {
        a.alpha = 0.5f;//変数aのalpha値を変更
    }
}

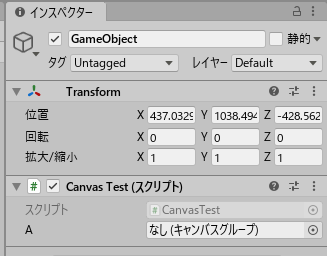
4.空のゲームオブジェクト作成&スクリプトをアタッチ
image.png

5.スクリプトにCanvasGroupをアタッチ
Canvasを空のオブジェクトのスクリプトの変数a欄にアタッチ
image.png

 
CanvasGroupの場所を覚えさせることができました。
image.png

6.実行結果
透過率がまとめて変わりました~。
image.png

おわりに

個別の透過率変更とはサヨナラです♪

5
1
0

Register as a new user and use Qiita more conveniently

  1. You get articles that match your needs
  2. You can efficiently read back useful information
  3. You can use dark theme
What you can do with signing up
5
1

Delete article

Deleted articles cannot be recovered.

Draft of this article would be also deleted.

Are you sure you want to delete this article?