SpringBootでRabbitMQを使ってキュー管理しましょう。
今回は一番簡単そうな、一旦バッファーしてあとでまとめて処理するがテーマです。
グループウェアの通知機能とかアフェリエートの報告みたいのとか細々としてたものを後で一括まとめて処理したい場合が多いですが。DBにいちいち入れて、出して、消してするのは手間がかかって面倒です。
システムの一個の部品としてキュー管理機能をあらかじめ実装しておきましょう。
フロントでキューを追加して、他のスレッドで1分に一回とか処理する事を想定します。
動くサンプル
1.RabbitMQの接続設定
この前作成したrabbitMQクラスタに接続してみます
2.コントローラーの作成
RabbitTemplateを使ってキューにコンテンツを登録します
3.CommandLineLinearの作成
CommandLineLinearを継承したクラスでキューを取り出して処理するタスクを追加します
4.Receiverの設定
リアルタイムで非同期データ受信を行うときのレシーバーとして利用します
RabbitMQApplication内の下記のコメントアウトを外して実験してみましょう
    ......
    @Bean
    Receiver receiver() {
        return new Receiver();
    }
    ......
    @Bean
    MessageListenerAdapter listenerAdapter(Receiver receiver) {
        return new MessageListenerAdapter(receiver, "receiveMessage");
    }
    ......
    container.setMessageListener(listenerAdapter);
    ......
5.CURLでデータ送信
コントローラーで作成したURLにデータを送信します
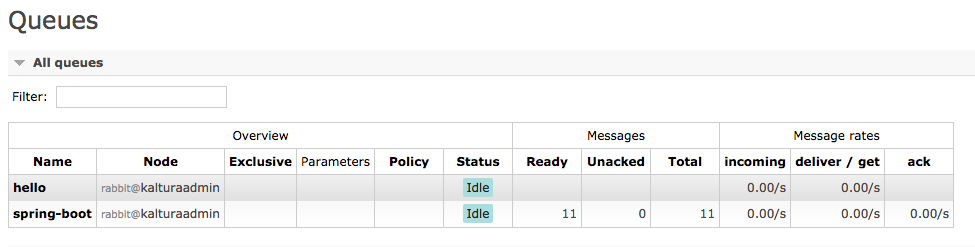
6.画面で確認
http://192.168.3.3:15672/#/queues
RabbitMQの管理画面で確認します
7.ログで確認
RabbitMQApplicationを実行した際のログを確認します
1.RabbitMQの接続設定
RabbitMQConfig.java
package demo.configs;

import org.springframework.amqp.rabbit.connection.CachingConnectionFactory;
import org.springframework.amqp.rabbit.connection.ConnectionFactory;
import org.springframework.amqp.rabbit.listener.SimpleMessageListenerContainer;
import org.springframework.context.annotation.Bean;
import org.springframework.context.annotation.Configuration;

@Configuration
public class RabbitMQConfig {

    /*@Bean
    TopicExchange exchange() {
        return new TopicExchange("spring-boot-exchange");
    }

    @Bean
    Binding binding(Queue queue, TopicExchange exchange) {
        return BindingBuilder.bind(queue).to(exchange).with(queueName);
    }*/

    @Bean
    CachingConnectionFactory rabbitConnectionFactory(){
        CachingConnectionFactory rabicon = new CachingConnectionFactory();
        //amqp.connect('amqp://admin:admin@192.168.3.3:5672/',
        rabicon.setHost("192.168.3.3");
        rabicon.setUsername("admin");
        rabicon.setPassword("admin");
        rabicon.setPort(5672);
        return rabicon;
    }

    @Bean
    SimpleMessageListenerContainer simpleMessage(ConnectionFactory connectionFactory) {
        SimpleMessageListenerContainer container = new SimpleMessageListenerContainer();
        container.setConnectionFactory(connectionFactory);
        container.setQueueNames(Const.RabbitMQMessageQue);
        //container.setMessageListener(listenerAdapter);
        return container;
    }


    /*
     * レシーバーは一旦コメントアウト
     * @Bean
    Receiver receiver() {
        return new Receiver();
    }

    @Bean
    MessageListenerAdapter listenerAdapter(Receiver receiver) {
        return new MessageListenerAdapter(receiver, "receiveMessage");
    }*/

}
2.コントローラーの作成
RabbitController.java
package demo.controller;


import org.codehaus.jackson.map.ObjectMapper;
import org.springframework.amqp.rabbit.core.RabbitTemplate;
import org.springframework.beans.factory.annotation.Autowired;
import org.springframework.boot.autoconfigure.EnableAutoConfiguration;
import org.springframework.boot.context.properties.EnableConfigurationProperties;
import org.springframework.context.ApplicationContext;
import org.springframework.stereotype.Controller;
import org.springframework.web.bind.annotation.RequestMapping;
import org.springframework.web.bind.annotation.RequestMethod;
import org.springframework.web.bind.annotation.RequestParam;
import org.springframework.web.bind.annotation.ResponseBody;

import demo.configs.Const;
import demo.dto.Mail;
import demo.dto.Status;

@EnableAutoConfiguration
@EnableConfigurationProperties
@Controller
@RequestMapping(value="/rabiit",method=RequestMethod.POST)
public class RabbitController {
    @Autowired
    private ApplicationContext context;

    @Autowired
    RabbitTemplate rabbitTemplate;

    /**
     * curl -d to="muromari@com" -d text="1いいねしました" http://localhost:8080/rabiit/push
     * curl -d to="muromari@com" -d text="3写真アップしました" http://localhost:8080/rabiit/push
     * */
    @RequestMapping(value="/push",method=RequestMethod.POST)
    public @ResponseBody Status getAllPath(@RequestParam(value="to", required=true) String to,@RequestParam(value="text", defaultValue="") String text) {
        ObjectMapper mapper = new ObjectMapper();

        Mail mail = new Mail();
        mail.setToAddress(to);
        mail.setStrContent(text);

        try {
            String jsonInString = mapper.writeValueAsString(mail);
            rabbitTemplate.convertAndSend(Const.RabbitMQMessageQue,jsonInString);
        } catch (Exception e) {
            System.out.println(e.getMessage());
        }

        return new Status("OK");

    }
}
3.CommandLineLinearの作成
RabbitMQApplication.java
package demo;

import java.util.Date;

import org.codehaus.jackson.map.ObjectMapper;
import org.springframework.amqp.core.Binding;
import org.springframework.amqp.core.BindingBuilder;
import org.springframework.amqp.core.Queue;
import org.springframework.amqp.core.TopicExchange;
import org.springframework.amqp.rabbit.connection.CachingConnectionFactory;
import org.springframework.amqp.rabbit.connection.ConnectionFactory;
import org.springframework.amqp.rabbit.core.RabbitTemplate;
import org.springframework.amqp.rabbit.listener.SimpleMessageListenerContainer;
import org.springframework.batch.core.configuration.annotation.EnableBatchProcessing;
import org.springframework.beans.factory.annotation.Autowired;
import org.springframework.boot.CommandLineRunner;
import org.springframework.boot.SpringApplication;
import org.springframework.boot.autoconfigure.EnableAutoConfiguration;
import org.springframework.boot.context.properties.EnableConfigurationProperties;
import org.springframework.context.ApplicationContext;
import org.springframework.context.annotation.Bean;

import demo.configs.Const;
import demo.dto.Mail;

@EnableAutoConfiguration
@EnableBatchProcessing
@EnableConfigurationProperties
public class RabbitMQApplication implements CommandLineRunner {

    @Autowired
    ApplicationContext context;


    @Autowired
    RabbitTemplate rabbitTemplate;

    @Bean
    Queue queue() {
        return new Queue(Const.RabbitMQMessageQue, false);
    }

    @Bean
    TopicExchange exchange() {
        return new TopicExchange("spring-boot-exchange");
    }

    @Bean
    Binding binding(Queue queue, TopicExchange exchange) {
        return BindingBuilder.bind(queue).to(exchange).with(Const.RabbitMQMessageQue);
    }

    @Bean
    CachingConnectionFactory rabbitConnectionFactory(){
        CachingConnectionFactory rabicon = new CachingConnectionFactory();
        //amqp.connect('amqp://admin:admin@192.168.3.3:5672/',
        rabicon.setHost("192.168.3.3");
        rabicon.setUsername("admin");
        rabicon.setPassword("admin");
        rabicon.setPort(5672);
        return rabicon;
    }


    @Bean
    SimpleMessageListenerContainer container(ConnectionFactory connectionFactory) {
        SimpleMessageListenerContainer container = new SimpleMessageListenerContainer();
        container.setConnectionFactory(connectionFactory);
        container.setQueueNames(Const.RabbitMQMessageQue);
        //container.setMessageListener(listenerAdapter);
        return container;
    }

    /*
    For asyncronized receiving

    @Bean
    Receiver receiver() {
        return new Receiver();
    }

    @Bean
    MessageListenerAdapter listenerAdapter(Receiver receiver) {
        return new MessageListenerAdapter(receiver, "receiveMessage");
    }*/

    public static void main(String[] args) throws InterruptedException {
        SpringApplication.run(RabbitMQApplication.class, args);
    }

    @Override
    public void run(String... args) throws Exception {
        System.out.println("Waiting five seconds...");

        while(0 < 1){
            for(int i = 0 ; i < 5 ; i++){
                String object = (String)rabbitTemplate.receiveAndConvert(Const.RabbitMQMessageQue);
                if(object != null){
                    try{
                        System.out.println(new Date().toGMTString() + ": " + object);
                        ObjectMapper mapper = new ObjectMapper();
                        Mail mail = mapper.readValue(object, Mail.class);
                        System.out.println(mail.getToAddress() + " , " + mail.getStrContent());
                    }catch(Exception e){
                        System.out.println(e.getMessage());
                    }
                }
            }
            Thread.sleep(10000);
        }
    }
}
4.Receiverの設定
Receiver.java
package demo.service;

import java.util.concurrent.CountDownLatch;

public class Receiver {

    private CountDownLatch latch = new CountDownLatch(1);

    public void receiveMessage(String message) {
        System.out.println("Received <" + message + ">");
        latch.countDown();
    }

    public CountDownLatch getLatch() {
        return latch;
    }

}
5.CURLでデータ送信
[murotanimari]$ curl -d to="muromari@com" -d text="1いいねしました" http://localhost:8080/rabiit/push
{"status":"OK"}
6.画面で確認
spring-bootのキューの中にReadyの部分のナンバーが増えています
7.ログで確認
コマンドラインの出力を確認します
8 Nov 2015 15:48:17 GMT: {"toAddress":"muromari@com","strContent":"1いいねしました"}
muromari@com , 1いいねしました
8 Nov 2015 15:48:17 GMT: {"toAddress":"muromari@com","strContent":"1いいねしました"}
muromari@com , 1いいねしました
8 Nov 2015 15:48:17 GMT: {"toAddress":"muromari@com","strContent":"1いいねしました"}
muromari@com , 1いいねしました
8 Nov 2015 15:48:17 GMT: {"toAddress":"muromari@com","strContent":"1いいねしました"}
muromari@com , 1いいねしました