1. 事前準備
Android Studioのインストール
SDKのインストール
Project > New で新規のプロジェクトを作成する
参考サイト:
https://github.com/AnyChart/AnyChart-Android/wiki/Getting-started
https://github.com/AnyChart/AnyChart-Android/tree/master/sample/src/main/java/com/anychart/sample/charts
https://wannabe-jellyfish.hatenablog.com/entry/2015/08/08/231840
2. AnyChartをgradleに追加
3. gradleの設定ファイルを変更
3.1 mavenリポジトリの追加
 をクリックして選択
allprojects > repositories の下に追加します。
maven { url 'https://jitpack.io' }
allprojects {
    repositories {
        google()
        jcenter()
        maven { url 'https://jitpack.io' }
    }
}
3.2 dependencyの追加
 をクリックして選択
dependenciesの最後に追記します。
3.3 dependencyの追加
implementation 'com.github.AnyChart:AnyChart-Android:1.0.6'
dependencies {
    .....省略
    implementation 'com.github.AnyChart:AnyChart-Android:1.0.6'
}
3.4 Sync
 画面右上のMenuからSyncボタンを押してSyncをするとインストールされます。
4. サンプルコード追加
お試しなのでサクッとMainActivityの中のonCreateの一番下に追記しちゃいます。
class MainActivity : AppCompatActivity(), NavigationView.OnNavigationItemSelectedListener {
override fun onCreate(savedInstanceState: Bundle?) {
.......
.......
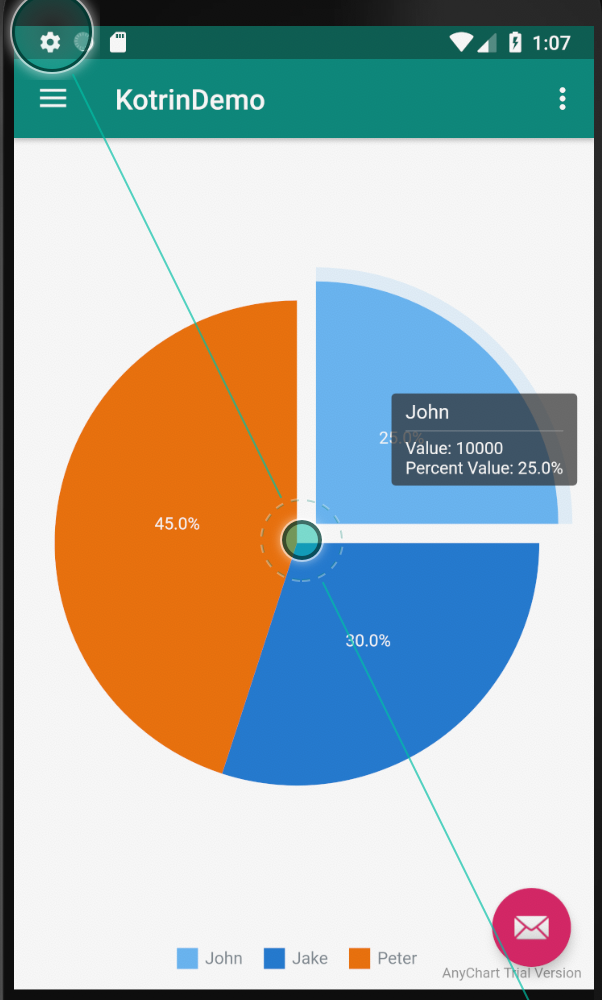
Pie Chart Example
val pie = AnyChart.pie()
val data = ArrayList<DataEntry>()
data.add(ValueDataEntry("John", 10000))
data.add(ValueDataEntry("Jake", 12000))
data.add(ValueDataEntry("Peter", 18000))
pie.data(data)
}
}
res/layout/content_main.xml
    <com.anychart.AnyChartView
            android:id="@+id/pie_chart_view"
            android:layout_width="match_parent"
            android:layout_height="match_parent"
    />
よちよちKotlin勉強会
(もくもくしてます)
https://techplay.jp/event/708101