入社以前にAPIの作成に用いていた Swagger が便利だった記憶があるので、当時浅い理解で雑に使っていたことがもったいなかったと思い、紹介と勉強のために軽くしたためる。
Swagger とは
The design and documentation platform for teams and individuals working with the OpenAPI Specification.
Swagger Tools
大きく3つのツール
- Editor
yml/json の形式でAPIの定義を書くことで後述のUIを吐き出すツール - UI
上記Editorに適切なyml/jsonをインポートすることでAPIがどのようなやりとりをするのか視覚的に見せるツール - Codegen
作成したAPIを各種言語で使えるようにExportするツール、HTMLで吐き出すとUIの機能をGitHub等で管理できる
で構成される。以前触った時は上の2つには触れたが、Codegenの威力に触れる機会が少なかったので、EditorとCodegenを中心に紹介したい。
弊社はマンガコンテンツを配信しているので、マンガを例にAPIを書いていく。
Editor/UI
yml全体はGitHubに置いておき、エンドポイントやdefinitionを少し紹介する(一部改変)。リンク先のymlファイルをSwagger Editorに貼り付けながら読むと理解が深まりやすいと思われる。
paths:
  /mangas:
    get:
      tags:
      - manga
      operationId: getMangas
      responses:
        200:
          description: successful operation
          schema:
            type: array
            items:
              $ref: '#/definitions/Manga'
definitions:
  Manga:
    type: object
    required:
    - id
    properties:
      id:
        type: integer
        format: int64
        example: 1
      name:
        type: string
        example: クレッフィーの大冒険!
      releaseDate:
        type: string
        format: date-time
        example: '2020-12-01 00:00:00.000'
      chapters:
        type: array
        minLength: 1
        items:
          $ref: '#/definitions/Chapter'
        example:
        - {id: 1, name: '威張れ!クレッフィー!'}
        - {id: 2, name: '電磁波!クレッフィー!'}
  Chapter:
    required:
    - id
    - name
    properties:
      id:
        type: integer
        example: 1
      name:
        type: string
        example: 威張れ!クレッフィー!
      pages:
        type: array
        items:
          type: string
          format: url
        example:
        - '/image/1'
        - '/image/2'
なんとなく見ればわかるが、path以下で各種エンドポイントをかき、返す値やプロパティーにdefinitionsで定義しているオブジェクトを指定することができる。get methodだけだとわかりにくいので、コメントを送信するエンドポイントもみてみる。
path:
  ...
  /comments:
    get:
    ...
    put:
      tags:
      - comment
      summary: Send comment to title
      operationId: putCommentByTitleId
      parameters:
      - name: titleId
        in: query
        type: integer
        format: int64
        description: ID of title id
        required: true
      - name: userId
        in: query
        type: integer
        format: int64
        description: ID of user id
        required: true
      - name: body
        in: query
        type: string
        description: comment
        required: true
      responses:
        200:
          description: successful operation
        400:
          description: Bad Request
definitions:
  ...
  Comment:
    required:
    - userId
    - body
    properties:
      id:
        type: integer
        example: 1
      userId:
        type: integer
        example: 1
      titleId:
        type: integer
        example: 1
      body:
        type: string
        example: IBARU JAPAN
query paramとして、titleId,userId,bodyを必須とするputエンドポイントを定義している1。認証周りの設定等もでき、それなりに幅の広いAPIが作れるようだ。

Codegen
Editorで書いたyml/jsonは Client SDK, Server Stub, Documentに吐き出すことができる。
Client SDK
GitHubにはjavascriptのSDKを置いておく。他にも Java, Android, Objective-C, C#, PHP, Perl, Python に吐き出すことができる。
Chapter getの例を置く。
[getChapterById: /chapter/{id} のエンドポイントを定義]
this.getChapterById = function(id, callback) {
  var postBody = null;
  // verify the required parameter 'id' is set
  if (id === undefined || id === null) {
    throw new Error("Missing the required parameter 'id' when calling getChapterById");
  }
  var pathParams = { 'id': id };
  var queryParams = {  };
  var collectionQueryParams = {  };
  var headerParams = {  };
  var formParams = {  };
  var authNames = [];
  var contentTypes = [];
  var accepts = [];
  var returnType = Chapter; ・・・ (*)
  return this.apiClient.callApi(
    '/chapters/{id}', 'GET',
    pathParams, queryParams, collectionQueryParams, headerParams, formParams, postBody,
    authNames, contentTypes, accepts, returnType, callback
  );
}
最後に呼び出されている this.apiClient.callApi() は ここに定義されている関数で、 (*)returnType は src/model/Chapters.js に定義される2。
[JavaScript]
var Swaggerapi = require('swaggerapi');
var api = new Swaggerapi.ChapterApi();
var id = 1; // get id from path
var callback = function(error, data, response) {
  if (error) {
    console.error(error);
  } else {
    console.log('API called successfully. Returned data: ' + data);
  }
};
api.getChapterById(id, callback);
このように用いられる。callbackを上記のように定義することで、apiの結果であるdataを出力している。
ソースコードだけでなく、ドキュメントが出力されるのも特徴の一つで、ChapterApiにあるように、Markdown形式で必要なパラメーターや先にあげたSDK使用例のようなサンプルコードも乗っている。その返り値のプロパティーもリンク先のように出力される。これを用いることでクライアントエンジニアは出力されたSDKとドキュメントさえ読めばサーバーと通信可能なアプリケーションを作れる。
Server Stub
Serverも出力可能だ。PHPを例に出力しているが、Client SDK同様、さまざまな言語に対応している。
ChapterControllerをみてみる。
public function getChapterByIdAction(Request $request, $id)
{
    $produces = [];
    $clientAccepts = $request->headers->has('Accept') ? $request->headers->get('Accept') : '*/*';
    $responseFormat = $this->getOutputFormat($clientAccepts, $produces);
    if ($responseFormat === null) {
        return new Response('', 406);
    }
    $id = $this->deserialize($id, 'int', 'string');

    // Validate the input values
    $asserts = [];
    $asserts[] = new Assert\NotNull();
    $asserts[] = new Assert\Type("int");
    $response = $this->validate($id, $asserts);
    if ($response instanceof Response) {
        return $response;
    }

    try {
        $handler = $this->getApiHandler();
        $responseCode = 200;
        $responseHeaders = [];
        $result = $handler->getChapterById($id, $responseCode, $responseHeaders);
        $message = 'successful operation';
        switch ($responseCode) {
            case 200:
                $message = 'successful operation';
                break;
        }

        return new Response(
            $result ? $this->serialize($result, $responseFormat) : '',
            $responseCode,
            array_merge($responseHeaders, [
                'Content-Type' => $responseFormat,
                'X-Swagger-Message' => $message
            ])
        );
    } catch (Exception $fallthrough) {
        return $this->createErrorResponse(new HttpException(500, 'An unsuspected error occurred.', $fallthrough));
    }
}
routing.ymlに書かれているパスへのアクセスをコントローラーに投げらている。ChapterApiInterfaceを継承したChapterApiを定義し、その中で$idに当たるチャプターの情報を返すようにすれば、サーバーサイドが出来上がる3。ChapterModelも出力されているので実装のコストはかからない。
Document
毎回yml/jsonをSwagger UIにコピーしないとSwaggerのいい点である視覚的・直感的な理解はできないわけではない。/html/index.html を開くと
このようなページが開く。SwaggerEditorを用いて表示を毎回行う必要はなく、htmlファイルを開けばそれ以上の機能が再現できる。エンドポイント一覧がページ全体の左側にまとまっているため、必要なエンドポイントをすぐにリンクで飛んで確認できる。curlコマンドが写っているが、それだけでなく、各種言語のサンプルコードも吐き出される4。
最後に
実際に動かすところまでできれば行きたかったが、そこまで進めることができずに残念に思う。その実、動かしてみないとわからないことも多いと思われ、また浅い理解に終わってしまった。次触ることがあれば動かしてみたい。
最大の特徴としてはクライエントエンジニアはSDK及び一緒に出力されたリファレンスを、サーバーエンジニアも出力されたStubとリファレンスをそれぞれ見れば意思疎通が可能なことにある。大元のひとつのyml/jsonからそれぞれのエンジニアにとって必要なリファレンス、ソースコードが出力されるため、お互いが編集する必要の出る箇所はyml/jsonのみにとどまる。複数箇所を編集する必要がなくなるため、引き継ぎやドキュメントの更新忘れなどでの人的エラーが起こりにくくなる。
まだまだ伝えきれていない魅力・私自身が理解していない仕様などがたくさんある、間違い・勘違いがあればご指摘いただきたい。割とテストコードを改変して遊んだ程度に止まってしまったので、ドキュメントをちゃんと読んできちんとしたものを作れると力になりそう。
ところで、どうして"Swagger"なんだろう。「威張る」って意味だよな、、、と思っていだが、形容詞が「粋な・スマートな」という意味らしく、命名もなんとなく納得。
-
parametersの
inにはqueryの他にbody,header,formData,pathが指定できる。
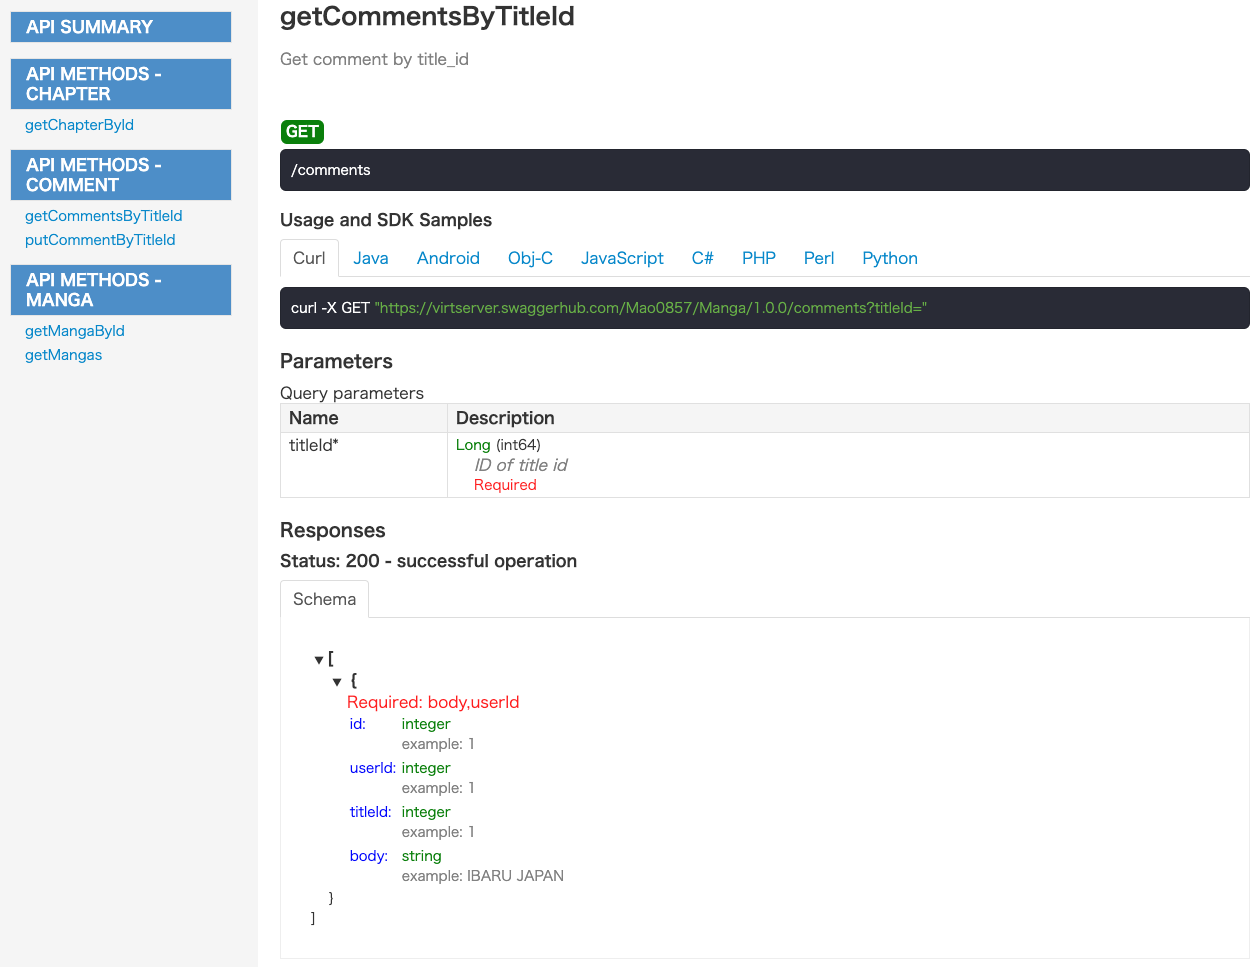
軽くUIを紹介すると、pathごとに以下のようなカード(?)が作られ、視覚的にどのようなparam,queryが必要になるのか、responseの形はどうなっているのかなどがわかるようになっている(exampleの値を定義しておくと嬉しいのはこの箇所)。 ↩ -
src/model以下には yml/json で definitions に書かれているものが吐き出されている。
作られた SDK は ↩ -
README#getting-started参照
Client同様、Markdown形式のAPI Referenceが出力される。そのためサーバーエンジニアも出力されたStubとドキュメントさえ読めばクライアントから送られてくるパラメーター及びレスポンスとしてどのようなものが期待されているのかが明確にわかるようになっている。 ↩ -
Client SDKを動かすサンプル。 ↩