初めまして。
個人的に引越しを行った際にスピーカーを買い替えて
手元に有線のスピーカーが余っていたので何か使えないかと調べていたら
ラズパイを使ったSpotify Connectの環境を作れる記事を発見、、、
ラズパイからSpotifyが流れるだと、、、
ちょうどラズパイも余っていたのでやってみました。
Rust?とやらでビルドしてみたのですがバージョンなど依存関係でなんだか動かず、、、
とりあえず最速でスピーカーから音が流れるならなんでも良くなった(依存関係の解決が面倒になったわけではある)ので
英語のドキュメントは極力避けたい私のようなゴミカスエンジニアは参考になればと。
用意するもの
- ラズパイ
音楽が流れる&聴ける環境が整うのであればラズパイゼロでもなんでもいいです。SSHで入っても直接ターミナルで操作しても構いません
私はSSHでまずいのでラズパイ4に、32bitのraspiOS Liteをraspberrypi imagerで作成しました
$ uname -a
Linux raspberrypi 6.1.21-v8+ #1642 SMP PREEMPT Mon Apr  3 17:24:16 BST 2023 aarch64 GNU/Linux
以上。
実行ファイルの取得
最新版取得します。
自分のOSに合ったものをダウンロードしてください。
今回はコマンドでダウンロードするのでリンク先では対象のファイルのリンクだけコピーしに行きます
取得先:https://github.com/Spotifyd/spotifyd/releases/tag/v0.3.5#:~:text=slondr-,Assets,-22
$ wget https://github.com/Spotifyd/spotifyd/releases/download/v0.3.5/spotifyd-linux-armhf-slim.tar.gz
保存したこと確認
$ ls
... spotifyd-linux-armhf-slim.tar.gz
解凍
$ tar xzf spotifyd-linux-armhf-slim.tar.gz
解凍したこと確認
$ ls
...  spotifyd  spotifyd-linux-armhf-slim.tar.gz
設定ファイルの作成
Spotifyのアカウント情報とかを設定します。
spotifydは、
/home/自分のユーザ名/.config/spotifyd/spotifyd.conf
上記に設定を見にいくように作られているみたいなので確実に作りましょう。
$ mkdir /home/自分のユーザ名/.config/spotifyd/
$ vi /home/自分のユーザ名/.config/spotifyd/spotifyd.conf
設定項目
[global]
username = "Spotify登録のユーザー名"
password = "パスワード"
backend = "alsa"
device = "hw" #※1
mixer = "PCM"
volume_controller = "alsa"
device_name = "raspberrypi"  #Spotify上に表示する名前
bitrate = 160 #90,160,320お好きなので
volume_normalisation = true
normalisation_pregain = -10
#cache_path = "cache_directory" #キャッシュの保存先。使う人はパスを入れてください
※1
ここが難しいポイントで、ラズパイの出力先を設定します。
defaultなどでもいけるのですが、
まず自分が出力したい機器をaplay -lで特定しましょう。
デフォルトではHDMIになにも接続されていなければ、ヘッドホンジャックから音が出るようになっているはずです。 HDMIに何か繋いでいる場合で、ヘッドホンジャックから音声を出したい場合は、raspi-configで出力先を変更できます。
引用先:https://www.mikan-tech.net/entry/raspi-speaker
上記に該当する場合はraspi-configから修正が必要です
私はHDMIは繋いでいないのでイヤホンからいきなり音が流れました。
raspiから流す場合は
ヘッドホン、HDMI、bluetoothのどれかだと思うのですが
・ヘッドホン、HDMI → hw
・bluetooth→???
僕も調べてないんでわからんです。
実行
$ ./spotifyd --no-daemon
Loading config from "/home/ユーザ名/.config/spotifyd/spotifyd.conf"
No proxy specified
Using alsa volume controller.
Ignoring blacklisted access point ap-gue1.spotify.com:4070
Ignoring blacklisted access point ap-gew4.spotify.com:80
Connecting to AP "ap-gae2.spotify.com:443"
Authenticated as "spotifyのユーザ名" !
Country: "JP"
Converting with ditherer: tpdf
Using AlsaSink with format: S16
うまく動くとここで待機中みたいになります。
Spotifyから曲を流してみる
こんな感じで名前が表示されます
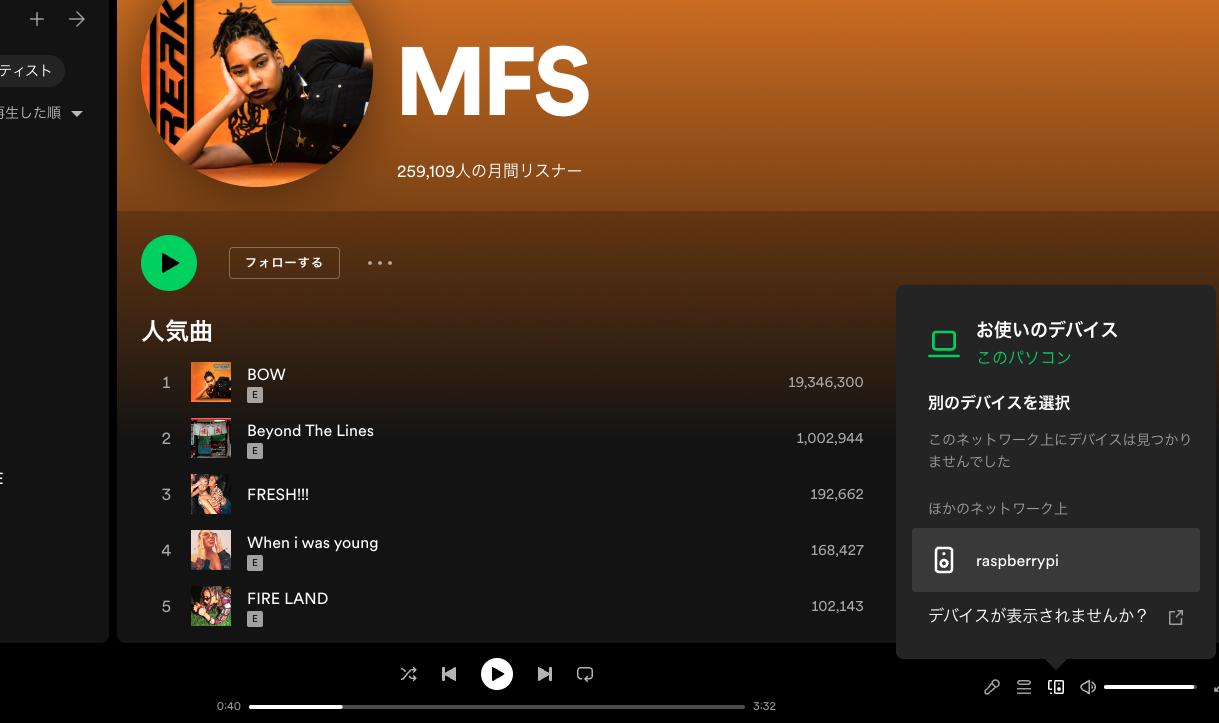
再生すると、、、
Using AlsaSink with format: S16
Loading <BOW> with Spotify URI <spotify:track:65FftemJ1DbbZ45DUfHJXE>
<BOW> (212253 ms) loaded
曲名が表示されますね。
自動起動化
毎回コマンド叩くの面倒なのでデーモン先生に起動時に実行していただきます。
$ sudo vi /etc/systemd/user/spotifyd.service
設定内容
[Unit]
Description=A spotify playing daemon
Documentation=https://github.com/Spotifyd/spotifyd
Wants=sound.target
After=sound.target
Wants=network-online.target
After=network-online.target

[Service]
ExecStart=/home/ユーザー名/spotifyd --no-daemon
Restart=always
RestartSec=12

[Install]
WantedBy=default.target
起動
$ systemctl --user start spotifyd.service
※たまにunmaskと怒られるので、その際は
$ systemctl --user unmask spotifyd.service
自動起動設定
$ sudo loginctl enable-linger ユーザー名
$ systemctl --user enable spotifyd.service
以上です!!!!
参考