はじめに
この記事では、Blender 4.0のPython APIを使用して、オブジェクトを発光させつつ動かすスクリプトを作成する方法について解説します。
デモ動画
こちらの記事もおすすめ
Blender 4.0 と Python API
Blenderは、3Dグラフィックスを作成するための強力なオープンソースソフトウェアです。Blender 4.0は、より進化した機能と使いやすさを提供します。Python APIを使用すると、Blenderの機能を自動化し、カスタマイズするスクリプトを作成できます。
スクリプトの目的
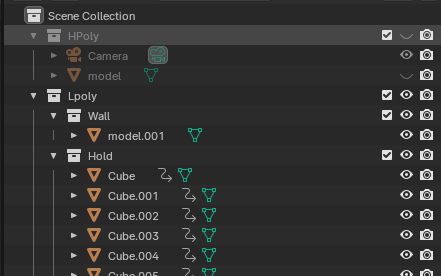
このスクリプトは、特定のコレクション内のオブジェクトに発光効果を適用し、それらをアニメーションさせることを目的としています。具体的には、'Lpoly' コレクション内の 'Hold' コレクションに含まれるオブジェクトに焦点を当てます。
スクリプトの解説
モジュールのインポート
import bpy
bpy モジュールは、BlenderのPython APIを使用するために必要です。
コレクションの取得
lpoly_collection = bpy.data.collections.get('Lpoly')
hold_collection = lpoly_collection.children.get('Hold') if lpoly_collection else None
ここで、'Lpoly' という名前のコレクションを取得し、その子コレクション 'Hold' を取得しています。
条件判断
if hold_collection:
この行は、'Hold' コレクションが存在するかどうかを確認します。存在しない場合は、以下のステップは実行されません。
オブジェクトに対する操作
for obj in hold_collection.objects:
'Hold' コレクション内の各オブジェクトに対して操作を行います。
マテリアルの設定(発光)
mat = bpy.data.materials.new(name="GlowMaterial")
mat.use_nodes = True
bsdf = mat.node_tree.nodes["Principled BSDF"]
emission = mat.node_tree.nodes.new('ShaderNodeEmission')
emission.inputs[0].default_value = (1, 1, 1, 1)  # 白色
mat.node_tree.links.new(bsdf.inputs[0], emission.outputs[0])
obj.data.materials.append(mat)
新しいマテリアルを作成し、オブジェクトに発光効果を与えます。ここでは、白色の発光を設定しています。
アニメーションの設定
obj.keyframe_insert(data_path="location", frame=frame_start)
obj.location.z += 2  # Z軸に沿って移動
obj.keyframe_insert(data_path="location", frame=frame_end)
オブジェクトの位置にキーフレームを設定し、Z軸に沿って移動させます。これにより、アニメーションが作成されます。
フレームの更新
frame_start += 10
frame_end += 10
次のオブジェクトのアニメーションのために、フレームの開始と終了を更新します。
全体コード
import bpy

# コレクション 'Lpoly' 内の 'Hold' コレクションを取得
lpoly_collection = bpy.data.collections.get('Lpoly')
hold_collection = lpoly_collection.children.get('Hold') if lpoly_collection else None

if hold_collection:
    frame_start = 1
    frame_end = 10

    for obj in hold_collection.objects:
        # オブジェクトのマテリアルを設定(発光させる)
        mat = bpy.data.materials.new(name="GlowMaterial")
        mat.use_nodes = True
        bsdf = mat.node_tree.nodes["Principled BSDF"]
        emission = mat.node_tree.nodes.new('ShaderNodeEmission')
        emission.inputs[0].default_value = (1, 1, 1, 1)  # 白色
        mat.node_tree.links.new(bsdf.inputs[0], emission.outputs[0])

        obj.data.materials.append(mat)

        # アニメーションの設定
        obj.keyframe_insert(data_path="location", frame=frame_start)
        obj.location.z += 2  # Z軸に沿って移動
        obj.keyframe_insert(data_path="location", frame=frame_end)

        frame_start += 10
        frame_end += 10
まとめ
このスクリプトは、Blenderの強力なPython APIを使用して、オブジェクトを発光させ、動かす方法を示しています。これは、3Dアニメーションの作業の効率化の初めの一歩に最適なスクリプトだと思いますので是非使ってみてください。