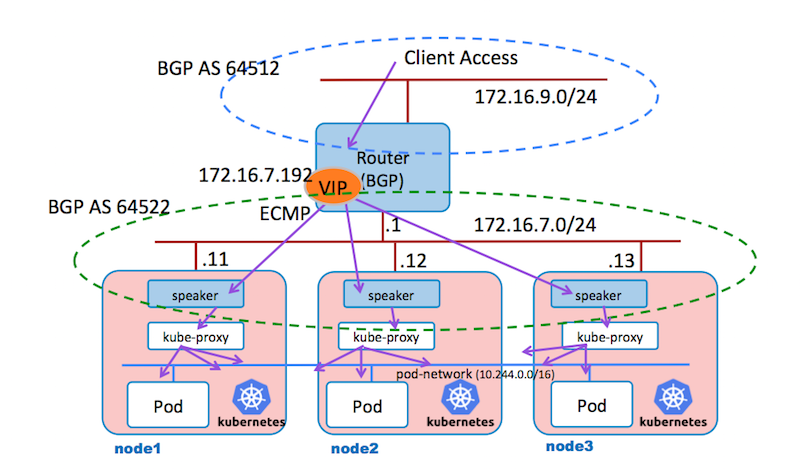
これまで検証したk8sのロードバランサーは、VIPを持っているワーカーノードに必ずトラフィックが流れ、kube-proxyが定義するiptablesによって、負荷を分散します。 この事から、VIPを持つ特定のノードに負荷が集中することになります。 MetalLBは、BGPを喋るルータとセットにして、ECMP (Equal Const Multi Path) を利用して、参加するノードに均等に負荷を与える動作をするものです。
次の図で動作を説明していきます。 MetalLBは、マスターノードにコントロールを起動して、デーモンセットとしてspeaker を、それぞれのワーカノードにポッドを起動します。 入り口のルータは、VIP 172.16.7.192 宛てのパケットを受け取ると、ECMPによって、各ワーカノードの 172.16.7.11, 172.16.7.12, 172.16.7.13 へフォワードします。ポッド speaker は、各ワーカーノードで、VIP 172.16.7.192のパケットを受け取る様にして、ポッドへリクエストを分散する様にします。 MetalLBは、この様にして、各ノードに均等にパケットが送信される様に振る舞う事から、高トラフィックに対応できる事が期待できます。
もちろん、この方法では、HTMLヘッダーのcookie等によって、セッションをトラックする事はできません。 しかし、元々、iptablesで負荷を分散するk8sでは、HTMLヘッダー等でセッションを特定のポッド(サーバー)へ宛先を固定する事ができませんから、各アプリ・サーバーは、KVS等にセッション情報を保存して、アプリサーバーのクラスタで共有できる様になっている必要があります。
参考までに、以下が過去の K8s on Vagrantの記事のリストです。
- Kubenetes v1.10 クラスタをVagrantで構築したメモ
- K8s on Vagrant, Node障害時の振る舞いについての検証記録
- K8s on Vagrant, ダッシュボードのセットアップ
- K8s on Vagrant, NFS 永続ボリュームの利用メモ
- K8s on Vagrant, NGINX Ingress Controller の利用
- K8s on Vagrant, Workerノードの追加と削除
- K8s on Vagrant, kube-keepalived-vip を利用したサービスIP設定
検証システム
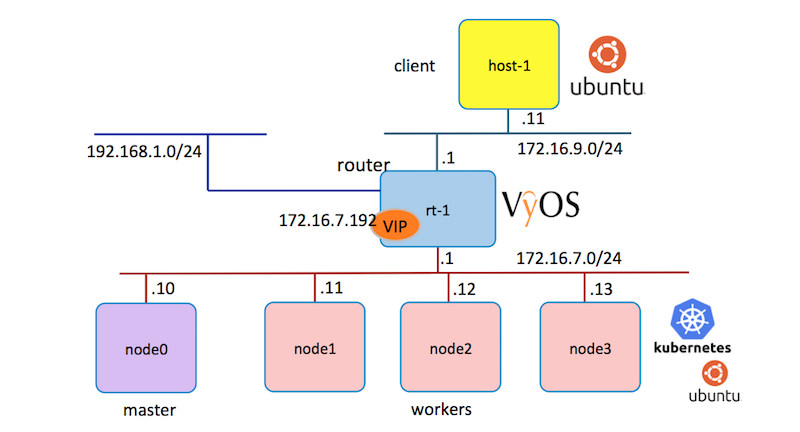
Vagrantの仮想サーバーとしてVyOSルーターを動作させ、172.16.7.0/24上のK8sノード群のMetalLBと連携させます。 クライアントは172.16.9.0/24のネットワークにクライアントを起動してアクセステストを実施します。 これらのルータとサーバーは全て、Vagrantfileで起動します。
次の3つのディレクトリにそれぞれのVgrantfileを準備します。
imac:Vagrant maho$ ls -lr k8s-metallb/
total 0
drwxr-xr-x  5 maho  staff  170  4 30 19:32 k8s-cluster
drwxr-xr-x  6 maho  staff  204  4 30 19:20 clients-nw
drwxr-xr-x  4 maho  staff  136  4 30 18:55 bgp-router
ルータの設定
bgp-routerのディレクトリに、下記のVagrantfileを置き、vagrant up コマンでルーターを起動します。
# coding: utf-8
# -*- mode: ruby -*-
# vi: set ft=ruby :

Vagrant.configure("2") do |config|

  # ルータ設定
  config.vm.define "rt-1" do |router|
    router.vm.box = "higebu/vyos"
    router.vm.network "public_network", bridge: "en0: Ethernet", ip: "192.168.1.200"
    router.vm.network "private_network",
                       ip: "172.16.7.1",
                       netmask: "255.255.255.0",
                       auto_config: true,
                       virtualbox__intnet: "k8s-net"
    router.vm.network "private_network",
                       ip: "172.16.9.1",
                       netmask: "255.255.255.0",
                       auto_config: true,
                       virtualbox__intnet: "c-net"
  end
  config.vm.provider "virtualbox" do |v|
    v.customize ["modifyvm", :id, "--ostype", "Debian_64"]
    v.cpus = 1
    v.memory = 512
  end
  config.vm.host_name = "rt-1"
  config.ssh.insert_key = false

  if Vagrant.has_plugin?("vagrant-cachier")
    config.cache.scope = :box
  end
end
vagrant ssh でログインして、コンフィグモードに変更して、設定を完成させます。
imac:bgp-router maho$ vagrant ssh
Linux vyos 3.13.11-1-amd64-vyos #1 SMP Wed Aug 12 02:08:05 UTC 2015 x86_64
Welcome to VyOS.
This system is open-source software. The exact distribution terms for
each module comprising the full system are described in the individual
files in /usr/share/doc/*/copyright.
Last login: Mon Apr 30 11:10:36 2018 from 10.0.2.2

vagrant@rt-1:~$ config
[edit]
vagrant@rt-1#
VyOSルータで設定するコマンドのリストです。
config
set protocols bgp 64512
set protocols bgp 64512 network 172.16.9.0/24
set protocols bgp 64512 neighbor 172.16.7.11 remote-as 64522
set protocols bgp 64512 neighbor 172.16.7.12 remote-as 64522
set protocols bgp 64512 neighbor 172.16.7.13 remote-as 64522
set protocols bgp 64512 maximum-paths ibgp 2
commit
save
exit
完了した設定は以下の様に表示されます。
vagrant@rt-1# sh protocols bgp 64512
 maximum-paths {
     ibgp 2
 }
 neighbor 172.16.7.11 {
     remote-as 64522
 }
 neighbor 172.16.7.12 {
     remote-as 64522
 }
 neighbor 172.16.7.13 {
     remote-as 64522
 }
 network 172.16.9.0/24 {
 }
[edit]
クライアントの仮想マシンの設定
clients-nwのディレクトリに、次のVagrantfileを配置して、vagrant upで起動します。 追加する設定は特にありません。
# -*- mode: ruby -*-
# vi: set ft=ruby :

Vagrant.configure("2") do |config|
  config.vm.define "host-1" do |server|
    server.vm.box = "ubuntu/xenial64"

    server.vm.network "private_network",
                      ip: "172.16.9.11",
                      netmask: "255.255.255.0",
                      auto_config: true,
                      virtualbox__intnet: "c-net"

  end
  config.vm.provider "virtualbox" do |v|
    v.cpus = 1
    v.memory = 512
    v.gui = false
  end
  config.vm.host_name = "host-1"
  config.vm.provision "shell", inline: <<-EOF
  apt-get update
  apt-get install -y curl

  route add -net 172.16.7.0/24 gw 172.16.9.1
  cat <<EOF3 > /etc/rc.local
# !/bin/sh -e
#
route add -net 172.16.7.0/24 gw 172.16.9.1

exit 0
EOF3
chmod 0755 /etc/rc.local

EOF
end
K8sクラスタの設定
k8sのマスターノード、ワーカーノードを起動するための次のVagrantfileを、ディレクトリ k8s-cluster に置き、vagrant upで起動します。
# coding: utf-8
# -*- mode: ruby -*-
# vi: set ft=ruby :

Vagrant.configure("2") do |config|

  # k8sクラスタ設定
  (0..3).each do |i|
    config.vm.define "node#{i}" do |server|
      server.vm.box = "ubuntu/xenial64"
      server.vm.hostname = "node#{i}"
      private_ip = "172.16.7.#{i+10}"
      server.vm.network "private_network",
                   ip: private_ip,
                   netmask: "255.255.255.0",
                   auto_config: true,
                   virtualbox__intnet: "k8s-net"

      server.vm.provider "virtualbox" do |v|
        if i == 0 then
          v.memory = 2048
        else
          v.memory = 1024
        end
        v.cpus = 1
        v.gui = false
      end
      server.vm.provision "shell", inline: <<-EOF1
      apt-get update
      apt-get install -y curl

      #
      #
      route add -net 172.16.9.0/24 gw 172.16.7.1
cat <<EOF3 > /etc/rc.local
# !/bin/sh -e
#
route add -net 172.16.9.0/24 gw 172.16.7.1

exit 0
EOF3
chmod 0755 /etc/rc.local

      # for kube-proxy (iptables)
      #
      echo net.bridge.bridge-nf-call-iptables = 1 >> /etc/sysctl.conf
      sysctl -p

      # install tools
      #
      apt-get update
      apt-get install -y apt-transport-https ca-certificates curl software-properties-common

      # configure a repository for Docker-CE
      #
      curl -fsSL https://download.docker.com/linux/ubuntu/gpg | apt-key add -
      add-apt-repository "deb https://download.docker.com/linux/$(. /etc/os-release; echo "$ID") $(lsb_release -cs) stable"
      curl -s https://packages.cloud.google.com/apt/doc/apt-key.gpg | apt-key add -

      # configure a repository for kubernetes
      #
      cat <<EOF2 >/etc/apt/sources.list.d/kubernetes.list
      deb http://apt.kubernetes.io/ kubernetes-xenial main
EOF2
      # install Docker-CE
      #
      apt-get update
      apt-get install -y docker-ce=$(apt-cache madison docker-ce | grep 17.03 | head -1 | awk '{print $3}')
      # install Kubernetes (standard)
      #
      #apt-get install -y kubelet=1.9.6-00 kubeadm=1.9.6-00 kubectl=1.9.6-00
      apt-get install -y kubelet kubeadm kubectl
EOF1
    end
  end
  if Vagrant.has_plugin?("vagrant-cachier")
    config.cache.scope = :box
  end
end
仮想サーバーの起動後は、「Kubenetes v1.10 クラスタをVagrantで構築したメモ」に従って設定を進めます。変更箇所は、以下に列挙します・
- マスターノード設定時に、10-kubeadm.conf の"--node-ip=172.42.42.11"は、"--node-ip=172.16.7.10" へ変更です。
- ポッド・ネットワークの設定の "--iface=enp0s9" は、"--iface=enp0s8"へ変更です。
- ワーカーノードの10-kubeadm.confの "--node-ip="を各ノードのIPアドレス 172.16.7.11, 172.16.7.12, 172.16.7.13に変更します。
MetalLBの設定
次のYAMLファイルを kubectl apply -f metalib.yaml によって適用します。 これによって、マスターノードに、デプロイメント controller が起動し、全ワーカーノードに、デーモンセット speakerが起動します。
---
# Source: metallb/templates/namespace.yaml
apiVersion: v1
kind: Namespace
metadata:
  name: metallb-system

---
# Source: metallb/templates/rbac.yaml
# Roles
apiVersion: rbac.authorization.k8s.io/v1
kind: ClusterRole
metadata:
  name: metallb-system:controller
rules:
- apiGroups: [""]
  resources: ["services"]
  verbs: ["get", "list", "watch", "update"]
- apiGroups: [""]
  resources: ["services/status"]
  verbs: ["update"]
- apiGroups: [""]
  resources: ["events"]
  verbs: ["create"]
---
apiVersion: rbac.authorization.k8s.io/v1
kind: ClusterRole
metadata:
  name: metallb-system:speaker
rules:
- apiGroups: [""]
  resources: ["services", "endpoints", "nodes"]
  verbs: ["get", "list", "watch"]
---
apiVersion: rbac.authorization.k8s.io/v1
kind: Role
metadata:
  namespace: metallb-system
  name: leader-election
rules:
- apiGroups: [""]
  resources: ["endpoints"]
  resourceNames: ["metallb-speaker"]
  verbs: ["get", "update"]
- apiGroups: [""]
  resources: ["endpoints"]
  verbs: ["create"]
---
apiVersion: rbac.authorization.k8s.io/v1
kind: Role
metadata:
  namespace: metallb-system
  name: config-watcher
rules:
- apiGroups: [""]
  resources: ["configmaps"]
  verbs: ["get", "list", "watch"]
- apiGroups: [""]
  resources: ["events"]
  verbs: ["create"]
---

## Service accounts
apiVersion: v1
kind: ServiceAccount
metadata:
  namespace: metallb-system
  name: controller
---
apiVersion: v1
kind: ServiceAccount
metadata:
  namespace: metallb-system
  name: speaker
---

## Role bindings
apiVersion: rbac.authorization.k8s.io/v1
kind: ClusterRoleBinding
metadata:
  name: metallb-system:controller
subjects:
- kind: ServiceAccount
  namespace: metallb-system
  name: controller
roleRef:
  apiGroup: rbac.authorization.k8s.io
  kind: ClusterRole
  name: metallb-system:controller
---
apiVersion: rbac.authorization.k8s.io/v1
kind: ClusterRoleBinding
metadata:
  name: metallb-system:speaker
subjects:
- kind: ServiceAccount
  namespace: metallb-system
  name: speaker
roleRef:
  apiGroup: rbac.authorization.k8s.io
  kind: ClusterRole
  name: metallb-system:speaker
---
apiVersion: rbac.authorization.k8s.io/v1
kind: RoleBinding
metadata:
  namespace: metallb-system
  name: config-watcher
subjects:
- kind: ServiceAccount
  name: controller
- kind: ServiceAccount
  name: speaker
roleRef:
  apiGroup: rbac.authorization.k8s.io
  kind: Role
  name: config-watcher
---
apiVersion: rbac.authorization.k8s.io/v1
kind: RoleBinding
metadata:
  namespace: metallb-system
  name: leader-election
subjects:
- kind: ServiceAccount
  name: speaker
roleRef:
  apiGroup: rbac.authorization.k8s.io
  kind: Role
  name: leader-election
---
# Source: metallb/templates/controller.yaml
apiVersion: apps/v1beta2
kind: Deployment
metadata:
  namespace: metallb-system
  name: controller
  labels:
    app: metallb
    component: controller
  annotations:
    prometheus.io/scrape: "true"
    prometheus.io/port: "7472"
spec:
  revisionHistoryLimit: 3
  selector:
    matchLabels:
      app: metallb
      component: controller
  template:
    metadata:
      labels:
        app: metallb
        component: controller
    spec:
      serviceAccountName: controller
      terminationGracePeriodSeconds: 0
      securityContext:
        runAsNonRoot: true
        runAsUser: 65534 # nobody
      containers:
      - name: controller
        image: metallb/controller:v0.5.0
        imagePullPolicy: Always
        args:
        - --port=7472
        ports:
        - name: monitoring
          containerPort: 7472
        resources:
          limits:
            cpu: 100m
            memory: 100Mi

        securityContext:
          allowPrivilegeEscalation: false
          capabilities:
            drop:
            - all
          readOnlyRootFilesystem: true

---
# Source: metallb/templates/speaker.yaml
apiVersion: apps/v1beta2
kind: DaemonSet
metadata:
  namespace: metallb-system
  name: speaker
  labels:
    app: metallb
    component: speaker
spec:
  selector:
    matchLabels:
      app: metallb
      component: speaker
  template:
    metadata:
      labels:
        app: metallb
        component: speaker
      annotations:
        prometheus.io/scrape: "true"
        prometheus.io/port: "7472"
    spec:
      serviceAccountName: speaker
      terminationGracePeriodSeconds: 0
      hostNetwork: true
      containers:
      - name: speaker
        image: metallb/speaker:v0.5.0
        imagePullPolicy: Always
        args:
        - --port=7472
        env:
        - name: METALLB_NODE_IP
          valueFrom:
            fieldRef:
              fieldPath: status.hostIP
        - name: METALLB_NODE_NAME
          valueFrom:
            fieldRef:
              fieldPath: spec.nodeName
        ports:
        - name: monitoring
          containerPort: 7472
        resources:
          limits:
            cpu: 100m
            memory: 100Mi

        securityContext:
          allowPrivilegeEscalation: false
          readOnlyRootFilesystem: true
          capabilities:
            drop:
            - all
            add:
            - net_raw
次のBGPの設定のため、kubectl apply -f bgp.yaml を実行します。 これを実行する事で、ルーターとBGPで連携するための準備が整います。
apiVersion: v1
kind: ConfigMap
metadata:
  namespace: metallb-system
  name: config
data:
  config: |
    peers:
    - my-asn: 64522
      peer-asn: 64512
      peer-address: 172.16.9.1
    address-pools:
    - name: my-ip-space
      protocol: bgp
      avoid-buggy-ips: true
      addresses:
      - 172.16.7.192/26
最後に、次のYAMLを適用してアプリを起動します。 ポッドのホスト名を返してくれるデプロイメントとロードバランサーのサービスを起動します。
kubectl apply -f nginx.yaml を実行する事で、172.16.7.192/26の範囲からVIPを確保して、ルータへ伝えます。
apiVersion: apps/v1beta2
kind: Deployment
metadata:
  name: nginx
spec:
  replicas: 3
  selector:
    matchLabels:
      app: nginx
  template:
    metadata:
      labels:
        app: nginx
    spec:
      containers:
      - name: nginx
        image: strm/helloworld-http
        ports:
        - name: http
          containerPort: 80

---
apiVersion: v1
kind: Service
metadata:
  name: nginx
spec:
  ports:
  - name: http
    port: 80
    protocol: TCP
    targetPort: 80
  selector:
    app: nginx
  type: LoadBalancer
ルータのBGPルーティング情報
上記を実行する事で、次の様に、LoadBalancerのサービスで、EXTERNAL-IPが 172.16.7.192が確保されます。 そして、ルータ側のルーティング情報では、
vagrant@node0:~$ kubectl get svc
NAME         TYPE           CLUSTER-IP      EXTERNAL-IP    PORT(S)        AGE
kubernetes   ClusterIP      10.244.0.1      <none>         443/TCP        3h
nginx        LoadBalancer   10.244.183.80   172.16.7.192   80:30310/TCP   3h
172.16.7.192のアドレスのパケットは、Next Hop 172.16.7.11, 172.16.7.12, 172.16.7.13 に転送されます。
vagrant@rt-1:~$ sh ip bgp
BGP table version is 0, local router ID is 10.0.2.15
Status codes: s suppressed, d damped, h history, * valid, > best, i - internal,
              r RIB-failure, S Stale, R Removed
Origin codes: i - IGP, e - EGP, ? - incomplete

   Network          Next Hop            Metric LocPrf Weight Path
*> 172.16.7.192/32  172.16.7.11                            0 {64522} ?
*                   172.16.7.12                            0 {64522} ?
*                   172.16.7.13                            0 {64522} ?
*> 172.16.9.0/24    0.0.0.0                  1         32768 i

Total number of prefixes 2
VyOSは、明示的にECMP (Equal Cost Multi-Path)が実装されていると記載されていません。 Vyatta Subscription Edtion (vRouter)では、BGP ECMPの機能があるのですが、VyOSのWikiドキュメントには、ECMPの記載が無く実装されていない様です。 上記のルーティングでは、最適(ベスト)を表す表示 ">"マークが Next Hop 172.16.7.11 の行にあります。 おそらく、172.16.7.11へホップされた後、kube-proxyで分散されていると思われます。 しかし、ECMPの実装があれば、3個のNext Hopへ均等にロードバランスされると考えられます。
アクセステスト
クライアント役のhost-1からcurlコマンドで、VIPをアクセスして、動作を確認します。 curlの結果は、ランダムにポッド名が表示されるので、node1からnode3に分散されている事がわかります。
vagrant@host-1:~$ curl http://172.16.7.192/
<html><head><title>HTTP Hello World</title></head><body><h1>Hello from nginx-75b9dd8ccb-9cv4j</h1></body></html
vagrant@host-1:~$ curl http://172.16.7.192/
<html><head><title>HTTP Hello World</title></head><body><h1>Hello from nginx-75b9dd8ccb-l2k2h</h1></body></html
vagrant@host-1:~$ curl http://172.16.7.192/
<html><head><title>HTTP Hello World</title></head><body><h1>Hello from nginx-75b9dd8ccb-mlj82</h1></body></html
ポッドとノードのリスト
vagrant@node0:~$ kubectl get po -o wide
NAME                     READY     STATUS    RESTARTS   AGE       IP           NODE
nginx-75b9dd8ccb-9cv4j   1/1       Running   0          3h        10.244.1.2   node1
nginx-75b9dd8ccb-l2k2h   1/1       Running   0          3h        10.244.3.3   node3
nginx-75b9dd8ccb-mlj82   1/1       Running   0          3h        10.244.2.2   node2
ノードの1つが停止すると、ルータのルーティング情報はすぐに更新されます。 次は、vagrant halt node2を実行した直後のルーティング状態です。シャットダウンが完了しないうちに、ノードのルーティング情報が落とされている事が確認できました。
vagrant@rt-1:~$ sh ip bgp
BGP table version is 0, local router ID is 10.0.2.15
Status codes: s suppressed, d damped, h history, * valid, > best, i - internal,
              r RIB-failure, S Stale, R Removed
Origin codes: i - IGP, e - EGP, ? - incomplete

   Network          Next Hop            Metric LocPrf Weight Path
*> 172.16.7.192/32  172.16.7.11                            0 {64522} ?
*                   172.16.7.13                            0 {64522} ?
*> 172.16.9.0/24    0.0.0.0                  1         32768 i

Total number of prefixes 2
まとめ
MetalLBのポッドspeakerからBGPにより、VIPに対するルーティング情報が流れて来ている事が確認できました。VyOSにECMPが実装されていない様で残念でしたが、ECMPはルータ側の機能なので、BGPでVIPへのホップ先としてノードのIPアドレスが着ていれば、ほぼ問題なくECMPが有効な状態で利用可能であると考えられます。 しかし、この組み合わせでも、VIPへのアクセスも可能で、ノード停止時の切り替わりも早いため、負荷の偏りを許容できれば十分に利用できると思います。 Calicoを利用している場合に問題がある点、このプロジェクトのステータスなど注意事項が多いのですが、MetalLBのプロジェクトの発展を期待したいと思います。
参考資料
1.「オンプレK8sで使えるGoogle製External Load Balancer: MetalLB」, < https://qiita.com/tmatsu/items/f45f0ca07b4f8489df85 >, 2018/4/30
2.「METALLB Homepage」, < https://metallb.universe.tf/ >, 2018/4/30
3.「GitHub google/metallb」, < https://github.com/google/metallb >, 2018/4/30

