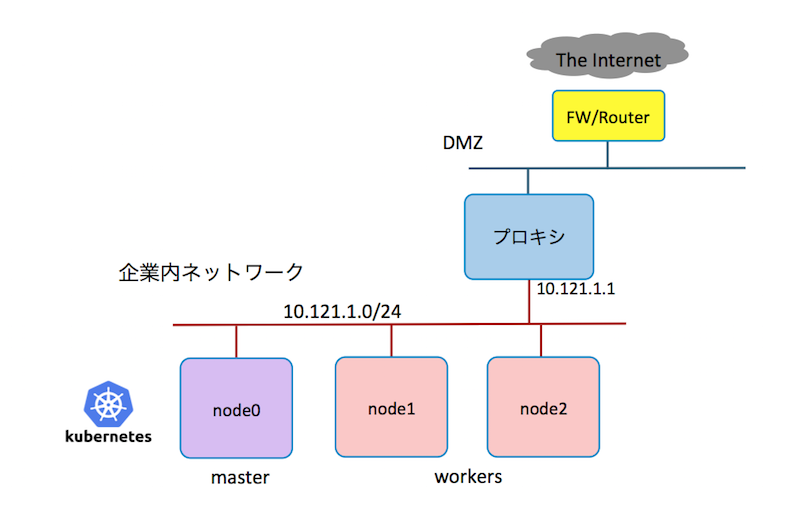
企業プロキシの背後に、k8sクラスタを作る際に必要なプロキシ対応事項をまとめました。想定する環境は以下の様に、企業内ネットワークにk8sクラスタを構築します。インターネットとはプロキシやファイアウォールを介して繋がっており、直接インターネットをアクセスできず、プロキシを仲介してインターネットとアクセスします。
vagrant (開発環境)
VagrantをPROXY環境下で利用する場合は、環境変数にプロキシのIPアドレスとポート番号を設定する必要があります。また、vagrant-proxyconf という、仮想環境にプロキシを設定するための、便利なプラグインがありますので、あわせて紹介します。
環境変数
以下の環境変数が設定されていれば、vagrant upを実行できます。ただし、起動した仮想マシンのOSには、プロキシの設定が入っていないので、Linuxやdockerなどに個別にプロキシの設定が必要です。
export http_proxy=http://10.121.1.1:3128
export https_proxy=https://10.121.1.1:3128
実行例
次は、環境変数をセットして、プロキシ越しに、vagrantboxをダウンロードして起動する実行例です。 しかし、このままでは、起動後に apt-get updateやyum updateは実行できません。 Linuxディストリビューションごとのproxy設定を追加する必要があります。
$ export http_proxy=http://10.121.1.1:3128
$ export https_proxy=https://10.121.1.1:3128
$ vagrant init bento/ubuntu-16.04
...

$ vagrant up
Bringing machine 'default' up with 'virtualbox' provider...
==> default: Importing base box 'bento/ubuntu-16.04'...
==> default: Matching MAC address for NAT networking...
==> default: Checking if box 'bento/ubuntu-16.04' is up to date...
...
    default: /vagrant => /Users/takara/Vagrant/test2

$ vagrant ssh
Welcome to Ubuntu 16.04.4 LTS (GNU/Linux 4.4.0-87-generic x86_64)

 * Documentation:  https://help.ubuntu.com
 * Management:     https://landscape.canonical.com
 * Support:        https://ubuntu.com/advantage

0 packages can be updated.
0 updates are security updates.


vagrant@vagrant:~$
vagrant-proxyconf プラグイン
vagrantで動作する仮想環境について、前述の様なOSへの追加設定なしにプロキシを通す様にできる超便利なプラグインとして、vagrant-proxyconfがあります。
インストール方法
$ export http_proxy=http://10.121.1.1:3128
$ export https_proxy=https://10.121.1.1:3128
$ vagrant plugin install vagrant-proxyconf
Installing the 'vagrant-proxyconf' plugin. This can take a few minutes...
Installed the plugin 'vagrant-proxyconf (1.5.2)'!
Mahos-MacBook-Air:test2 takara$ vagrant plugin list
vagrant-proxyconf (1.5.2)

$ vagrant init centos/7
vi Vagrantfileなど、好きなエディタでVagrantfileを編集します。 編集箇所は、次のconfigのセクションに、if 〜 endまでの行を追加します。
Vagrant.configure("2") do |config|
  if Vagrant.has_plugin?("vagrant-proxyconf")
    config.proxy.http = "http://10.121.1.1:3128/"
    config.proxy.https = "http://10.121.1.1:3128/"
    config.proxy.no_proxy = "localhost,127.0.0.1"
  end
実行例
次の実行例は、前述のvagrant-proxyconfの設定をVagrantfileに加えて、CentOS7を起動したものです。 yumにプロキシ設定しなくても、yum updateが成功していることが解ります。
$ vagrant up
Bringing machine 'default' up with 'virtualbox' provider...
==> default: Importing base box 'centos/7'...
==> default: Matching MAC address for NAT networking...
==> default: Checking if box 'centos/7' is up to date...
...

==> default: Configuring proxy environment variables...
==> default: Configuring proxy for Yum...
==> default: Rsyncing folder: /Users/takara/Vagrant/test2/ => /vagrant

$ vagrant ssh
[vagrant@localhost ~]$ sudo yum update
Loaded plugins: fastestmirror
base                                                                                         | 3.6 kB  00:00:00
extras                                                                                       | 3.4 kB  00:00:00
updates                                                                                      | 3.4 kB  00:00:00
(1/4): base/7/x86_64/group_gz                                                                | 156 kB  00:00:00
(2/4): extras/7/x86_64/primary_db                                                            | 185 kB  00:00:00
(3/4): base/7/x86_64/primary_db                                                              | 5.7 MB  00:00:01
(4/4): updates/7/x86_64/primary_db                                                           | 6.9 MB  00:00:02
Determining fastest mirrors
 * base: download.nus.edu.sg
 * extras: centos.usonyx.net
 * updates: centos.usonyx.net
参考資料
vagrant-proxyconf で行う ゲストOSへのかんたんProxy設定, https://weblabo.oscasierra.net/vagrant-proxyconf/
Ubuntu/Debian aptコマンド
企業内ネットワーク上の物理サーバー、その他の仮想サーバーなど、vagrantのプラグインが使えない環境では、パッケージをアップデートするために必要なaptに設定を追加しなければなりません。
/etc/apt/apt.conf に以下の設定を追加します。
Acquire::http::proxy "http://10.121.1.1:3128/";
Acquire::https::proxy "https://10.121.1.1:3128/";
Acquire::ftp::proxy "ftp://10.121.1.1:3128/";
Acquire::socks::proxy "socks://10.121.1.1:3128/";
実行例
次の実行例では、/etc/apt/apt.conf.d/10proxyに、次の様なAcquireから始まる4行をセットします。 これによって、apt-get updateがプロキシ環境下でも動作していることが確認できます。
vagrant@vagrant:~$ sudo -s
root@vagrant:~# vi /etc/apt/apt.conf.d/10proxy
root@vagrant:~# cat /etc/apt/apt.conf.d/10proxy
Acquire::http::proxy "http://10.121.1.1:3128/";
Acquire::https::proxy "https://10.121.1.1:3128/";
Acquire::ftp::proxy "ftp://10.121.1.1:3128/";
Acquire::socks::proxy "socks://10.121.1.1:3128/";

root@vagrant:~# apt-get update
Hit:1 http://archive.ubuntu.com/ubuntu xenial InRelease
Get:2 http://security.ubuntu.com/ubuntu xenial-security InRelease [107 kB]
Get:3 http://archive.ubuntu.com/ubuntu xenial-updates InRelease [109 kB]
...
Fetched 5,577 kB in 16s (345 kB/s)
Reading package lists... Done
参考資料
Cannot download Docker images behind a proxy, https://stackoverflow.com/questions/23111631/cannot-download-docker-images-behind-a-proxy
CentOS/RedHat yumコマンド
/etc/yum.confの最終行に設定を追加します。 設定は、proxy=http://10.121.1.1:3128 の様にします。
実行例
次は、CentOS7を起動して、/etc/yum.confを編集してプロキシの設定を加えます。 そして、プロキシ超えでyum updateを実行している例です。
$ vagrant init centos/7
$ vagrant up
$ vagrant ssh
[vagrant@localhost ~]$ sudo -s
[root@localhost vagrant]# vi /etc/yum.conf
[root@localhost vagrant]# tail /etc/yum.conf
...
proxy=http://10.121.1.1:3128

[root@localhost vagrant]# yum update
Loaded plugins: fastestmirror
base                                                                                         | 3.6 kB  00:00:00
extras                                                                                       | 3.4 kB  00:00:00
updates                                                                                      | 3.4 kB  00:00:00
(1/4): extras/7/x86_64/primary_db                                                            | 185 kB  00:00:00
(2/4): base/7/x86_64/group_gz                                                                | 156 kB  00:00:00
(3/4): base/7/x86_64/primary_db                                                              | 5.7 MB  00:00:01
(4/4): updates/7/x86_64/primary_db                                                           | 6.9 MB  00:00:01
参考資料
yum,wgetのproxy設定(centOS 7), https://qiita.com/katsuta/items/17eee8e78543871b5f27
gitコマンド
gitのサブコマンド config を利用して、プロキシーを設定します。
git config --global http.proxy http://proxyuser:proxypwd@proxy.server.com:8080
- change proxyuser to your proxy user
- change proxypwd to your proxy password
- change proxy.server.com to the URL of your proxy server
- change 8080 to the proxy port configured on your proxy server
実行例
[vagrant@localhost ~]$ git config --global http.proxy http://10.121.1.1:3128
[vagrant@localhost ~]$ git clone https://github.com/takara9/hello-java
Cloning into 'hello-java'...
remote: Counting objects: 212, done.
remote: Total 212 (delta 0), reused 0 (delta 0), pack-reused 212
Receiving objects: 100% (212/212), 55.65 KiB | 0 bytes/s, done.
Resolving deltas: 100% (86/86), done.
プロキシ設定をリセットするには、`git config --global --unset http.proxy'を実行します。
参考資料
stackoverflow Getting git to work with a proxy server, https://stackoverflow.com/questions/783811/getting-git-to-work-with-a-proxy-server
curlコマンド
vagrantと同じ環境変数で、対応します。
実行例
次は、環境変数を設定後、インターネット上のコンテンツをcurlで取得した実行例です。 もし、環境変数がなければ、目的のHTTPサーバーに接続できず、エラーが帰ります。
[vagrant@localhost ~]$ export http_proxy=http://10.121.1.1:3128
[vagrant@localhost ~]$ export https_proxy=https://10.121.1.1:3128
[vagrant@localhost ~]$ curl http://www.yahoo.co.jp
<!DOCTYPE HTML PUBLIC "-//W3C//DTD HTML 4.01 Transitional//EN" "https://www.w3.org/TR/html4/loose.dtd">
<html lang="ja">
<head>
<meta http-equiv="Content-Type" content="text/html; charset=utf-8">
...
docker コンテナ環境
デスクトップ環境
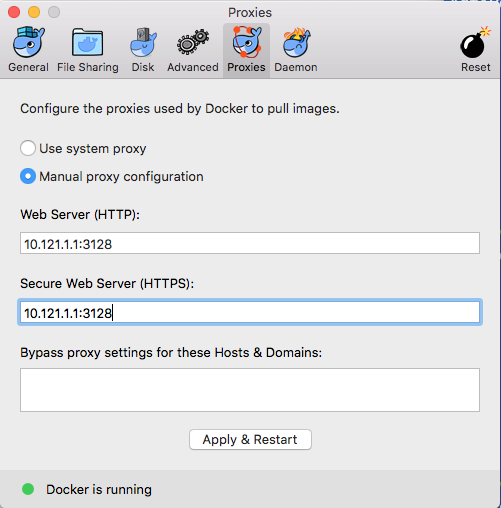
Docker-CEのプリファレンスを開いて、次の様に設定します。
Linux環境
Linuxの場合は、dockerデーモンをsystemdから起動する際の環境ファイルを作成して、環境変数としてプロキシのアドレスを与えます。
$ sudo mkdir -p /etc/systemd/system/docker.service.d
$ vi /etc/systemd/system/docker.service.d/http-proxy.conf
プロキシのアドレスとポート番号をセットします。 DNS名でもIPアドレスでも、どちらでもセットできます。
[Service]
Environment="HTTP_PROXY=http://proxy.example.com:80/"
Environment="HTTPS_PROXY=https://proxy.example.com:443/"
実行中のデーモンを再スタートさせて、systemctlコマンドで、環境変数を確認します。
sudo systemctl daemon-reload
sudo systemctl restart docker
systemctl show --property=Environment docker
設定は、以上になります。
実行例
vagrantでdocker環境が設定されているvagrantboxを利用してテストした実行例です。
$ vagrant init envimation/ubuntu-xenial-docker
...

$ vagrant up
Bringing machine 'default' up with 'virtualbox' provider...
==> default: Importing base box 'envimation/ubuntu-xenial-docker'...
...
default: /vagrant => /Users/takara/Vagrant/test1

$ vagrant ssh
Welcome to Ubuntu 16.04.3 LTS (GNU/Linux 4.4.0-109-generic x86_64)

 * Documentation:  https://help.ubuntu.com
 * Management:     https://landscape.canonical.com
 * Support:        https://ubuntu.com/advantage

vagrant@base-debootstrap:~$ docker version
Client:
 Version:	17.12.0-ce
 API version:	1.35
 Go version:	go1.9.2
 Git commit:	c97c6d6
 Built:	Wed Dec 27 20:11:19 2017
 OS/Arch:	linux/amd64

Server:
 Engine:
  Version:	17.12.0-ce
  API version:	1.35 (minimum version 1.12)
  Go version:	go1.9.2
  Git commit:	c97c6d6
  Built:	Wed Dec 27 20:09:53 2017
  OS/Arch:	linux/amd64
  Experimental:	false

$ sudo -s
# mkdir -p /etc/systemd/system/docker.service.d
# echo "[Service]" > /etc/systemd/system/docker.service.d/http-proxy.conf
# echo "Environment="HTTP_PROXY=http://10.121.1.1:3128/"" >> /etc/systemd/system/docker.service.d/http-proxy.conf
# echo "Environment="HTTPS_PROXY=https://10.121.1.1:3128/"" >> /etc/systemd/system/docker.service.d/http-proxy.conf
# cat /etc/systemd/system/docker.service.d/http-proxy.conf
[Service]
Environment=HTTP_PROXY=http://10.121.1.1:3128/
Environment=HTTPS_PROXY=https://10.121.1.1:3128/
Dockerデーモンを再起動して、環境変数を調べます。
# systemctl daemon-reload
# systemctl restart docker
# systemctl show --property=Environment docker
Environment=HTTP_PROXY=http://10.121.1.1:3128/ HTTPS_PROXY=https://10.121.1.1:3128/
正しい設定が正しければ、プロキシ越しにコンテナをダウンロードして、スタートします。
$ docker run -it ubuntu:latest bash
Unable to find image 'ubuntu:latest' locally
latest: Pulling from library/ubuntu
a48c500ed24e: Pull complete
1e1de00ff7e1: Pull complete
0330ca45a200: Pull complete
471db38bcfbf: Pull complete
0b4aba487617: Pull complete
Digest: sha256:c8c275751219dadad8fa56b3ac41ca6cb22219ff117ca98fe82b42f24e1ba64e
Status: Downloaded newer image for ubuntu:latest
root@90ae11859540:/# cat /etc/issue
Ubuntu 18.04 LTS \n \l
参考資料
HTTP/HTTPS proxy, https://docs.docker.com/config/daemon/systemd/#runtime-directory-and-storage-driver
VituralBox
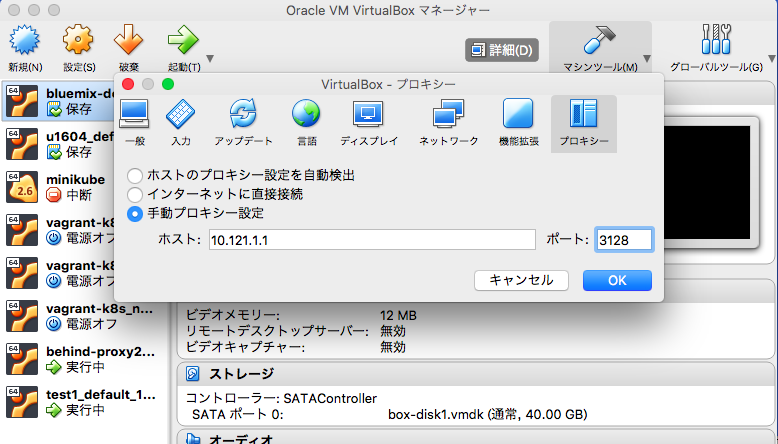
設定から次のウィンドを表示して、プロキシーを選択して、下記の画面の様に設定します。 vagrantから操作するケースと、minikubeでは、この設定は不要です。
minikube
プロキシ下で、MacOSのターミナルから、minikubeをスタートさせるには、--docker-envを使って、http_proxy と https_proxy の環境変数に、プロキシサーバーのアドレスとポート番号を設定します。 起動に失敗する場合は、minikube deleteを実行して、ローカル環境のminikubeのクラスタを削除して、再度、スタートさせると良いでしょう。
minikubeをスタートさせると、kubectlの環境設定も一緒にされますから、kubectl get nodeでクラスタの状態を確認できます。
$ minikube start --docker-env http_proxy=http://10.121.1.1:3128 --docker-env https_proxy=http://10.121.1.1:3128
Starting local Kubernetes v1.10.0 cluster...
Starting VM...
Getting VM IP address...
Moving files into cluster...
Setting up certs...
Connecting to cluster...
Setting up kubeconfig...
Starting cluster components...
Kubectl is now configured to use the cluster.
Loading cached images from config file.
Mahos-MacBook-Air:~ takara$ minikube status
minikube: Running
cluster: Running
kubectl: Correctly Configured: pointing to minikube-vm at 192.168.99.102

$ kubectl get node
NAME       STATUS    ROLES     AGE       VERSION
minikube   Ready     master    55s       v1.10.0
次の実行例は、Nginxのデプロイメントを適用して、アクセスした例です。
$ vi nginx.yaml

$ kubectl apply -f nginx.yaml
deployment.apps "nginx" created
service "nginx" created

$ kubectl get deploy
NAME      DESIRED   CURRENT   UP-TO-DATE   AVAILABLE   AGE
nginx     3         3         3            0           3s

$ kubectl get po
NAME                     READY     STATUS              RESTARTS   AGE
nginx-645dbd8899-g6crd   0/1       ContainerCreating   0          8s
nginx-645dbd8899-h5kd2   0/1       ContainerCreating   0          8s
nginx-645dbd8899-nbf2t   0/1       ContainerCreating   0          8s

$ kubectl get svc
NAME         TYPE        CLUSTER-IP      EXTERNAL-IP   PORT(S)        AGE
kubernetes   ClusterIP   10.96.0.1       <none>        443/TCP        4m
nginx        NodePort    10.98.136.127   <none>        80:30778/TCP   23s

$ kubectl get po
NAME                     READY     STATUS    RESTARTS   AGE
nginx-645dbd8899-g6crd   1/1       Running   0          43s
nginx-645dbd8899-h5kd2   1/1       Running   0          43s
nginx-645dbd8899-nbf2t   1/1       Running   0          43s

$ curl http://192.168.99.102:30778/
<!DOCTYPE html>
<html>
<head>
<title>Welcome to nginx!</title>
<style>
    body {
        width: 35em;
        margin: 0 auto;
        font-family: Tahoma, Verdana, Arial, sans-serif;
    }
</style>
</head>
<body>
<h1>Welcome to nginx!</h1>
<p>If you see this page, the nginx web server is successfully installed and
working. Further configuration is required.</p>

<p>For online documentation and support please refer to
<a href="http://nginx.org/">nginx.org</a>.<br/>
Commercial support is available at
<a href="http://nginx.com/">nginx.com</a>.</p>

<p><em>Thank you for using nginx.</em></p>
</body>
</html>
Kubernetes
起業プロキシの背後に、本番運用を考慮したK8sクラスタを環境構築では作業内容は異なります。 マスターやノードのベースとなるOSやDocker環境に、これまでに挙げた方法で、プロキシ設定を実施する必要があります。 しかし、Vagrantのプラグインを利用すると、手間を大幅に減らせますから、ここでは、Vagrantの仮想環境で簡単に設定する方法を試しました。
実行例
GitHubに公開しているて、Vagrant上にk8sクラスタを構築する方法 https://github.com/takara9/vagrant-k8s に対して、プロキシ対応を実施したものです。
環境変数をセットして、プラグインをインストールします。
Mahos-MacBook-Air:vagrant-k8s takara$ export http_proxy=http://10.121.1.1:3128
Mahos-MacBook-Air:vagrant-k8s takara$ export https_proxy=https://10.121.1.1:3128
Mahos-MacBook-Air:vagrant-k8s takara$ vagrant plugin install vagrant-proxyconf
Installing the 'vagrant-proxyconf' plugin. This can take a few minutes...
Installed the plugin 'vagrant-proxyconf (1.5.2)'!
前述の様に、vagrant-proxyconf のプラグインを 次の様に Vagrantfileに組み込見ます。
# -*- mode: ruby -*-
# # vi: set ft=ruby :
#

Vagrant.configure(2) do |config|

  if Vagrant.has_plugin?("vagrant-proxyconf")
    config.proxy.http = "http://10.121.1.1:3128/"
    config.proxy.https = "http://10.121.1.1:3128/"
    config.proxy.no_proxy = "localhost,127.0.0.1"
  end

  (1..3).each do |i|
    config.vm.define "node-#{i}" do |s|
      s.vm.box = "ubuntu/xenial64"
      s.vm.hostname = "node-#{i}"

      # public_ip = "192.168.1.#{i+90}"
      public_ip = "10.121.1.#{i+90}"
Docker、Kubernetesの必要なモジュールをインストールが完了して、起動が完了した状態です。
Mahos-MacBook-Air:vagrant-k8s takara$ vagrant status
Current machine states:

node-1                    running (virtualbox)
node-2                    running (virtualbox)
node-3                    running (virtualbox)

This environment represents multiple VMs. The VMs are all listed
above with their current state. For more information about a specific
VM, run `vagrant status NAME`.
プロキシ環境下で、k8sクラスタのセットアップを完了させるまでの操作ログです。
Mahos-MacBook-Air:vagrant-k8s takara$ vagrant ssh node-1
Welcome to Ubuntu 16.04.4 LTS (GNU/Linux 4.4.0-122-generic x86_64)
...

vagrant@node-1:~$ ifconfig
docker0   Link encap:Ethernet  HWaddr 02:42:0f:aa:c4:d3
          inet addr:172.17.0.1  Bcast:0.0.0.0  Mask:255.255.0.0
          UP BROADCAST MULTICAST  MTU:1500  Metric:1
          RX packets:0 errors:0 dropped:0 overruns:0 frame:0
          TX packets:0 errors:0 dropped:0 overruns:0 carrier:0
          collisions:0 txqueuelen:0
          RX bytes:0 (0.0 B)  TX bytes:0 (0.0 B)

enp0s3    Link encap:Ethernet  HWaddr 02:d4:20:7b:c2:aa
          inet addr:10.0.2.15  Bcast:10.0.2.255  Mask:255.255.255.0
          inet6 addr: fe80::d4:20ff:fe7b:c2aa/64 Scope:Link
          UP BROADCAST RUNNING MULTICAST  MTU:1500  Metric:1
          RX packets:3612 errors:0 dropped:0 overruns:0 frame:0
          TX packets:2767 errors:0 dropped:0 overruns:0 carrier:0
          collisions:0 txqueuelen:1000
          RX bytes:337787 (337.7 KB)  TX bytes:339939 (339.9 KB)

enp0s8    Link encap:Ethernet  HWaddr 08:00:27:46:e8:ad
          inet addr:10.121.1.91  Bcast:10.121.1.255  Mask:255.255.255.0
          inet6 addr: fe80::a00:27ff:fe46:e8ad/64 Scope:Link
          UP BROADCAST RUNNING MULTICAST  MTU:1500  Metric:1
          RX packets:74278 errors:0 dropped:1740 overruns:0 frame:0
          TX packets:29430 errors:0 dropped:0 overruns:0 carrier:0
          collisions:0 txqueuelen:1000
          RX bytes:106684964 (106.6 MB)  TX bytes:1962290 (1.9 MB)

lo        Link encap:Local Loopback
          inet addr:127.0.0.1  Mask:255.0.0.0
          inet6 addr: ::1/128 Scope:Host
          UP LOOPBACK RUNNING  MTU:65536  Metric:1
          RX packets:0 errors:0 dropped:0 overruns:0 frame:0
          TX packets:0 errors:0 dropped:0 overruns:0 carrier:0
          collisions:0 txqueuelen:1
          RX bytes:0 (0.0 B)  TX bytes:0 (0.0 B)


vagrant@node-1:~$ sudo -s
root@node-1:~# vi /etc/systemd/system/kubelet.service.d/10-kubeadm.conf

root@node-1:~# systemctl daemon-reload
root@node-1:~# systemctl restart kubelet

root@node-1:~# kubeadm init --pod-network-cidr=10.244.0.0/16 --apiserver-advertise-address=10.121.1.91 --service-cidr=10.244.0.0/16
[init] Using Kubernetes version: v1.10.2
[init] Using Authorization modes: [Node RBAC]
...

Your Kubernetes master has initialized successfully!

To start using your cluster, you need to run the following as a regular user:

  mkdir -p $HOME/.kube
  sudo cp -i /etc/kubernetes/admin.conf $HOME/.kube/config
  sudo chown $(id -u):$(id -g) $HOME/.kube/config

You should now deploy a pod network to the cluster.
Run "kubectl apply -f [podnetwork].yaml" with one of the options listed at:
  https://kubernetes.io/docs/concepts/cluster-administration/addons/

You can now join any number of machines by running the following on each node
as root:

  kubeadm join 10.121.1.91:6443 --token xryspc.9zqpvxd673xutwgu --discovery-token-ca-cert-hash sha256:901c57651284e3d716647e0eec8425c4dbe9e380c4c66d2c8e5a3705326b8561

root@node-1:~# exit

vagrant@node-1:~$ mkdir -p $HOME/.kube
vagrant@node-1:~$ sudo cp -i /etc/kubernetes/admin.conf $HOME/.kube/config
vagrant@node-1:~$ sudo chown $(id -u):$(id -g) $HOME/.kube/config

vagrant@node-1:~$ kubectl get node
NAME      STATUS     ROLES     AGE       VERSION
node-1    NotReady   master    55s       v1.10.2


vagrant@node-1:~$ curl -O https://raw.githubusercontent.com/coreos/flannel/v0.10.0/Documentation/kube-flannel.yml
  % Total    % Received % Xferd  Average Speed   Time    Time     Time  Current
                                 Dload  Upload   Total   Spent    Left  Speed
100  3217  100  3217    0     0   9018      0 --:--:-- --:--:-- --:--:--  9036


vagrant@node-1:~$ vi kube-flannel.yml
vagrant@node-1:~$ kubectl apply -f kube-flannel.yml
clusterrole.rbac.authorization.k8s.io "flannel" created
clusterrolebinding.rbac.authorization.k8s.io "flannel" created
serviceaccount "flannel" created
configmap "kube-flannel-cfg" created
daemonset.extensions "kube-flannel-ds" created


vagrant@node-1:~$ kubectl get node
NAME      STATUS    ROLES     AGE       VERSION
node-1    Ready     master    2m        v1.10.2
vagrant@node-1:~$ logout
Connection to 127.0.0.1 closed.


Mahos-MacBook-Air:vagrant-k8s takara$ vagrant ssh node-2
Welcome to Ubuntu 16.04.4 LTS (GNU/Linux 4.4.0-122-generic x86_64)
...

vagrant@node-2:~$ sudo -s
root@node-2:~# vi /etc/systemd/system/kubelet.service.d/10-kubeadm.conf
root@node-2:~# systemctl daemon-reload
root@node-2:~# systemctl restart kubelet
root@node-2:~# kubeadm join 10.121.1.91:6443 --token xryspc.9zqpvxd673xutwgu --discovery-token-ca-cert-hash sha256:901c57651284e3d716647e0eec8425c4dbe9e380c4c66d2c8e5a3705326b8561
[preflight] Running pre-flight checks.
	[WARNING FileExisting-crictl]: crictl not found in system path
Suggestion: go get github.com/kubernetes-incubator/cri-tools/cmd/crictl
	[WARNING HTTPProxy]: Connection to "https://10.121.1.91" uses proxy "http://10.121.1.1:3128/". If that is not intended, adjust your proxy settings
[discovery] Trying to connect to API Server "10.121.1.91:6443"
[discovery] Created cluster-info discovery client, requesting info from "https://10.121.1.91:6443"
[discovery] Requesting info from "https://10.121.1.91:6443" again to validate TLS against the pinned public key
[discovery] Cluster info signature and contents are valid and TLS certificate validates against pinned roots, will use API Server "10.121.1.91:6443"
[discovery] Successfully established connection with API Server "10.121.1.91:6443"

This node has joined the cluster:
* Certificate signing request was sent to master and a response
  was received.
* The Kubelet was informed of the new secure connection details.

Run 'kubectl get nodes' on the master to see this node join the cluster.
root@node-2:~# exit
vagrant@node-2:~$ logout
Connection to 127.0.0.1 closed.


Mahos-MacBook-Air:vagrant-k8s takara$ vagrant ssh node-3
Welcome to Ubuntu 16.04.4 LTS (GNU/Linux 4.4.0-122-generic x86_64)
...

vagrant@node-3:~$ sudo -s
root@node-3:~# vi /etc/systemd/system/kubelet.service.d/10-kubeadm.conf
root@node-3:~# systemctl daemon-reload
root@node-3:~# systemctl restart kubelet

root@node-3:~# kubeadm join 10.121.1.91:6443 --token xryspc.9zqpvxd673xutwgu --discovery-token-ca-cert-hash sha256:901c57651284e3d716647e0eec8425c4dbe9e380c4c66d2c8e5a3705326b8561
...

root@node-3:~# exit
vagrant@node-3:~$ logout
Connection to 127.0.0.1 closed.


Mahos-MacBook-Air:vagrant-k8s takara$ vagrant ssh node-1
Welcome to Ubuntu 16.04.4 LTS (GNU/Linux 4.4.0-122-generic x86_64)
...

Last login: Wed May  9 23:48:14 2018 from 10.0.2.2
vagrant@node-1:~$ kubectl get node
NAME      STATUS     ROLES     AGE       VERSION
node-1    Ready      master    5m        v1.10.2
node-2    Ready      <none>    1m        v1.10.2
node-3    NotReady   <none>    4s        v1.10.2

vagrant@node-1:~$ kubectl label node node-2 node-role.kubernetes.io/node=
node "node-2" labeled
vagrant@node-1:~$ kubectl label node node-3 node-role.kubernetes.io/node=
node "node-3" labeled
vagrant@node-1:~$ kubectl label nodes node-2 type=worker
node "node-2" labeled
vagrant@node-1:~$ kubectl label nodes node-3 type=worker
node "node-3" labeled

vagrant@node-1:~$ kubectl get node
NAME      STATUS    ROLES     AGE       VERSION
node-1    Ready     master    6m        v1.10.2
node-2    Ready     node      2m        v1.10.2
node-3    Ready     node      46s       v1.10.2
まとめ
企業内プロキシ配下で、Kuberentesが動作する事が確認できました。 しかし、インターネットからダウンロードするアセットが多いため、各ツールについて考慮が必要な事が整理できたと思います。


