自分のパソコン上に 仮想サーバーとして VyOS を立で Bluemix VPN サービスなどと接続できたら便利ですよね。 VPNルーター用に専用にパソコンを動作させなくても、コストをかけず手軽に安全に利用できるはずです。この方法は、Bluemix VPN サービス だけでなく、Bluemix Infrastructure (旧SoftLayer)の VPNサービスの接続に適用できますから、有用性も高いと思います。
これは提案を作るにあたって、注意点を理解したかったので、実際に確認してみた記録です。
構成図
vagrant + VirtualBox で動作するVyOS仮想ルーターとBluemixのVPNサービスとを接続して、自分のオフィス と Bluemix の IBM Container 環境をセキュアに接続する

Bluemix VPN サービス 注文
Bluemix にログイン して 次のアイコンから VPNサービスをオーダーします。 オーダー時にIBM Container が起動していなければ、VPNで接続するネットワークが存在しないために、ゲートウェイが作成されませんから、先に適当なIBM Container を一つ作成しておきます。
オーダーが完了したら 次の Create New をクリックして設定を進めていきます。

次の主要な設定を進め、Save をクリックします。
- Preshared Key String VyOSのVPN IPSec設定と共有するキーワード
- Customer Gateway IP 自オフィスのインターネットのアドレス
- Customer Subnet 自オフィスのサブネット
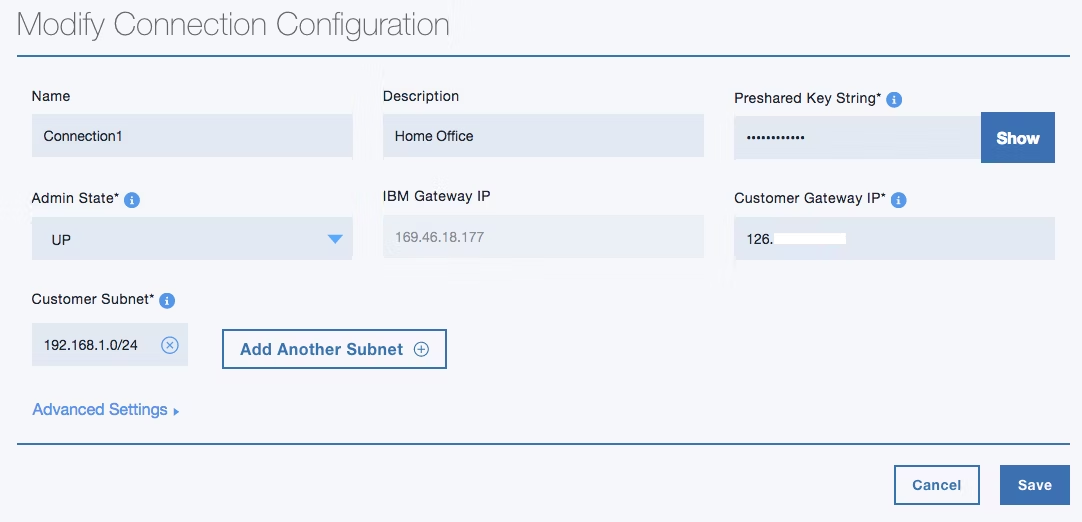
自分のオフィスのルーターのインターネット側のIPアドレスを知るには、以下のコマンドが使えます。
ubuntu@ubuntu-xenial:~$ curl ifconfig.me
126.**.***.***
Vagrant の仮装サーバーの環境を作る
ディレクトリを作って仮想サーバーの環境を初期化します。 VirtualBoxのVyOSの仮想サーバーは、https://atlas.hashicorp.com/higebu/boxes/vyos/ のイメージを利用することにしました。
imac:~ maho$ mkdir vyos
imac:~ maho$ cd vyos
imac:vyos maho$ vagrant init higebu/vyos
Vagrant up する前に、Vagrantfile を編集しておきます。 編集の目的は以下の2点です。
・認証用公開鍵の変更を止める
・ブリッジ・インタフェースを設定してIPアドレスを付与
付与するIPアドレスが、自分のオフィスや他のvagrantの仮想サーバーから IBM Container のネットワークをアクセスする場合の ゲートウェイのアドレスになりますので、オフィスのアドレス範囲から確保する必要があります。
  # Create a public network, which generally matched to bridged network.
  # Bridged networks make the machine appear as another physical device on
  # your network.
  config.ssh.insert_key = false
  config.vm.network "public_network", bridge: "en0: Ethernet", ip: "192.168.1.76"
VyOS 仮装ルーターを起動する
imac:vyos maho$ vagrant up
VyOS にログインして、初期の確認作業を実施します。
imac:vyos maho$ vagrant ssh
Linux vyos 3.13.11-1-amd64-vyos #1 SMP Wed Aug 12 02:08:05 UTC 2015 x86_64
Welcome to VyOS.
This system is open-source software. The exact distribution terms for
each module comprising the full system are described in the individual
files in /usr/share/doc/*/copyright.
最初に eth1 インタフェースを確認しておきます。 VagrantFileの設定が誤っていると eth1が存在しないかもしれません。
vagrant@vyos:~$ sh int
Codes: S - State, L - Link, u - Up, D - Down, A - Admin Down
Interface        IP Address                        S/L  Description
---------        ----------                        ---  -----------
eth0             10.0.2.15/24                      u/u
eth1             192.168.1.76/24                   u/u
lo               127.0.0.1/8                       u/u
                 ::1/128
Bluemix の VPNゲートウェイと疎通を確認する。
vagrant@vyos:~$ ping 169.46.18.177
PING 169.46.18.177 (169.46.18.177) 56(84) bytes of data.
64 bytes from 169.46.18.177: icmp_req=1 ttl=63 time=145 ms
64 bytes from 169.46.18.177: icmp_req=2 ttl=63 time=145 ms
64 bytes from 169.46.18.177: icmp_req=3 ttl=63 time=145 ms
^C
--- 169.46.18.177 ping statistics ---
3 packets transmitted, 3 received, 0% packet loss, time 2002ms
rtt min/avg/max/mdev = 145.132/145.174/145.247/0.315 ms
VyOSの設定
設定モードへ変更
VyOSは省略コマンドが使えるので、configure とフルスペルではなく、confで変更できます。
vagrant@vyos:~$ conf
[edit]
インタフェースの設定
VagrantFileの設定したブリッジ用のインタフェースに、固定IPアドレスを付与します。 固定IPアドレスを設定する理由は、他のPCなどのノードからも利用できるためです。
vagrant@vyos# edit interfaces ethernet eth1
[edit interfaces ethernet eth1]
vagrant@vyos# set address 192.168.1.76/24
[edit interfaces ethernet eth1]
VPNの設定
Bluemix の VPN サービスを参照しながらESPとIKEを設定します。 このESP (Encapsulated Security Payload )は、ペイロード部に対して暗号化の設定です。IKE(Internet Key Exchange)は、鍵交換のプロトコルです。
ipsec-interface で sh int で表示される ブリッジ側のインタフェースを設定します。
nat-networks は、Bluemix VPN サービスの詳細の ( All Single Containers / All Scalable Groups ) のアドレスを設定します。
nat-traversal enable は、ブロードバンドルーターが NATしているので有効にします。
 ipsec {
     esp-group default {  <-- Bluemix VPN の IPsec Policies と合わせる
         compression disable
         lifetime 3600
         mode tunnel
         pfs dh-group2
         proposal 1 {
             encryption aes128
             hash sha1
         }
     }
     ike-group default { <-- Bluemix VPN の IKE Policies と合わせる
         ikev2-reauth no
         key-exchange ikev1
         lifetime 86400
         proposal 1 {
             dh-group 2
             encryption aes128
             hash sha1
         }
     }
     ipsec-interfaces {
         interface eth1
     }
     nat-networks {
         allowed-network 172.29.0.0/16 {
         }
     }
     nat-traversal enable
Bluemix VPNサービスの条件を設定します。
vagrant@vyos# sh ipsec site-to-site
 peer 169.46.18.177 {  <-- Bluemix の VPN ルーターのIPアドレス
     authentication {
         id 126.77.118.60  <-- 自サイトのブロードバンドルータに付与されたアドレス
         mode pre-shared-secret
         pre-shared-secret *********  <-- Bluemix VPNに設定された共有鍵と同じもの
         remote-id 169.46.18.177  <-- Bluemix の VPN ルーターのIPアドレス
     }
     connection-type initiate    <-- 接続を自発的に開始
     default-esp-group default   <-- ESPを前述のdefaultに設定
     ike-group default           <-- IKEを前述のdefaultに設定
     ikev2-reauth inherit
     local-address any
     tunnel 1 {
         local {
             prefix 192.168.1.0/24  <-- 自環境のネットワークのアドレス
         }
         remote {
             prefix 172.29.0.0/16   <-- IBM Container のアドレス範囲
         }
     }
 }
[edit vpn]
設定の確定と動作確認
設定が終わったら、設定変更の確定と永続化を実施します。
vagrant@vyos# commit
vagrant@vyos# save
設定モードから抜けてセッションを確認します。
下記のコマンドで、state が up であれば設定完了です。
vagrant@vyos:~$ sh vpn ipsec sa
Peer ID / IP                            Local ID / IP
------------                            -------------
169.46.18.177                           10.0.2.15

    Tunnel  State  Bytes Out/In   Encrypt  Hash    NAT-T  A-Time  L-Time  Proto
    ------  -----  -------------  -------  ----    -----  ------  ------  -----
    1       up     0.0/0.0        aes128   sha1    yes    1314    3600    all
トラブルシューティング
設定が間違いなどで、セッションがIPSecのセッションが確立できない場合の問題判別のヒントです。
- sh vpn debug で pending のキーワードを探して止まってる箇所を特定
- sh log tail でセッション確立失敗を確認
- sh vpn ike sa, sh vpn ipsec sa でセッションの状態を確認
疎通試験
VyOSのブリッジ・インターフェースのIPアドレスに、ルーティングしておきます。
tkr@raspi1 ~ $ netstat -r
Kernel IP routing table
Destination     Gateway         Genmask         Flags   MSS Window  irtt Iface
default         192.168.1.1     0.0.0.0         UG        0 0          0 eth0
172.29.0.0      192.168.1.76    255.255.0.0     UG        0 0          0 eth0
192.168.1.0     *               255.255.255.0   U         0 0          0 eth0
192.168.1.0     *               255.255.255.0   U         0 0          0 eth0.1
IBM Container に向けて ping に応答がある事を確認します。
tkr@raspi1 ~ $ ping 172.29.0.48
PING 172.29.0.48 (172.29.0.48) 56(84) bytes of data.
64 bytes from 172.29.0.48: icmp_req=1 ttl=62 time=138 ms
64 bytes from 172.29.0.48: icmp_req=2 ttl=62 time=137 ms
64 bytes from 172.29.0.48: icmp_req=3 ttl=62 time=137 ms
^C
--- 172.29.0.48 ping statistics ---
3 packets transmitted, 3 received, 0% packet loss, time 2003ms
rtt min/avg/max/mdev = 137.700/138.014/138.446/0.532 ms
traceroute で 経路を確認します。
tkr@raspi1 ~ $ traceroute 172.29.0.48
traceroute to 172.29.0.48 (172.29.0.48), 30 hops max, 60 byte packets
 1  192.168.1.76 (192.168.1.76)  0.864 ms  0.503 ms  0.726 ms
 2  * * *
 3  172.29.0.48 (172.29.0.48)  137.325 ms  137.757 ms  137.515 ms
IBM Container ibmnodeにアクセスしてみます
tkr@raspi1 ~ $ curl http://172.29.0.48:3000
Hello World!
以上、VirutalBox 上の VyOSルータ と Bluemix VPN との VPNセッションが機能していることがわかります。
VyOS全設定ファイル
vagrant@vyos:~$ sh conf
interfaces {
    ethernet eth0 {
        address dhcp
        duplex auto
        hw-id 08:00:27:0f:ec:bf
        smp_affinity auto
        speed auto
    }
    ethernet eth1 {
        address 192.168.1.76/24
        duplex auto
        hw-id 08:00:27:7a:71:aa
        smp_affinity auto
        speed auto
    }
    loopback lo {
    }
}
service {
    ssh {
        disable-host-validation
        port 22
    }
}
system {
    config-management {
        commit-revisions 20
    }
    gateway-address 192.168.1.1
    host-name vyos
    ntp {
        server 0.pool.ntp.org {
        }
        server 1.pool.ntp.org {
        }
        server 2.pool.ntp.org {
        }
    }
    package {
        auto-sync 1
        repository community {
            components main
            distribution helium
            password ****************
            url http://packages.vyos.net/vyos
            username ""
        }
    }
    syslog {
        global {
            facility all {
                level notice
            }
            facility protocols {
                level debug
            }
        }
    }
    time-zone UTC
}
vpn {
    ipsec {
        esp-group default {
            compression disable
            lifetime 3600
            mode tunnel
            pfs dh-group2
            proposal 1 {
                encryption aes128
                hash sha1
            }
        }
        ike-group default {
            ikev2-reauth no
            key-exchange ikev1
            lifetime 86400
            proposal 1 {
                dh-group 2
                encryption aes128
                hash sha1
            }
        }
        ipsec-interfaces {
            interface eth1
        }
        nat-networks {
            allowed-network 172.29.0.0/16 {
            }
        }
        nat-traversal enable
        site-to-site {
            peer 169.46.18.177 {
                authentication {
                    id **.**.**.** <- 秘密です
                    mode pre-shared-secret
                    pre-shared-secret ****************
                    remote-id 169.46.18.177
                }
                connection-type initiate
                default-esp-group default
                ike-group default
                ikev2-reauth inherit
                local-address any
                tunnel 1 {
                    allow-nat-networks disable
                    allow-public-networks disable
                    local {
                        prefix 192.168.1.0/24
                    }
                    remote {
                        prefix 172.29.0.0/16
                    }
                }
            }
        }
    }
}