Hosting on S3 with Cloudflare
I wanted to see if you could create a serverless site with high availability and low cost without any major maintenance.
This is where the AWS S3 bucket came in. S3 buckets can do Static website hosting and are in general a cheap option for cloud storage, and have high availability. Not to mention, a S3 hosted website will basically not go down as long as the AWS servers are running.
However, one issue with S3 is that it does not do caching by itself and since you pay for each request this could potentially cause the monthly cost to spike if you get a lot of traffic.
In order to remedy this, I found that Cloudflare could be used with S3, which is a cloud solution that allows caching of website resources through the Cloudflare servers. If I stay within their free plan, I can use Cloudflare for free. Another option would have been AWS Cloudfront, but that solution is quite expensive.
So, Combining S3 with Cloudflare seemed like the most logical solution for my case. While S3 is limited to hosting HTML, CSS and Javascript. It seemed like a chance to try out some Vue.js to see how well it runs on S3.
The setup
After doing some research I found this setup to be the simplest to implement, while leaving some room for improvement.
The infrastructure
Before getting into the nitty-gritty, I thought I would go though the infrastructure first.
This is a simple overview of my setup and how I imagine the data flow.
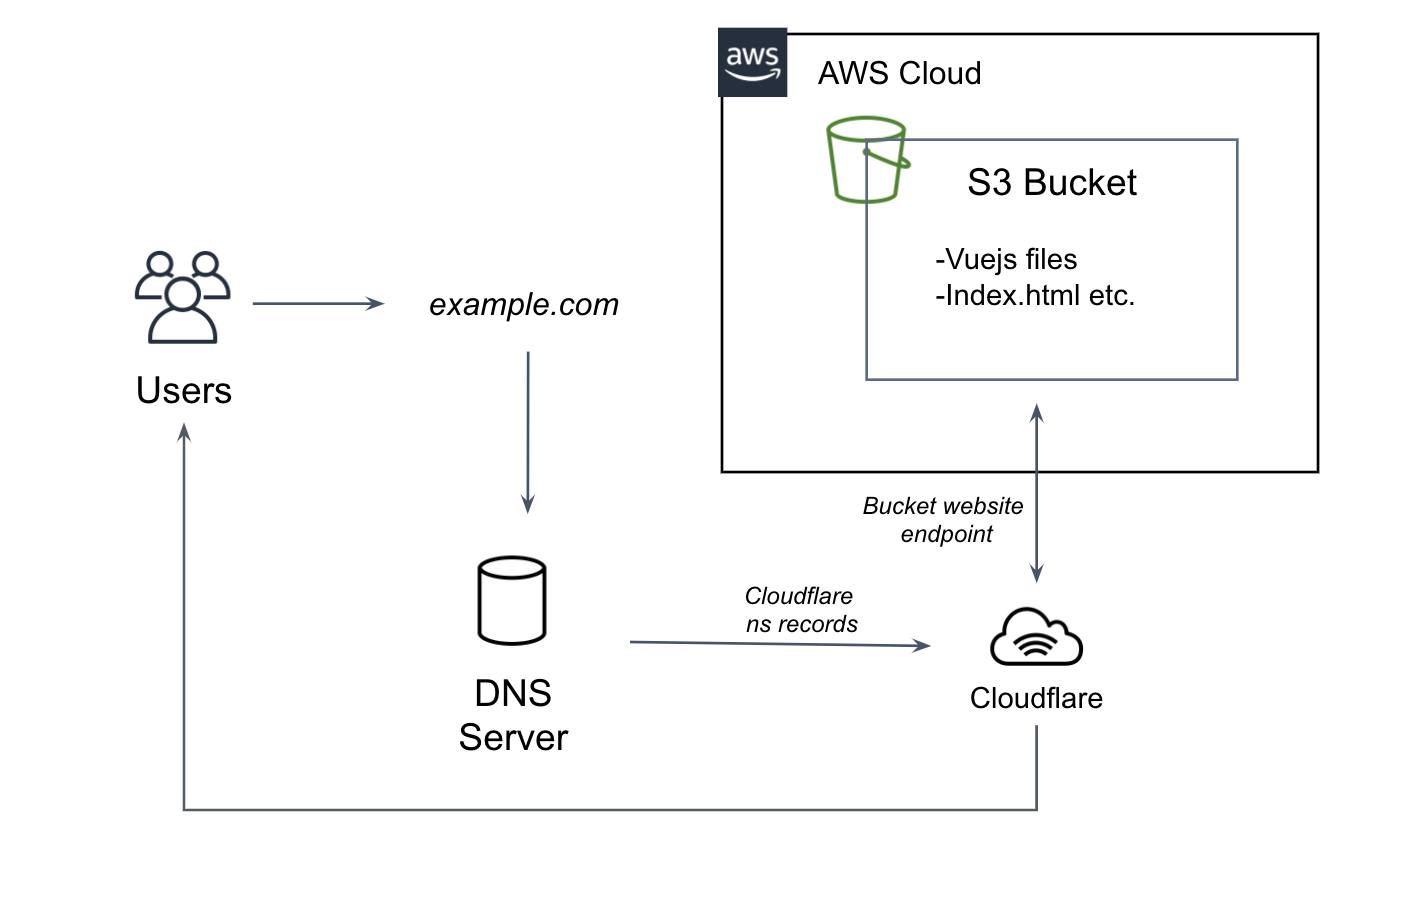
- Users access the domain which goes to the DNS server
- The Domain ns records are set to point at the Cloudflare name servers.
- Cloudflare accepts requests from the DNS and direct them to the target S3 bucket endpoint
- The S3 buckets serves the resources to Cloudflare.
- Cloudflare caches the resources and delivers them to the end user.
Requirements before starting
- A domain name
- AWS account
- An hour or so of your time.
- Coffee
Step 1: Create S3 bucket
- Go to your S3 page in the AWS console. Link: https://s3.console.aws.amazon.com/s3
- Press "Create bucket".
- Set the bucket name to your root domain name.
- Under Bucket settings uncheck "Block all public access".
- Make sure to check the following:
・Block public access to buckets and objects granted through new access control lists (ACLs)
・Block public access to buckets and objects granted through any access control lists (ACLs)
6. Add tags if you need it. (Good practice)
7. Create bucket.
Step 2: Configure S3 bucket
- After creating the bucket, open the bucket and go to Properties
- Press Edit under Static website hosting and enable it.
- Choose Host a static website.
- Under Index Document make sure it is set to index.html. This will be the main file for each directory.
- Add an Error Document if you want to. This will be the default error page it will redirect to.
- Save settings.
Step 3: Set S3 bucket permissions
- The bucket is currently set to be public, so you need to limit the access to it.
- Go to Permissions in your bucket.
- Under Bucket policy add a new policy and copy the following:
Bucket Policy Sample
{
    "Version": "2012-10-17",
    "Statement": [
        {
            "Sid": "PublicReadGetObject",
            "Effect": "Allow",
            "Principal": "*",
            "Action": "s3:GetObject",
            "Resource": "arn:aws:s3:::example.com/*",
            "Condition": {
                "IpAddress": {
                    "aws:SourceIp": [
                        "2400:cb00::/32",
                        "2405:8100::/32",
                        "2405:b500::/32",
                        "2606:4700::/32",
                        "2803:f800::/32",
                        "2c0f:f248::/32",
                        "2a06:98c0::/29",
                        "103.21.244.0/22",
                        "103.22.200.0/22",
                        "103.31.4.0/22",
                        "104.16.0.0/12",
                        "108.162.192.0/18",
                        "131.0.72.0/22",
                        "141.101.64.0/18",
                        "162.158.0.0/15",
                        "172.64.0.0/13",
                        "173.245.48.0/20",
                        "188.114.96.0/20",
                        "190.93.240.0/20",
                        "197.234.240.0/22",
                        "198.41.128.0/17"
                    ]
                }
            }
        }
    ]
}
Step 4: Upload Vue files (or static files)
I will not go too deep into this topic and just cover the part on what you need to upload.
- Using Vue-cli build your vue project
- Check the contents of your build. Usually ~/dist
- Upload the contents from your build to your S3 bucket, make sure index.html is included and in the top directory.
- That's it.
Step 5: Setup Cloudflare
Setting up Cloudflare for S3.
- Create a Cloudflare account with a free plan.
Link: https://www.cloudflare.com/ - Register your domain name on Cloudflare
- Setup a CNAME for the root domain (and additional sub-domains)
・The NAME should be your root domain.
-if you have any sub-domains you register just the first part(eg. www.).
・The TARGET should be your S3 Bucket Endpoint.
・Press Save when done. - Next, Cloudflare requires you to set your domain NS records to point at two Cloudlfare NS records.
・This step might be different depending on your domain registrar.
・Cloudflare has a guide on how to setup the NS records on some popular domain sites here
・Remember to set the TTL to a low number on your NS record so you don't have to wait too long. - After the setup you can request Cloudflare to check if the domain setup has gone through.
- If no issues occur Cloudflare will tell you it succeeded and you can now use your site.
STEP 6: Testing the site
Access your domain, it should now display your site, if all settings are correct.
If for any reason you get a 403 error, it is most likely caused by your S3 bucket permissions.
Any other issues might be caused by the DNS settings or the Cloudflare cache.
That is it, you now have an S3 hosted website.
Final thoughts
I think you can easily expand on this solution by integrating Lamda, Rest or gRPC to make a more dynamic site, while still keeping it some what serverless and low cost. I have yet tried this solution for an extended period of time, but I don't imagine that the monthly costs will go above 10~15$.
I do realize there are other VPC solutions that can achieve the same results as S3, which is something that deserves some exploring.
Overall I am satisfied with the end results, but I believe there is room for tweaking.