「カラー図解 最新 Raspberry Piで学ぶ電子工作」で紹介されている、DCモータをモータドライバTA7291Pで制御する例題を、pigpioでPWM制御する方法に作り変えてみました。
使用機材
書籍に紹介されているのと基本的に同じです。
- Raspberry pi3 model b+
- ボリューム抵抗10kΩ
- 12bit ADコンバータ MCP3208
- モータドライバ TA7291P
- 乾電池4個
TA7291Pを動作させるのに4.5V以上の電源が必要なので、乾電池4個は必要です。
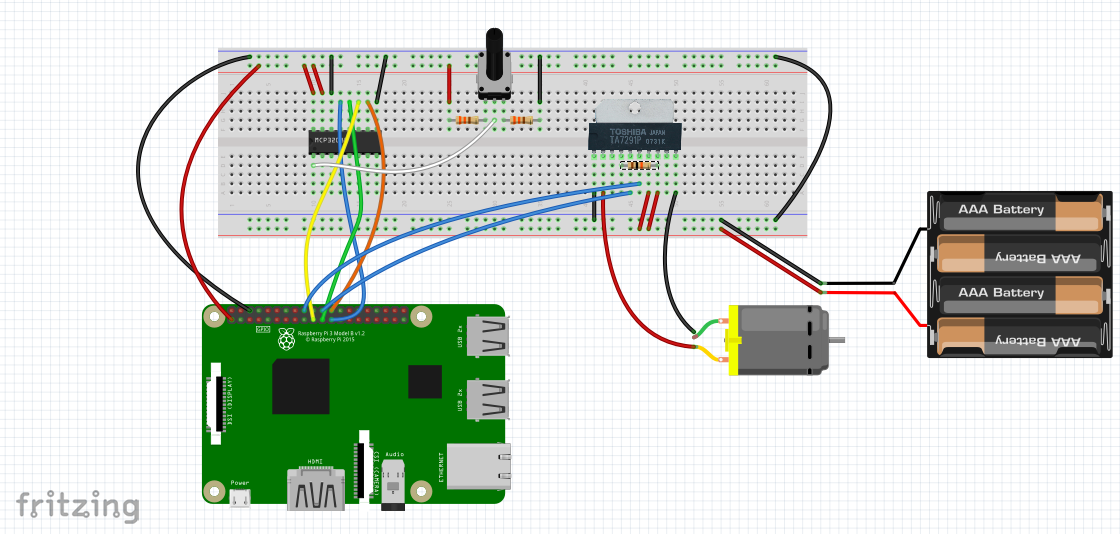
配線図
配線図は自分で書き起こしましたが、書籍に紹介されているのと基本的に同じです。ボリューム抵抗の脇に抵抗が追加されているのはノイズ対策だそうで、この辺がノウハウなのかなと思います。詳しくは書籍を参考にしてください。
Pythonプログラム
pigpioを使う場合の約束として、最初にsudo pigpiodを行う必要があります。
# -*- coding: utf-8 -*-
import pigpio
import time
import spidev

PWM_PIN = [25,24] #PWM IN1,IN2
FREQ = 100
RANGE = 255

pi = pigpio.pi()


# MCP3208からSPI通信で12ビットのデジタル値を取得。0から7の8チャンネル使用可
def readadc_spidev(adcnum):
    if ((adcnum > 7) or (adcnum < 0)):
        return -1
    command1 = 0x6 | (adcnum & 0x4)>>2
    command2 = (adcnum & 0x3)<<6
    ret=spi.xfer2([command1,command2,0])
    adcout = (ret[1]&0xf)<<8 | ret[2]
    return adcout


spi=spidev.SpiDev()
spi.open(0, 0) # bus0, CE0
spi.max_speed_hz = 1000000 # 1MHz

for j in range(2):
    pi.set_mode(PWM_PIN[j], pigpio.OUTPUT)  #pigpioで制御するピンの指定
    pi.set_PWM_frequency(PWM_PIN[j], FREQ)  #PWMの周波数(Hz)を指定。デフォルトは800。
    pi.set_PWM_range(PWM_PIN[j], RANGE)  #PWM値(μs)の最大値を指定。指定可能な値は25〜40000。デフォルトは255。


inputVal = 0
duty = 0

try:
    while True:
        inputVal = readadc_spidev(0)

        if inputVal>100 and inputVal<2048:  #正転
            duty = (2048-inputVal)*70/2048
            pi.set_PWM_dutycycle(PWM_PIN[0], duty) #デューティー比変更
            pi.set_PWM_dutycycle(PWM_PIN[1], 0)
        elif inputVal>=2048 and inputVal<4000:  #逆転
            duty = (inputVal-2048)*70/2048
            pi.set_PWM_dutycycle(PWM_PIN[0], 0)
            pi.set_PWM_dutycycle(PWM_PIN[1], duty) #デューティー比変更
        else:
            pass  #ノイズ対策のため100未満と4000以上の値は無視する
        print(inputVal,duty)
        time.sleep(0.5)

except KeyboardInterrupt:
    pass

spi.close()
pi.stop()
書籍ではChangeDutyCycle()を利用しているところをpigpioに変えました。
なお、書籍ではADコンバータの読み取りをGPIOの制御で実現していますが、こちらもspidevを使う方法に変えてあります。(前回の記事参照)