ぷりぷりあぷりけーしょんずインフラ担当による ぷりぷりあぷりけーしょんず Advent Calendar 2019 の11日目
目標
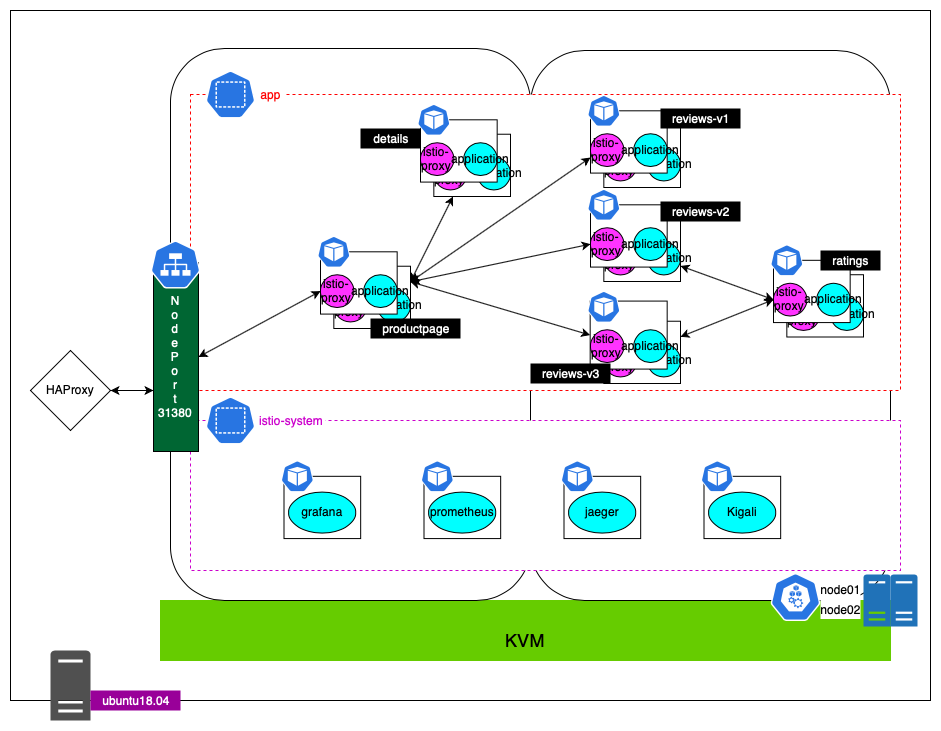
前回構築したおうちk8s上にIstioのサンプルアプリケーションをデプロイします。
Istioのデプロイ
k8sの動作する環境はできあがっているので、さっそくですがIstioのデプロイをします。
セットアップ
-
Istioのマニフェストを作成する時に必要なHelmをインストールします。
$ curl -L https://git.io/get_helm.sh | bash -
Istioのインストール
$ curl -L https://git.io/getLatestIstio | sh - -
マニフェストの作成
GatewayやVirtualServiceなどIstioが利用するCRDを作成するためのマニフェスト$ helm template istio-1.4.1/install/kubernetes/helm/istio-init/ \ --name istio-init \ --namespace istio-system \ > istio-init.ymlIstioコンポーネントなどIstio本体のデプロイに必要なマニフェスト
$ helm template istio-1.4.1/install/kubernetes/helm/istio/ \
  --name istio \
  --namespace istio-system \
  --set global.configValidation=false \
  --set gateways.istio-ingressgateway.type=NodePort \
  --set grafana.enabled=true \
  --set tracing.enabled=true \
  --set kiali.enabled=true \
  > istio.yml
マニフェストをちょっと編集
上記の手順で作成したマニフェストをデプロイするとLimitRangeの管理がガバガバで、後々Podのデプロイができない状態に陥ってしまうことがあるためマニフェストを編集します。
$ view istio.yml
  17635           requests:
  17636             cpu: 1000m
istio-telemetryの定義をしている箇所ですが、この通り1000mつまり1vCPUをデプロイ時に要求してしまいます。
  17787             requests:
  17788               cpu: 500m
  17789               memory: 2048Mi
istio-pilotについてはメモリを2G要求してしまいますね。
これらIstioコンポーネントの利用するリソースの使用量については、まだしっかりと把握できていないので適切な値がいくつかはわかっていません。
ただ、今回のような動作確認がしたいという場合であればこれらの値を低く設定して実行しても問題はありません。
デプロイ
-
ネームスペースの作成
$ kubectl create ns istio-system -
CRDの作成
$ kubectl apply -f istio-init.yml -
Kiali認証に必要なSecretsの作成
$ vi kiali-auth.ymlkiali-auth.yml## admin:adminでKialiへログインすることができます apiVersion: v1 kind: Secret metadata: name: kiali namespace: istio-system labels: app: kiali type: Opaque data: username: YWRtaW4= passphrase: YWRtaW4=$ kubectl apply -f kiali-auth.yml -
Istioのデプロイ
$ kubectl apply -f istio.yml
たまにデプロイで躓く
ここまででIstioコンポーネントのデプロイが完了しますが、下記のようなエラーが出る場合があります。(根本的な原因はわかりませんが、たまに起こります)
Error from server (InternalError): error when creating "istio.yml": Internal error occurred: failed calling webhook "mixer.validation.istio.io": Post https://istio-galley.istio-system.svc:443/admitmixer?timeout=30s: dial tcp 10.100.146.252:443: connect: connection refused
Error from server (InternalError): error when creating "istio.yml": Internal error occurred: failed calling webhook "mixer.validation.istio.io": Post https://istio-galley.istio-system.svc:443/admitmixer?timeout=30s: dial tcp 10.100.146.252:443: connect: connection refused
Error from server (InternalError): error when creating "istio.yml": Internal error occurred: failed calling webhook "mixer.validation.istio.io": Post https://istio-galley.istio-system.svc:443/admitmixer?timeout=30s: dial tcp 10.100.146.252:443: connect: connection refused
Error from server (InternalError): error when creating "istio.yml": Internal error occurred: failed calling webhook "mixer.validation.istio.io": Post https://istio-galley.istio-system.svc:443/admitmixer?timeout=30s: dial tcp 10.100.146.252:443: connect: connection refused
Error from server (InternalError): error when creating "istio.yml": Internal error occurred: failed calling webhook "mixer.validation.istio.io": Post https://istio-galley.istio-system.svc:443/admitmixer?timeout=30s: dial tcp 10.100.146.252:443: connect: connection refused
Error from server (InternalError): error when creating "istio.yml": Internal error occurred: failed calling webhook "mixer.validation.istio.io": Post https://istio-galley.istio-system.svc:443/admitmixer?timeout=30s: dial tcp 10.100.146.252:443: connect: connection refused
Error from server (InternalError): error when creating "istio.yml": Internal error occurred: failed calling webhook "mixer.validation.istio.io": Post https://istio-galley.istio-system.svc:443/admitmixer?timeout=30s: dial tcp 10.100.146.252:443: connect: connection refused
Error from server (InternalError): error when creating "istio.yml": Internal error occurred: failed calling webhook "mixer.validation.istio.io": Post https://istio-galley.istio-system.svc:443/admitmixer?timeout=30s: dial tcp 10.100.146.252:443: connect: connection refused
Error from server (InternalError): error when creating "istio.yml": Internal error occurred: failed calling webhook "mixer.validation.istio.io": Post https://istio-galley.istio-system.svc:443/admitmixer?timeout=30s: dial tcp 10.100.146.252:443: connect: connection refused
数秒後に再度$ kubectl apply -f istio.ymlを実行するとデプロイに成功しますが、その際の標準出力が下記のようになります。
service/tracing unchanged
mutatingwebhookconfiguration.admissionregistration.k8s.io/istio-sidecar-injector configured
attributemanifest.config.istio.io/istioproxy created
attributemanifest.config.istio.io/kubernetes created
instance.config.istio.io/requestcount created
instance.config.istio.io/requestduration created
instance.config.istio.io/requestsize created
instance.config.istio.io/responsesize created
instance.config.istio.io/tcpbytesent created
instance.config.istio.io/tcpbytereceived created
instance.config.istio.io/tcpconnectionsopened created
instance.config.istio.io/tcpconnectionsclosed unchanged
再度Applyを実行した際にinstanceなどのオブジェクトが作成されていることがわかります。
instanceはIstioのCRDで定義したオブジェクトであり、エラーメッセージにはistio-galleyへ接続できていない旨があるため、istio-galleyの作成が追いつかずinstanceなどの検証・作成ができずエラーになっているのかなと推測しています。
数秒おくことでIstioマニフェストのデプロイに成功するのはistio-galleyが作成されたからということでしょうかね。
ただinstanceでも作成されているものもあるし、handlerなど他のオブジェクトについても作成されているし、他に原因があるのだろうか...?
サンプルアプリケーションのデプロイ
-
ネームスペースの作成
今回はなんとなくネームスペースを作成しています。$ kubectl create ns app
WorkerNodeのリソースに不安がある場合はLimitRangeを設定すると良いでしょう。apiVersion: "v1" kind: "LimitRange" metadata: name: app-limit namespace: app spec: limits: - type: "Container" default: cpu: "500m" memory: "128Mi" defaultRequest: cpu: "10m" memory: "128Mi" -
アプリケーションのデプロイ
$ kubectl apply -n app -f <(./istio-1.4.1/bin/istioctl kube-inject -f istio-1.4.1/samples/bookinfo/platform/kube/bookinfo.yaml)$ kubectl apply -n app -f istio-1.4.1/samples/bookinfo/networking/bookinfo-gateway.yaml
動作確認
今回の構成ではKVMのネットワークはデフォルトなので、ホストOSの外からアクセスすることはできません。
Linuxブリッジ(virbr0)をホストOSのNICにアタッチすることでアクセス可能になりますが、今回はその設定はせずホストOSにHAProxyを導入しています。
-
サンプルアプリケーションの入り口となるIPアドレスを取得します。
$ URL=$(kubectl get po -l istio=ingressgateway -n istio-system -o jsonpath='{.items[0].status.hostIP}') -
ホストOSからアクセス可能か検証
$ curl -I $URL:31380/productpage200が返ってくるようなら動作しています。
-
HAProxyを導入(ホストOS側で作業)
$ sudo apt install haproxy$ sudo vi /etc/haproxy/haproxy.cfgfrontend bookinfo bind *:80 default_backend bookinfo # $URLは適宜書き換え backend bookinfo server bookinfo $URL:31380/productpage/ check$ sudo systemctl restart haproxy
ここまでで、http://ホストOSのIPアドレス/productpageでGUIからデプロイしたアプリケーションへアクセスすることが可能になりました。
まとめ
Qiitaへの投稿は前回が初めてであり勝手がわからず単なる手順書のようになってしまいましたね。
ただ、自宅のNUCへUbuntu Serverを導入し、KVMで仮想化し、k8sを構築し、Istioでサンプルアプリケーションをデプロイするまでの手順がひとまとめで紹介されているサイトも少なかったので、それらの手順をまとめる主旨で書けたので満足です!