TL;DR
- Action Cable を使用してプッシュ通信のプログレスバーを実装した
- Action Cable について解説する
ProgressChannel.broadcast_to(current_user, percent: (index+1) * 100 / pictures.length)
背景
旅行の思い出投稿サイトを作ったときに写真アップロードが遅くて、UX 的にアップロードの進捗状況を表すプログレスバーがあったほうが良いのではないかとなり、Action Cable の勉強も兼ねて実装しました
モノ
Action Cable 解説
Rails に Action Cable という WebSocket と Rails のその他の部分をシームレスに統合するための機能が存在します
Rails 公式なので Rails ガイドを見るのが良いと思ったのですが、Rails ガイドの解説がとても分かりづらかったので自分でまとめ直してみました
参考になれば幸いです
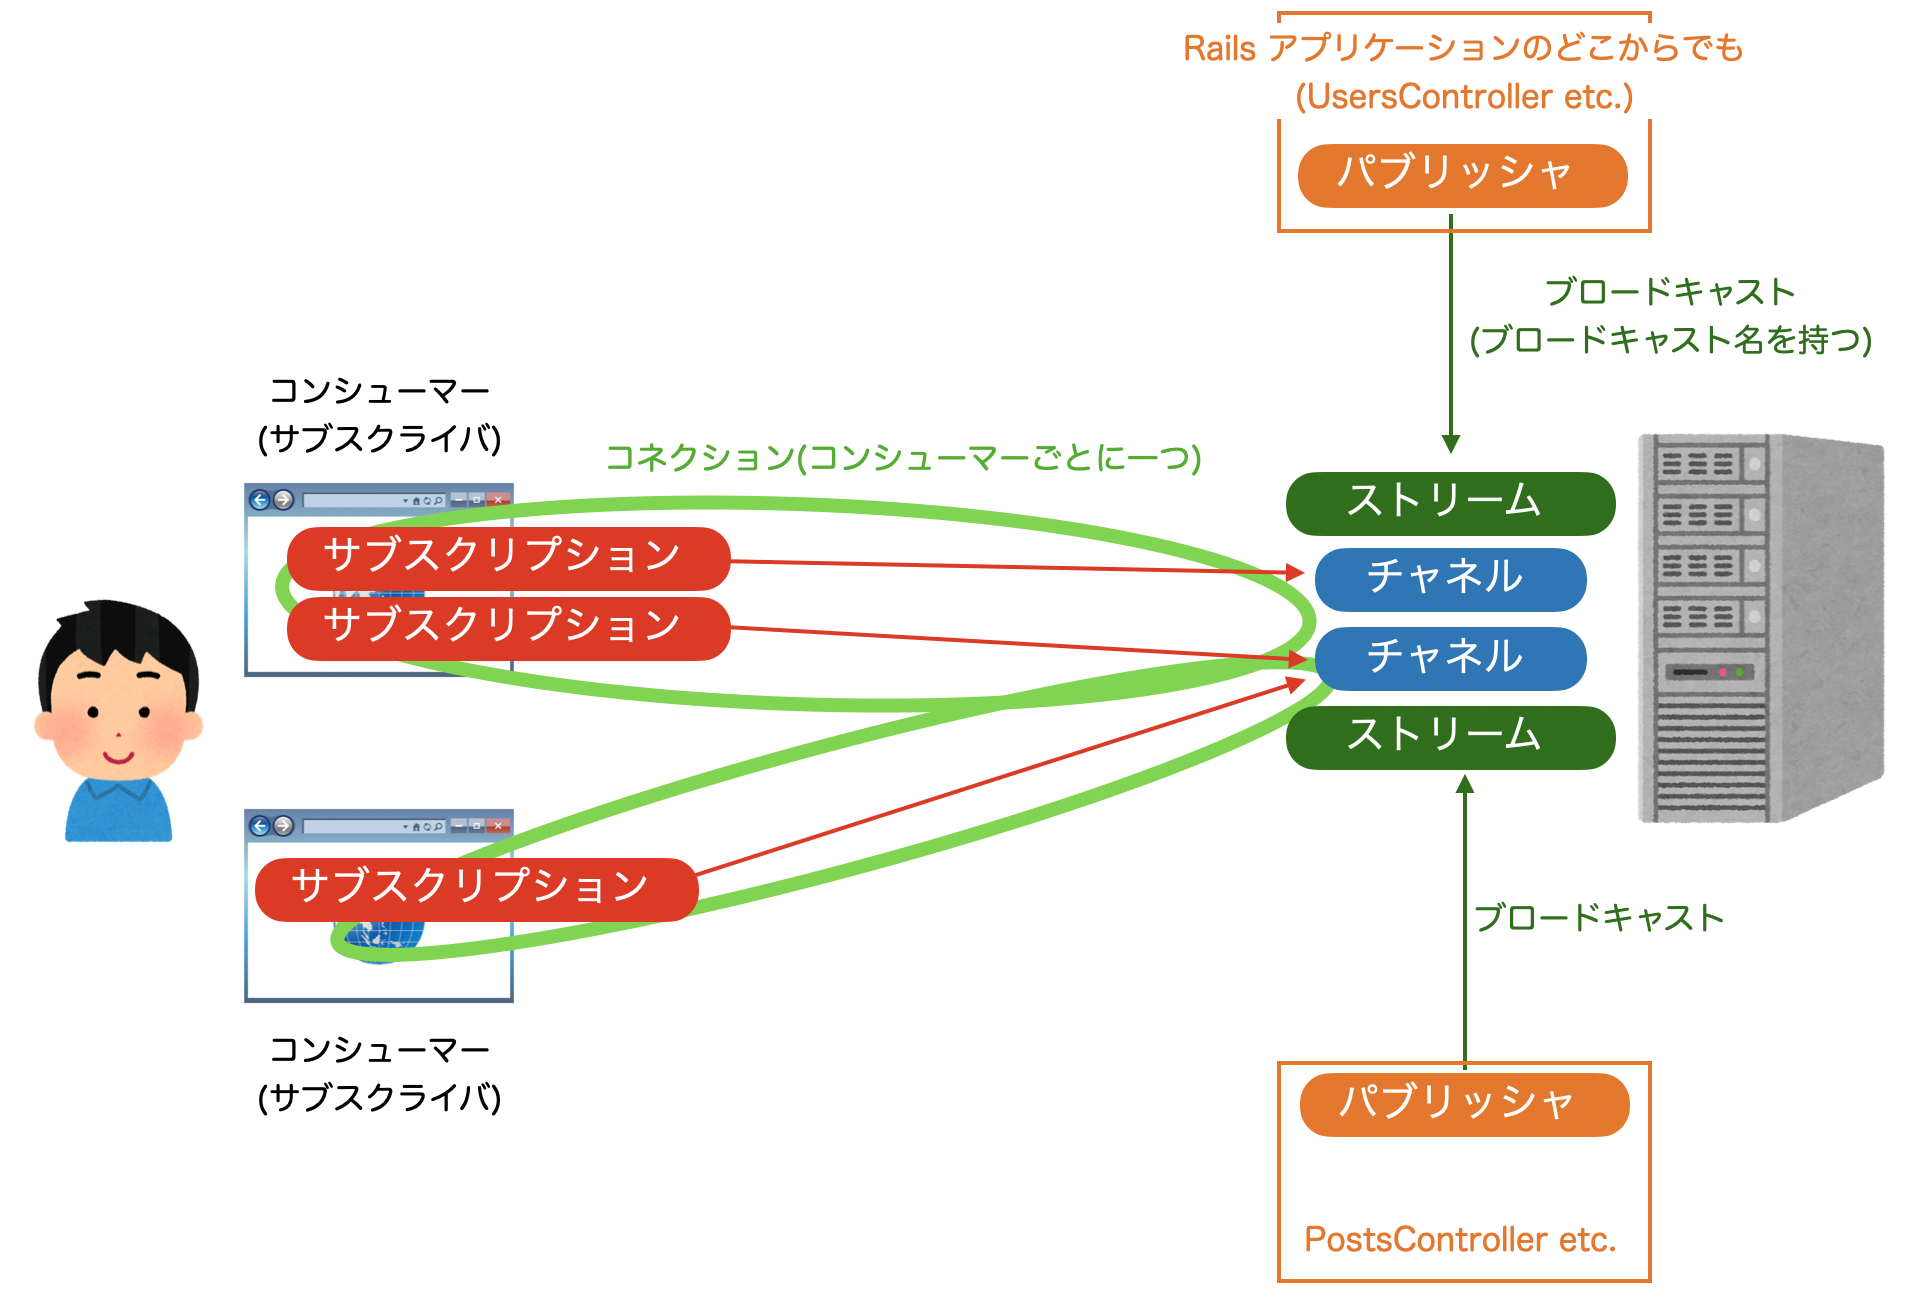
図が一番わかり易い
Rails ガイドがわかりづらかった理由の一つが図がなかったことだと思ったので図を作りました
どこか間違ってたら教えてください
用語解説
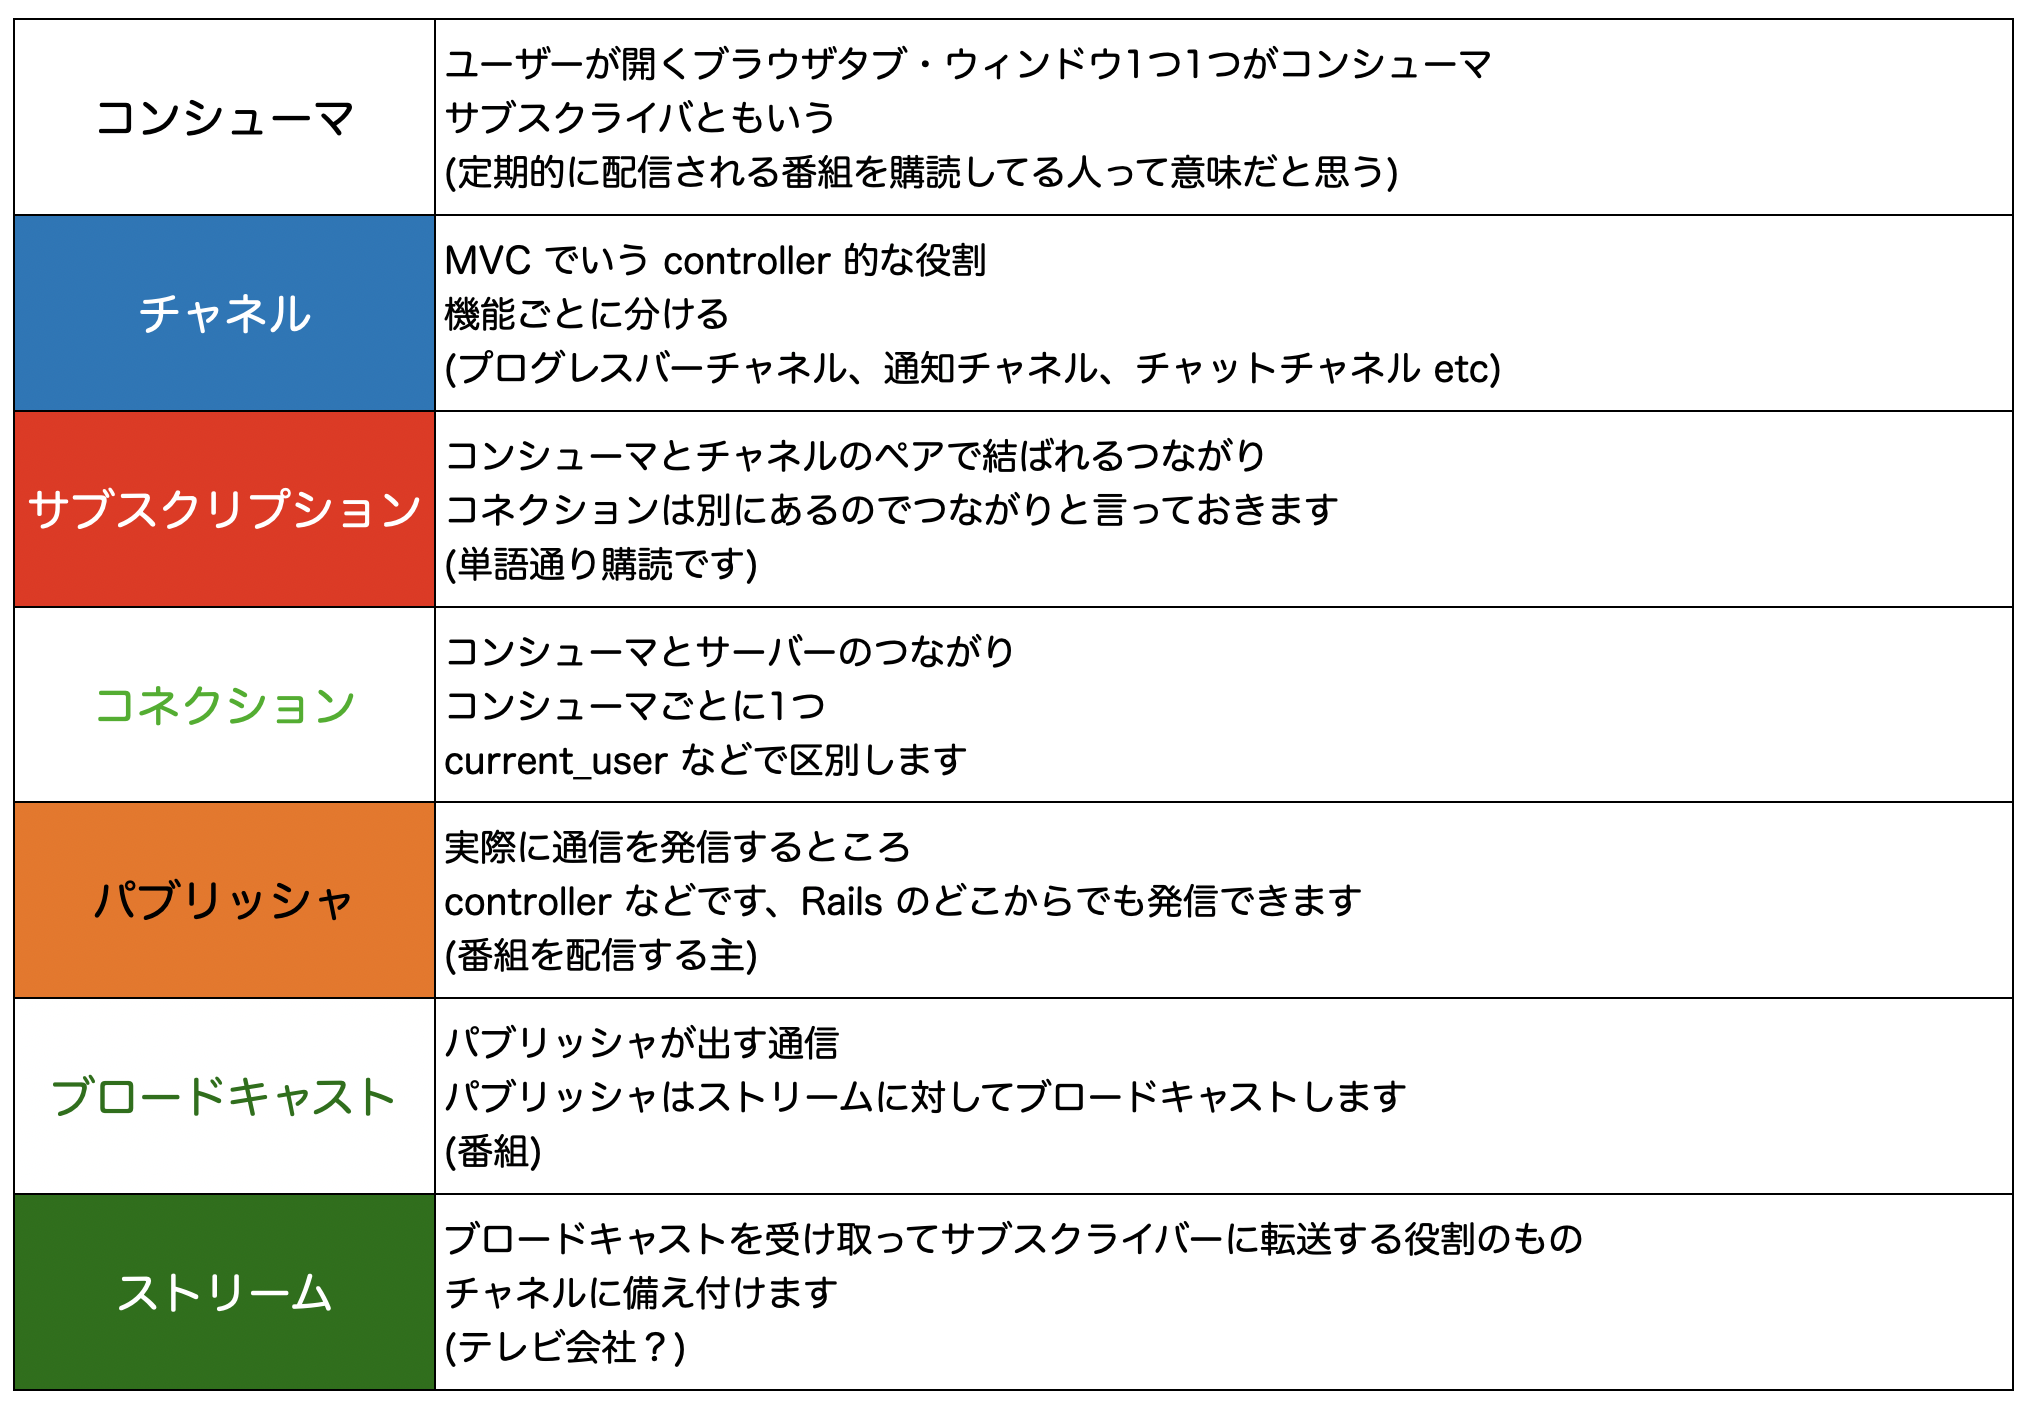
Rails ガイドと順番が違うかもしれませんが、一番わかり易いと思う順番にしました
究極的にはパブリッシャからサブスクライバへ通信が行われる pub/sub リンクです
Rails アプリケーションの controller でブロードキャストを行い、チャネルを通して各タブ(サブスクライバ)に配信します
プログレスバーの実装
プログレスバーを主題に実際の実装を見ていきます
実行環境
- ruby:2.6.5 (Docker image)
- Rails 6.0.2
まずは rails g channel <チャネル名> でひな形を作成します
$ rails g channel progress
サーバー側
チャネル
サーバー側のプログレスチャネルです
class ProgressChannel < ApplicationCable::Channel
  def subscribed
    stream_for current_user
  end

  def unsubscribed
    # Any cleanup needed when channel is unsubscribed
  end
end
subscribedとunsubscribedのひな形は用意されていて、それぞれサブスクリプションができた/なくなったときの挙動を書きます
一般的には、stream_from "progress_#{params[:progress_id]}" のような形で受け取るブロードキャストを指定します
しかし、ここでは stream_for を使用し、ユーザーごとに変わるブロードキャストを指定しています
これで、progress:Z2lkOi8vbWVtb3BpYy9Vc2VyLzE (ブロードキャスト名) のようなブロードキャストを受信することができます
コネクション
サーバー側ではこのコネクションクラスをもとに、コネクションインスタンスを作成します
module ApplicationCable
  class Connection < ActionCable::Connection::Base
    identified_by :current_user

    def connect
      self.current_user = find_verified_user
    end

    private
      def find_verified_user
        User.find(session['warden.user.user.key'][0][0])
      rescue
        reject_unauthorized_connection
      end

      def session
        @session ||= cookies.encrypted[Rails.application.config.session_options[:key]]
      end
  end
end
identified_by に指定したものを参考に、サーバーはコネクションを識別できるようになります
このコードでは、current_user に入る User オブジェクトをもとに識別しています
アプリケーションで Devise を使用しているので、ここの実装は
https://qiita.com/masuidrive/items/fd13ab8d9410206a1b91
を参考にしました
パブリッシャ
今回は model のところにブロードキャストするコードを書きます
pictures.each_with_index do |picture, index|
   album.pictures.new(picture_name: picture)
   ProgressChannel.broadcast_to(
      user,
      percent: (index+1) * 100 / pictures.length
   )
end
ここでの user は current_user に当たります(実装上、変数名が違います)
ここでクライアントにわたす data (percent: (index+1) * 100 / pictures.length) を指定してプログレスバーの進めるわけです
単純に枚数で進捗の%を計算しています
このブロードキャストがチャネルの stream_for current_user につながり、current_user がいるクライアントにデータが送信されます
以上で、サーバー側の実装は終わりです
クライアント側
好きな場所にプログレスバーを置きます
<div class="progress-percentage text-xs-center">0%</div>
<progress class="progress progress-striped" max="100" value="0"></progress>
クライアント側でもコネクションを作成しないといけません
// Action Cable provides the framework to deal with WebSockets in Rails.
// You can generate new channels where WebSocket features live using the `rails generate channel` command.

import { createConsumer } from "@rails/actioncable"

export default createConsumer()
import consumer from "./consumer"

consumer.subscriptions.create("ProgressChannel", {
  connected() {
    // Called when the subscription is ready for use on the server
  },

  disconnected() {
    // Called when the subscription has been terminated by the server
  },

  received(data) {
    // Called when there's incoming data on the websocket for this channel
    $('.progress-percentage').text(`${data.percent}%`)
    $('progress').prop('value', data.percent)
  }
});
consumer.jsでコンシューマを作成し、progress_channel.js でコネクション(サブスクリプション)を作成しています
今回は ProgressChannel につながるサブスクリプションです
connected()にコネクションができたときの動作、disconnected()にコネクションがなくなったときの動作を記述します
received()にはブロードキャストされたデータを受け取ったときの挙動を書きます
プログレスバーの進捗状況がサブスクライバにブロードキャストされて受け取るので、ここでプログレスバーの各要素を jQuery で書き換えます
完成!
まとめ
以上のコードを実装することでユーザーごとにプッシュ通信にするプログレスバーが実装できます
Qiita 初投稿で ActionCable も学びたてなので間違っているところもあるかもしれません、その部分はご指摘・ご教授いただけるとありがたいです
また、記事のこの部分がわかりづらいというコメントもお待ちしています!
参考記事
https://railsguides.jp/action_cable_overview.html
https://qiita.com/QUANON/items/0ba35cd0eb5d720f4237
https://qiita.com/masuidrive/items/fd13ab8d9410206a1b91
P.S.
『memopic』 という旅行の思い出・アルバム・写真共有サービスを作っています。是非使ってみてください!
ご意見・ご要望などあれば @memopic_bambooまで DM お願いします!