本記事の目的
Odriveを使用してBLDCのモーター制御を実行します
環境
本記事は以下の環境で実験しています.
| 項目 | バージョン |
|---|---|
| Ubuntu | 18.04 |
| Odrive | 0.5.2 |
実験環境
 |
 |
Hall wireの接続
| Hall wire | J4 signal |
|---|---|
| Red | 5V |
| Yellow | A |
| Blue | B |
| Green | Z |
| Black | GND |
必要機材
Odrivetoolインストール
以下のコマンドを順に打ってodriveをインストールします。
$ sudo apt update
$ sudo apu upgrade
$ sudo apt install python3 python3-pip
$ sudo pip3 install --upgrade odrive
$ echo "PATH=$PATH:~/.local/bin/" >> ~/.bashrc
無事にインストールされた場合、odrivetoolと打てば以下のような表示が出るはずです。
$ odrivetool

ODrive control utility v0.5.2
Please connect your ODrive.
Type help() for help.
ash
Connected to ODrive 207B346D5748 as odrv0
Connected to ODrive 207B346D5748 as odrv0の部分は、odriveに外部電源から電源供給せずにPCに接続しても表示されないので電源供給してからodrivetoolと打ちましょう。
また207B346D5748はodriveの識別ID、odrv0がodriveのボードを意味します。複数個のodriveを使用する場合、odrv1, odrv2...などと表示されます。
次に以下のコマンドでファームウェアをupdateします。
$ sudo odrivetool dfu
無事成功すると以下のように表示されます。
ODrive control utility v0.5.2.post0
Waiting for ODrive...
Found ODrive 207B346D5748 (v3.6-24V) with firmware [unknown version] in DFU mode
Checking online for newest firmware... found v0.5.2
Downloading firmware v0.5.2...
The configuration cannot be backed up because the device is already in DFU mode. The configuration may be lost after updating. Do you want to continue anyway? [Y/n] Y
Erasing... done
Flashing... done
Verifying... done
Device firmware update successful.
BLDC速度制御(1輪のみ)
odriveではボードの永続メモリにconfigを保存してから、ターミナルで指令値を送る事でモーターを回転させる事ができます。ここでは片輪のモーターの速度制御のためのconfigを記載します。**しかし、このconfigやキャリブレーションが一筋縄ではいかなかったのでここではその経緯についても補足します。**config内の各種パラメータについてはdocumentを参照してください。
まず以下のconfigをodriveに保存します。
odrv0.axis0.motor.config.pole_pairs = 15
odrv0.axis0.motor.config.resistance_calib_max_voltage = 4
odrv0.axis0.motor.config.requested_current_range = 25
odrv0.axis0.motor.config.current_control_bandwidth = 100

odrv0.axis0.motor.config.torque_constant = 8.27 / 16
odrv0.axis0.encoder.config.mode = ENCODER_MODE_HALL
odrv0.axis0.encoder.config.cpr = 90
odrv0.axis0.encoder.config.calib_scan_distance = 150

odrv0.axis0.encoder.config.bandwidth = 100
odrv0.axis0.controller.config.pos_gain = 1
odrv0.axis0.controller.config.vel_gain = 0.02 * odrv0.axis0.motor.config.torque_constant * odrv0.axis0.encoder.config.cpr
odrv0.axis0.controller.config.vel_integrator_gain = 0.1 * odrv0.axis0.motor.config.torque_constant * odrv0.axis0.encoder.config.cpr
odrv0.axis0.controller.config.vel_limit = 10

odrv0.axis0.controller.config.control_mode = CONTROL_MODE_VELOCITY_CONTROL

odrv0.config.enable_brake_resistor = True
odrv0.axis0.motor.config.current_lim = 5
odrv0.axis0.motor.config.calibration_current = 5
odrv0.axis0.encoder.config.hall_polarity_calibrated = True

odrv0.save_configuration()
odrv0.reboot()
次にモーターのキャリブレーションを行います。モーターのキャリブレーション時には、モーターからビープ音がなり、モーターに一定の電流値が流れます。ここでビープ音が鳴らなければconfig内のキャリブレーション関係のパラメータ設定に問題がある可能性があります。具体的なエラー内容については**dump_errors(odrv0)**で確認しましょう。
odrv0.axis0.requested_state = AXIS_STATE_MOTOR_CALIBRATION
odrv0.axis0.motor
次にエンコーダのオフセットキャリブレーションを行います。エンコーダオフセットキャリブレーション時にはゆっくりモーターが正転一回、逆転一回動作します。ここでモーターが回らない場合はconfig設定や配線等に問題がある可能性があります。
odrv0.axis0.requested_state = AXIS_STATE_ENCODER_OFFSET_CALIBRATION
odrv0.axis0.encoder
しかし私の場合、このエンコーダオフセットキャリブレーションで正転一回、逆転一回したにも関わらず、以下のようなエラーが発生していました。
system: no error
axis0
  axis: no error
  motor: no error
  sensorless_estimator: no error
  encoder: Error(s):
    ENCODER_ERROR_ILLEGAL_HALL_STATE
  controller: no error
axis1
  axis: no error
  motor: no error
  sensorless_estimator: no error
  encoder: no error
  controller: no error
エラー内容はENCODER_ERROR_ILLEGAL_HALL_STATEの部分です。エラーの原因について調べると以下のようなサイトに行きつきました。
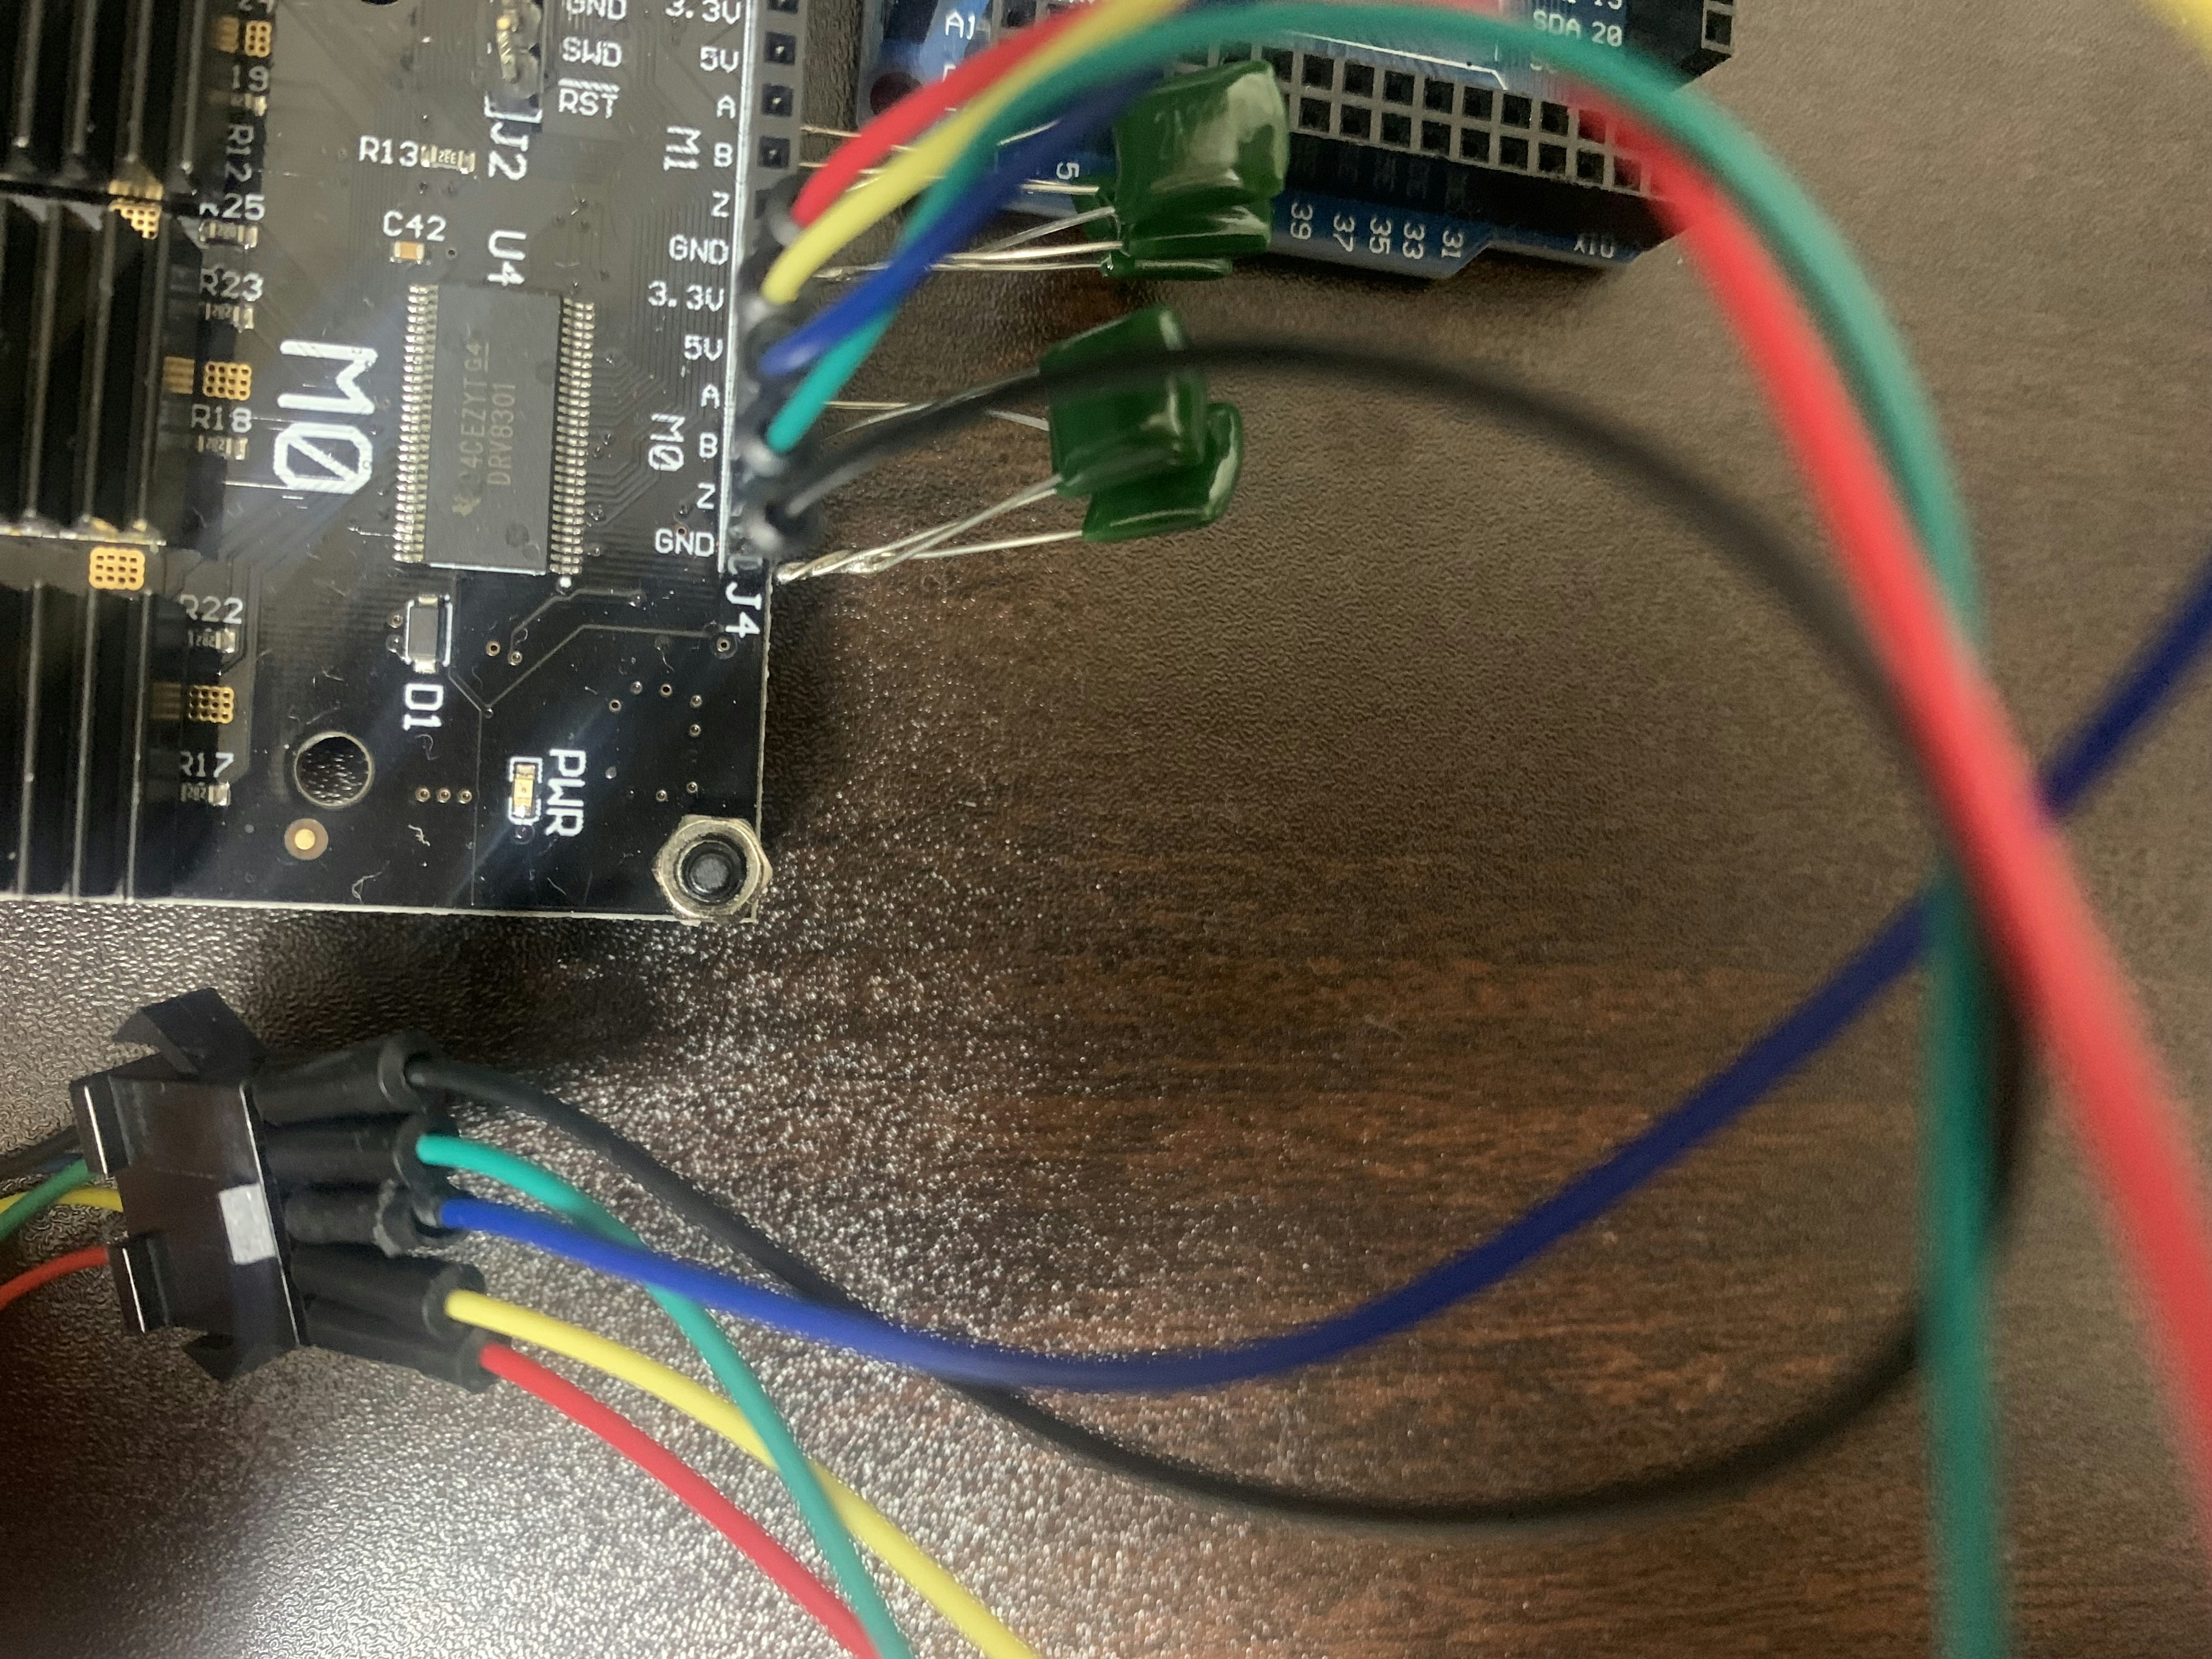
結局のところ上記エラーの原因はエンコーダーのノイズによるところらしいです。ノイズが酷い事によりエンコーダーからの信号が全て0の場合に発生するエラーです。このエラーに対処する方法は、各エンコーダー信号ピンとGND間に22nF~47nF程度のコンデンサを入れてノイズ除去することで解決することができます。
ノイズ除去のコンデンサーとしては、セラミックコンデンサーもしくはフィルムコンデンサーを使用してください。私はamazonでフィルムコンデンサーを購入しました。
以下の画像のように22nFのコンデンサーを半田付けを行います。
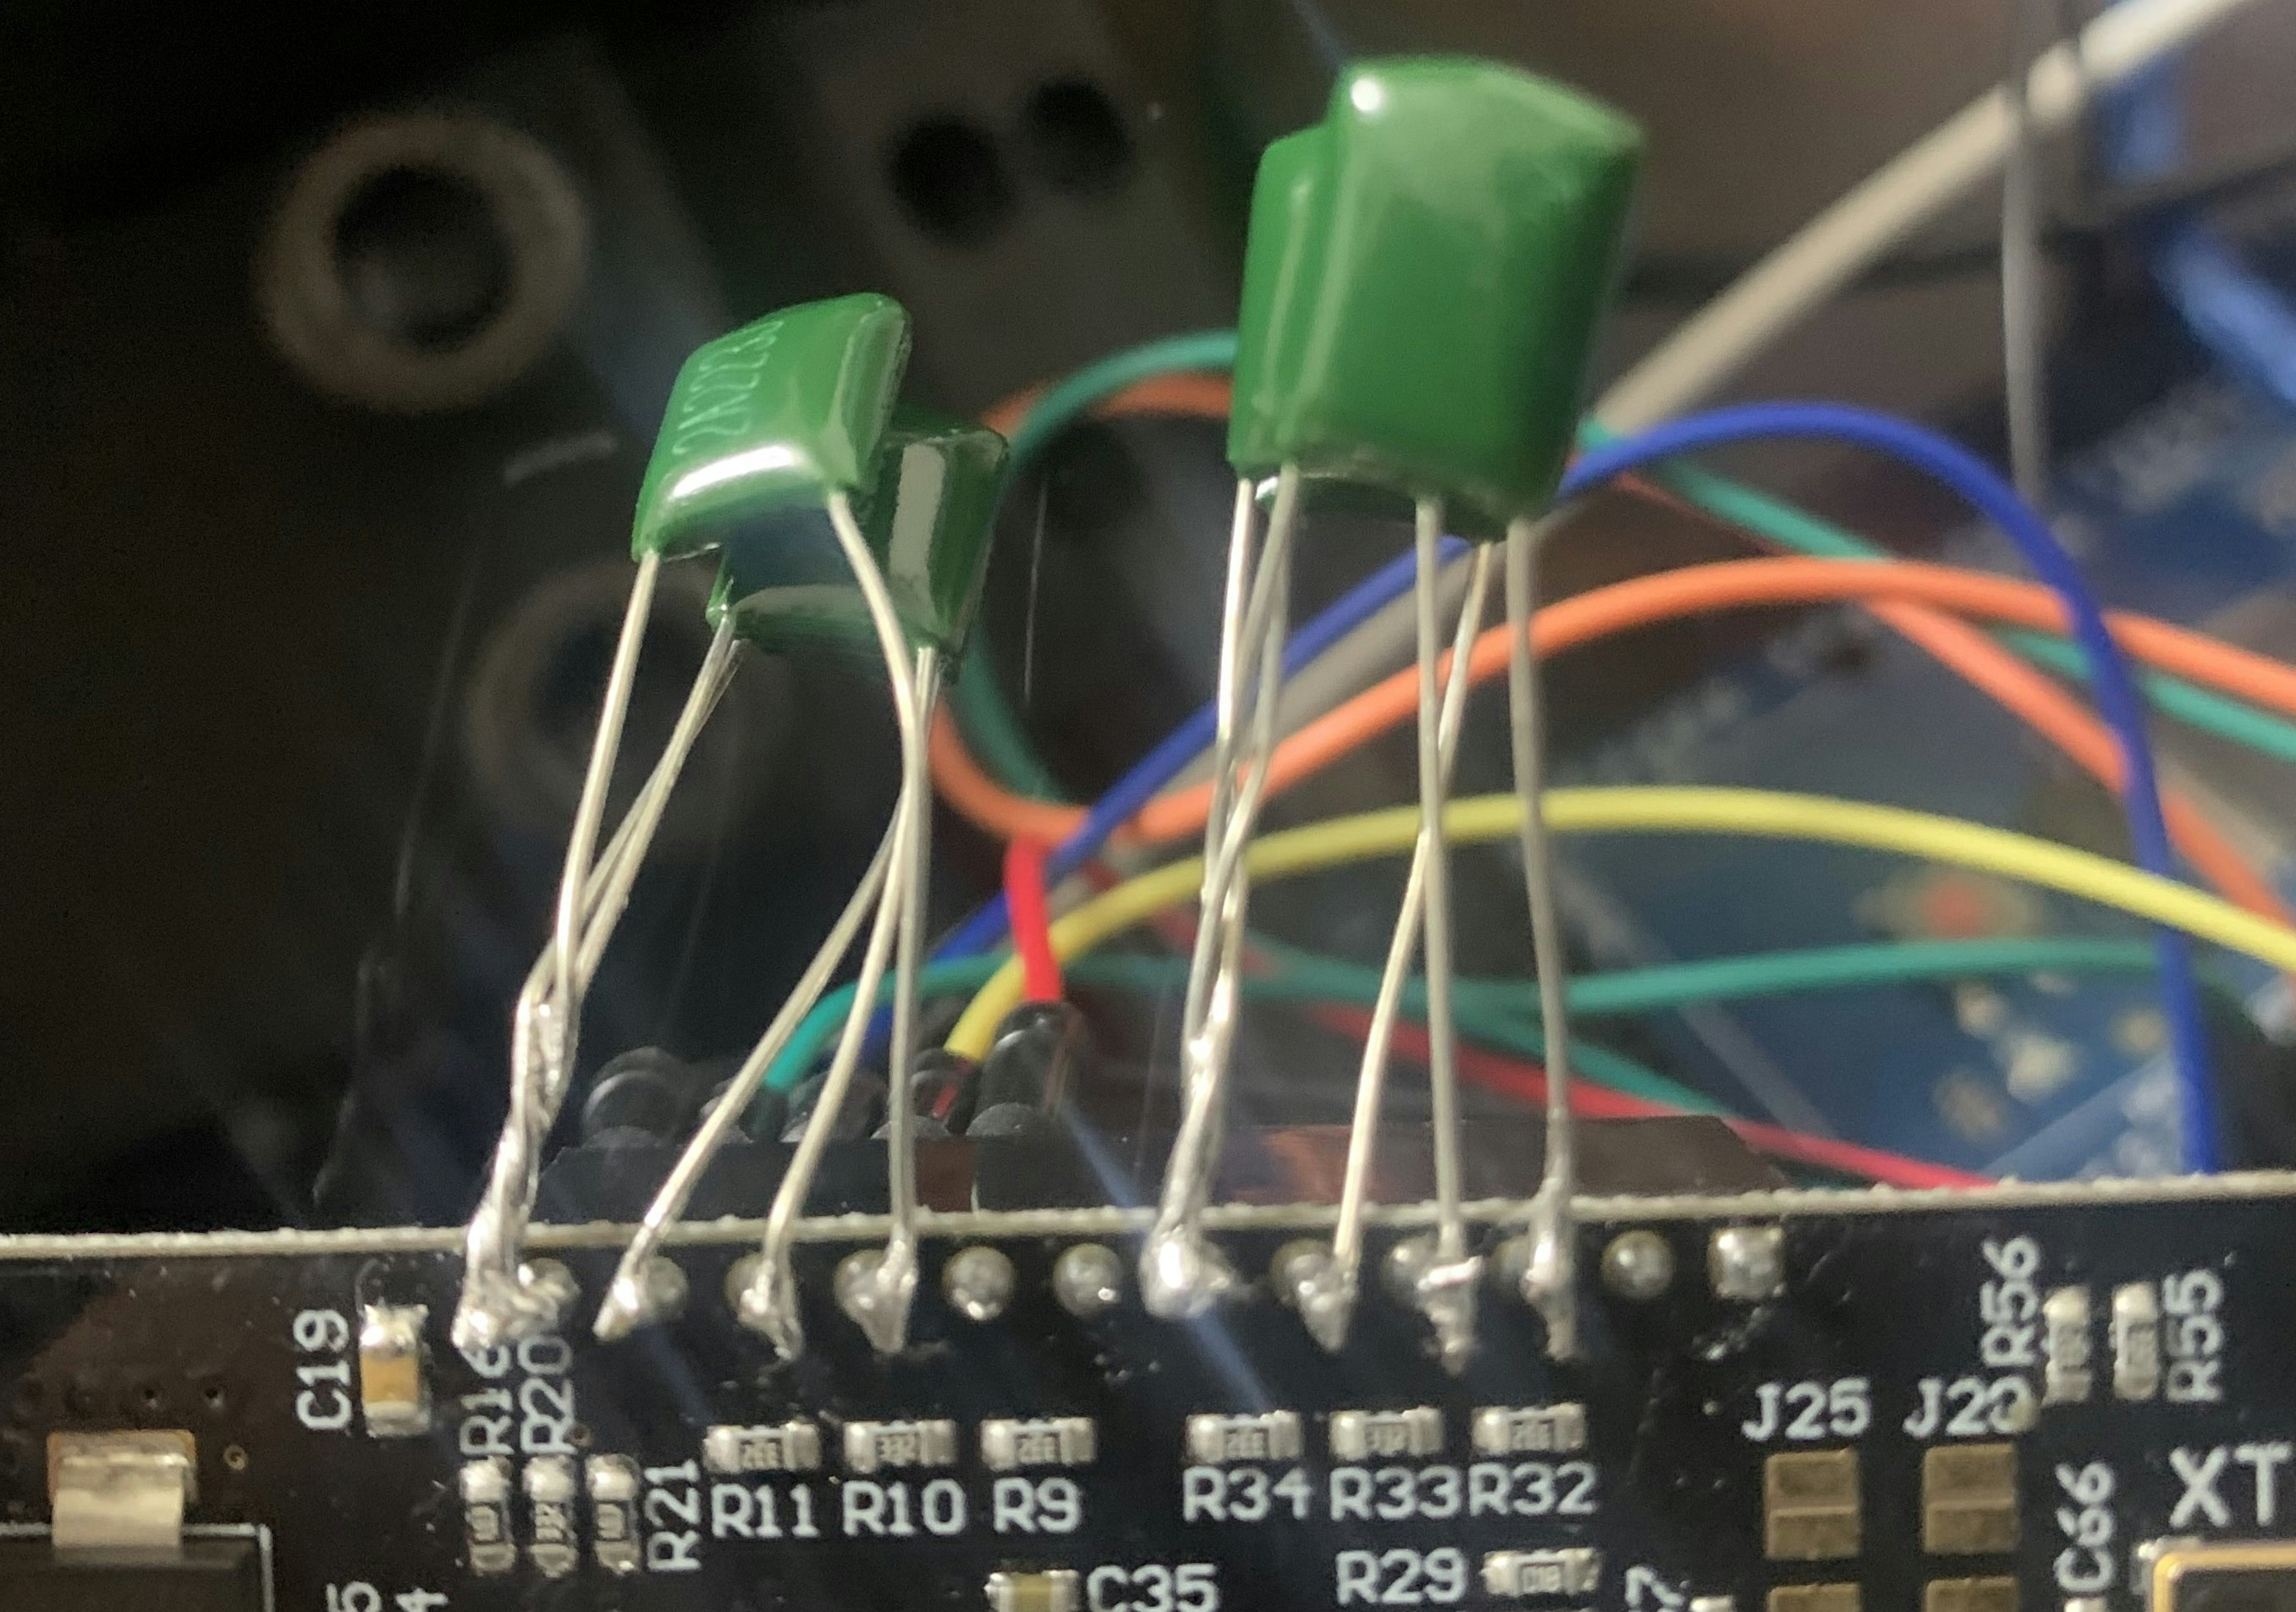
この状態で再度エンコーダオフセットキャリブレーションを行うとエラーが無くなりました!
またエンコーダのデバックについてはodrv0.axis0.encoderのhall_stateも見ておきましょう。hall_stateが0か7の場合、何か異常があるサインです。本来は、キャリブレーション中にhall_stateを監視し続けて、0か7になる瞬間があるかどうかで判断するのが良いと思われます。
In [37]: odrv0.axis0.encoder
Out[37]:
calib_scan_response: 144.0 (float)
config:
  abs_spi_cs_gpio_pin: 1 (uint16)
  bandwidth: 100.0 (float)
  calib_range: 0.019999999552965164 (float)
  calib_scan_distance: 150.0 (float)
  calib_scan_omega: 12.566370964050293 (float)
  cpr: 90 (int32)
  direction: -1 (int32)
  enable_phase_interpolation: True (bool)
  find_idx_on_lockin_only: False (bool)
  hall_polarity: 0 (uint8)
  hall_polarity_calibrated: False (bool)
  ignore_illegal_hall_state: False (bool)
  index_offset: 0.0 (float)
  mode: 1 (uint16)
  phase_offset: -23 (int32)
  phase_offset_float: -0.4535244107246399 (float)
  pre_calibrated: False (bool)
  sincos_gpio_pin_cos: 4 (uint16)
  sincos_gpio_pin_sin: 3 (uint16)
  use_index: False (bool)
  use_index_offset: True (bool)
count_in_cpr: 48 (int32)
delta_pos_cpr_counts: 5.605193857299268e-45 (float)
error: 528 (uint16)
hall_state: 5 (uint8)
index_found: False (bool)
interpolation: 0.5 (float)
is_ready: True (bool)
phase: 0.04866981506347656 (float)
pos_abs: 0 (int32)
pos_circular: 0.534058153629303 (float)
pos_cpr_counts: 48.02492141723633 (float)
pos_estimate: 0.5333594679832458 (float)
pos_estimate_counts: 48.00235366821289 (float)
set_linear_count(obj: object_ref, count: int32)
shadow_count: 48 (int32)
spi_error_rate: 0.0 (float)
vel_estimate: 0.0 (float)
vel_estimate_counts: 0.0 (float)
エラーが無くなったので、キャリブレーション内容を永続メモリに保存します。**永続メモリに保存する事で次回以降キャリブレーションをする必要がなくなります。**永続メモリに保存するコマンドは以下の通りです。
- モーターのキャリブレーションの場合
odrv0.axis0.motor.config.pre_calibrated = True - エンコーダオフセットキャリブレーションの場合
odrv0.axis0.encoder.config.pre_calibrated = True
最後にconfigをsaveしてrebootします。
odrv0.axis0.requested_state = AXIS_STATE_MOTOR_CALIBRATION
odrv0.axis0.motor
odrv0.axis0.motor.config.pre_calibrated = True

odrv0.axis0.requested_state = AXIS_STATE_ENCODER_OFFSET_CALIBRATION
odrv0.axis0.encoder
odrv0.axis0.encoder.config.pre_calibrated = True

odrv0.save_configuration()
odrv0.reboot()
次にモータのrequested_stateをAXIS_STATE_CLOSED_LOOP_CONTROLにして、指令値を送る事でモータが回転します。今回、control_modeがCONTROL_MODE_VELOCITY_CONTROLなのでodrv0.axis0.controller.input_velコマンドで指令値を送ります。
odrv0.axis0.requested_state = AXIS_STATE_CLOSED_LOOP_CONTROL
odrv0.axis0.controller.input_vel = 2
これでモーターを速度制御する事が出来ました!
上記一連のコマンドを記載いたします。以下の内容を順にconfig及びターミナルで実行すれば、モーターの速度制御が出来ると思います。
odrv0.axis0.motor.config.pole_pairs = 15
odrv0.axis0.motor.config.resistance_calib_max_voltage = 4
odrv0.axis0.motor.config.requested_current_range = 25
odrv0.axis0.motor.config.current_control_bandwidth = 100

odrv0.axis0.motor.config.torque_constant = 8.27 / 16
odrv0.axis0.encoder.config.mode = ENCODER_MODE_HALL
odrv0.axis0.encoder.config.cpr = 90
odrv0.axis0.encoder.config.calib_scan_distance = 150

odrv0.axis0.encoder.config.bandwidth = 100
odrv0.axis0.controller.config.pos_gain = 1
odrv0.axis0.controller.config.vel_gain = 0.02 * odrv0.axis0.motor.config.torque_constant * odrv0.axis0.encoder.config.cpr
odrv0.axis0.controller.config.vel_integrator_gain = 0.1 * odrv0.axis0.motor.config.torque_constant * odrv0.axis0.encoder.config.cpr
odrv0.axis0.controller.config.vel_limit = 10

odrv0.axis0.controller.config.control_mode = CONTROL_MODE_VELOCITY_CONTROL

odrv0.config.enable_brake_resistor = True
odrv0.axis0.motor.config.current_lim = 5
odrv0.axis0.motor.config.calibration_current = 5
odrv0.axis0.encoder.config.hall_polarity_calibrated = True

odrv0.save_configuration()
odrv0.reboot()

odrv0.axis0.requested_state = AXIS_STATE_MOTOR_CALIBRATION
odrv0.axis0.motor
odrv0.axis0.motor.config.pre_calibrated = True

odrv0.axis0.requested_state = AXIS_STATE_ENCODER_OFFSET_CALIBRATION
odrv0.axis0.encoder
odrv0.axis0.encoder.config.pre_calibrated = True

odrv0.save_configuration()
odrv0.reboot()

odrv0.axis0.requested_state = AXIS_STATE_CLOSED_LOOP_CONTROL
odrv0.axis0.controller.input_vel = 2

odrv0.axis0.requested_state = AXIS_STATE_IDLE
BLDC速度制御(2輪)
1つのodriveボードで制御できるモータの個数は2個までです。ここでは上記のconfigを参考に2個のBLDCを同時に回転させるためのconfigを示します。1個目のモータの軸はodrv0.axis0、2個目のモータの軸はodrv0.axis1です。1輪のみの速度制御のconfigとの違いは、axis0と同じ内容をaxis1でも同様に設定する事です。
odrv0.axis0.motor.config.pole_pairs = 15
odrv0.axis0.motor.config.resistance_calib_max_voltage = 4
odrv0.axis0.motor.config.requested_current_range = 25
odrv0.axis0.motor.config.current_control_bandwidth = 100

odrv0.axis1.motor.config.pole_pairs = 15
odrv0.axis1.motor.config.resistance_calib_max_voltage = 4
odrv0.axis1.motor.config.requested_current_range = 25
odrv0.axis1.motor.config.current_control_bandwidth = 100

odrv0.axis0.motor.config.torque_constant = 8.27 / 16
odrv0.axis0.encoder.config.mode = ENCODER_MODE_HALL
odrv0.axis0.encoder.config.cpr = 90
odrv0.axis0.encoder.config.calib_scan_distance = 150

odrv0.axis1.motor.config.torque_constant = 8.27 / 16
odrv0.axis1.encoder.config.mode = ENCODER_MODE_HALL
odrv0.axis1.encoder.config.cpr = 90
odrv0.axis1.encoder.config.calib_scan_distance = 150

odrv0.axis0.encoder.config.bandwidth = 100
odrv0.axis0.controller.config.pos_gain = 1
odrv0.axis0.controller.config.vel_gain = 0.02 * odrv0.axis0.motor.config.torque_constant * odrv0.axis0.encoder.config.cpr
odrv0.axis0.controller.config.vel_integrator_gain = 0.1 * odrv0.axis0.motor.config.torque_constant * odrv0.axis0.encoder.config.cpr
odrv0.axis0.controller.config.vel_limit = 10

odrv0.axis1.encoder.config.bandwidth = 100
odrv0.axis1.controller.config.pos_gain = 1
odrv0.axis1.controller.config.vel_gain = 0.02 * odrv0.axis0.motor.config.torque_constant * odrv0.axis1.encoder.config.cpr
odrv0.axis1.controller.config.vel_integrator_gain = 0.1 * odrv0.axis0.motor.config.torque_constant * odrv0.axis1.encoder.config.cpr
odrv0.axis1.controller.config.vel_limit = 10

odrv0.axis0.controller.config.control_mode = CONTROL_MODE_VELOCITY_CONTROL
odrv0.axis1.controller.config.control_mode = CONTROL_MODE_VELOCITY_CONTROL

odrv0.config.enable_brake_resistor = True
odrv0.axis0.motor.config.current_lim = 5
odrv0.axis0.motor.config.calibration_current = 5
odrv0.axis0.encoder.config.hall_polarity_calibrated = True

odrv0.axis1.motor.config.current_lim = 5
odrv0.axis1.motor.config.calibration_current = 5
odrv0.axis1.encoder.config.hall_polarity_calibrated = True

odrv0.save_configuration()
odrv0.reboot()

odrv0.axis0.requested_state = AXIS_STATE_MOTOR_CALIBRATION
odrv0.axis0.motor.config.pre_calibrated = True

odrv0.axis0.requested_state = AXIS_STATE_ENCODER_OFFSET_CALIBRATION
odrv0.axis0.encoder.config.pre_calibrated = True

odrv0.axis1.requested_state = AXIS_STATE_MOTOR_CALIBRATION
odrv0.axis1.motor.config.pre_calibrated = True

odrv0.axis1.requested_state = AXIS_STATE_ENCODER_OFFSET_CALIBRATION
odrv0.axis1.encoder.config.pre_calibrated = True

odrv0.save_configuration()
odrv0.reboot()

odrv0.axis0.requested_state = AXIS_STATE_CLOSED_LOOP_CONTROL
odrv0.axis1.requested_state = AXIS_STATE_CLOSED_LOOP_CONTROL
odrv0.axis0.controller.input_vel = 2
odrv0.axis1.controller.input_vel = 2

odrv0.axis0.requested_state = AXIS_STATE_IDLE
odrv0.axis1.requested_state = AXIS_STATE_IDLE
上手く行けば以下のように2輪のモータを同時に速度制御する事が出来ます。
その他よく使用するコマンド
- 指令値コマンド
odrv0.axis0.controller.input_pos = <turn>
odrv0.axis0.controller.input_vel = <turn/s>
odrv0.axis0.controller.input_torque = <torque in Nm>
- エンコーダーの値の確認
odrv0.axis0.encoder.shadow_count
- 外部電源電圧の確認
odrv0.vbus_voltage
- エラー確認
dump_errors(odrv0)
- 構成をODriveの永続メモリに保存
odrv0.save_configuration()
- 構成変数を工場出荷時のデフォルトにリセット
odrv0.erase_configuration()
- odriveの再起動
odrv0.reboot()
- デバイスを大文字の16進数で一意に識別する番号
odrv0.serial_number
Odrivetoolアンインストール
以下のコマンドを実行することでOdriveをアンインストールすることが出来ます。
$ sudo pip3 uninstall odrive
無事アンインストール出来れば以下の内容が表示されます。
Successfully uninstalled odrive-0.5.2.post0
移行ガイド
v0.5.1からv0.5.2への変更は、以下のポイントです。
ブレーキ動作
ブレーキ抵抗器を使用する前に、次のように明示的に有効にする必要があります。
odrv0.config.enable_brake_resistor = True
次に、構成を保存して再起動し、設定を有効にします。
まとめ
- odriveを使用してBLDCの単純な速度制御を行いました
参考文献