はじめに
今回は.NET MAUIでAzure ActiveDirectory B2Cを使ってログイン認証処理をやっていきます。
かなり内容が濃くなるため、今回はB2Cの利点である複数のアカウント認証サービスを追加するところまではやらずに、Microsoftアカウントのみの認証のところまでやっていきます。
AD B2Cに登録する
Azureに登録してポータルサイトからActiveDirectory B2Cのアプリを登録しましょう。
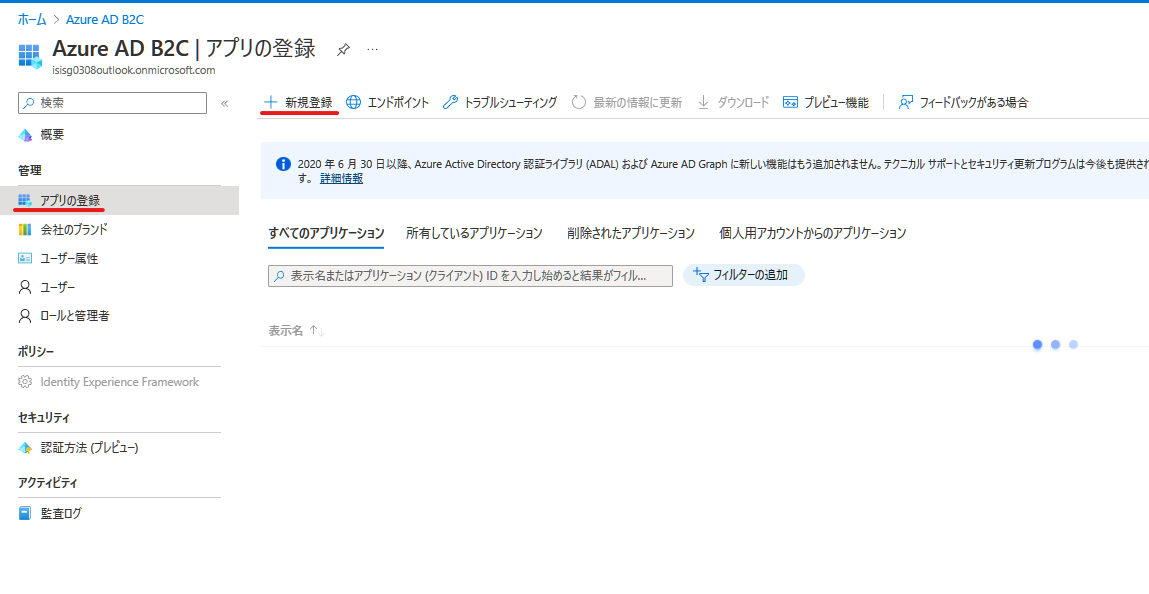
Azure AD B2Cと検索して機能の概要に入ります。(ActiveDirectoryと間違えないように注意)
左側のメニューから「アプリの登録」を押して、画面が変わったらメイン画面の上部メニューの「新規登録」を押します。
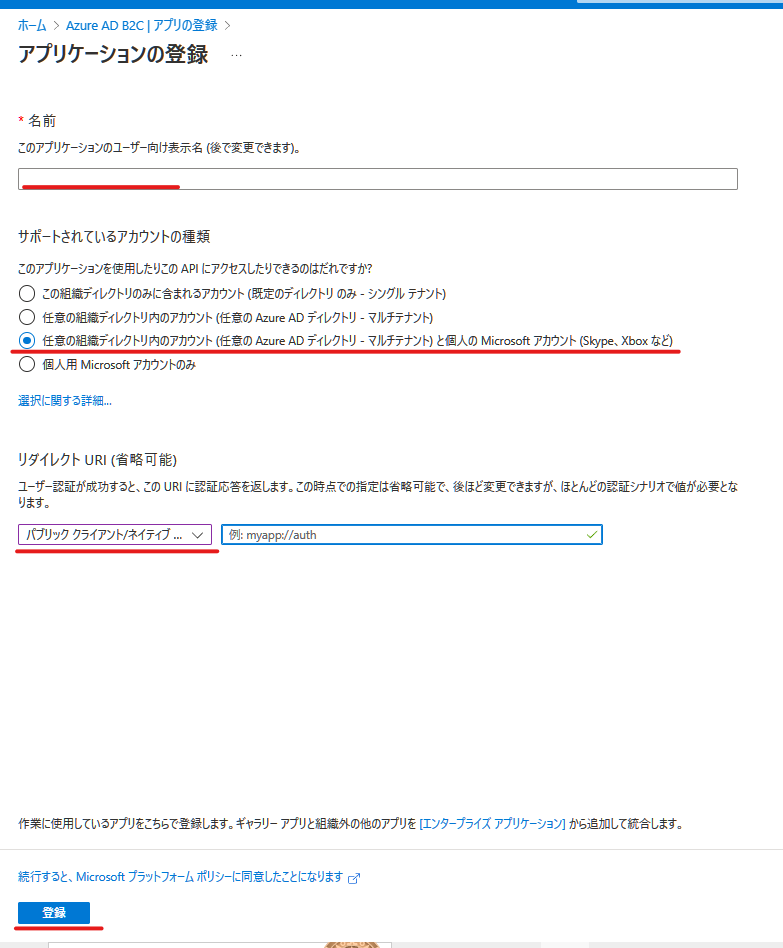
新規登録画面で必要な情報を入力します。
・名前・・・アプリ名を入力します。なんでもよいです。
・サポートされているアカウントの種類・・・3番目の「任意の組織ディレクトリ内のアカウント(略)と個人のMicrosoftアカウント(略)」を選択します。
・リダイレクトURL・・・プルダウンから「パブリック クライアント/ネイティブ(モバイルとデスクトップ)」を選択します。(URLはあとで決めるので未記入でよい)
全て記入し、登録を押します。
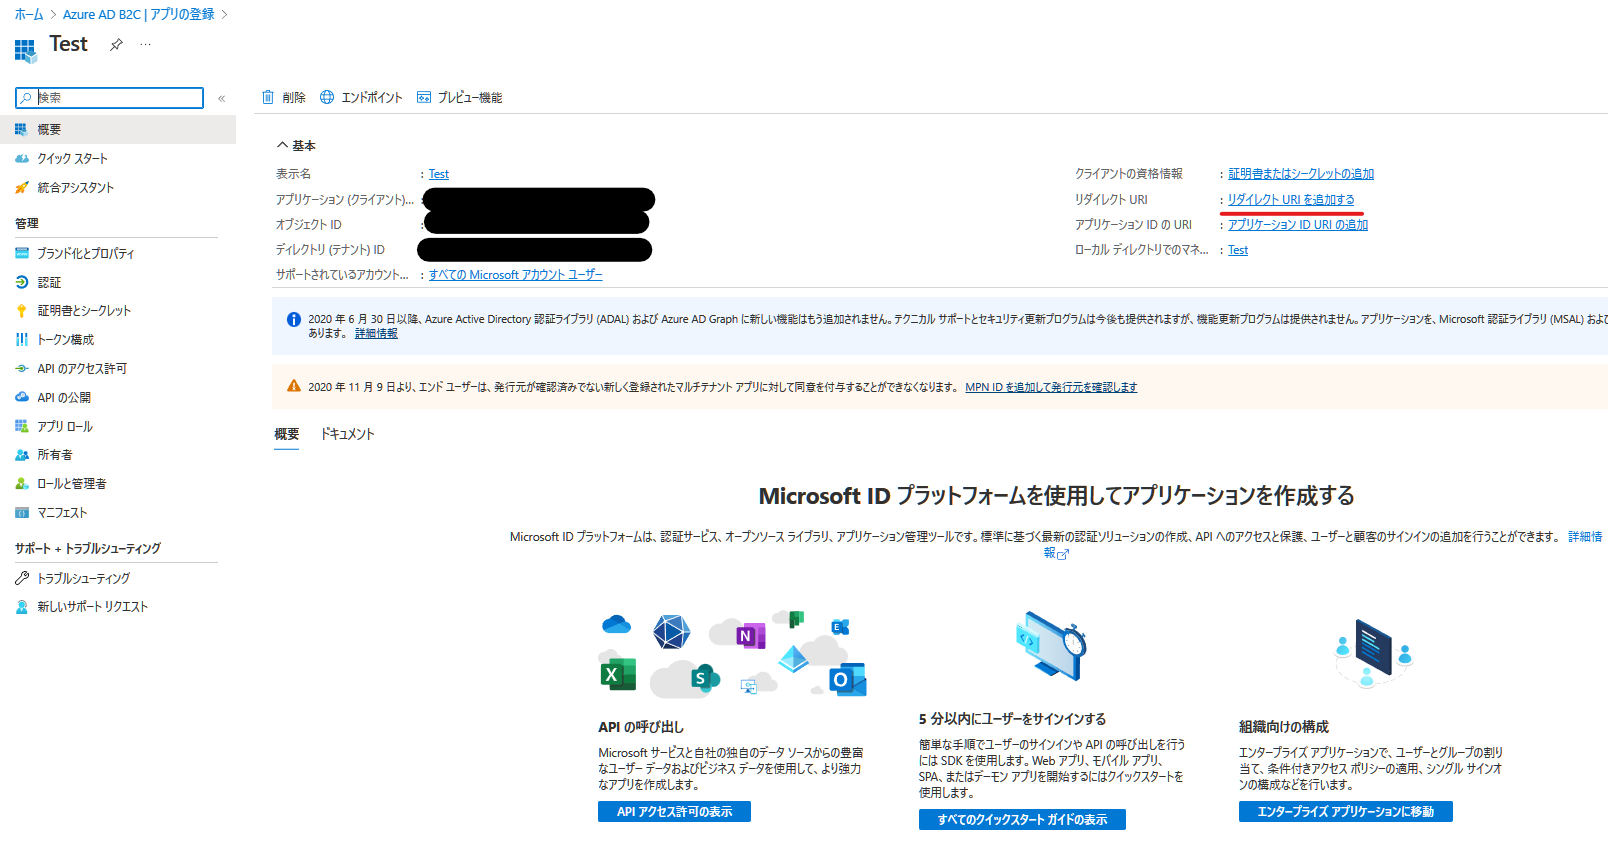
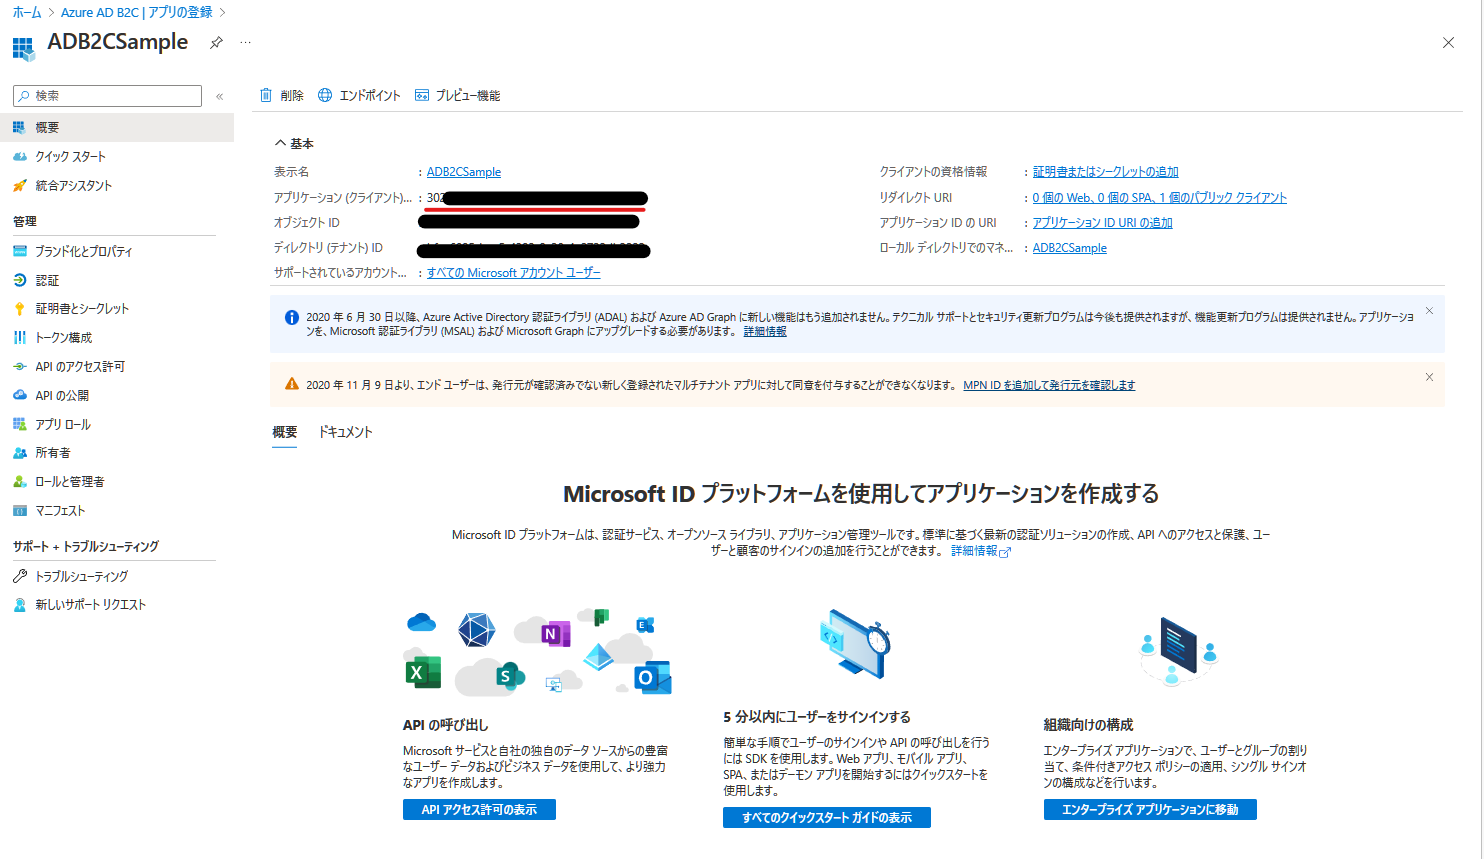
アプリ画面が現れます。
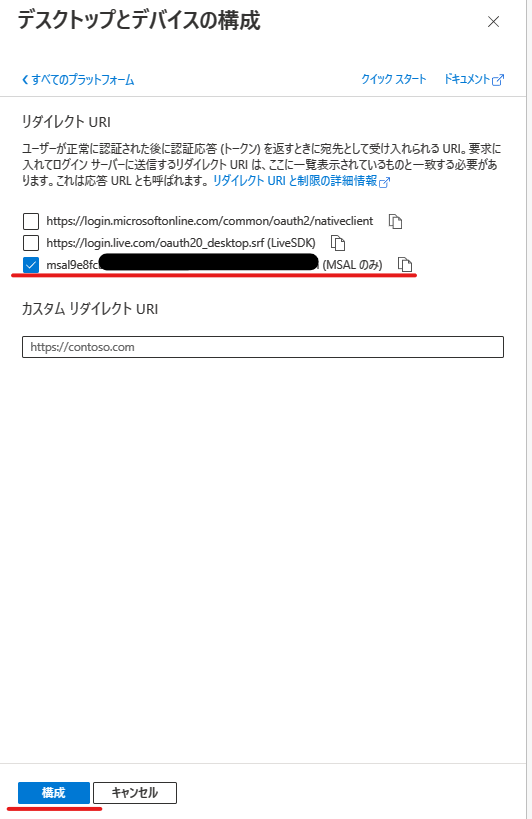
そしてリダイレクトURLを決めていなかったのでここで選択し、決めていきます。
「プラットフォームの追加」をクリックすると右側の画面が出てくるので一番下の「モバイルアプリケーションとデスクトップアプリケーション」を押します。
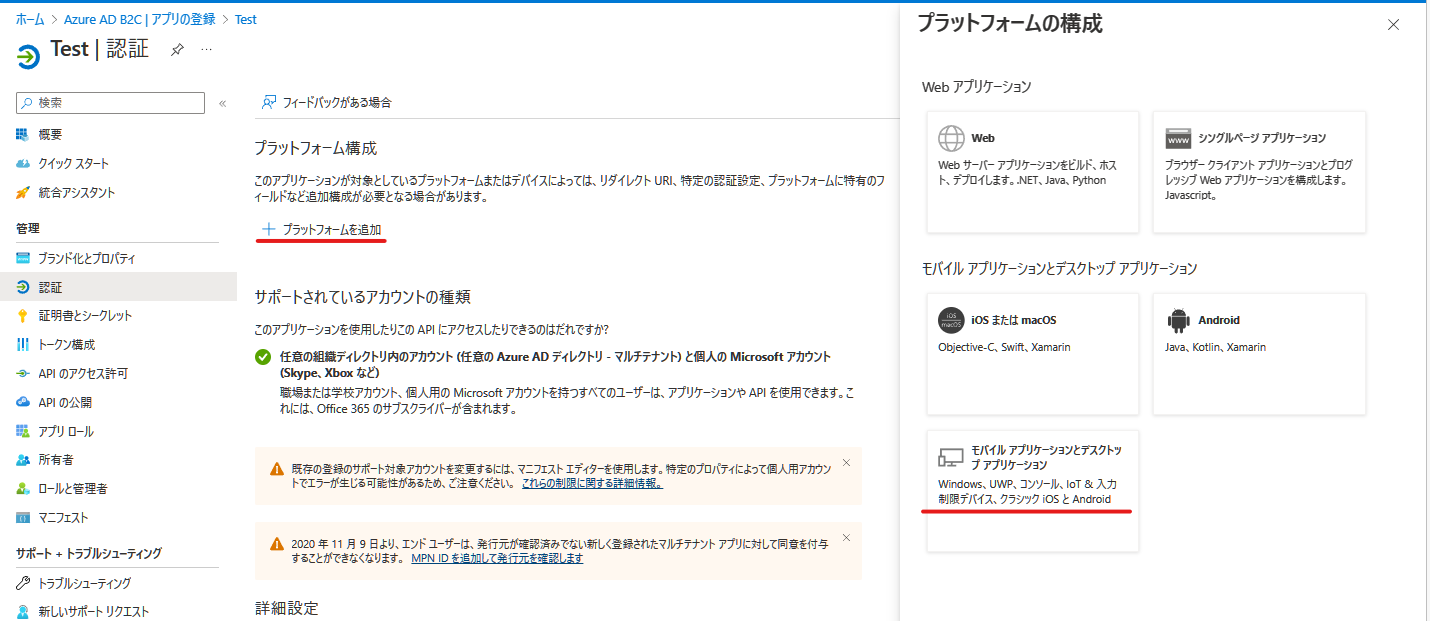
画面が変わるので、「リダイレクトURL」を3番目のMSALのみのものにします。
このURLはmsal+(アプリのクライアントID)://authで割りつけてあるので、この特性を生かして認証作業を単純化させていきます。
これでAzureの登録は以上になります。
認証処理
.NET MAUIのアプリに認証処理をつけていきます。
1.NuGet
必要なライブラリをNuGetでインストールしていきます。
今回使用するのは
・「Microsoft.Identity.Client」・・・認証処理用のライブラリ
・「System.IdentityModel.Tokens.Jwt」・・・認証処理で取得したトークンを文字として取得するライブラリ
・「CommunityToolkit.Maui」・・・認証処理が完了したことを知らせるアラート(トースト)を表示するライブラリ(無理に使わなくてもよい)
2.CommunityToolkitの追加の処理
CommunityToolkitを使うためにMamuiProgram.csファイルのbuilderに以下を追加します。
builder
			.UseMauiApp<App>()
            .UseMauiCommunityToolkit()//←CommunityToolkitを使用するために追加
			.ConfigureFonts(fonts =>
			{
				fonts.AddFont("OpenSans-Regular.ttf", "OpenSansRegular");
				fonts.AddFont("OpenSans-Semibold.ttf", "OpenSansSemibold");
			});
3.Constansクラスの作成
ソリューションエクスプローラーからModelフォルダを作成し、Azure ADのクライアントIDやスコープの情報などを入れるConstansクラスを作成します。
namespace AzureADB2CSample.Model
{
    public static class Constants
    {
        //↓Azure AD B2CのクライアントIDをコピペ
        public static readonly string ClientId = "302cf...";//←Azure AD B2CのクライアントIDをコピペしている

        //スコープはデフォルトにしている
        public static readonly string[] Scopes = new string[] { "openid", "offline_access" };
    }
}
クライアントIDは「アプリケーション(クライアント)ID」という項目にあるのでこれをコピペする
4.AuthenticationServiceクラスを作成する
認証用のサービスを作成する。
ソリューションエクスプローラーからServicesフォルダーを追加し、AuthenticationServiceクラスを作成する。
using AzureADB2CSample.Model;
using Microsoft.Identity.Client;

namespace AzureADB2CSample.Services
{
    public partial class AuthenticationService
    {
        private readonly IPublicClientApplication authenticationClient;

        //失敗または成功のトークンを受け取るためのリダイレクトURLを提供します
        public AuthenticationService()
        {
            authenticationClient= PublicClientApplicationBuilder
                .Create(Constants.ClientId)//クライアントIDから認証用のクライアントを作成する。
                .WithRedirectUri($"msal{Constants.ClientId}://auth")//先ほど設定したリダイレクトURL(「msal+(クライアントID)://auth」なのでこのように記述)
                .WithAuthority(AzureCloudInstance.AzurePublic, "common")

#if ANDROID
                    .WithParentActivityOrWindow(()=>Platform.CurrentActivity)//Androidでは認証画面に推移するために必要です。
#elif IOS
                .WithIosKeychainSecurityGroup("com.microsoft.adalcache")//IOSKeyChainを作成する
#endif
                .Build();
        }

        //認証するためのメソッド
        public async Task<AuthenticationResult> LoginAsync(CancellationToken cancellationToken)
        {
            AuthenticationResult result;//認証結果
            try
            {
                result = await authenticationClient//先ほど作った認証用のクライアントを使い、認証をさせる
                    .AcquireTokenInteractive(Constants.Scopes)
                    .WithPrompt(Prompt.ForceLogin) //←これはオプション。ユーザー名、パスワードを毎回入力する必要がある場合に追加
                    .ExecuteAsync(cancellationToken);
                return result;//認証結果を返す
            }
            catch (MsalClientException)
            {
                return null;
            }
        }
    }
}
5.MainPageの処理
この認証処理をMainPageのボタンを押したときに呼び出したいため、MainPage.xaml.csファイルに移り以下のように記述する
private async void LoginBtn_Clicked(object sender, EventArgs e)//MainPage.xamlでLoginBtnを作っておき、そのイベントハンドラーで発火する
    {
        try
        {
            var authService = new AuthenticationService();
            var result = await authService.LoginAsync(CancellationToken.None);//上のメソッドを呼び出し、resultに認証結果を返す
            var token = result?.IdToken; //←認証結果からIdTokenを受け取る。
            if (token != null)
            {
                var handler = new JwtSecurityTokenHandler();
                var data = handler.ReadJwtToken(token);//JwtSecurityTokenHandlerを使ってトークンをデータ化する
                if (data != null)
                {
                    var stringBuilder = new StringBuilder();
                    stringBuilder.AppendLine($"Name: {data.Claims.FirstOrDefault(x => x.Type.Equals("name"))?.Value}");//Claimsからnameの値を見つけてくる
                    stringBuilder.AppendLine($"Email: {data.Claims.FirstOrDefault(x => x.Type.Equals("preferred_username"))?.Value}");//Claimsからpreferred_usernameを見つけてくる(Email)
                    await Toast.Make(stringBuilder.ToString()).Show();//アラートとして表示
                    claimsData.Text= stringBuilder.ToString();//画面にも表示する
                }
            }
        }
        catch (MsalClientException ex)
        {
            await Toast.Make(ex.Message).Show();
        }
    }
これでWindowsでは動作が可能になります。
次に各プラットフォームで動かすためマニフェストやメソッドを整理していきます。
6.Androidについての処理
まずAndroidのプラットフォームフォルダに移り、「Android.Manifest」ファイルを開き以下のようにします。
<?xml version="1.0" encoding="utf-8"?>
<manifest xmlns:android="http://schemas.android.com/apk/res/android">
	<application android:allowBackup="true" android:icon="@mipmap/appicon" android:roundIcon="@mipmap/appicon_round" android:supportsRtl="true">

    <!--追加-->
    <activity android:name="microsoft.identity.client.BrowserTabActivity"  android:exported="true">
      <intent-filter>
        <action android:name="android.intent.action.VIEW" />
        <category android:name="android.intent.category.DEFAULT" />
        <category android:name="android.intent.category.BROWSABLE" />
        <data android:scheme="msal302cff3a-3c98-4bc2-b025-2570a8b0eb7a" android:host="auth" />
      </intent-filter>
    </activity>
    <!---->

  </application>

  <!--追加-->
  <queries>
    <package android:name="com.azure.authenticator" />
    <package android:name="com.companyname.azureadb2csample" />
    <package android:name="com.microsoft.windowsintune.companyportal" />
    <!-- 認証画面へ遷移するとき、アプリ内にブラウザビューを生成してそこで認証するために必要です。(外部のブラウザを使うとうまく認証できません) -->
    <intent>
      <action android:name="android.intent.action.VIEW" />
      <category android:name="android.intent.category.BROWSABLE" />
      <data android:scheme="https" />
    </intent>
    <intent>
      <action android:name="android.support.customtabs.action.CustomTabsService" />
    </intent>
  </queries>
  <!---->

	<uses-permission android:name="android.permission.ACCESS_NETWORK_STATE" />
	<uses-permission android:name="android.permission.INTERNET" />
</manifest>
また、MainActivity.csファイルを以下のようにしてください。
[Activity(Theme = "@style/Maui.SplashTheme", MainLauncher = true, ConfigurationChanges = ConfigChanges.ScreenSize | ConfigChanges.Orientation | ConfigChanges.UiMode | ConfigChanges.ScreenLayout | ConfigChanges.SmallestScreenSize | ConfigChanges.Density)]
public class MainActivity : MauiAppCompatActivity
{
    //↓これを追加
    protected override void OnActivityResult(int requestCode, Result resultCode, Intent data)
    {
        base.OnActivityResult(requestCode, resultCode, data);
        AuthenticationContinuationHelper.SetAuthenticationContinuationEventArgs(requestCode, resultCode, data);
    }
}
これでAndroidでの処理も完了になります。
7.iOSについての処理
iOSのマニュフェストはデフォルトでXMLにならないため、Info.plistファイルを右クリックし「ファイルを開くアプリケーションの選択」をクリックします。
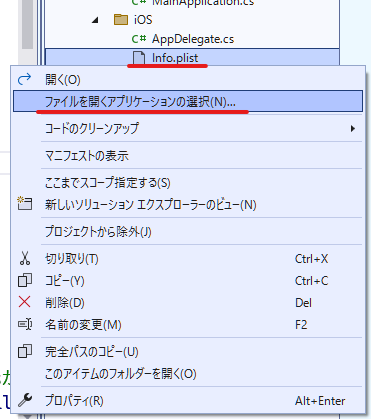
ダイアログが出てくるので「XML(テキスト)エディター」を選択するとマニフェストのXMLが表示されます。
そのXMLに以下の文を追加します。
<!--~省略~-->
	<key>XSAppIconAssets</key>
	<string>Assets.xcassets/appicon.appiconset</string>
  <!--追加-->
	<key>CFBundleURLTypes</key>
	<array>
		<dict>
			<key>CFBundleURLName</key>
			<string>com.companyname.azureadb2csample</string>
			<key>CFBundleURLSchemes</key>
			<array>
				<string>msal302cff3a-3c98-4bc2-b025-2570a8b0eb7a</string>
			</array>
			<key>CFBundleTypeRole</key>
			<string>Editor</string>
		</dict>
	</array>
	<key>LSApplicationQueriesSchemes</key>
	<array>
		<string>msauthv2</string>
		<string>msauthv3</string>
	</array>
  <!---->
</dict>
そして「AppDelegate.cs」に以下のように追加します。
[Register("AppDelegate")]
public class AppDelegate : MauiUIApplicationDelegate
{
	protected override MauiApp CreateMauiApp() => MauiProgram.CreateMauiApp();
    //↓追加
    public override bool OpenUrl(UIApplication app, NSUrl url, NSDictionary options)
    {
        AuthenticationContinuationHelper.SetAuthenticationContinuationEventArgs(url);
        return base.OpenUrl(app, url, options);
    }
}
以上でiOSデバイスについても完了になります。
さいごに
長くなりましたが、これでAzure AD B2CのMicrosoftアカウントの認証作業が完了となります。
次回いつになるかわかりませんが、B2Cの利点である多数のプロバイダーのアカウント認証について調べて紹介しようと思います。