はじめに
今回は、discord.py(V2)を普段から使用している人向けの記事となっております。
初学者の方は、
discord.pyでスラッシュコマンドを使ってみる
などを最初に見ておくといいかもしれません。
discord.py、Buttonでつまずくくね?
最近、discord.pyを使用してBotを書いている知り合いからDMで連絡が来ました。
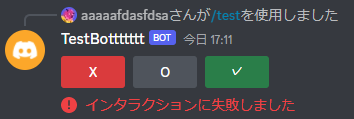
どうやら、Botを再起動したらButtonが反応しなくなるみたいです。
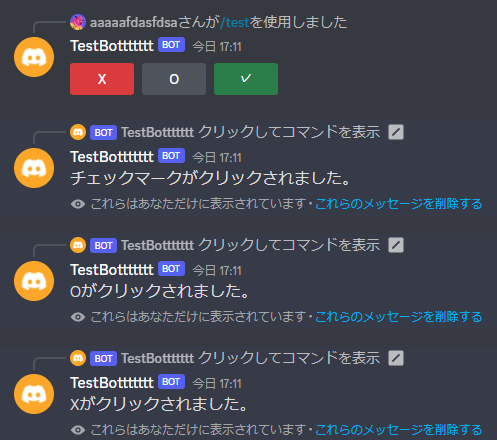
状況のスクリーンショット
通常↓
再起動後↓
その時に知り合いから来たコードがこちらです。
import discord
from discord import app_commands

TOKEN = ""

intents = discord.Intents.default()
client = discord.Client(intents=intents)
tree = app_commands.CommandTree(client)

@client.event
async def on_ready():
    await tree.sync()

class ButtonTest(discord.ui.View):
    def __init__(self):
        super().__init__()

    @discord.ui.button(label='X', style=discord.ButtonStyle.red, row=4)
    async def pressedN(self, interaction: discord.Interaction, button: discord.ui.Button):
        await interaction.response.send_message("Xがクリックされました。",ephemeral=True)

    @discord.ui.button(label='O', style=discord.ButtonStyle.grey, row=4)
    async def pressed0(self, interaction: discord.Interaction, button: discord.ui.Button):
        await interaction.response.send_message("Oがクリックされました。",ephemeral=True)

    @discord.ui.button(label='✓', style=discord.ButtonStyle.green, row=4)
    async def pressedY(self, interaction: discord.Interaction, button: discord.ui.Button):
        await interaction.response.send_message("チェックマークがクリックされました。",ephemeral=True)

@tree.command(name="test",description="テストコマンドです。")
async def test_command(interaction: discord.Interaction):
    await interaction.response.send_message(view=ButtonTest())

client.run(TOKEN)
discord.ui.Buttonの先頭に@がついてデコレーターになっていて、それがClassの中に入っている。
そしてclassの引数にdiscord.ui.Viewを入れることでviewとしてボタンごと送信できるようになっているみたいですね。
これだと、再起動したらボタンが反応しなくなってしまいます。
discord.py V2では、on_button_click(ボタンに反応するbot.event)はありません。
そのため、on_interactionというあまり使用することが想定されていないものを試しに使って、on_button_clickや、on_dropdownを作ってみました。
on_interactionを使ってon_button_clickを作る
import discord
from discord import app_commands

TOKEN = ""

intents = discord.Intents.default()
client = discord.Client(intents=intents)
tree = app_commands.CommandTree(client)

@client.event
async def on_ready():
    await tree.sync()

@tree.command(name="test3",description="aaa")
async def test_command3(interaction: discord.Interaction):
    button = discord.ui.Button(label="a",style=discord.ButtonStyle.primary,custom_id="aaa")
    view = discord.ui.View()
    view.add_item(button)
    await interaction.response.send_message(view=view)

@tree.command(name="test2",description="aaa")
async def test_command2(interaction: discord.Interaction):
    select = [
        discord.SelectOption(label="test1",value="1",description="1"),
        discord.SelectOption(label="test2",value="2",description="2")
    ]
    view = discord.ui.View()
    view.add_item(discord.ui.Select(custom_id="iii",options=select))
    await interaction.response.send_message(view=view)


#全てのインタラクションを取得
@client.event
async def on_interaction(inter:discord.Interaction):
    try:
        if inter.data['component_type'] == 2:
            await on_button_click(inter)
        elif inter.data['component_type'] == 3:
            await on_dropdown(inter)
    except KeyError:
        pass

## Button,Selectの処理
async def on_button_click(inter:discord.Interaction):
    custom_id = inter.data["custom_id"]
    print(custom_id)
    await inter.response.send_message("Button!",ephemeral=True)


async def on_dropdown(inter:discord.Interaction):
    custom_id = inter.data["custom_id"]
    select_values = inter.data["values"]
    print(custom_id)
    await inter.response.send_message("Select!",ephemeral=True)

client.run(TOKEN)
このような感じでon_interactionからon_button_click(Buttonを押した時の反応)とon_dropdown(SelectMenuで選択した時の反応)を書くことができました。
一応、解説を下に書いておきますが、パスして「応用して作る」を見て参考にしていただいても構いません。
解説(中級者向け)
#全てのインタラクションを取得
@client.event
async def on_interaction(inter:discord.Interaction):
    try:
        if inter.data['component_type'] == 2:
            await on_button_click(inter)
        elif inter.data['component_type'] == 3:
            await on_dropdown(inter)
    except KeyError:
        pass
重要なのはここのコードです。
on_interactionは文字通り全てのインタラクションを取得するものですが、inter.dataというのを見てみるとdictになっていて、component_typeというKeyが返されるのは、ButtonやSelectMenuなどのcomponent特有の事です。
スラッシュコマンドなどのインタラクションを取得した時はcomponent_typeというKeyが無いため、component_typeでif文を書くとKeyErrorが出ます。だから、try exceptでどうにかできます。
component_typeが2だったらButton,3だったらSelectMenuだと判定していますが、Discord公式のAPIDocumentにcomponent_typeについての記載があります。
だから、component_typeでButtonかどうかなどの判別ができます。
応用して作る
試しに、ボタンを押したらEmbedで押した人のユーザー名と#の後の部分が表示されるコードを書いていきます。
import discord
from discord import app_commands

TOKEN = ""

intents = discord.Intents.default()
client = discord.Client(intents=intents)
tree = app_commands.CommandTree(client)

@client.event
async def on_ready():
    await tree.sync()

#全てのインタラクションを取得
@client.event
async def on_interaction(inter:discord.Interaction):
    try:
        if inter.data['component_type'] == 2:
            await on_button_click(inter)
    except KeyError:
        pass

## Buttonの処理
async def on_button_click(inter:discord.Interaction):
    custom_id = inter.data["custom_id"]
    #print(custom_id)
    #ここから下に書く

client.run(TOKEN)
さっきのコードを流用して土台になるコードを用意しました。
ここからスラッシュコマンドの追加とButtonの反応を追加していきます。
@tree.command(name="username",description="自分のユーザー名を確認")
async def username(interaction: discord.Interaction):
    button = discord.ui.Button(label="確認",style=discord.ButtonStyle.primary,custom_id="check")
    view = discord.ui.View()
    view.add_item(button)
    await interaction.response.send_message("自分のユーザー名を確認してみましょう。",view=view)
まずはスラッシュコマンドから作りました。
discord.ui.Buttonはデコレーターとして使うのではなく、変数に入れていきます。今回はcustom_idを"check"としています。
ButtonをViewに追加してスラッシュコマンドのレスポンスとして送信。
これだとボタンを押した時の反応のコードを書いていないのでボタンの反応のコードを書く必要があります。さっきon_interactionを利用して作ったon_button_clickを利用してつくっていきます。
async def on_button_click(inter:discord.Interaction):
    custom_id = inter.data["custom_id"]#inter.dataからcustom_idを取り出す
    if custom_id == "check":
        embed = discord.Embed(
            title = "あなたのユーザー名",
            description = inter.user.name + "#" + inter.user.discriminator,
            color = 0x0000ff
        )
        await inter.response.send_message(embed=embed,ephemeral=True)#Embedを「これらはあなただけに表示されています」の状態で送信。
Buttonには"check"というcustom_idを指定していたので、custom_idが"check"ならばというif文にしました。
Embedをボタンを押した時のレスポンスとして送信。こっちでは「これらはあなただけに表示されています」という、ボタンを押した人しかボタンのレスポンスを見れない状態(ephemeral)というのを設定しています。
もちろん、今回の目的である、再起動してもボタンに反応するということもon_button_clickを作ることで達成しています。
今回はこんな感じのBotになりました↓

全体のコード
import discord
from discord import app_commands

TOKEN = ""

intents = discord.Intents.default()
client = discord.Client(intents=intents)
tree = app_commands.CommandTree(client)

@client.event
async def on_ready():
    await tree.sync()

#全てのインタラクションを取得
@client.event
async def on_interaction(inter:discord.Interaction):
    try:
        if inter.data['component_type'] == 2:
            await on_button_click(inter)
    except KeyError:
        pass

## Buttonの処理
async def on_button_click(inter:discord.Interaction):
    custom_id = inter.data["custom_id"]
    if custom_id == "check":
        embed = discord.Embed(
            title = "あなたのユーザー名",
            description = inter.user.name + "#" + inter.user.discriminator,
            color = 0x0000ff
        )
        await inter.response.send_message(embed=embed,ephemeral=True)

@tree.command(name="username",description="自分のユーザー名を確認")
async def username(interaction: discord.Interaction):
    button = discord.ui.Button(label="確認",style=discord.ButtonStyle.primary,custom_id="check")
    view = discord.ui.View()
    view.add_item(button)
    await interaction.response.send_message("自分のユーザー名を確認してみましょう。",view=view)

client.run(TOKEN)
まとめ
今回はdiscord.pyでBotを再起動するとボタンが反応しなくなることについての対処法みたいなことを書いていきました。
discord.pyの派生である、Disnakeでは、on_button_clickやon_dropdownが最初から使えるため、もしCogを利用した大規模なBotを作ろうとする時にもdiscord.pyよりも簡単にBotをつくることができます。
Disnakeは英語の記事が多いため、日本語の記事を書いていく予定です。
それでは〜