こちらは、 Houdini Apprentice Advent Calendar 2024 の3日目の記事になります。
Houdini 作業で必須級のShelfツール紹介!
Houdiniの作業中にPythonスクリプトを使うことはありますか?
ノードベースの操作では、膨大な数のノードを扱う必要があり、煩雑に感じることも多いですよね。
そこで今回は、少しでも作業を効率化できるshelfツールをいくつかご紹介します!
shelfツール セットアップ
始めに、Shelfにツールを登録する方法について説明します。
Houdini画面上側のShelfTabを見て、+ボタン→ New Shelf Tab 、NameとLabelを適当に命名して、Acceptを押します。

作成したShelf の空白部分を左クリックして、Edit tool を出します。
(1) Options タブ
Name,Label,Icon,Keywords(←これ何??) を登録できます。
・Iconの右マークをクリックして、hicon:/ → SVGIcons.index で任意の Icon を選択できます。
・任意ノードを右クリック、Type Properties → Basicタブ → Icon をコピペすると、そのノードのIconにできます。
(2) Script, Help タブ
Script に pythonコード、Help に詳しい説明が書けます。
Helpの書き方に関しては、こちらをご参照ください。
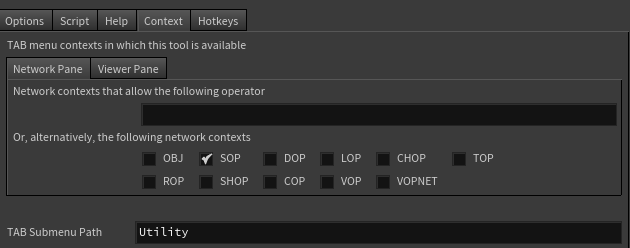
(3) Context タブ
使用するContexts,Tab Submenuを記入することで、Tabメニュー から shelf が呼び出せるようになります。
(4) Hotkeys タブ
使う場面に応じて、ショートカットキーを登録できます。
任意のEditボタンを押して Hotkey Manager が開き、 緑の+ボタン → 任意のショートカットキー → Accept で登録できます。

以上で Shelfツール 登録完了です!
デフォルトの状態だと、$HOME\houdini'version'\toolbar\default.shelf に登録されます。
1. 任意ノードを選択ノード下に作成
[ createAnyNode ]
##-- createAnyNode --##

# 任意ノードのタイプ(そのノードの Nodeinfo の上に書いてあるカッコ内の文字列)
NODETYPE = "null"

# 作成するノードの位置
ADDPOS = [0, -1.5]

##------------------------##

# itemから任意nodeを作成
def createNode(item, nodetype, addpos):
    addnode = item.parent().createNode(nodetype)

    # positionを設定(dotのみなぜかずれるので補正)
    pos = item.position()
    if item.networkItemType() == hou.networkItemType.NetworkDot:
        pos += hou.Vector2(-0.5, -0.155)
    addnode.setPosition(pos + hou.Vector2(addpos))

    # wireを繋ぐ(output=0のときスキップ)
    if item.networkItemType() == hou.networkItemType.Node and len(item.outputLabels()) == 0:
            return
    addnode.setInput(0, item)

##-----------------------##

# 選択ノードから任意ノードを作成
for selecteditem in hou.selectedItems():
    createNode(selecteditem, NODETYPE, ADDPOS)
この内容をscript欄にコピペしてご使用ください。コード上部にノードを指定できるようにしてあるので、任意のものに変えて下さい。
ちなみに、選択ノード以外に NetworkDot,SubnetIndirectInput にも対応しているところがミソです!
2. Inputを揃えて再接続
[ sortNodeInput ]
import hou

# 接続のoutputIndexを取得
def outputIndex(connect):
    if connect.inputItem().networkItemType() is hou.networkItemType.Node:
        return connect.outputIndex()
    else:
        return 0

# 接続元ノードのX位置を取得
def itemPosX(connect):
    return connect.inputItem().position()[0]

# 接続元ノードのY位置を取得
def itemPosY(connect):
    return connect.inputItem().position()[1] * (-1)

##-------------------------##

# 選択ノードのinputをソートして再接続
for node in hou.selectedNodes():
    connects = node.inputConnections()
    if not connects: continue

    # X位置、Y位置、outputIndexの順でソート
    connects = sorted(connects, key=lambda
               connect: (itemPosX(connect), itemPosY(connect), outputIndex(connect)))

    # ソートされた順に再接続
    for i, connect in enumerate(connects):
        node.setInput(i, connect.inputItem(), outputIndex(connect))
ぜひショートカットを設定して使ってください!
個人的にはこれがないと仕事ができないくらいよく使うコードです。
3. AutoUpdateを切り替え
[ toggleAutoUpdate ]
##-- toggleAutoUpdate --##

import hou

def toggleAutoUpdate():
    # updateModeのリスト
    modelist = [hou.updateMode.AutoUpdate,
                hou.updateMode.OnMouseUp,
                hou.updateMode.Manual]

    # updateModeを取得
    mode = hou.updateModeSetting()


    # 次のモードを設定
    next_mode = modelist[(modelist.index(mode) + 1) % len(modelist)]
    hou.setUpdateMode(next_mode)

# 関数を実行
toggleAutoUpdate()
重い作業をしているとき、頻繫にAutoUpdateを切り替えたいときがあるのですが、これを使って切り替えることで、いちいちマウスでクリックするよりも全然楽になります。
4. 新しいGeoを作って任意ノードを参照
[ setNewGeometry ]
##-- setNewGeometry --##

# 作成するノードの位置。
ADDPOS = [2.5, 0]


##------------------------##

import hou

# 選択ノードを取得
def customSelectedNodes():
    nodes = hou.selectedNodes()
    if len(nodes) == 0: print("[ set New Geometry ] Selected nodes not found.")
    return nodes

# 指定されたノードタイプの右下のBoundingBox座標を計算
def calcNodetypesBboxRB(nodes, typename):
    geos = [node for node in nodes if node.type().name() == typename]
    bboxrb = [max(node.position()[0] for node in geos),
              min(node.position()[1] for node in geos)]
    return bboxrb

# 指定位置に任意のノードを作成
def createNodeFromPos(parent, nodetype, nodename, pos):
    addnode = parent.createNode(nodetype)
    addnode.setName(nodename, True)
    addnode.setPosition(hou.Vector2(pos))
    return addnode

##------------------------##

# メイン処理
selectednodes = customSelectedNodes()
if len(selectednodes):
    # geoノードを作成
    bboxrb = calcNodetypesBboxRB(hou.node("obj/").children(), "geo")
    geo_pos = [pos1 + pos2 for pos1, pos2 in zip(bboxrb, ADDPOS)]
    geo = createNodeFromPos(hou.node("obj/"), "geo", "geo", geo_pos)

    # obj_mergeノードを作成
    objm_pos = [0, 0]
    for selectednode in selectednodes:
        objmerge = createNodeFromPos(geo, "object_merge", "import_" + selectednode.name(), objm_pos)
        objmerge.parm("objpath1").set(selectednode.path())

        objm_pos = [pos1 + pos2 for pos1, pos2 in zip(objm_pos, ADDPOS)]
新しくGeoノードを作って、任意ノードをObjmergeSOPで参照する作業を自動化しました。
これもよくやる作業ですね。
5. Cache系ノードを自動セット
[ setCacheNodes ]
##-- setCacheNodes --##

# テキストボックスのデフォルト値。よく使うものがあれば入れてください。
INITIAL_MESSAGE = ""

# 作成しない / TOP の切替スイッチ。
USETOP = 1

# 作成するノードの位置。
ADDPOS = [0, -1.5]


##------------------------##

import hou

# selecteditemsを返す
def customSelectedItems():
    items = hou.selectedItems()
    if len(items) == 0: print("[ set Cache nodes ] Seleted items not found.")
    return items

# メッセージウィンドウを呼び出す
def callMessage():
    message = "Cache Name : "
    buttons = ["Apply", "Cancel"]
    severity = hou.severityType.Message
    default_choice = 0
    close_choice = 1
    help = None
    title = "setCacheNodes"
    initial_contents = INITIAL_MESSAGE
    reply = hou.ui.readInput(message, buttons, severity, default_choice, close_choice,
            help, title, initial_contents)
    return reply

# Nodesから任意nodetypeのnodeを返す
def findNode(nodes, nodetype):
    return next((node for node in nodes if node.type().name() == nodetype), None)

# NodesのBoundingBoxの右下を取得
def calcNodesBboxRB(nodes):
    if not nodes:
        return [0, 0]
    bboxrb = [max(node.position()[0] for node in nodes),
              min(node.position()[1] for node in nodes)]
    return bboxrb


# itemから任意nodeを作成
def createNodeFromItem(item, nodetype, nodename, addpos):
    addnode = item.parent().createNode(nodetype)
    addnode.setName(nodename, True)

    # positionを設定
    pos = item.position()
    if item.networkItemType() == hou.networkItemType.NetworkDot:
        pos += hou.Vector2(-0.5, -0.155) #dotの補正
    addnode.setPosition(pos + hou.Vector2(addpos))

    # wireを繋ぐ(outputがない場合スキップ)
    if item.outputs():
        addnode.setInput(0, item)
    return addnode

# parentから任意nodeを作成
def createNodeFromPos(parent, nodetype, nodename, pos):
    addnode = parent.createNode(nodetype)
    addnode.setName(nodename, True)
    addnode.setPosition(hou.Vector2(pos))
    return addnode

##------------------------##

# メイン処理
selecteditems = customSelectedItems()
if len(selecteditems):
    reply = callMessage()

    if reply[0] == 0:
        cachename = reply[1]

        # filecacheノードを作成
        filecache = createNodeFromItem(hou.selectedItems()[0], "filecache::2.0", cachename, ADDPOS)

        # USETOP のときTOPノードを作成
        if USETOP:
            topnet = findNode(hou.node("tasks/").children(), "topnet")
            if not topnet:
                print("[ set Cache Nodes ] topnet node not found.")
            else:
                ropfetch_pos = [pos1 + pos2 for pos1, pos2 in zip(calcNodesBboxRB(topnet.children()), ADDPOS)]
                ropfetch = createNodeFromPos(topnet, "ropfetch", cachename, ropfetch_pos)
                ropfetch.parm("roporder").set(0)
                ropfetch.parm("roppath").set(filecache.path() + "/render")
cacheを取るときfilecacheSOPを作成し、TOPでropfetchTOPに繋げる一連の作業を自動化しました。
オプションでTOP作成をOFFにすることもできるようになってます。
終わりに
以上、shelfツール紹介でした!
コードにどこか間違いや不具合などございましたらTwitterDMにご連絡ください。
いくつかの関数についてはツールごとに重複しているものもあり、モジュール化した方がいいのは事実なんですが、一応python初学者の方のための参考にして頂きたいというのもあり、そのままコピペするだけで使えるようにしておきます。
個人的な話、こうして記事としてアウトプットすることで自分のツール周りの整理もできたので一石二鳥ではありましたが、久しぶりにpythonを書いたので疲れました...
ということで、このツールを上手いこと使ってみて良きHoudiniライフをお過ごし下さい~!


