はじめに
mbedを用いて無線通信をしたい。もっというとキーボードやマウスとして接続したい。
そう思いたってmbedをHIDとして実装する方法を調べてみました。mbed×BLEの前例記事がそもそも少ないので、HIDの実装となると文献がほぼなく苦労しましたが、なんとか動くモノを実装できたのでまとめてみます。
今回の実装に関しては佐藤氏のブログ記事 氾濫原|ErgoDoxではないナニか。オープンソースかつBluetooth接続のキーボード を大変参考にさせていただきました。
実装環境
- mbed Switch Science mbed TY51822r3, mbed-os 5.5
動作確認済み
- macOS High Sierra 10.13.3
- iOS 11.2.2
作ったキーボード(?)
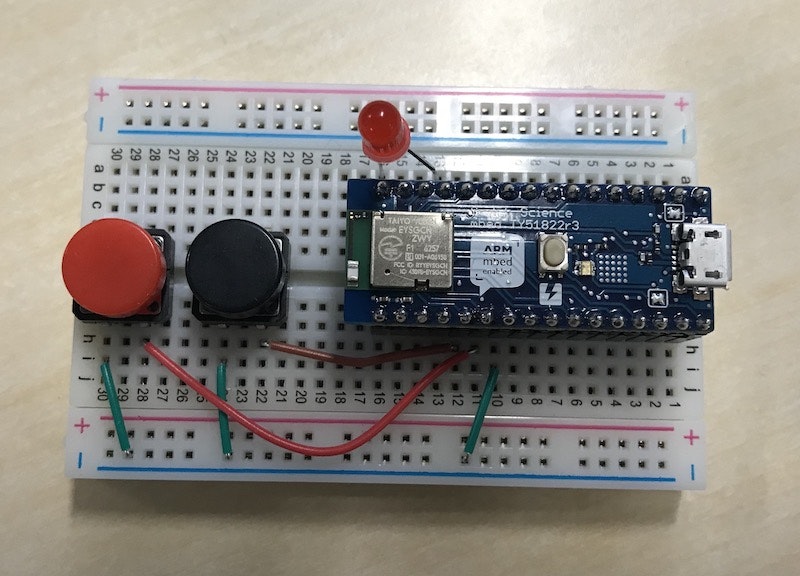
赤いキーでAが入力でき、黒いキーで削除ができます。
回路
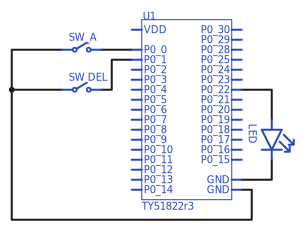
キーとなるスイッチをp0とp1にそれぞれつなぎ、BLEの接続確認をするためのLEDをLED2ピンに繋ぎました。なおLEDは抵抗入りのものを利用したので省略しています。
動作確認だけのため電源は有線で得ています。本当に無線化したい場合はバッテリを使ってください。
実装
1.mbed-OSのプロジェクト立ち上げ
ここからImport into Mbed IDEでMbed Compilerにインポートすると楽です。
最新のmbed-OSでの動作は未確認なので、状況に応じて古いバージョンにリビジョンしてください。
2.有志のライブラリを拝借
jpbrucker氏のgithubレポジトリのBLE_HIDディレクトリから
- HIDServiceBase.h
- HIDServiceBase.cpp
- KeyboardService.h
- Keyboard_types.h
- USBHID_Types.h
をダウンロードしてプロジェクトのルートディレクトリにインポートします。
3.main.cppを実装
ソースコード
# include "mbed.h"
# include "BLE.h"
# include "KeyboardService.h"
# include "BatteryService.h"
# include "DeviceInformationService.h"

# if 0
Serial pc(USBTX, USBRX);
# define DEBUG(...) { pc.printf(__VA_ARGS__); }
# else
# define DEBUG(...)
# endif

InterruptIn btnA(p1);
InterruptIn btnD(p0);
DigitalOut led(LED2);

BLE ble;
KeyboardService *kbdService;

static const char DEVICE_NAME[] = "MyKeyboard";
static const char SHORT_DEVICE_NAME[] = "MK";

static const uint16_t UUID_SERVICES[] = {
        GattService::UUID_HUMAN_INTERFACE_DEVICE_SERVICE,
        GattService::UUID_DEVICE_INFORMATION_SERVICE,
        GattService::UUID_BATTERY_SERVICE};

static Gap::ConnectionParams_t fast;

static void connectionCallback(const Gap::ConnectionCallbackParams_t *params) {
    DEBUG("Connected!\r\n");
    led = 1;
    ble.gap().stopAdvertising();
    ble.updateConnectionParams(params->handle, &fast);
}

static void disconnectionCallback(const Gap::DisconnectionCallbackParams_t *params) {
    DEBUG("Disconnected!\r\n");
    led = 0;
    ble.gap().startAdvertising();
}

static void securitySetupInitiatedCallback(Gap::Handle_t, bool allowBonding, bool requireMITM, SecurityManager::SecurityIOCapabilities_t iocaps) {
    DEBUG("Security setup initiated\r\n");
}

static void passkeyDisplayCallback(Gap::Handle_t handle, const SecurityManager::Passkey_t passkey) {
    DEBUG("Input passKey: ");
    for (int i=0; i<Gap::ADDR_LEN; i++) {
        DEBUG("%c", passkey[i]);
    }
    DEBUG("\r\n");
}

static void securitySetupCompletedCallback(Gap::Handle_t handle, SecurityManager::SecurityCompletionStatus_t status) {
    if (status == SecurityManager::SEC_STATUS_SUCCESS) {
        DEBUG("Security success %d\r\n", status);
    } else {
        DEBUG("Security failed %d\r\n", status);
    }
}

void send_A() {
    if (!kbdService)
        return;
    if (!kbdService->isConnected()) {
        DEBUG("Error: not connected");
    } else {
        DEBUG("Send");
        kbdService->_putc(65);
    }
}

void send_D() {
    if (!kbdService)
        return;
    if (!kbdService->isConnected()) {
        DEBUG("Error: not connected");
    } else {
        DEBUG("Send");
        kbdService->_putc(8);
    }
}

int main(void) {
    btnA.mode(PullUp);
    btnD.mode(PullUp);
    btnA.rise(send_A);
    btnD.rise(send_D);
    DEBUG("Start\r\n");

    DEBUG("Initialise\r\n");
    ble.init();

    DEBUG("Setup the event handlers\r\n");
    ble.gap().onConnection(connectionCallback);
    ble.gap().onDisconnection(disconnectionCallback);

    DEBUG("Setup latency\r\n");
    ble.getPreferredConnectionParams(&fast);
    fast.minConnectionInterval = 7.5;
    fast.maxConnectionInterval = 10;
    fast.slaveLatency = 0;
    ble.setPreferredConnectionParams(&fast);

    DEBUG("Initialize security\r\n");
    ble.securityManager().onSecuritySetupInitiated(securitySetupInitiatedCallback);
    ble.securityManager().onPasskeyDisplay(passkeyDisplayCallback);
    ble.securityManager().onSecuritySetupCompleted(securitySetupCompletedCallback);
    ble.securityManager().init(true, false, SecurityManager::IO_CAPS_NONE);

    DEBUG("Adding device info and battery service\r\n");
    KeyboardService kbdService_(ble);
    kbdService = &kbdService_;
    DeviceInformationService deviceInfo(ble, "ARM", "m1", "abc", "def", "ghi", "jkl");
    BatteryService batteryInfo(ble, 80);

    DEBUG("Advertising payload\r\n");
    ble.gap().accumulateAdvertisingPayload(GapAdvertisingData::KEYBOARD);
    ble.gap().accumulateAdvertisingPayload(GapAdvertisingData::COMPLETE_LOCAL_NAME, (const uint8_t *)DEVICE_NAME, strlen(DEVICE_NAME));
    ble.gap().accumulateAdvertisingPayload(GapAdvertisingData::SHORTENED_LOCAL_NAME, (const uint8_t *)SHORT_DEVICE_NAME, strlen(SHORT_DEVICE_NAME));
    ble.gap().setDeviceName((const uint8_t *)DEVICE_NAME);

    ble.gap().accumulateAdvertisingPayload(GapAdvertisingData::BREDR_NOT_SUPPORTED | GapAdvertisingData::LE_GENERAL_DISCOVERABLE);
    ble.gap().accumulateAdvertisingPayload(GapAdvertisingData::COMPLETE_LIST_16BIT_SERVICE_IDS, (uint8_t *)UUID_SERVICES, sizeof(UUID_SERVICES));
    ble.gap().setAdvertisingType(GapAdvertisingParams::ADV_CONNECTABLE_UNDIRECTED);
    ble.gap().setAdvertisingInterval(160); //100ms; in multiples of 0.625ms.
    ble.gap().startAdvertising();

    DEBUG("Add service\r\n");
    ble.gattServer().addService(customService);

    while (true) {
        ble.waitForEvent();
    }
}
カスタマイズする時編集するところ
- DEVICE_NAME
- SHORT_DEVICE_NAME
- deviceInfo
- batteryInfo
- ボタン(スイッチ)関連
ちょっと解説
・kbdService->_putc(数字);のところで入力するキーを指定しています。
数字はASCIIコードの10進数番号です(たぶん)。
・スイッチはDigitalInに抵抗を挟まず繋いでますが、mbedのプルアップモードを使うとちゃんと動きます。
また、riseでキーが押された時の関数を指定してあげれば割り込み処理ができます。
Macと接続したい時
ここにある通り、BatteryService.hとDeviceInformationService.hをコピーして中身を書きかえて、requireSecurity(SecurityManager::SECURITY_MODE_ENCRYPTION_NO_MITM)にすればOKです。
具体的には佐藤氏のmbedレポジトリを見てください。
注意
文字入力がうまくいかない時は、一度完全に端末との接続を解除してもう一度繋いでみてください。
おわりに
先駆者様がいたおかげで短時間にてHIDキーボードの実装ができました。
この分野はマニアックなのか、BLEが難しいからか非常に前例文献が少ないので、なるべく分かったことは記事に残していきたいですね。