iPhone5se の発表を今か今かと心待ちにしております。![]()
angularjs で Twitter クライアントを作成し AWS.S3 で動かす の続きです。
前回作成した mytiwtter をいじります。
一緒にやってみたい方は こちらのブランチ から取得してください。
やりたいこと
- プロフィールページの追加
- コントローラの追加
- Twitterサービスから他の情報を取得
最終的にこのようなプロフィールページができあがります。
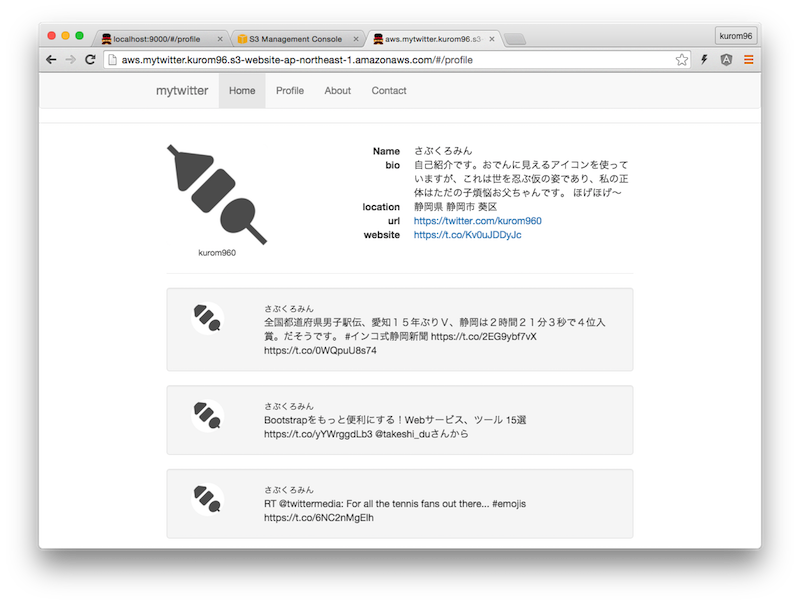
プロフィール情報を表示して、自分のツィートを下にゔぁーっ、と。
yeomanでルートの追加
前回仕様した generator-angular で新しいルートを作成します。
$ cd mytwitter
$ yo angular:route profile
   invoke   angular:controller:/Users/kuro/Documents/Practice/mytwitter/node_modules/generator-angular/route/index.js
   create     app/scripts/controllers/profile.js
   create     test/spec/controllers/profile.js
   invoke   angular:view:/Users/kuro/Documents/Practice/mytwitter/node_modules/generator-angular/route/index.js
   create     app/views/profile.html
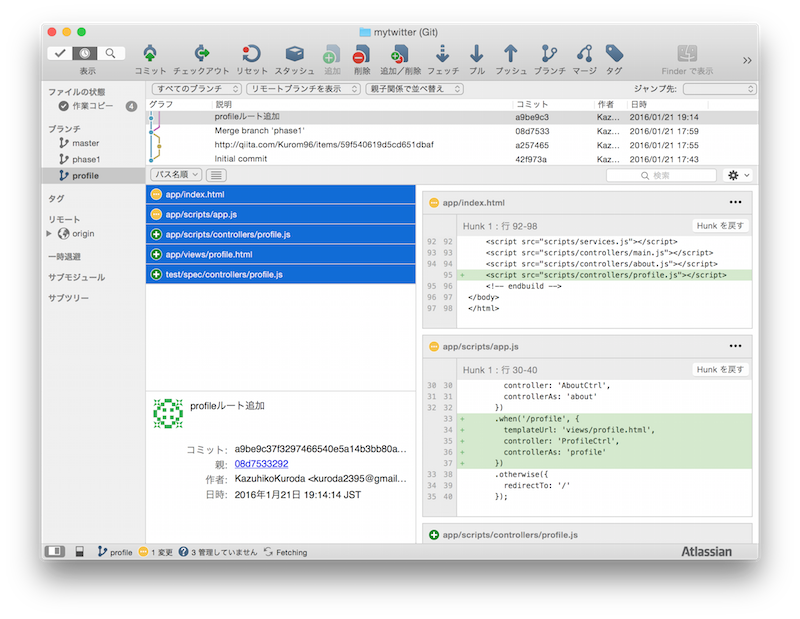
結果、何がどうなったか?と言いますと、ファイルが3つ追加されています。
profileのテンプレート、コントローラとテストファイルです。
index.html に prifile.js の script タグが追加されています。
    <!-- build:js({.tmp,app}) scripts/scripts.js -->
    <script src="scripts/app.js"></script>

    <script src="scripts/services.js"></script>
    <script src="scripts/controllers/main.js"></script>
    <script src="scripts/controllers/about.js"></script>
    <script src="scripts/controllers/profile.js"></script>
    <!-- endbuild -->
あとapp.jsにルートが追加されていますね。
      .when('/profile', {
        templateUrl: 'views/profile.html',
        controller: 'ProfileCtrl',
        controllerAs: 'profile'
      })
git diff --cached 等で差分見るとわかりやすいです。
私は、SourceTree を使っているのでそちらで見ます。
ナビ追加
index.html のナビに Profile を追加します。
<ul class="nav navbar-nav">
  <li class="active"><a href="#/">Home</a></li>
  <li><a ng-href="#/profile">Profile</a></li>
  <li><a ng-href="#/about">About</a></li>
  <li><a ng-href="#/">Contact</a></li>
</ul>
これでプロフィールページが表示できるようになりました。
grunt serve で確認してみてください。
サービス
以下の2機能をTwitterServiceに追加します。
- プロフィール情報の取得
- ユーザーのTweet取得
プロフィールの取得
TwitterAPI のエンドポイント users からも取得可能ですが、ここでは OAuth の me() で取得します。
詳しくは こちら を参照してください。
getMe: function() {
    var deferred = $q.defer();

    authResult.me()
        .done(function(result) {
            deferred.resolve(result);
        })
        .fail(function(err) {
            deferred.reject(err);
        });
    return deferred.promise;
},
ユーザータイムラインの取得
getUserTimeline: function() {
    var deferred = $q.defer(),
        url = '/1.1/statuses/user_timeline.json';

    authResult.get(url)
        .done(function(result) {
            deferred.resolve(result);
        })
        .fail(function(err) {
            deferred.reject(err);
        });
    return deferred.promise;
}
プロフィールページ
デザイン
画面のデザインをパパッと作っちゃいましょう。
今回は、layoutit というサービスを利用します。
Bootstrap のコンポーネントをドラッグ&ドロップで配置でき、プレビューや共有、ダウンロードができます。べんり。
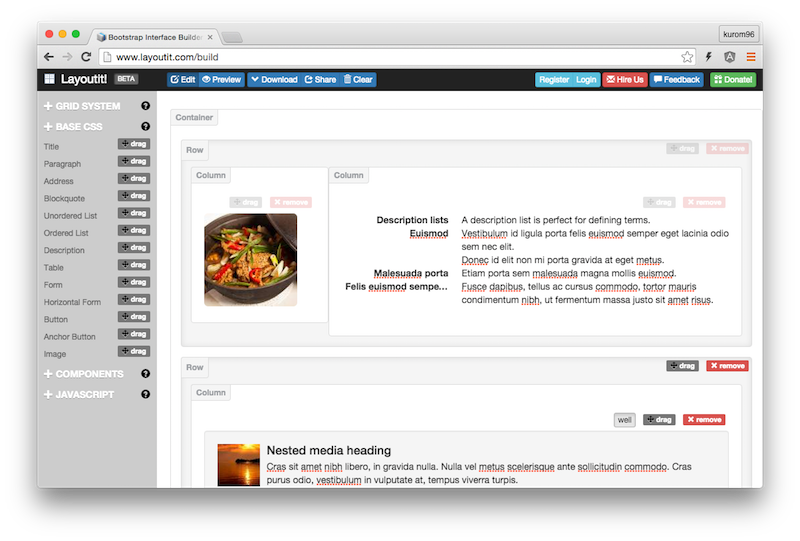
ダウンロードボタンを押下して表示された HTML を profile.html にペーストして、前回同様に angularjs のディレクティブを記述します。
<div class="container-fluid">
    <div class="row" ng-show="profile.showProfile">
        <div class="col-md-3 text-center">
            <img ng-src="{{profile.info.avatar}}" class="img-rounded" />
            <div>
                <small>{{profile.alias}}</small>
            </div>
        </div>
        <div class="col-md-9">
            <dl class="dl-horizontal">
                <dt>Name</dt>
                <dd>{{profile.info.name}}</dd>
                <dt>bio</dt>
                <dd>{{profile.info.bio}}</dd>
                <dt>location</dt>
                <dd>{{profile.info.location}}</dd>
                <dt>url</dt>
                <dd><a href="{{profile.info.url}}">{{profile.info.url}}</a></dd>
                <dt>website</dt>
                <dd><a href="{{profile.info.website}}">{{profile.info.website}}</a></dd>
            </dl>
        </div>
    </div>
    <hr>
    <div class="row">
        <div class="col-md-12">
            <div class="media well" ng-repeat="tweet in profile.tweets">
                <div class="col-md-2">
                    <img ng-src="{{tweet.user.profile_image_url}}" class="img-circle">
                </div>
                <div class="col-md-10">
                    <small>{{tweet.user.name}}</small>
                    <br> <span ng-bind-html="tweet.text"></span>
                </div>
            </div>
        </div>
    </div>
</div>
コントローラ
最後にコントローラです。
twitterService を初期化して、プロフィール情報とユーザータイムラインを取得します。プロフィール画面は、メイン画面の認証情報を引き継いでいるため、サインアウトした状態だと何も表示しません。
'use strict';

function ProfileControl(twitterService) {
    var vm = this;
    vm.info = {};
    vm.tweets = [];
    vm.showProfile = false;

    twitterService.initialize();

    if (twitterService.isReady()) {
        twitterService.getMe()
            .then(function(result) {
                vm.info = result;
                vm.showProfile = true;
            }, function() {
                // error
            });

        twitterService.getUserTimeline()
            .then(function(result) {
                vm.tweets = vm.tweets.concat(result);
            }, function() {
                // error
            });
    }
}

angular.module('mytwitterApp')
    .controller('ProfileCtrl', ProfileControl);
grunt serve で確認し、問題なければ grunt build して dist ディレクトリ配下を S3 にアップして確認、と。
この辺の手順については、前回を参照してください。

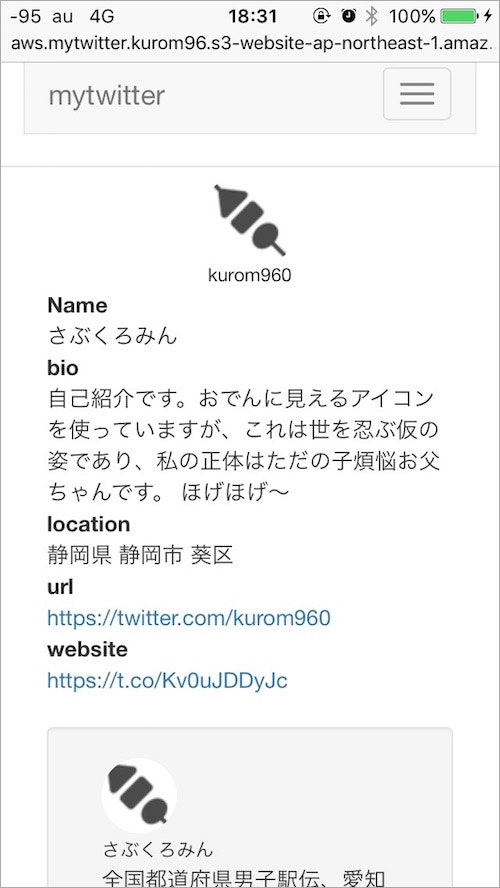
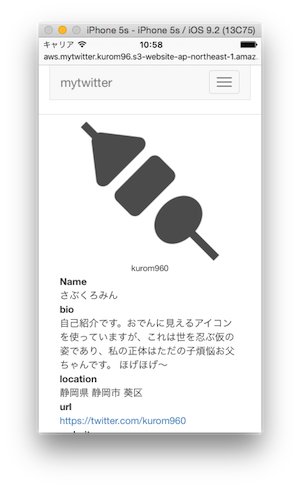
iPhone5s で見るとこんな感じです。
おまけ:フィルタで画像URL置換
なんかダサい。
プロフィール用のアイコンが小さい。
もちっと大きいのに変えよう。
文字列置換のフィルタを登録します。
画像URL内の _normal を _200x200 に変更してみます。
    .filter('replace', function() {
        return function(input, pattern, replacement) {
            if ((typeof input) === 'string'){
                return input.replace(pattern, replacement, 'g');
            } else {
                return input;
            }
        };
    });
profile.avatar を表示している img タグを以下のように書き換えます。
<img ng-src="{{profile.info.avatar| replace:'_normal':'_200x200'}}" class="img-rounded" style="width:100%; max-width:200px;"/>
![]()