概要
本記事では、PlayStation3 (SIXAXIS) コントローラ(以下PS3コントローラ)を
Raspberry Piに無線(Bluetooth)で接続し、
LED の ON/OFF をPS3コントローラから制御するまで書いています。
実装
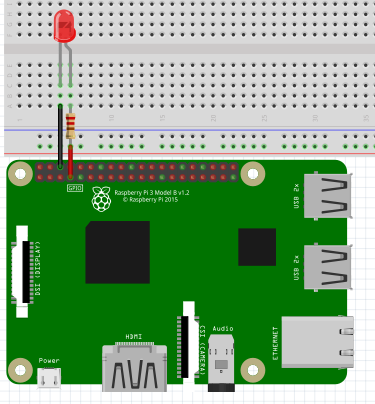
LEDチカチカ装置
Raspberry Pi Robotics #1: GPIO Control
の動画を参考に作成しました。英語ですが音声OFFにしてても雰囲気でなんとなくわかりました。
以下 プログラム開始直後からLED が3回チカチカするプログラムです。
import RPi.GPIO as GPIO
import time

GPIO.setmode( GPIO.BOARD)
GPIO.setup( 7, GPIO.OUT)

for x in range(0,3):
  GPIO.output(7,True)
  time.sleep(1)
  GPIO.output(7,False)
  time.sleep(1)
GPIO.cleanup()
PS3コントローラ登録
とりあえずOSを最新版に更新しました。
$ sudo apt update && sudo apt upgrade
$ sudo apt-get install libusb-dev
sixpair
落としてきたファイル(sixpair.c)からsixpair 実行ファイルを作ります。
$ wget "https://help.ubuntu.com/community/Sixaxis?action=AttachFile&do=get&target=sixpair.c" -O sixpair.c
$ gcc -o sixpair sixpair.c -lusb
$ ls -la
合計 24
drwxr-xr-x 2 pi pi  4096  9月  4 17:36 .
drwxr-xr-x 5 pi pi  4096  9月  4 15:32 ..
-rwxr-xr-x 1 pi pi 10076  9月  4 17:36 sixpair
-rw-r--r-- 1 pi pi  3367  9月  4 17:31 sixpair.c
qtsixa
次にqtsixa を作るのですが、いくつかライブラリが不足していたので
インストールします。
--- pyuic4 ---
$ sudo apt install python-qt4 pyqt4-dev-tools qt4-designer
--- jack.h ---
$ sudo apt install libjack-jackd2-dev
--- bluetooth.h ---
$ sudo apt install libbluetooth-dev
ライブラリの準備が終わったので、コンパイル、インストール します。
$ git clone https://github.com/falkTX/qtsixa.git
$ cd qtsixa
$ make
$ sudo make install
make install -C qtsixa
make[1]: Entering directory '/path/to/qtsixa/qtsixa'
# Make directories
...
# Install files
...
Installation is Complete!
make[1]: Leaving directory '/path/to/qtsixa/sixad'
$ echo $?
0
準備完了です。sixad を起動した後、PSボタンを押して接続します。
(※細かい手順を忘れました。うまくいかなかった人は以下サイトを参考にしてください。
ラズパイでラジコン(2):PS3コントローラとBluetooth接続
)
 $ sudo sixad -start &
[1] 8098
 $ [....] Starting bluetooth (via systemctl): bluetooth.service[ ok .
sixad-bin[8191]: started
sixad-bin[8191]: sixad started, press the PS button now
sixad-sixaxis[8198]: started
sixad-sixaxis[8198]: Connected 'PLAYSTATION(R)3 Controller (00:19:C1:1B:70:3C)' [Battery 05]
無事繋がりました\(^o^)/
Raspberry Pi起動時にいつでもsixadが起動しているようにサービスの設定を行います。
$ sudo systemctld enable sixad
PS3コントローラでLチカ
ラズパイでラジコン(3):Pythonでdualshock3の入力を読み取る
入力を読み取るコードを参考に以下のようなプログラムを作ってみました。
仕様概要
- PS3コントローラの〇を押したら、LEDが点灯
- PS3コントローラの〇から指が離れたら、LEDを消灯
- PS3コントローラの×を押したら、アプリ終了
プログラム
$ cat 20180904_PS3.py
import RPi.GPIO as GPIO
import time
import struct

device_path = "/dev/input/js0"
EVENT_FORMAT = "LhBB";
EVENT_SIZE = struct.calcsize(EVENT_FORMAT)

GPIO.setmode( GPIO.BOARD)
GPIO.setup( 7, GPIO.OUT)
try:
  with open(device_path, "rb") as device:
    event = device.read(EVENT_SIZE)
    while event:
      (ds3_time, ds3_val, ds3_type, ds3_num) = struct.unpack(EVENT_FORMAT, event)
      if ds3_type == 1:
        if ds3_num == 13:
          sw = False if ds3_val == 0 else True
          GPIO.output(7,sw)
          # print('LED POWER ')

        if ds3_num == 14:
          break

      # print( "{0}, {1}, {2}, {3}".format( ds3_time, ds3_val, ds3_type, ds3_num ) )
      event = device.read(EVENT_SIZE)
finally:
  GPIO.cleanup()
最終系
仕様概要
- 起動時に今回のプログラムを起動し、PS3コントローラの接続を待つ
- 〇△□×ボタンのどれかを押したら、LEDを点灯
- ボタンから離したら、LEDを消灯
- PSボタン長押しでコントローラの電源が切れると同時にRaspberryPiもシャットダウン
プログラム
# !/bin/sh -e
#
# rc.local
#
# This script is executed at the end of each multiuser runlevel.
# Make sure that the script will "exit 0" on success or any other
# value on error.
#
# In order to enable or disable this script just change the execution
# bits.
#
# By default this script does nothing.

# Print the IP address
_IP=$(hostname -I) || true
if [ "$_IP" ]; then
  printf "My IP address is %s\n" "$_IP"
fi

python3 /path/to/PS3LED.py
exit 0
↑↑↑元のソースからpython3 /path/to/PS3LED.py を追加しております。
import RPi.GPIO as GPIO
import time
import struct
import os

device_path = "/dev/input/js0"
EVENT_FORMAT = "LhBB";
EVENT_SIZE = struct.calcsize(EVENT_FORMAT)

GPIO.setmode( GPIO.BOARD)
GPIO.setup( 7, GPIO.OUT)

# コントローラ接続待ち
con = False
while True:
  try:
    with open(device_path, "rb") as device:
      event = device.read(EVENT_SIZE)
    print("コントローラに繋がったょ")
    break
  except IOError:
    con = False

# コントローラに繋がった
sw_stat = 0
sw_counter = 0
try:
  with open(device_path, "rb") as device:
    event = device.read(EVENT_SIZE)
    while event:
      (ds3_time, ds3_val, ds3_type, ds3_num) = struct.unpack(EVENT_FORMAT, event)
      if ds3_type == 1:
        if ds3_num == 12:  # △ボタン
          sw = False if ds3_val == 0 else True
          GPIO.output(7,sw)

        elif ds3_num == 13:  # 〇ボタン
          sw = False if ds3_val == 0 else True
          GPIO.output(7,sw)

        elif ds3_num == 14:  # ×ボタン
          sw = False if ds3_val == 0 else True
          GPIO.output(7,sw)

        elif ds3_num == 15:  # □ボタン
          sw = False if ds3_val == 0 else True
          GPIO.output(7,sw)

      # print( "{0}, {1}, {2}, {3}".format( ds3_time, ds3_val, ds3_type, ds3_num ) )
      event = device.read(EVENT_SIZE)

except IOError:
  # PSボタン長押しでコントローラの電源が切れた時を想定(乱暴)
  print("コントローラの電源切れたよ")
  os.system("sudo shutdown -h now")

finally:
  GPIO.cleanup()
ブレッドボード図はFritzingを用いて作成しております。
