今回は、ESP32のSPIFFS領域にファイルを保存する必要があったので記録として残します。
1、開発環境
arduino1.8.19
2、方法
1、arduino1.8.19をインストール。以下のURLから
https://www.arduino.cc/en/software/

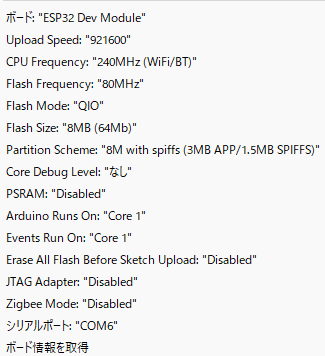
2、今回のボードの設定は以下です。
3、以下のサイトからESP32FS-1.1.zipをダウンロードして、解凍後
C:\Users*****\OneDrive\ドキュメント\Arduino\toolsフォルダに保存(toolsフォルダは作成する必要あり)
https://github.com/me-no-dev/arduino-esp32fs-plugin/releases/tag/1.1
(ESP32FSごと保存)
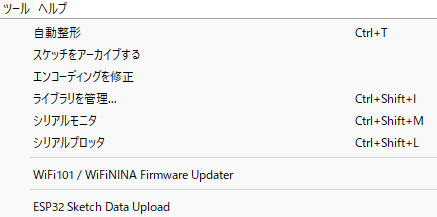
4、arduinoIDEを起動してESP32 Sketch Data Uploadが表示されればOK
5、プログラムと同じフォルダにdataフォルダを作成して、そのフォルダに書き込みたいファイルを保存。
その後、ESP32 Sketch Data Uploadを実行したら確認できます。
今回は、config.txtファイルを作成して、中身は「hello」と書き込みをしています。
6、以下のプログラムを作成して動作確認して下さい。()
#include "FS.h"
#include <SPIFFS.h>

void setup() {
    SPIFFS.format(); // 初回フォーマット時のみ有効にする(次回書き込みからは無効にする)
    Serial.begin(115200);
    if (!SPIFFS.begin(true)) {
        Serial.println("SPIFFSのマウントに失敗しました。");
        return;
    }

}

void loop() {
    delay(2000);
    File file = SPIFFS.open("/config.txt", "r");
    if (!file) {
        Serial.println("ファイルを開けませんでした。");
        return;
    }

    Serial.print("config.txtの内容:");
    while(file.available()){  // ファイルのデータ分繰り返す
      char c = file.read(); // ファイルから1バイトずつデータを読み取り
      Serial.print(c);      // 液晶へ表示
    }
    Serial.println();
    file.close();
}
7、2秒間隔でhelloが表示されればOKです。
