はじめに
こんにちは。Kuniと申します。
今回はNiantic社が提供しているLightship ARDKを使用して、スマホでハンドトラッキングをしてみました。
※現在、ハンドトラッキング機能はExperimental Featuresに分類されているため、試験的な機能となっております。
そのため、サポートされておらず、今後SDKに組み込まれない可能性もあります。その点ご了承の上お進みください。
環境
OS:Windows11
Unity:2021.3.8f1
ARDK:2.3.0
スマホ:Galaxy21 (Android Ver.12)、
gradle:6.7.1
※gradleはARDKの最初のセットアップの際に使用します。
1.セットアップ
Lightship ARDKのセットアップについては、公式ドキュメントを参照してください。
日本語版があるので、そちらに沿って行えば大丈夫です。
ARDKのインポートとともにARDK実例シーン(ARDK Examples)のインポートもお願いします。
今回使用するシーン、スクリプトがこちらに含まれております。
2.シーンの準備
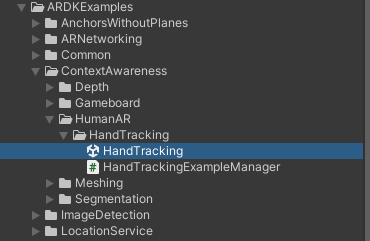
1.ARDKExamples/ContextAwareness/HumanAR/HandTrackingの中にあるHandTrackingという名前のシーンを開きます。
このシーンを使用することで最初のセットアップのほとんどが終了しています。
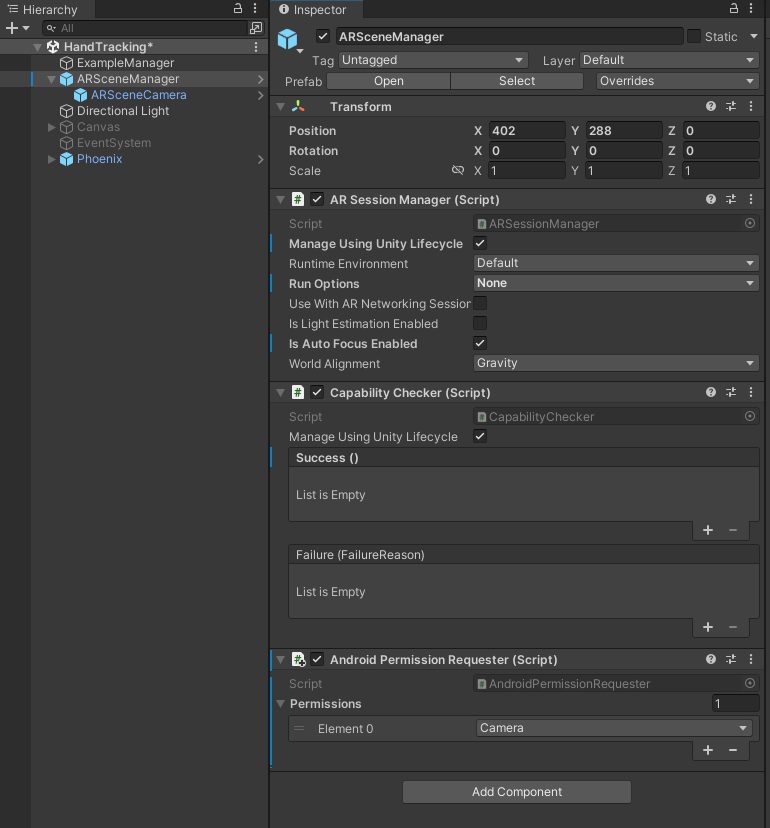
2.シーン内のARSceneManagetにAndroid Permission RequesterをAdd Componentします。
Android Permission RequesterのPermissionsの"+"を押します。
そうすると下記の画像のようになると思います。
スクリプト
今回は2種類のスクリプトを記述します。
一つ目は、HandTracking用のスクリプト
using System.Collections;
using System.Collections.Generic;
using UnityEngine;

using Niantic.ARDK.AR.Awareness;
using ARDK.Extensions;

public class HandTracingScript : MonoBehaviour
{

    [SerializeField] private ARHandTrackingManager _handTrackingManager;
    [SerializeField] private Camera aRCamera;
    [SerializeField] private float minHandConfidence = 0.85f; //多分閾値

    private Vector3 handPosition;
    public Vector3 HandPosition { get => handPosition; }

    // Start is called before the first frame update
    void Start()
    {
        _handTrackingManager.HandTrackingUpdated += HandTrackingUpdated;
    }

    private void OnDestroy()
    {
        _handTrackingManager.HandTrackingUpdated -= HandTrackingUpdated;
    }

    private void HandTrackingUpdated(HumanTrackingArgs handData)
    {
        var detections = handData.TrackingData?.AlignedDetections;
        if(detections == null)
        {
            return;
        }

        foreach(var detection in detections)
        {
            if(detection.Confidence < minHandConfidence)
            {
                return;
            }

            Vector3 detectionSize = new Vector3(detection.Rect.width, detection.Rect.height, 0);
            float depthEstimation = 0.2f + Mathf.Abs(1 - detectionSize.magnitude);
            //ビューポート空間の位置座標からワールド空間上の位置座標への変換
            handPosition = aRCamera.ViewportToWorldPoint(new Vector3(detection.Rect.center.x, 1 - detection.Rect.center.y, depthEstimation));
        }

    }

}
こちらのスクリプトの内容は、公式ドキュメントを参照していただけると詳しい内容がわかると思います。
二つ目は、オブジェクトを追従させるスクリプトです。
using System.Collections;
using System.Collections.Generic;
using UnityEngine;


public class PlaceARObjectsOnHand : MonoBehaviour
{

    [SerializeField] private HandTracingScript handPositionSolver;
    [SerializeField] private GameObject aRObject;
    [SerializeField] private float speedMovement = 0.5f;
    [SerializeField] private float speedRotation = 25.0f;

    private float minDistance = 0.05f;
    private float minAngleMagnitude = 2.0f;
    private bool shouldAjustRotation;

    // Update is called once per frame
    void Update()
    {
        PlaceObjectOnHand(handPositionSolver.HandPosition);
    }

    private void PlaceObjectOnHand(Vector3 handPosition)
    {
        float distance = Vector3.Distance(handPosition, aRObject.transform.position);
        aRObject.transform.position = Vector3.MoveTowards(aRObject.transform.position, handPosition, speedMovement * Time.deltaTime);
        if(distance >= minDistance)
        {
            aRObject.transform.LookAt(handPosition);
            shouldAjustRotation = true;
        }
        else
        {
            if (shouldAjustRotation)
            {
                aRObject.transform.rotation = Quaternion.Slerp(aRObject.transform.rotation, Quaternion.identity, 2 * Time.deltaTime);
                Vector3 angles = aRObject.transform.rotation.eulerAngles;
                shouldAjustRotation = angles.magnitude >= minAngleMagnitude;
            }
            else
            {
                aRObject.transform.Rotate(Vector3.up * speedRotation * Time.deltaTime);

            }
        }
    }
}
以上のスクリプトを記述します。
シーン上に配置
上記で作成したスクリプトをシーン上のExample ManagerにAdd Componentします。
そして、オブジェクトを下記の画像のようにアタッチします。
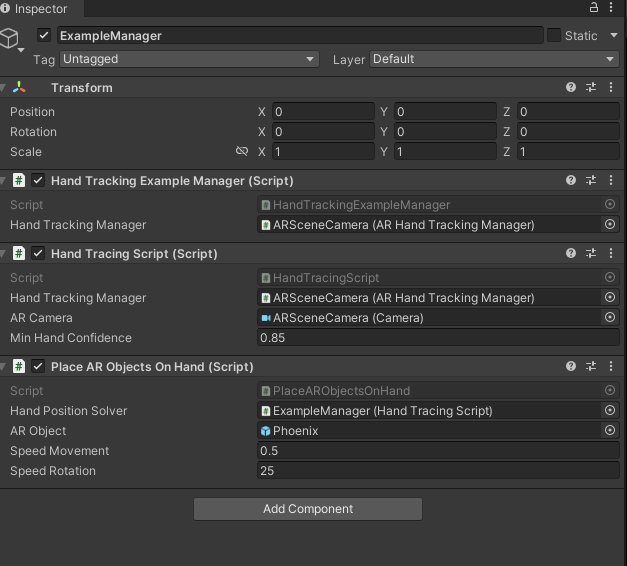
Place AR Objects On HandのARObjectの欄に好きなモデル、オブジェクトをアタッチすれば、そのオブジェクトが追従してくれます。
今回私は、参考にさせていただいた動画のリンクにあるモデルを使用させていただきました。
結果
AndroidでBuildした結果がこちらです。
参考動画