はじめに
Spring BootアプリケーションにSpring Securityを組み込んでログイン機能を実装する。DB(PostgreSQL)にログインアカウントを登録してそのアカウントで認証を行う。
環境
開発環境は以下の通り。
Eclipse IDE Version: 2023-12 (4.30.0)
PostgreSQL 16.0,
アプリケーションプロパティ
application.propertiesはDBの接続情報を記載する。
spring.application.name=demo_Postgre
spring.datasource.driver-class-name=org.postgresql.Driver
spring.datasource.url=jdbc:postgresql://localhost:5432/postgres
spring.datasource.username=postgres
spring.datasource.password=root
build.gradle
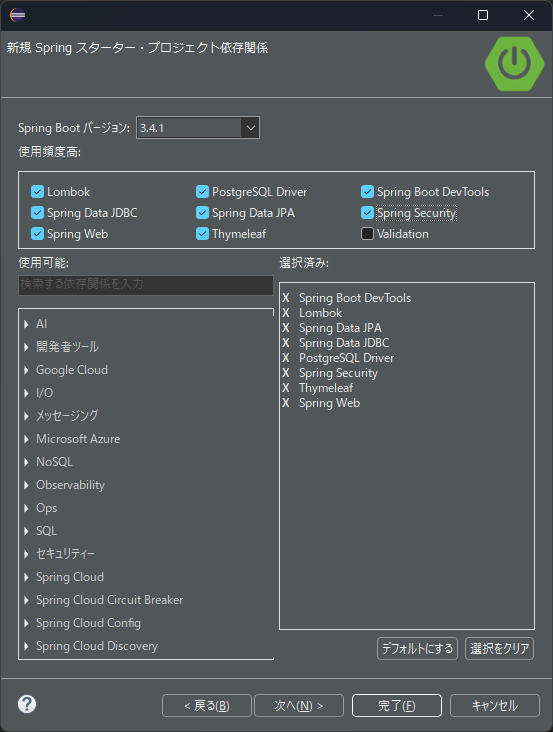
build.gradleは新規にSpringスターター・プロジェクトを作成する際の依存関係の設定によって自動生成される。
ウィザードの依存関係の設定ではSpring Securityなど必要なライブラリを指定する。
--省略--
dependencies {
	implementation 'org.springframework.boot:spring-boot-starter-data-jdbc'
	implementation 'org.springframework.boot:spring-boot-starter-data-jpa'
	implementation 'org.springframework.boot:spring-boot-starter-security'
	implementation 'org.springframework.boot:spring-boot-starter-thymeleaf'
	implementation 'org.springframework.boot:spring-boot-starter-web'
	implementation 'org.thymeleaf.extras:thymeleaf-extras-springsecurity6'
	compileOnly 'org.projectlombok:lombok'
	developmentOnly 'org.springframework.boot:spring-boot-devtools'
	runtimeOnly 'org.postgresql:postgresql'
	annotationProcessor 'org.projectlombok:lombok'
	testImplementation 'org.springframework.boot:spring-boot-starter-test'
	testImplementation 'org.springframework.security:spring-security-test'
	testRuntimeOnly 'org.junit.platform:junit-platform-launcher'
}
サンプルプログラム
サンプルプログラムのプロジェクト名はdemo_Postgreで以下のサイトからダウンロードできる。
Git Hub
ダウンロードした圧縮ファイルを解凍する。
プロジェクト名とディレクトリ名は一致する必要があるので解凍したディレクトリ名をdemo_Postgreに変更すること。
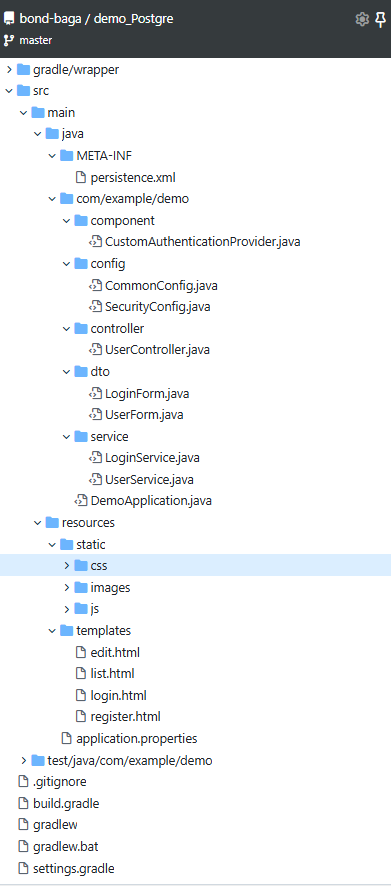
プログラムソースの構成
サンプルプログラムを実行してみると
初期状態
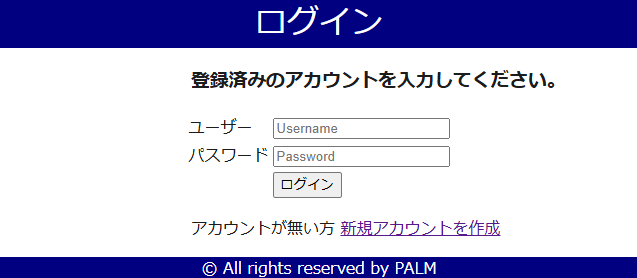
以下のアドレスにアクセスするとログイン画面が表示される。
http://localhost:8080
最初はDBにアカウントが未登録であるので「新規アカウント作成」をクリックする。
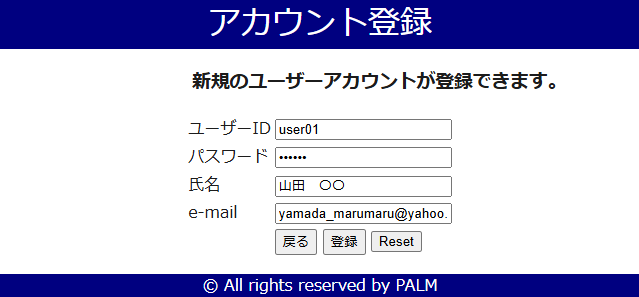
アカウント登録
アカウント登録画面に遷移してアカウント情報を入力して登録ボタンをクリックする。Spring Securityではusernameとpasswordで認証を行うがこれでは同一ユーザー名でアカウント登録ができないことになる。そのため本サンプルではusername以外にfullnameを追加してusernameをユーザーID、fullnameを氏名としている。同一氏名のアカウントは複数登録できるが同一ユーザーIDのアカウントは複数登録できない。
ログイン画面に戻る
登録終了後はログイン画面に遷移する。入力したユーザーIDがデフォルトで表示されているので再度パスワードを入力して「ログイン」ボタンをクリックする。ログインに失敗する場合はユーザーが存在しない場合とパスワードが一致しない場合でどちらが原因か分かるようなメッセージを出力できる。
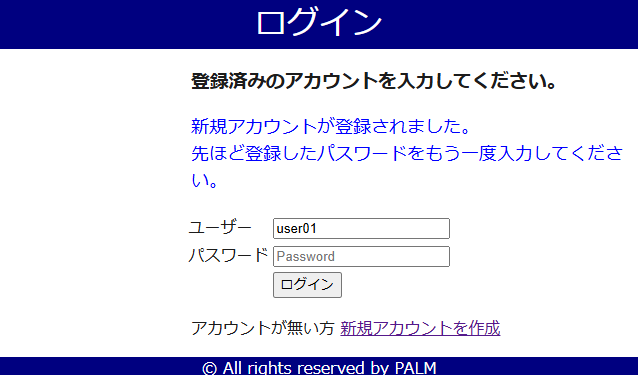
ログイン成功
本サンプルでは社員一覧画面に遷移するが社員データを準備する必要があるので単純に「Hello World」を表示するだけでもセキュリティの確認は行える。
一覧ではログイン者の氏名をセッション情報から表示する。
ログアウトボタンをクリックするとログイン画面に遷移する。

登録されたアカウント情報
パスワードは以下のようにハッシュ化して登録する。

ハッシュ化は暗号化と違って不可逆なハッシュ値を生成する。パスワードにハッシュ値が用いられるのは、仮にハッシュ値が知られたとしても元の値を隠蔽できるから。複数のアカウントで同じパスワードを登録しても異なるハッシュ値が登録されている。
パスワードの照合
認証はputされたデータのusernameでレコードを取得してレコードのハッシュ化されているパスワードと入力された生のパスワードをPasswordEncoderのmatchesメソッドで比較する。
インターフェース PasswordEncoderのmatchesメソッド
戻り値:boolean
matches(CharSequenceSE rawPassword, StringSE encodedPassword)
ストレージから取得したエンコードされたパスワードが、送信された生のパスワードと一致することを確認します。
アカウントのテーブル
usernameと入力されたパスワードをハッシュ化した値でDBのアカウントを検索する訳ではない。(同一パスワードでも異なるハッシュ値にエンコードされるのだから。)そこでusernameは重複を許さないのだからusernameではなくuseridにしたいのだがログインHTMLのエレメント名を変更することはできなかった。結局、usernameをユーザーIDとしてfullnameを氏名とする以下のテーブルを定義した。(Publicはスキーマ)
create table public.login (
  id serial not null
  , username character varying(255)
  , fullname character varying(255)
  , password character varying(255)
  , email character varying(255)
  , primary key (id)
);
本サンプルの解説
BeanやComponentのはなし
Web系ではあらかじめ必要なインスタンスをコンテナに保持して利用する側はそのインスタンスを参照する。コンテナに登録されるインスタンスにはBean、Component、Serviceなどがあるらしい。Beanはメソッドの戻り値のインスタンスでComponentは他のクラスで利用される部品的なニュアンス、ServiceはDB関係の処理を行うクラス等々。
BeanはConfigクラス(@Configurationアノテーションが付加されたクラス)で定義できるがService等のクラスに@Configurationアノテーションを付加すればBeanを定義できる。Configクラスに定義しているのはこのクラスがシステム起動時に読み込まれて他のクラスを参照しないからだと思われる。
Beanを参照するフィールドインジェクションとコンストラクターインジェクション
フィールドインジェクションはコンテナに登録されているインスタンスを@Autowiredアノテーションで参照する。一方コンストラクターインジェクションはBeanを参照するクラスのコンストラクタの引数にBeanを指定してクラスのメンバ変数で参照する。フィールドインジェクションよりコンストラクターインジェクションが望ましいそうだ。
本サンプルのBean定義
本サンプルではBCryptPasswordEncoder型のBeanを作成している。このBeanはSecurityConfigクラスで定義したいのだがSecurityConfigクラスではAuthenticationProvider型のコンポーネントを参照している。このコンポーネントも同じBeanを参照しているため循環参照に陥るのでわざわざ別のConfigクラスを作成してBeanを定義することになった。
@Configuration
public class CommonConfig {
    @Bean
	BCryptPasswordEncoder passwordEncoder(){
		return new BCryptPasswordEncoder();
	}
}
認証の仕組み
以下の2つのクラスで認証を行う。
1 SecurityFilterChain型のBeanを登録するクラス
2 AuthenticationProviderを継承したComponentクラス
SecurityFilterChain型のBeanを登録するクラス
@Configuration
@EnableWebSecurity
public class SecurityConfig {
  /*
   AuthenticationProviderを継承したComponentを参照するメンバ変数
   */
	private final CustomAuthenticationProvider customAuthenticationProvider;
    /*
    コンストラクタでComponetへの参照をメンバ変数に代入
    */
    public SecurityConfig(CustomAuthenticationProvider customAuthenticationProvider){
        this.customAuthenticationProvider = customAuthenticationProvider;
    }
  /*
  認証処理を行うSecurityFilterChain型のBeanの作成
  */
  @Bean
  SecurityFilterChain securityFilterChain(HttpSecurity http) throws Exception{
	  http
      /*
      AuthenticationProviderを継承したComponentをBeanで参照できるようにする。
      */
      .authenticationProvider(customAuthenticationProvider)
      /*
      ログイン処理
      */
	  .formLogin((login) -> login
        /*
        認証のメソッド
       AuthenticationProviderのoverrideしたauthenticateメソッドを参照する。
        */
    	.loginProcessingUrl("/authenticate")
        /*
        ログインしていない場合はコントローラーの@GetMapping(value={"/login"})にマップされたメソッドが実行される。
        */
        .loginPage("/login")
        /*
        ログインが成功した場合コントローラーの@GetMapping("/")にマップされたメソッドが実行される。
        引数のtrueが無い場合はログイン前にユーザーが入力したアドレスをマップしたメソッドが実行される。
        */
        .defaultSuccessUrl("/",true)
        /*
        ログインが失敗した場合のURL
        本サンプルでは@GetMapping(value={"/login"})にマップされたメソッドが実行される。
        クエリ文字列failedでログイン失敗を判断してメッセージを表示する。
        */
        .failureUrl("/login?failed=true")
        .permitAll()
    ).logout((logout) -> logout
      /*
        ログアウトした場合のURL
        本サンプルでは@GetMapping(value={"/login"})にマップされたメソッドが実行される。
        クエリ文字列logoutでログアウトを判断してメッセージを表示する。
       */
    	.logoutSuccessUrl("/login?logout=true")
    	.permitAll()
    ).authorizeHttpRequests((authz) -> authz
      /*
        認証しなくても表示できるURLなど
        @GetMapping("/register")アノテーションのメソッドはログインしなくても実行できる。
        */
        .requestMatchers("/register","/css/**").permitAll()
        .anyRequest().authenticated()
     );
    return http.build();
  }
}
AuthenticationProviderを継承したComponentクラス
@Component
public class CustomAuthenticationProvider implements AuthenticationProvider {
    private final LoginService loginService;
    private final BCryptPasswordEncoder passwordEncoder;
    public CustomAuthenticationProvider(LoginService loginService, BCryptPasswordEncoder passwordEncoder) {
        this.loginService = loginService;
        this.passwordEncoder = passwordEncoder;
    }

    /*
    SecurityFilterChainに記載されている「.loginProcessingUrl("/authenticate") 」箇所のautenticateメソッドの実態。
    ユーザーがユーザーとパスワードを入力するとこのメソッドで認証するかどうか判断する。
    認証する場合はUsernamePasswordAuthenticationTokenを返却する。
    認証しない場合はエラーを発生させる。
    */
    @Override
    public Authentication authenticate(Authentication authentication) throws AuthenticationException {
        /*
     ユーザーとパスワードを取得する
        */
        String username = (String) authentication.getPrincipal();
        String Password = (String) authentication.getCredentials();
        LoginForm loginForm = loginService.select(username);
        /*
        認証不可の場合はユーザーが存在しないかユーザーは存在するがパスワードが一致しないかのどちらか
        */
        if(loginForm.getId() == 0){
            throw new UsernameNotFoundException("入力されたユーザーIDは存在しませんでした。");
        }
        if (passwordEncoder.matches(Password, loginForm.getPassword())) {
            return new UsernamePasswordAuthenticationToken(username, Password, null);
        } else {
            throw new BadCredentialsException("パスワードが一致しませんでした。");
        }
    }
    @Override
    public boolean supports(Class<?> authentication) {
        return authentication.equals(UsernamePasswordAuthenticationToken.class);
    }
}
<!--
body部分のみ
認証エラーのメッセージは以下で表示できる。
th:text="${session['SPRING_SECURITY_LAST_EXCEPTION'].message}">
-->
<body>
    <div class="slightly-left">
    <h3>登録済みのアカウントを入力してください。</h3>
    <p class="error" th:if="${param.failed}" th:text="${session['SPRING_SECURITY_LAST_EXCEPTION'].message}"></p>
    <p class="info" th:if="${param.logout}">ログアウトしました。<br>このサイトを利用する場合はもう一度ログインしてください。</p>
    <p class="info" th:if="${map.registered}">新規アカウントが登録されました。<br>先ほど登録したパスワードをもう一度入力してください。</p>
    </div>

    <form class="center" th:action="@{/authenticate}" method="post" th:object="${LoginForm}">
	<table>
        <tr>
            <td>ユーザー</td>
            <td><input type="text" th:field=*{username} placeholder="Username"/></td>
        </tr>

        <tr>
            <td>パスワード</td>
            <td><input type="password" th:field=*{password} placeholder="Password"/></td>
        </tr>

        <tr>
            <td></td>
            <td>
    			<input type="submit" value="ログイン" />
            </td>
        </tr>
    </table>
    </form>

    <div class="slightly-left">
	<p>アカウントが無い方 <a th:href="@{/register}">新規アカウントを作成</a></p>
    </div>

<footer class="footer">
    <p>© All rights reserved by PALM</p>
</footer>

<script th:inline="javascript">

window.onload =  function() {
	let title = /*[[${title}]]*/"title";

    let element_title = document.getElementById("title");
	element_title.textContent = title;
}

</script>

</body>
おわりに
Spring Securityの認証部分を解説したがネット上の記事では様々な記述があった。例えばSecurityFilterChain型のBeanのloginProcessingUrlでも"/authenticate"以外に"/login"、"/signin"などなど。
一応自前のサンプルでは目的とした動作をしたのでソースとともに公開することにした。コントローラーやサービスなど説明しきれていない部分はソースを参照してほしい。