実行環境
Google Colaboratoryで画像を読み込む為の準備
from google.colab import files
from google.colab import drive
drive.mount('/content/drive')
必要なライブラリの読み込み
import cv2 #opencv
import matplotlib.pyplot as plt
%matplotlib inline
img = plt.imread("/content/drive/My Drive/Colab Notebooks/img/Lenna.bmp")
# ↑この記事からplt.imreadで読み込むことにしました。
いろんな変換
plt.figure(figsize=(9, 6), dpi=100,
           facecolor='w', linewidth=0, edgecolor='w')

# オリジナル画像
plt.subplot(3,3,1)
plt.imshow(img)
plt.subplot(3,3,4)
color = ('b','g','r')
for i,col in enumerate(color):
    histr = cv2.calcHist([img],[i],None,[256],[0,256])
    plt.plot(histr,color = col)
    plt.xlim([0,256])

# グレースケール
plt.subplot(3,3,2)
gray = cv2.cvtColor(img, cv2.COLOR_RGB2GRAY)
plt.imshow(gray)
plt.subplot(3,3,5)
plt.hist(gray.ravel(),256,[0,256])

# 輝度平滑化
plt.subplot(3,3,3)
dst = cv2.equalizeHist(gray)
plt.imshow(dst)
plt.subplot(3,3,6)
plt.hist(dst.ravel(),256,[0,256])

plt.show()
結果
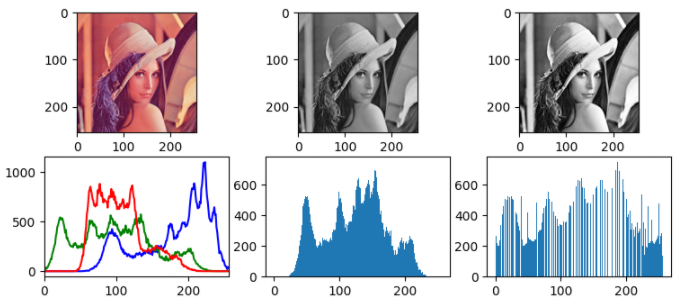
左から、
オリジナル / グレースケール / 輝度平滑化
文法
グレースケール
cv2.cvtColor(src, cv2.COLOR_RGB2GRAY)
輝度平滑化
cv2.equalizeHist(src)
輝度平滑化することでヒストグラムが満遍なく広がり、
明暗がわかりやすくなりましたね。
特徴を検出するにはこの処理をしたほうが良さそう。