はじめに
Photon PUN2の後継と言われているPhoton Fuisionの導入方法についてまとめました。
Fuisonの機能については公式で詳細に記されていますのでこちらをご確認ください。
まず、Fusionは公式に導入から簡単な実装までのチュートリアルがあります。
しかし、現時点(2022/6/22)でのチュートリアルはUnityやFusion,その他関連パッケージのバージョンアップが原因で下記URLのサイトの説明の通りに進めてもうまくいきません。
photon fusion 101 - Getting Started (チュートリアル)
そのため、今回は現時点のそれぞれの最新バージョンを用いて導入する方法についてまとめました。
実装したもの
先に実装するもののゴールについて説明します。
行うこととしては、公式チュートリアルの
・photon fusion 101 - Getting Started (チュートリアル)
・photon fusion 102 - シーンをセットアップする
を現バージョン用に修正します。
GameMode: Host/Cliant Mode(プレイヤーの一人1をHostにして残りのプレイヤーがクライアントになるモードです。オブジェクトの生成や管理は、ホストプレイヤーのPCが処理します。ゲームモードの詳細は公式サイトをご確認ください。)
実装環境
Windows10
Unity 2021.3.41f (ver. 2021.3.5f1でも動作確認済み)
Photon Fusion 1.1.1(Stable)
Mono Cecil 1.11.4

実装方法
まず、この投稿のステップ0~5については、公式の「photon fusion 101 - Getting Started」(上にURLあり)と同じです。そのため、実行環境と同じバージョンであるか、だけ注意して公式サイト通りに進めたので問題はありません。
おそらくバージョンが合っていれば、チュートリアル通りに進めると、公式のステップ7完了時にエラーが出ています。
それらの修正は、本投稿のステップ7で行いますので、公式サイトを見て進めた方は本投稿のステップ7から読み始めてください。
ステップ0 - アカウントとFusion用Photonサーバの作成
まず、Photon のアカウントを作成して、PhotonサーバのAppID(アプリケーションID)を取得するところまで行います。
前提として、1つのアプリケーションにつき1つのAppIDがあれば良いので、
すでにFusionのAppIDがある場合は行う必要はありません。
また、こちらのステップについては公式サイトに簡単で丁寧な説明がありますので、割愛します。
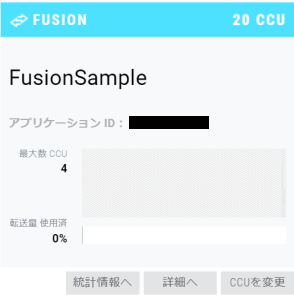
Photonのマイページにこのようなものが作成できていればOKです。
ステップ1- SDKのダウンロード
公式サイトからFuison SDKをダウンロードします。
ダウンロードページはこちら
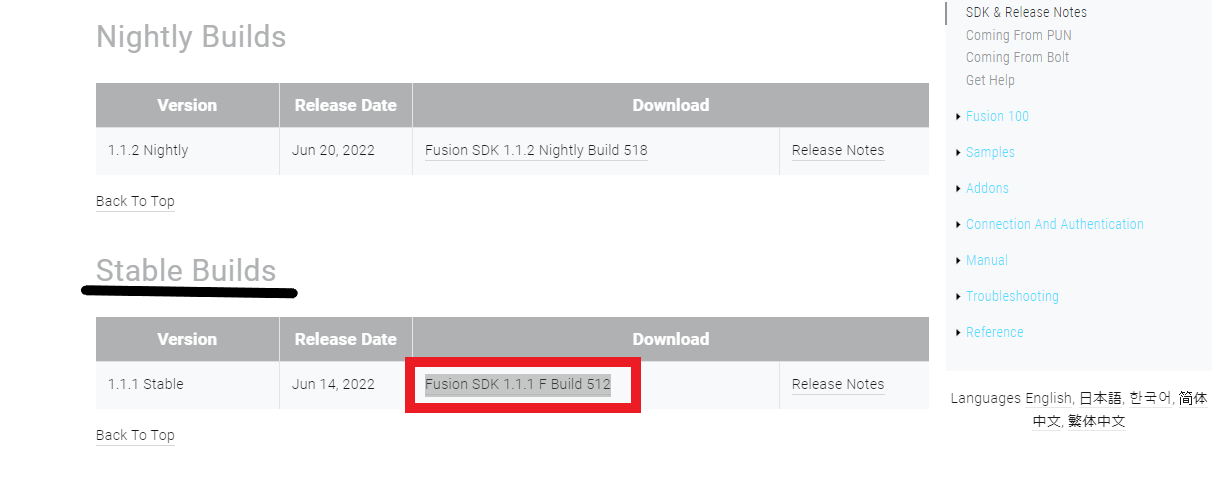
こちらから、Stable Builds の 「Fusion SDK 1.1.1 F Build 512」 をダウンロード
Stable Build の最新verが更新されていれば、最新verでOK
ステップ2 - Unityの要件を確認する
Fusionの実行に必要な最小のUnityバージョンを確認します。今回は、Unity 2021.3.41fを使用しています。
もし、Unity Hubにインストールができていなければ、インストールしておきましょう。
バージョンが変わると一部手順が変わったり、要らなくなったりするので、注意です。
ステップ3 - 空のプロジェクトを作成する

1. 新しいプロジェクトを作成
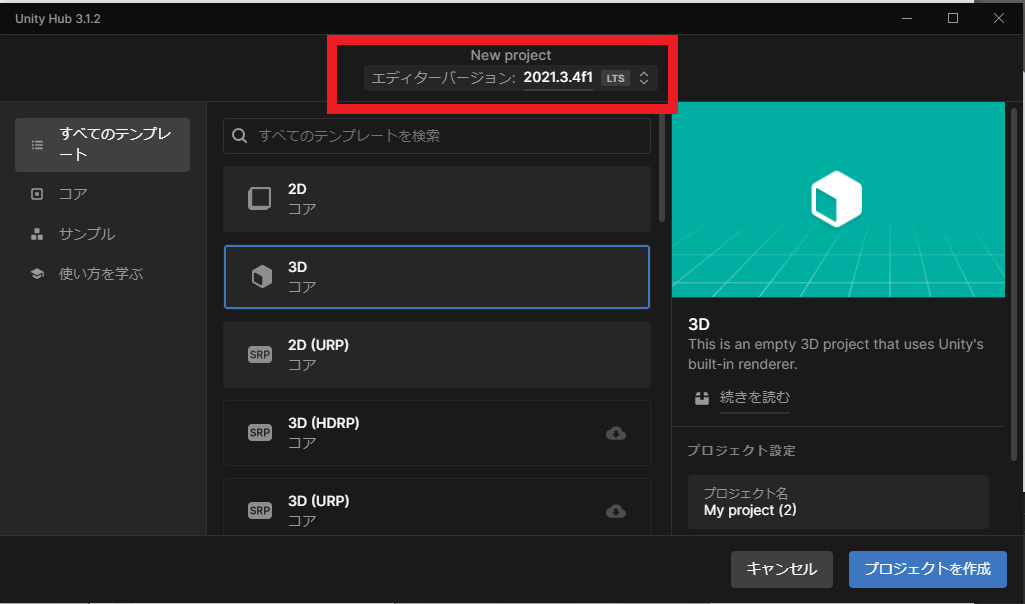
2. Unity エディターバージョン2021.3.4f1を選択
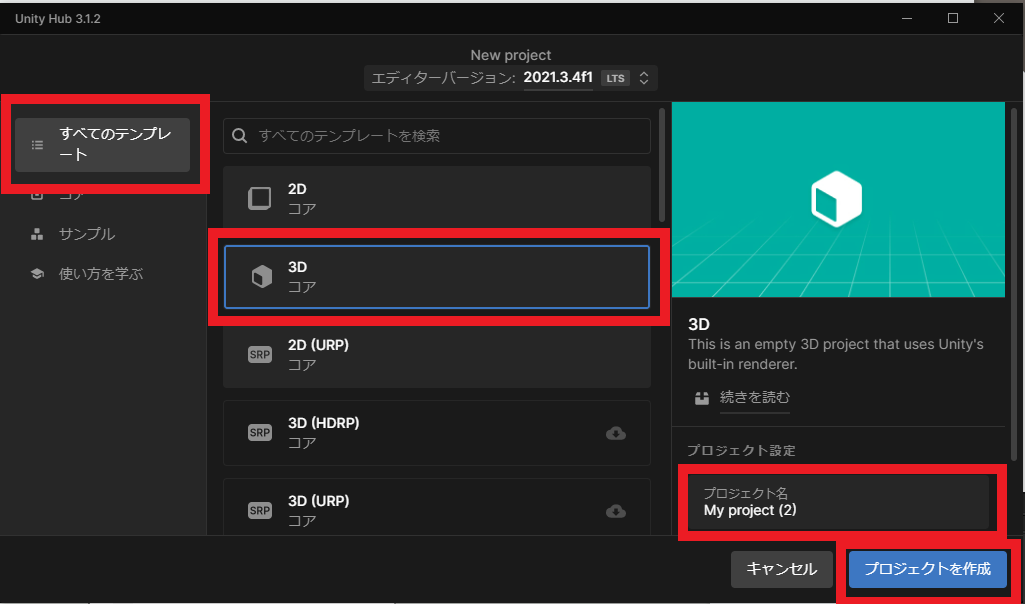
3. 左側の「すべてのテンプレート」を選択した状態で表示される「3D」を選択。
4. 右下のプロジェクト名を任意の名前に変更。(画像は変更前のものですが、私は「FusionSample」としています)
5. 右下の「プロジェクトを作成」を押す。
ステップ4 - Fusion用にプロジェクトを準備する
アセットシリアライゼーション
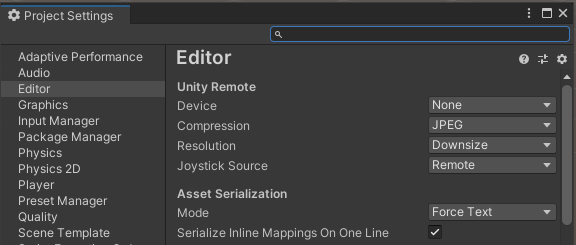
Fusion設定の中にはScriptableObjectアセットに保存されるものがあります。
これらの設定がいつでも読み取り可能であるようにするには、
Edit > Project Settings > Editor > Asset Serialization > Modeで
アセットシリアライゼーションのモードをForce Textにしておく必要があります。
Mono Cecil
Photon FusionではMono Cecilパッケージを使用します。
パッケージはUnity Package Manager経由でインストールできます。
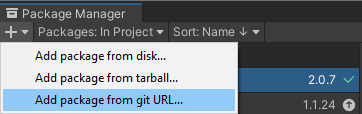
1. Window > Package Managerを開く
2. 左上の「+」のアイコンをクリックして表示される「Add package from git URL」を選択します。
3. 空欄に
com.unity.nuget.mono-cecil
を入力して「add」を押します。
※スペース,改行等が入っていると正常に読み込めないので注意
ステップ 5 - Fusion SDKをインポートする
ステップ0から4を行うと、プロジェクトがFusion SDKをインポートできるようになります。SDKは.unitypackageファイルとして提供され、
Assets > Import Package > Custom Packageツールでインポートできます。
ステップ1でダウンロードしたSDKを保存場所へ移動し、インポートを開始してください。
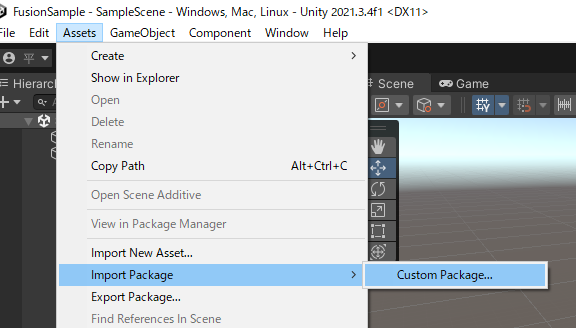
1. Assets > Import Package > Custom Packageツールをクリック。
2. ステップ1でダウンロードしたSDKを保存場所へ移動しファイルを選択。
3. 表示された一覧の右下にある「import」をクリックしてインポート。
この時点でエラーを吐いていると思いますが、後で修正するので、無視してください。
ステップ 6 - App IDを追加する

1. ステップ5完了後上図のよなFusionHubが自動で開かれる。
2. 「Fusion App Id」にステップ0で取得したPhoton Fusion サーバ用のAppIDを入力。
自動でPhoton Hub が開かない場合
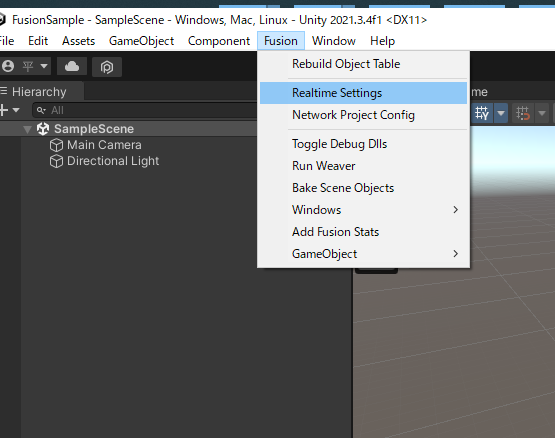
1. Fusion > Realtime Settings を開く

2. App Settingsを開いてApp Id Fusionにステップ0で取得したPhoton Fusion サーバ用のAppIDを入力。
ここまでが公式チュートリアルの
photon fusion 101 - Getting Started
で説明されているプロジェクトにPhoton Fusionを導入するまでの説明です。
ステップ 7 - 現時点でのエラーの修正
それではここからチュートリアルのままでは発生してしまうエラーの修正を行います。
修正するエラーはこちらです。

まず、こちらのエラーについては、
Unity 2021.3.41f + Photon Fusion 1.1.1(Stable)では発生しますが、バージョンの組み合わせ次第では発生しません。
例として、
Fusionのバージョンを1.1.1(Stable)のまま、Unity のバージョンを2020.3.36f1まで下げる
Unity のバージョンを2021.3.41fのまま、Fusionのバージョンを1.1.2(Nightly)に上げる
のどちらかの組み合わせにすることでこのエラーを回避できます。
そのため、Fusionが今後v1.1.2以降のStable Buildを配布するようになれば、このステップの作業は不要です。
また、修正方法については、Photon Fusion ver.1.1.2(Nightly) を参考にしています。
それでは修正していきます。
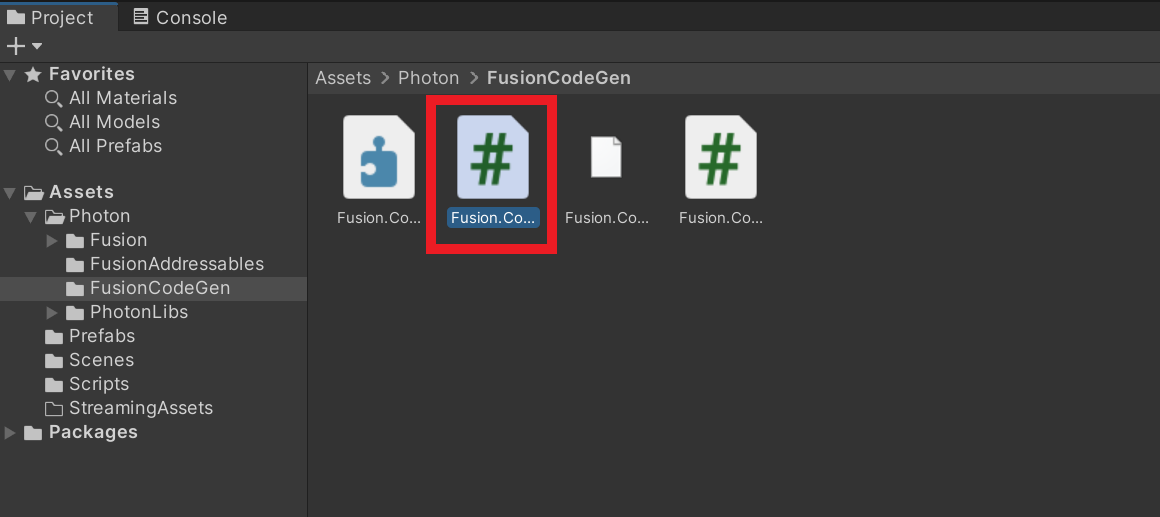
1. Asset/Photon/FusionCodeGen/Fusion.CodeGen/Fusion.CodeGen.csを開く(ステップ7冒頭図のエラーをダブルクリックしても開けます)。
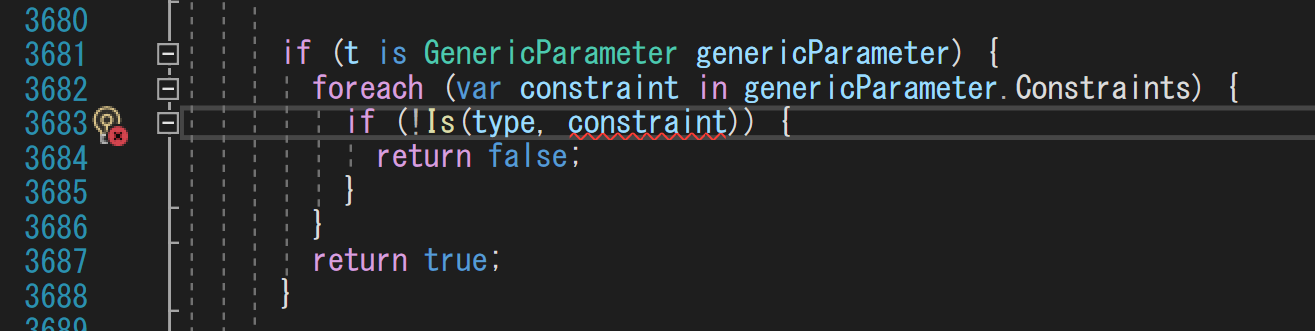
2. エラーがでている箇所に移動する。
×修正前
if (!Is(type, constraint)) {
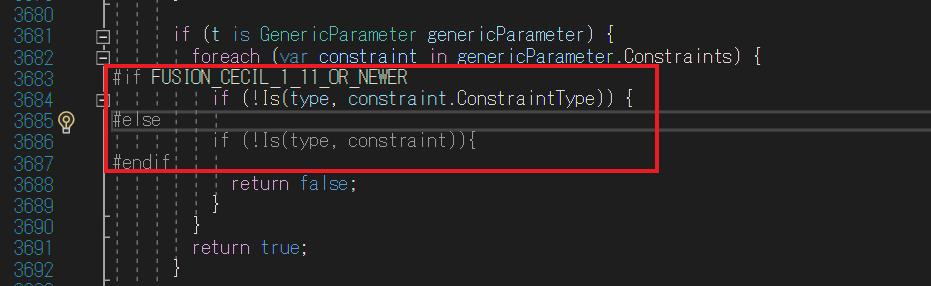
〇修正後
#if FUSION_CECIL_1_11_OR_NEWER
          if (!Is(type, constraint.ConstraintType)) {
#else
          if (!Is(type, constraint)){
#endif
3. コードを上記のように修正します。
4. 上図のようになっていれば、OK.
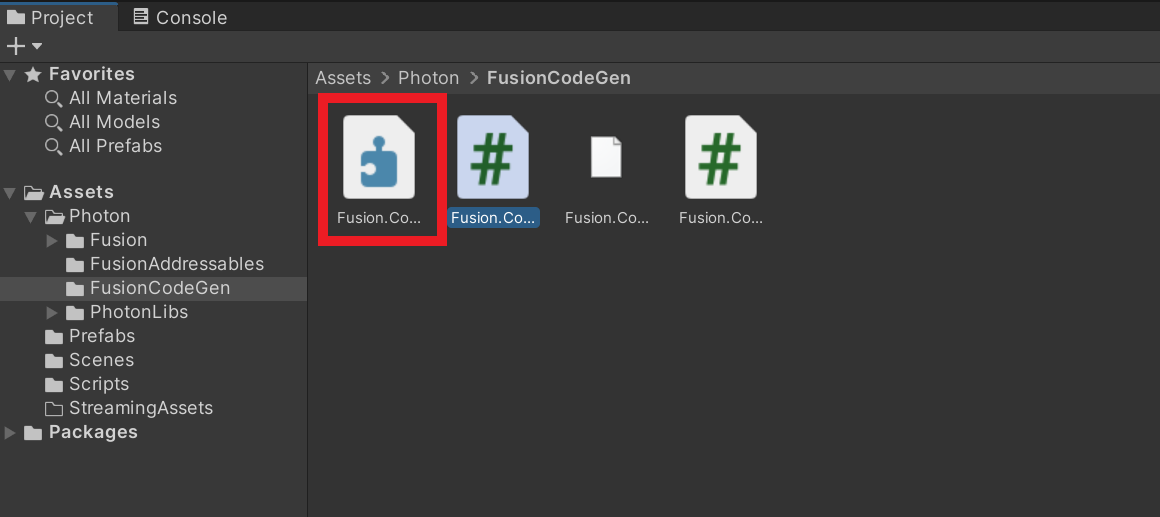
5. 先ほどのC#ファイルと同じディレクトリにあるAsset/Photon/FusionCodeGen/Fusion.CodeGen/Fusion.CodeGen.asmdef を開く
追加する要素
,
{
    "name": "com.unity.nuget.mono-cecil",
    "expression": "1.11",
    "define": "FUSION_CECIL_1_11_OR_NEWER"
}
6. その中の「"versionDefines"」のリストの中に上記要素を追加.
※追加する際、元から存在する要素と追加する要素との間に「 , 」を忘れないようにしましょう。
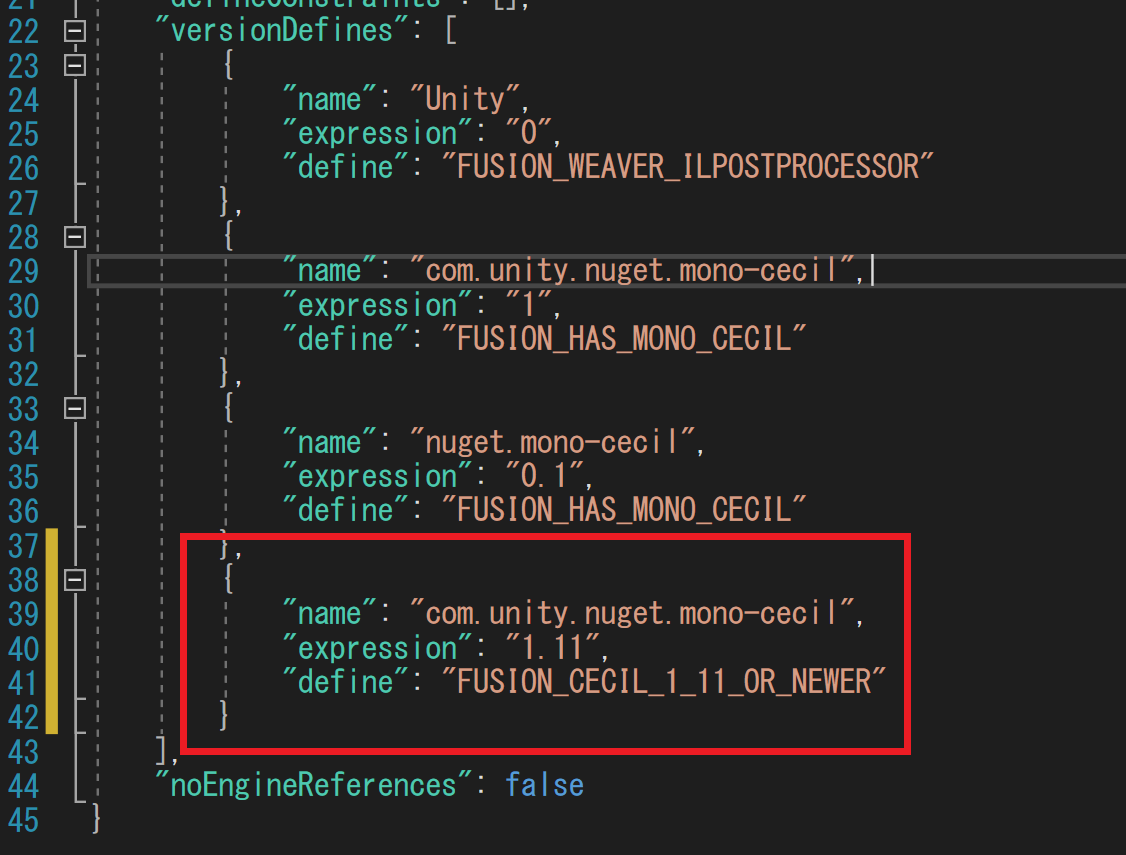
7. 上図のようになっていればOK
以上で修正が完了しました。
次のステップからは、公式チュートリアルの
photon fusion 102 - シーンをセットアップする
を進めていきます。こちらのチュートリアルについても、説明がバージョンアップに対応していないため、一部修正する必要があります。
さらに、ここからは修正箇所も多くあるので、作業は当ページをもとに進めて、関数など機能の説明は公式チュートリアルを参照することをおすすめします。
ステップ 8 - プレイヤー生成オブジェクトの作成
それでは、これから冒頭の動画のものを作っていきます。
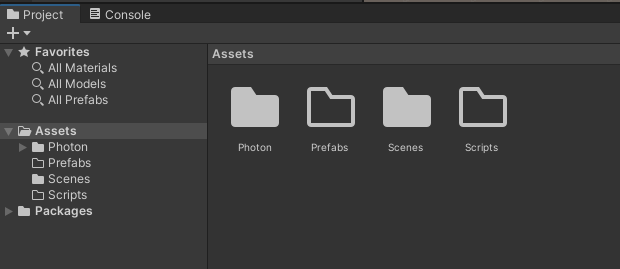
まず、スクリプトファイルやPreFabファイルを格納するためのフォルダを作成します。
1. Assetsフォルダに2つの空のフォルダ「Scripts」「Prefabs」を作成します。
2. 新しい空白のGameObjectを作成し、名前を「BasicSpawner」とする。
3. Scriptsフォルダに移動して「C# Script」ファイルを作成して名前を「BasicSpawner」とする。
4. ScriptファイルをGameObjectにドラッグアンドドロップしてアタッチする。
using System;
using System.Collections.Generic;
using Fusion;
using Fusion.Sockets;
using UnityEngine;
using UnityEngine.SceneManagement;


public class BasicSpawner : MonoBehaviour, INetworkRunnerCallbacks
{
    [SerializeField] private NetworkPrefabRef _playerPrefab;
    private Dictionary<PlayerRef, NetworkObject> _spawnedCharacters = new Dictionary<PlayerRef, NetworkObject>();
    private NetworkRunner _runner;
    private bool _mouseButton0;
    private bool _mouseButton1;

    //Because the game is running in hosted mode, only the host has authority to spawn new objects.
    //This means that all player avatars must be spawned by the host when they join the session.
    //Conveniently, the OnPlayerJoined method of the INetworkRunnerCallbacks interface is called
    //on this exact occasion.
    // Shared Modeの場合、誰かがJoinした際に、全クライアントで実行される。
    public void OnPlayerJoined(NetworkRunner runner, PlayerRef player)
    {
        //Debug.Log("Player Joined - spawning");
        // Create a unique position for the player
        Vector3 spawnPosition = new Vector3(3, 1, 0);
        NetworkObject networkPlayerObject = runner.Spawn(_playerPrefab, spawnPosition, Quaternion.identity, player);
        // Keep track of the player avatars so we can remove it when they disconnect
        _spawnedCharacters.Add(player, networkPlayerObject);


    }
    //Similarly, when a player disconnects, the OnPlayerLeft method is called.
    public void OnPlayerLeft(NetworkRunner runner, PlayerRef player)
    {
        //if (player != runner.LocalPlayer) { return; }
        // Find and remove the players avatar
        if (_spawnedCharacters.TryGetValue(player, out NetworkObject networkObject))
        {
            Debug.Log("despawn");

            runner.Despawn(networkObject);
            _spawnedCharacters.Remove(player);
        }
    }

    public void OnInput(NetworkRunner runner, NetworkInput input)
    {
        var data = new NetworkInputData();

        if (Input.GetKey(KeyCode.W))
            data.direction += Vector3.forward;

        if (Input.GetKey(KeyCode.S))
            data.direction += Vector3.back;

        if (Input.GetKey(KeyCode.A))
            data.direction += Vector3.left;

        if (Input.GetKey(KeyCode.D))
            data.direction += Vector3.right;

        if (_mouseButton0)
            data.buttons |= NetworkInputData.MOUSEBUTTON1;
        _mouseButton0 = false;

        if (_mouseButton1)
            data.buttons |= NetworkInputData.MOUSEBUTTON2;
        _mouseButton1 = false;

        input.Set(data);
    }
    public void OnInputMissing(NetworkRunner runner, PlayerRef player, NetworkInput input) { }
    public void OnShutdown(NetworkRunner runner, ShutdownReason shutdownReason) { }
    public void OnConnectedToServer(NetworkRunner runner) { }
    public void OnDisconnectedFromServer(NetworkRunner runner) { }
    public void OnConnectRequest(NetworkRunner runner, NetworkRunnerCallbackArgs.ConnectRequest request, byte[] token) { }
    public void OnConnectFailed(NetworkRunner runner, NetAddress remoteAddress, NetConnectFailedReason reason) { }
    public void OnUserSimulationMessage(NetworkRunner runner, SimulationMessagePtr message) { }
    public void OnSessionListUpdated(NetworkRunner runner, List<SessionInfo> sessionList) { }
    public void OnCustomAuthenticationResponse(NetworkRunner runner, Dictionary<string, object> data) { }
    public void OnReliableDataReceived(NetworkRunner runner, PlayerRef player, ArraySegment<byte> data) { }
    public void OnHostMigration(NetworkRunner runner, HostMigrationToken hostMigrationToken) { }
    public void OnSceneLoadDone(NetworkRunner runner) { }
    public void OnSceneLoadStart(NetworkRunner runner) { }

    async void StartGame(GameMode mode)
    {
        // Create the Fusion runner and let it know that we will be providing user input
        _runner = gameObject.AddComponent<NetworkRunner>();
        _runner.ProvideInput = true;

        // Start or join (depends on gamemode) a session with a specific name
        await _runner.StartGame(new StartGameArgs()
        {
            GameMode = mode,
            SessionName = "TestRoom",
            Scene = SceneManager.GetActiveScene().buildIndex,
            SceneManager = gameObject.AddComponent<NetworkSceneManagerDefault>()
        });
    }

    private void OnGUI()
    {
        if (_runner == null)
        {
            if (GUI.Button(new Rect(0, 0, 200, 40), "Host"))
            {
                StartGame(GameMode.Host);
            }
            if (GUI.Button(new Rect(0, 40, 200, 40), "Join"))
            {
                StartGame(GameMode.Client);
            }
        }
    }

    private void Update()
    {
        _mouseButton0 = _mouseButton0 | Input.GetMouseButton(0);
        _mouseButton1 = _mouseButton1 || Input.GetMouseButton(1);
    }
}
5. 上記コードをBasicSpawner.csに記入します。関数の呼び出されるタイミング等の詳細な説明は公式のチュートリアルやリファレンスをご確認ください。
ステップ 9 - プレイヤーアバターを作成する
それでは次に各プレイヤーが操作するPrefabを作成します。今回はただのCubeで実装します。必要に応じてPrefabを変更してください。
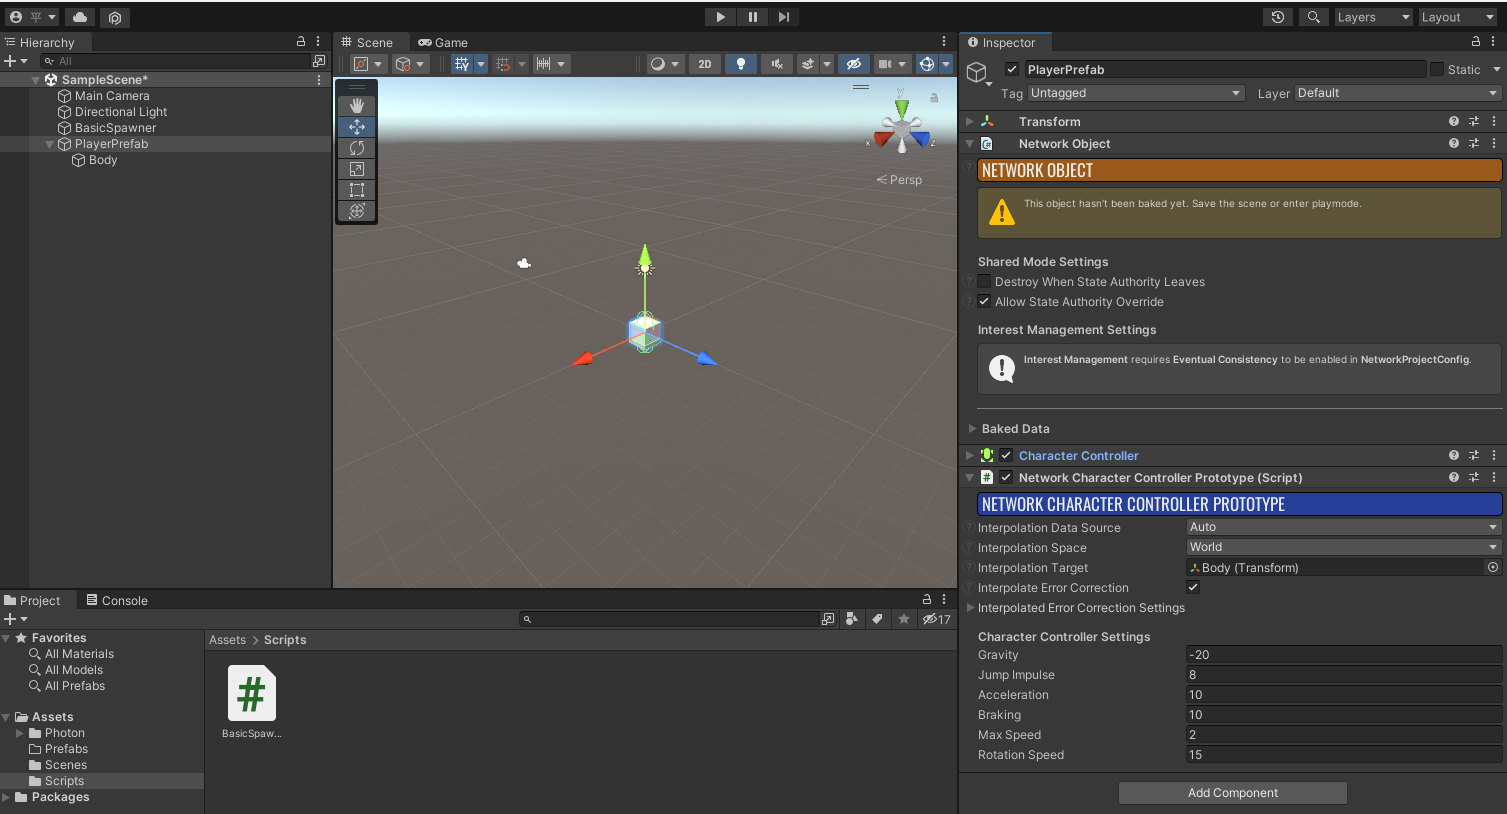
1. 新しい空白のGameObjectを作成し、名前を「PlayerPrefab」にします。
2. 作成した「PlayerPrefab」オブジェクトに以下のコンポーネントを追加します。
・「Network Object」
・「Network Character Controller Prototype」
3. 「PlayerPrefab」オブジェクトの子オブジェクトとして標準のUnityのCubeを追加します。そして、Cubeの名前を「Body」に変更します。
4. 「Body」ゲームオブジェクトを親の「Network Character Controller Prototype」の「Interpolation Target」プロパティにドラッグします。
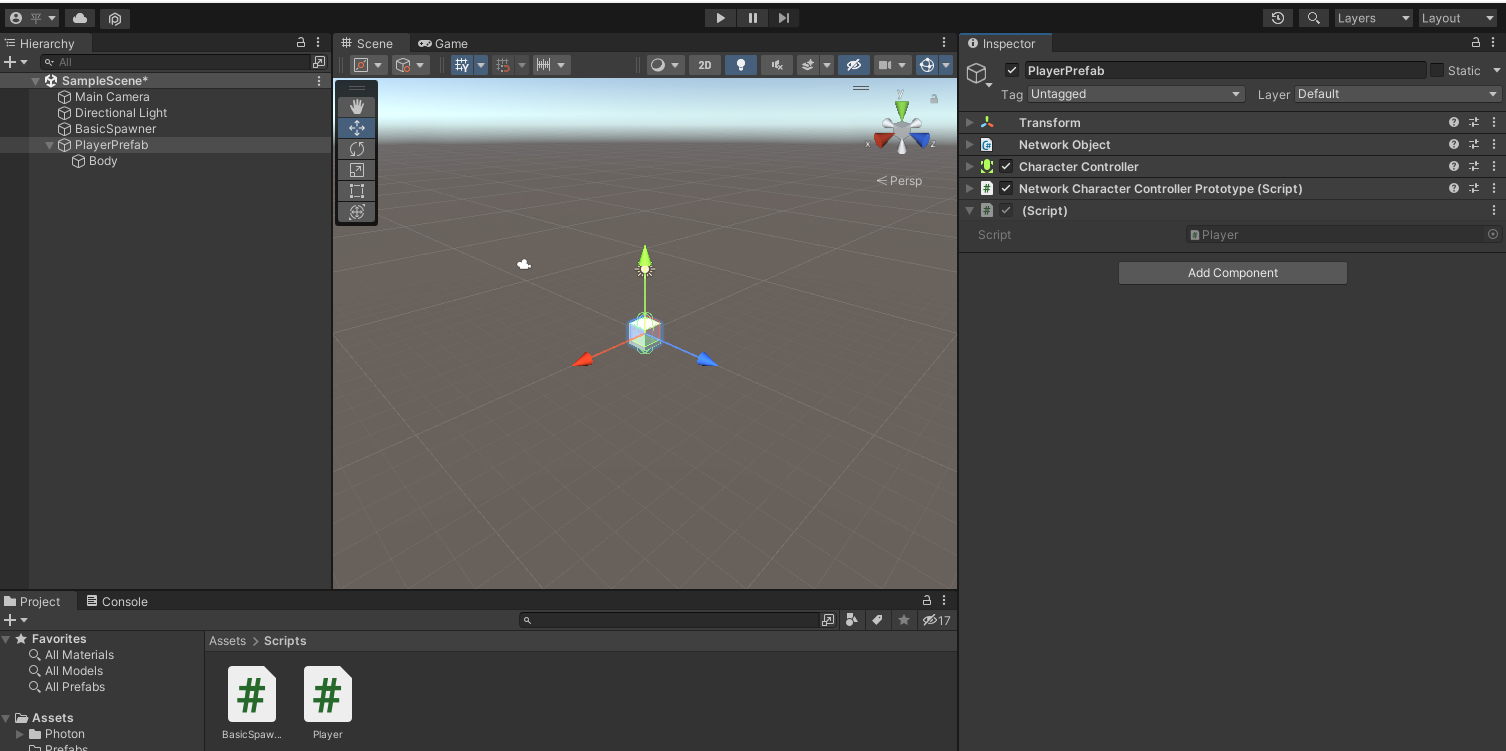
5. Scriptsフォルダに移動して「C# Script」ファイルを作成して名前を「Player」とします。
6. Playerスクリプトに以下を記入します。
using System.Collections;
using System.Collections.Generic;
using UnityEngine;
using Fusion;

public class Player : NetworkBehaviour
{
    private NetworkCharacterControllerPrototype _cc;

    private void Awake()
    {
        _cc = GetComponent<NetworkCharacterControllerPrototype>();
    }

    public override void FixedUpdateNetwork()
    {
        if (GetInput(out NetworkInputData data))
        {
            data.direction.Normalize();
            _cc.Move(5 * data.direction * Runner.DeltaTime);
        }
    }
}
7. 作成した「Player」スクリプトを「PlayerPrefab」オブジェクトに追加します。
ステップ 10 - インプットを実装する
using System.Collections;
using System.Collections.Generic;
using UnityEngine;
using Fusion;
public struct NetworkInputData : INetworkInput
{
    public const byte MOUSEBUTTON1 = 0x01;
    public const byte MOUSEBUTTON2 = 0x02;

    public byte buttons;
    //For simplicity this examples uses a vector to indicate desired movement direction,
    //but know that there are less bandwidth expensive ways of doing this.
    //For example a bitfield with one bit per direction
    public Vector3 direction;
}
- Scriptsフォルダに移動して「C# Script」ファイルを作成して名前を「NetworkInputData」とします。
- 上記コードを「NetworkInputData.cs」に記入します。

3. 作成した「PlayerPrefab」オブジェクトを「Prefabs」フォルダにドラッグアンドドロップします。
4. Hierarchyから「PlayerPrefab」を削除します。
5. HierarchyにUnity標準の「EventSystem」を追加
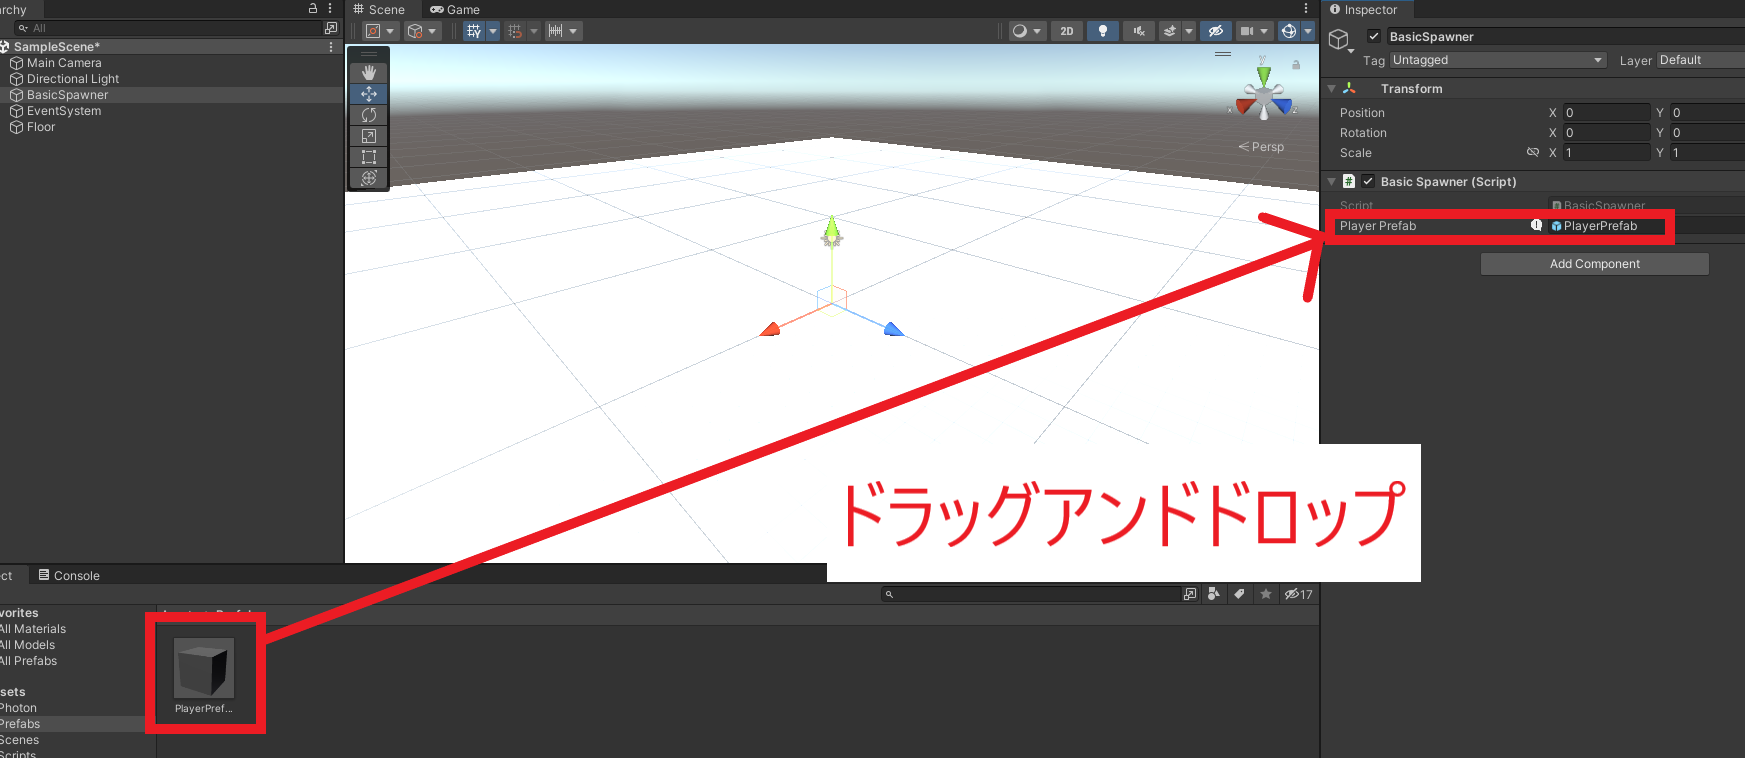
6. 「Prefabs」の「PlayerPrefab」を「BasicSpawner」コンポーネントの「PlayerPrefab」にドラッグアンドドロップする。
ステップ 11 - ステージを実装する
最後にプレイヤーを動かすためのステージを作成します。
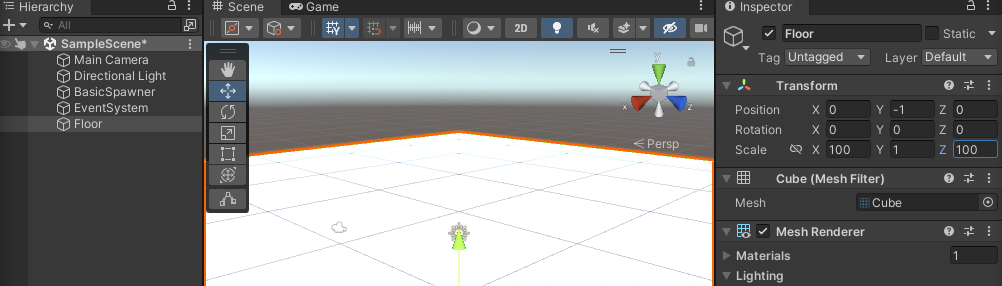
1. Unity標準ののCubeを追加して、名前を「Floor」にします。
2. 「Transform」コンポーネントのパラメータを上図のように修正すれば完成です
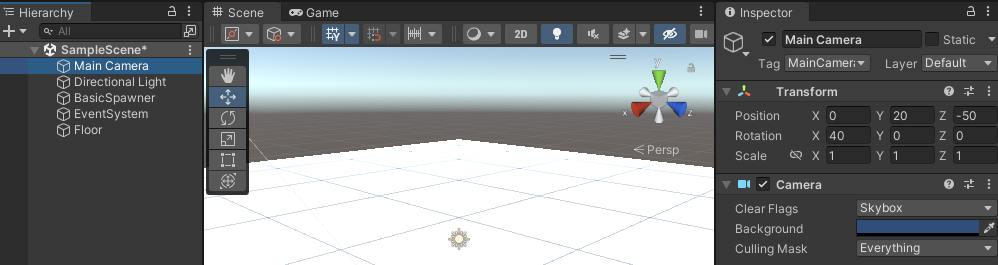
3. 最後に冒頭の動画のアングルにしたい場合のために「MainCamera」の「Transform」コンポーネントのパラメータを記載します。お好みでご利用ください。
4. また、「Floor」や「PlayerPrefab」の色や形などはご自由に変更してください。
ステップ 12 - テストする
これで実装は完了です。
アプリケーションをビルドして複数のインスタンスを起動します(または、Unity内から直接1つのインスタンスを実行します)。
Hostボタンを押すクライアントは1人で、後のクライアントはJoinを押すようにしてください。
プレイヤーのスピード等は、「Network Character Controller Prototype」のパラメータで調整可能です。
Unity内から実行する際に気を付けること
エディタでゲームを実行する場合は、フレームレートが非常に不安定になる可能性があります。フレームレートに不安がある場合は、2つのビルドした実行ファイルからお試しください。