努力せずに料理マスター。
こんにちは。
突然ですが皆さん、料理は好きですか?僕は好きです。
外食よりも格安で済み、手間暇かけたかいもあっておいしく感じる手料理。
工夫をこらした料理を口にして「やっぱ、おふくろにはかなわねえや。ハハッ」とひとりつぶやいて食べる夕食もオツなものです。
さて、そんな僕にはどうしても身に付けたい能力があります。
それがこちら...
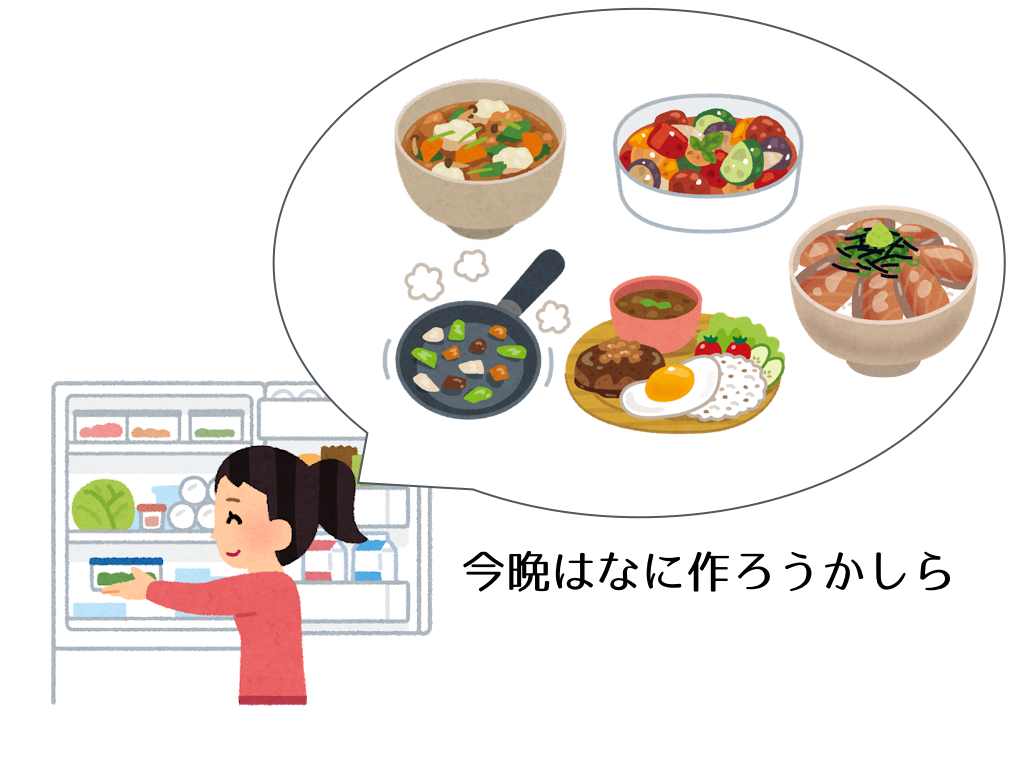
余り物で食卓を間に合わせる能力!!
そう、冷蔵庫を見た瞬間に数千の調理パターンを思い浮かべ最適な料理計画を立てるあの主婦力は、まるで天才騎士藤井聡太を間近で見ているようです。
とはいえ現実的な話、何十年も料理をしているからこそ野生的な勘が磨かれていくのです。明日、藤井聡太になれと言われてもとても無理です。
しかしどうしても野生的な主婦力が欲しい僕はある日ふとこう思いました。
人工知能に勉強させよう
ディープラーニングってやつがなんとかしてくれるなら、PCが熱く演算している時に僕はアイスでも食ってれば自動的に料理マスターになれますね。これぞ平成生まれの生き方です。
概要
今回作るのは、iPhoneを冷蔵庫の中にかざすと食材の画像を認識してその食材を使ったレシピを提案してくれるアプリです。
KerasとVGG16モデルを用いた転移学習によって10種類の野菜に特化した学習済みモデルを構築します。このモデルをCoreMLでiPhone向けのモデルにConvertしてSwiftでアプリケーションに仕上げていきます。(自前の環境でできるように野菜は10種、教師画像の枚数もかなり少なく抑えています。)
環境
Python 3.6.1
Keras 2.1.6
coremltools 0.8
Xcode 9.4.1
前提知識
VGG16とは
VGG16は2014年のILSVRC(ImageNet Large Scale Visual Recognition Challenge)で提案された畳み込み13層とフル結合3層の計16層から成る畳み込みニューラルネットワーク。層の数が多いだけで一般的な畳み込みニューラルネットと大きな違いはなく、同時期に提案されたGoogLeNetに比べるとシンプルでわかりやすい。ImageNetと呼ばれる大規模な画像データセットを使って訓練したモデルが公開されている。
VGG16の出力層は1000ユニットあり、1000クラスを分類するニューラルネットです。世の中のいろんなものを判別してくれて楽しいです。ただ外国で作られているので日本人の視覚にはなじみません。
転移学習とは
すでに学習済みのモデルを用いて新たなモデルを生成する手法です。
画像認識でゼロからモデルを構築するとなると、大量の画像データを集めるのが大変ですし、学習にも膨大な時間がかかります。
学習済みモデルでは、画像の特徴を抽出する層と画像の分類を行う層に分かれています。転移学習ではこの分類を行う層を新しいものにすり替えることで、画像の特徴抽出の能力を活かしつつ、目標とする分類を行います。
今回はVGG16を特徴抽出器として使います。VGG16は図のように畳み込み層のブロックが5つ続いたあとに全結合層のブロックが続く構成になっています。VGG16の全結合層はImageNetの1000クラスを分類するようになっているためそのままでは10クラスの野菜分類には使えません。
そこで、この全結合層を捨ててしまって直前の畳み込みブロックまでを特徴量抽出器として使うのがこの手法のキモです。
VGG16モデルの全結合層を外して新たに全結合層を追加し、15層以降のみを学習させます。(14層までの重みは凍結します。)
なお、転移学習とFine tuningはほぼ同じものとして扱われることが多いですが厳密には少し違うそうです。
(参考) https://www.quora.com/What-is-the-difference-between-transfer-learning-and-fine-tuning
今回は転移学習にあたります。
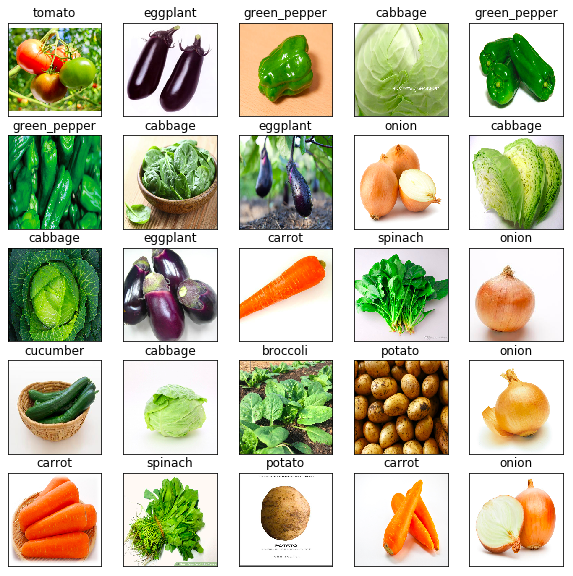
野菜たちの画像を集める
まずは学習に必要な画像を集めましょう。今回集める野菜はいかにも冷蔵庫にありそうなこの10種にします。
ブロッコリー(broccoli)
キャベツ(cabbage)
にんじん(carrot)
きゅうり(cucumber)
なす(eggplant)
ピーマン(green_pepper)
玉ねぎ(onion)
じゃがいも(potato)
ほうれんそう(spinach)
トマト(tomato)
画像集めは合計400枚くらい集めなきゃで結構な労働です。画像収集用のスクリプトを書いて一気に集めて、不要なものを削除していく方法がおすすめです。
参考までに使っていたスクリプトを掲載しておきます。
import os
from urllib import request as req
from urllib import error
from urllib import parse
import bs4

keyword = input('食材名を入力してください:')
if not os.path.exists(keyword):
  os.mkdir(keyword)

urlKeyword = parse.quote(keyword)
url = 'https://www.google.com/search?hl=jp&q=' + urlKeyword + '&btnG=Google+Search&tbs=0&safe=off&tbm=isch'

headers = {"User-Agent": "Mozilla/5.0 (X11; Ubuntu; Linux x86_64; rv:47.0) Gecko/20100101 Firefox/47.0",}
request = req.Request(url=url, headers=headers)
page = req.urlopen(request)

html = page.read().decode('utf-8')
html = bs4.BeautifulSoup(html, "html.parser")
elems = html.select('.rg_meta.notranslate')
counter = 0
for ele in elems:
    ele = ele.contents[0].replace('"','').split(',')
    eledict = dict()
    for e in ele:
        num = e.find(':')
        eledict[e[0:num]] = e[num+1:]
    imageURL = eledict['ou']

    pal = '.jpg'
学習済みモデルの構築
必要なモジュールをインストールします
from keras.models import Model
from keras.layers import Dense, GlobalAveragePooling2D, Input
from keras.applications.vgg16 import VGG16
from keras.preprocessing.image import ImageDataGenerator
from keras.optimizers import SGD
from keras.callbacks import CSVLogger
次にモデルを定義していきます。
n_categories = 10  # 10種類の野菜
batch_size = 32
train_dir = '~/Downloads/veg_dir/train/'
validation_dir = '~/Downloads/veg_dir/validation/'
file_name = 'vgg16_veg_file'

# 全結合層はいらないのでinclude_top=False
base_model = VGG16(weights='imagenet', include_top=False, input_tensor=Input(shape=(224,224,3)))

# 全結合層を付け加える
x = base_model.output
x = GlobalAveragePooling2D()(x)
x = Dense(1024, activation='relu')(x)
prediction = Dense(n_categories, activation='softmax')(x)
model = Model(inputs=base_model.input, outputs=prediction)

# 14層目までを凍結
for layer in base_model.layers[:15]:
    layer.trainable = False

# 確率的勾配降下法
model.compile(optimizer=SGD(lr=0.0001, momentum=0.9), loss='categorical_crossentropy', metrics=['accuracy'])
model.summary()

# モデルをjsonで保存
json_string = model.to_json()
f = open('vgg16_veg_fine.json', 'w')
f.write(json_string)
f.close()
モデルの構造は下のようになります。今回はblock5以降の層を学習させます。
_________________________________________________________________
Layer (type)                 Output Shape              Param #
=================================================================
input_1 (InputLayer)         (None, 224, 224, 3)       0
_________________________________________________________________
block1_conv1 (Conv2D)        (None, 224, 224, 64)      1792
_________________________________________________________________
block1_conv2 (Conv2D)        (None, 224, 224, 64)      36928
_________________________________________________________________
block1_pool (MaxPooling2D)   (None, 112, 112, 64)      0
_________________________________________________________________
block2_conv1 (Conv2D)        (None, 112, 112, 128)     73856
_________________________________________________________________
block2_conv2 (Conv2D)        (None, 112, 112, 128)     147584
_________________________________________________________________
block2_pool (MaxPooling2D)   (None, 56, 56, 128)       0
_________________________________________________________________
block3_conv1 (Conv2D)        (None, 56, 56, 256)       295168
_________________________________________________________________
block3_conv2 (Conv2D)        (None, 56, 56, 256)       590080
_________________________________________________________________
block3_conv3 (Conv2D)        (None, 56, 56, 256)       590080
_________________________________________________________________
block3_pool (MaxPooling2D)   (None, 28, 28, 256)       0
_________________________________________________________________
block4_conv1 (Conv2D)        (None, 28, 28, 512)       1180160
_________________________________________________________________
block4_conv2 (Conv2D)        (None, 28, 28, 512)       2359808
_________________________________________________________________
block4_conv3 (Conv2D)        (None, 28, 28, 512)       2359808
_________________________________________________________________
block4_pool (MaxPooling2D)   (None, 14, 14, 512)       0
_________________________________________________________________
block5_conv1 (Conv2D)        (None, 14, 14, 512)       2359808
_________________________________________________________________
block5_conv2 (Conv2D)        (None, 14, 14, 512)       2359808
_________________________________________________________________
block5_conv3 (Conv2D)        (None, 14, 14, 512)       2359808
_________________________________________________________________
block5_pool (MaxPooling2D)   (None, 7, 7, 512)         0
_________________________________________________________________
global_average_pooling2d_1 ( (None, 512)               0
_________________________________________________________________
dense_1 (Dense)              (None, 1024)              525312
_________________________________________________________________
dense_2 (Dense)              (None, 10)                10250
=================================================================
Total params: 15,250,250
Trainable params: 7,614,986
Non-trainable params: 7,635,264
_________________________________________________________________
学習済モデルの評価
# rescale: 画素値のリスケーリング係数
# shear_range: 反時計周りのシアー角度
# zoom_range: ランダムにズームする範囲
# horizontal_flip: 水平方向に入力をランダムに反転する
train_datagen = ImageDataGenerator(
    rescale=1.0 / 255,
    shear_range=0.2,
    zoom_range=0.2,
    horizontal_flip=True
)

validation_datagen = ImageDataGenerator(
    rescale=1.0/ 255
)

train_generator = train_datagen.flow_from_directory(
    train_dir,
    target_size=(224,224),
    batch_size=batch_size,
    class_mode='categorical',
    shuffle=True
)

validation_generator = validation_datagen.flow_from_directory(
    validation_dir,
    target_size=(224,224),
    batch_size=batch_size,
    class_mode='categorical',
    shuffle=True
)
それでは学習させましょう。CPUでやるなら一晩かかります。PCが熱を持つので抱いて寝ましょう。
hist = model.fit_generator(
    train_generator,
    epochs=100,
    verbose=1,
    validation_data=validation_generator,
    callbacks=[CSVLogger(file_name+'.csv')]
)
model.save(file_name+'.h5')
from keras.models import model_from_json
import matplotlib.pyplot as plt
import numpy as np
import os, random
from keras.preprocessing.image import img_to_array, load_img
from keras.preprocessing.image import ImageDataGenerator
from keras.optimizers import SGD

batch_size = 32
file_name = "vgg16_veg_file"
test_dir = '~/Downloads/veg_dir/test'
display_dir = '~/Downloads/veg_dir/display'

# trainディレクトリのフォルダ名の順序通り並べます
label = ['broccoli', 'cabbage', 'carrot', 'cucumber', 'eggplant', 'green_pepper', 'onion', 'potato', 'spinach','tomato']

json_string = open(file_name + '.json').read()
model = model_from_json(json_string)
model.load_weights(file_name + '.h5')

model.compile(optimizer=SGD(lr=0.0001, momentum=0.9), loss='categorical_crossentropy', metrics=['accuracy'])
test_datagen = ImageDataGenerator(rescale=1.0/255)

test_generator = test_datagen.flow_from_directory(
    test_dir,
    target_size=(224,224),
    batch_size=batch_size,
    class_mode='categorical',
    shuffle=True
)

score = model.evaluate_generator(test_generator)
print('\n test loss:', score[0])
print('\n test acc :', score[1])

files = os.listdir(display_dir)
img = random.sample(files, 25)

plt.figure(figsize=(10,10))
for i in range(25):
    temp_img = load_img(os.path.join(display_dir, img[i]), target_size=(224,224))
    plt.subplot(5,5,i+1)
    plt.imshow(temp_img)
    temp_img_array = img_to_array(temp_img)
    temp_img_array = temp_img_array.astype('float32') / 255.0
    temp_img_array = temp_img_array.reshape((1,224,224,3))

    img_pred = model.predict(temp_img_array)
    plt.title(label[np.argmax(img_pred)])
    plt.xticks([]), plt.yticks([])

plt.show()
私の環境では以下のような精度になりました。
test loss: 0.4294925645144299
test acc : 0.9191919197939863
CoreMLで学習済みモデルをConvert
こちらが非常に参考になりました。
(参考) https://qiita.com/kenmaz/items/d416b191f79f60e07752
CoreMLToolsのインストール。
pip install coremltools
次のようなテキストファイルを作ります。
broccoli
cabbage
carrot
cucumber
eggplant
green_pepper
onion
potato
spinach
tomato
.h5->.mlmodelへの変換コードを作ります。
path = '../keras/model.h5'

import coremltools
coreml_model = coremltools.converters.keras.convert(path,
        input_names = 'image',
        image_input_names = 'image',
        class_labels = 'labels.txt')
coreml_model.save('vegrecognition.mlmodel')
iOSモデルへの組み込み
基本的にここのコードを流用しています。
(参考) https://www.pyimagesearch.com/2018/04/23/running-keras-models-on-ios-with-coreml/
Main.storyboard消したり等、初期設定が必要なので上記URLの手順に従ってください。
import UIKit
import AVFoundation
import Vision

class ViewController: UIViewController, AVCaptureVideoDataOutputSampleBufferDelegate {

    // create a label to hold the Pokemon name and confidence
    let label: UILabel = {
        let label = UILabel()
        label.textColor = .white
        label.translatesAutoresizingMaskIntoConstraints = false
        label.text = "Label"
        label.font = label.font.withSize(30)
        return label
    }()

    override func viewDidLoad() {
        // call the parent function
        super.viewDidLoad()

        // establish the capture session and add the label
        setupCaptureSession()
        view.addSubview(label)
        setupLabel()
    }

    override func didReceiveMemoryWarning() {
        // call the parent function
        super.didReceiveMemoryWarning()

        // Dispose of any resources that can be recreated.
    }

    func setupCaptureSession() {
        // create a new capture session
        let captureSession = AVCaptureSession()

        // find the available cameras
        let availableDevices = AVCaptureDevice.DiscoverySession(deviceTypes: [.builtInWideAngleCamera], mediaType: AVMediaType.video, position: .back).devices

        do {
            // select a camera
            if let captureDevice = availableDevices.first {
                captureSession.addInput(try AVCaptureDeviceInput(device: captureDevice))
            }
        } catch {
            // print an error if the camera is not available
            print(error.localizedDescription)
        }

        // setup the video output to the screen and add output to our capture session
        let captureOutput = AVCaptureVideoDataOutput()
        captureSession.addOutput(captureOutput)
        let previewLayer = AVCaptureVideoPreviewLayer(session: captureSession)
        previewLayer.frame = view.frame
        view.layer.addSublayer(previewLayer)

        // buffer the video and start the capture session
        captureOutput.setSampleBufferDelegate(self, queue: DispatchQueue(label: "videoQueue"))
        captureSession.startRunning()
    }

    func captureOutput(_ output: AVCaptureOutput, didOutput sampleBuffer: CMSampleBuffer, from connection: AVCaptureConnection) {
        // load our CoreML Pokedex model
        guard let model = try? VNCoreMLModel(for: vegrecognition().model) else { return }

        // run an inference with CoreML
        let request = VNCoreMLRequest(model: model) { (finishedRequest, error) in

            // grab the inference results
            guard let results = finishedRequest.results as? [VNClassificationObservation] else { return }

            // grab the highest confidence result
            guard let Observation = results.first else { return }

            // create the label text components
            let predclass = "\(Observation.identifier)"
            let predconfidence = String(format: "%.02f%", Observation.confidence * 100)

            // set the label text
            DispatchQueue.main.async(execute: {
                self.label.text = "\(predclass) \(predconfidence)"
            })
        }

        // create a Core Video pixel buffer which is an image buffer that holds pixels in main memory
        // Applications generating frames, compressing or decompressing video, or using Core Image
        // can all make use of Core Video pixel buffers
        guard let pixelBuffer: CVPixelBuffer = CMSampleBufferGetImageBuffer(sampleBuffer) else { return }

        // execute the request
        try? VNImageRequestHandler(cvPixelBuffer: pixelBuffer, options: [:]).perform([request])
    }

    func setupLabel() {
        // constrain the label in the center
        label.centerXAnchor.constraint(equalTo: view.centerXAnchor).isActive = true

        // constrain the the label to 50 pixels from the bottom
        label.bottomAnchor.constraint(equalTo: view.bottomAnchor, constant: -50).isActive = true
    }

}
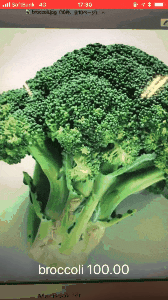
若干精度に問題はありますが、30枚程度の教師データでもそれなりの画像認識器ができました。
レシピAPIとの接続
野菜を検出できたら次はレシピを検索します。
今回は野菜名は英語で取得されるので、海外のレシピAPIを叩きます。
こちらの"Recipe Search"というAPIを使います。Application IDとApplication Keysを取得してください。
https://www.edamam.com/
例えば、下のURLはtomatoのレシピを取得するURLです。
https://api.edamam.com/search?q=tomato&app_id=[YOUR_APP_ID]&app_key=[YOUR_APP_KEY]&from=0&to=1
では、これを先ほどのSwiftコードに乗せていきましょう。
iPhoneを接続してRunすると中央にボタンが表示されているはずです。そのボタンをタップするとその時判定されている野菜名でレシピを検索して、料理名とレシピURLがデバッグコンソールに表示されると思います。
(レシピをアプリ上で表示する機能は本記事では割愛します。)
import UIKit
import AVFoundation
import Vision
import Foundation

class ViewController: UIViewController, AVCaptureVideoDataOutputSampleBufferDelegate {

    // ラベルのインスタンス生成
    let btnlabel = UILabel()
    var count = 0

    var vegname: String = ""

    // create a label to hold the Pokemon name and confidence
    let label: UILabel = {
        let label = UILabel()
        label.textColor = .white
        label.translatesAutoresizingMaskIntoConstraints = false
        label.text = "Label"
        label.font = label.font.withSize(30)
        return label
    }()

    struct RecipeJson: Codable {
        let hits: [Hits]
        struct Hits:Codable {
            let recipe: Recipe
        }
        struct Recipe:Codable {
            let label: String
            let url: URL
        }
    }

    override func viewDidLoad() {
        // call the parent function
        super.viewDidLoad()

        // establish the capture session and add the label
        setupCaptureSession()
        view.addSubview(label)
        setupLabel()

        // ボタンはコードで直に設置します
        let screenWidth:CGFloat = self.view.frame.width
        let screenHeight:CGFloat = self.view.frame.height
        let button = UIButton()
        button.frame = CGRect(x:screenWidth/4, y:screenHeight/2, width:screenWidth/2, height:50)
        button.setTitle("Tap me!", for:UIControlState.normal)
        button.titleLabel?.font =  UIFont.systemFont(ofSize: 36)
        button.backgroundColor = UIColor.init(
            red:0.9, green: 0.9, blue: 0.9, alpha: 1)
        button.addTarget(self,
                         action: #selector(ViewController.buttonTapped(sender:)),
                         for: .touchUpInside)
        self.view.addSubview(button)
        btnlabel.frame = CGRect(x:screenWidth/4, y:200, width:screenWidth/2, height:50);
        btnlabel.text = "Swift Test"
        btnlabel.textAlignment = NSTextAlignment.center
        btnlabel.font = UIFont.systemFont(ofSize: 36)
        self.view.addSubview(label)
    }

    override func didReceiveMemoryWarning() {
        // call the parent function
        super.didReceiveMemoryWarning()

        // Dispose of any resources that can be recreated.
    }

    @objc func buttonTapped(sender : AnyObject) {
        count += 1
        print("btn pressed")
        searchRecipe(keyword: self.vegname)
    }

    func searchRecipe(keyword: String) {
        guard let keyword_encode = keyword.addingPercentEncoding(withAllowedCharacters: .urlQueryAllowed) else {
            return
        }

        guard let req_url = URL(string: "https://api.edamam.com/search?q=\(keyword_encode)&app_id=[YOUR_APP_ID]&app_key=[YOUR_APP_KEY]&from=0&to=1") else {
            return
        }
        print(req_url)

        let task = URLSession.shared.dataTask(with: req_url) { data, response, error in
            if let data = data, let response = response {
                print(response)
                do {
                    let json = try JSONDecoder().decode(RecipeJson.self, from: data)
                    print(json.hits)
                    print(json.hits[0].recipe.label)
                    print(json.hits[0].recipe.url)
                } catch {
                    print("Serialize Error")
                }
            } else {
                print(error ?? "Error")
            }
        }

        task.resume()
    }

    func setupCaptureSession() {
        // create a new capture session
        let captureSession = AVCaptureSession()

        // find the available cameras
        let availableDevices = AVCaptureDevice.DiscoverySession(deviceTypes: [.builtInWideAngleCamera], mediaType: AVMediaType.video, position: .back).devices

        do {
            // select a camera
            if let captureDevice = availableDevices.first {
                captureSession.addInput(try AVCaptureDeviceInput(device: captureDevice))
            }
        } catch {
            // print an error if the camera is not available
            print(error.localizedDescription)
        }

        // setup the video output to the screen and add output to our capture session
        let captureOutput = AVCaptureVideoDataOutput()
        captureSession.addOutput(captureOutput)
        let previewLayer = AVCaptureVideoPreviewLayer(session: captureSession)
        previewLayer.frame = view.frame
        view.layer.addSublayer(previewLayer)

        // buffer the video and start the capture session
        captureOutput.setSampleBufferDelegate(self, queue: DispatchQueue(label: "videoQueue"))
        captureSession.startRunning()
    }

    func captureOutput(_ output: AVCaptureOutput, didOutput sampleBuffer: CMSampleBuffer, from connection: AVCaptureConnection) {
        // load our CoreML Pokedex model
        guard let model = try? VNCoreMLModel(for: vegrecognition().model) else { return }

        // run an inference with CoreML
        let request = VNCoreMLRequest(model: model) { (finishedRequest, error) in

            // grab the inference results
            guard let results = finishedRequest.results as? [VNClassificationObservation] else { return }

            // grab the highest confidence result
            guard let Observation = results.first else { return }

            // create the label text components
            let predclass = "\(Observation.identifier)"
            let predconfidence = String(format: "%.02f%", Observation.confidence * 100)

            // set the label text
            DispatchQueue.main.async(execute: {
                self.label.text = "\(predclass) \(predconfidence)"
                self.vegname = "\(predclass)"
            })
        }

        // create a Core Video pixel buffer which is an image buffer that holds pixels in main memory
        // Applications generating frames, compressing or decompressing video, or using Core Image
        // can all make use of Core Video pixel buffers
        guard let pixelBuffer: CVPixelBuffer = CMSampleBufferGetImageBuffer(sampleBuffer) else { return }

        // execute the request
        try? VNImageRequestHandler(cvPixelBuffer: pixelBuffer, options: [:]).perform([request])
    }

    func setupLabel() {
        // constrain the label in the center
        label.centerXAnchor.constraint(equalTo: view.centerXAnchor).isActive = true

        // constrain the the label to 50 pixels from the bottom
        label.bottomAnchor.constraint(equalTo: view.bottomAnchor, constant: -50).isActive = true
    }

}
デバッグコンソールにこのように表示されていれば成功です。
Tomato Gravy
http://www.seriouseats.com/recipes/2013/01/sauced-tomato-gravy-recipe.html
ここではトマトを検出してトマトカレー的なものが出てきました!
ひとこと
最低限の機能は手持ちのMacBookでもサクッと作れました。
発展の方向性として
・食材の種類を増やす
・教師データの数を増やす
・SSD, YOLOなどのリアルタイム物体検出と連携させる
などがありそうですねー。