■はじめに
今回はコードの整形ツールを紹介します。
■開発環境
- Windows 10
- Visual Studio Community 2019 (Version 16.6.3)
- WPF App (.NET Core)
■整形前後のXamlコード
先に整形前後のXamlサンプルをお見せします。
◇整形前
一行に複数のプロパティやイベントハンドラが書かれていて、右にスクロールしないと全部見えません。
<Window x:Class="WpfApp20200705.MainWindow"
        xmlns="http://schemas.microsoft.com/winfx/2006/xaml/presentation"
        xmlns:x="http://schemas.microsoft.com/winfx/2006/xaml"
        xmlns:d="http://schemas.microsoft.com/expression/blend/2008"
        xmlns:mc="http://schemas.openxmlformats.org/markup-compatibility/2006"
        xmlns:local="clr-namespace:WpfApp20200705"
        mc:Ignorable="d"
        Title="MainWindow" Height="450" Width="800" ResizeMode="CanResizeWithGrip">
    <Window.Resources>
        <!-- ツールボタンスタイル -->
        <Style x:Key="ToolButtonStyle" TargetType="Button">
            <Setter Property="Margin" Value="5"/>
            <Setter Property="Padding" Value="15,5"/>
        </Style>
    </Window.Resources>
    <Grid>
        <!-- グリッドのカラム定義 -->
        <Grid.ColumnDefinitions>
            <ColumnDefinition Width="1*"/>
            <ColumnDefinition Width="4*"/>
        </Grid.ColumnDefinitions>
        <!-- グリッドの行定義 -->
        <Grid.RowDefinitions>
            <RowDefinition Height="Auto"/>
            <RowDefinition/>
        </Grid.RowDefinitions>

        <!-- ツールバー -->
        <StackPanel Orientation="Horizontal" Grid.ColumnSpan="2" Background="Honeydew">
            <Button x:Name="newButton" Content="新規" Style="{StaticResource ToolButtonStyle}" Click="newButton_Click"/>
            <Button x:Name="openButton" Content="開く" Style="{StaticResource ToolButtonStyle}" Click="openButton_Click"/>
            <Button x:Name="saveButton" Content="保存" Style="{StaticResource ToolButtonStyle}" Click="saveButton_Click"/>
            <Button x:Name="helpButton" Content="ヘルプ" Style="{StaticResource ToolButtonStyle}" Click="helpButton_Click"/>
        </StackPanel>

        <!-- 左のリスト -->
        <ListBox x:Name="hogehogeList" Grid.Row="1" Background="LightCyan" SelectionChanged="hogehogeList_SelectionChanged"/>

        <!-- 右の編集エリア -->
        <TextBox x:Name="editText" Grid.Column="1" Grid.Row="1" Text="こんにちは" TextWrapping="Wrap" VerticalScrollBarVisibility="Visible" FontSize="18"/>

    </Grid>
</Window>
◇整形後
綺麗に整いました。
なるべく一行に一つの要素だけ書くようにしておくと、見やすいし修正前後の差分も確認しやすくなります。
<Window
    x:Class="WpfApp20200705.MainWindow"
    xmlns="http://schemas.microsoft.com/winfx/2006/xaml/presentation"
    xmlns:x="http://schemas.microsoft.com/winfx/2006/xaml"
    xmlns:d="http://schemas.microsoft.com/expression/blend/2008"
    xmlns:local="clr-namespace:WpfApp20200705"
    xmlns:mc="http://schemas.openxmlformats.org/markup-compatibility/2006"
    Title="MainWindow"
    Width="800"
    Height="450"
    ResizeMode="CanResizeWithGrip"
    mc:Ignorable="d">
    <Window.Resources>
        <!--  ツールボタンスタイル  -->
        <Style x:Key="ToolButtonStyle" TargetType="Button">
            <Setter Property="Margin" Value="5" />
            <Setter Property="Padding" Value="15,5" />
        </Style>
    </Window.Resources>
    <Grid>
        <!--  グリッドのカラム定義  -->
        <Grid.ColumnDefinitions>
            <ColumnDefinition Width="1*" />
            <ColumnDefinition Width="4*" />
        </Grid.ColumnDefinitions>
        <!--  グリッドの行定義  -->
        <Grid.RowDefinitions>
            <RowDefinition Height="Auto" />
            <RowDefinition />
        </Grid.RowDefinitions>

        <!--  ツールバー  -->
        <StackPanel
            Grid.ColumnSpan="2"
            Background="Honeydew"
            Orientation="Horizontal">
            <Button
                x:Name="newButton"
                Click="newButton_Click"
                Content="新規"
                Style="{StaticResource ToolButtonStyle}" />
            <Button
                x:Name="openButton"
                Click="openButton_Click"
                Content="開く"
                Style="{StaticResource ToolButtonStyle}" />
            <Button
                x:Name="saveButton"
                Click="saveButton_Click"
                Content="保存"
                Style="{StaticResource ToolButtonStyle}" />
            <Button
                x:Name="helpButton"
                Click="helpButton_Click"
                Content="ヘルプ"
                Style="{StaticResource ToolButtonStyle}" />
        </StackPanel>

        <!--  左のリスト  -->
        <ListBox
            x:Name="hogehogeList"
            Grid.Row="1"
            Background="LightCyan"
            SelectionChanged="hogehogeList_SelectionChanged" />

        <!--  右の編集エリア  -->
        <TextBox
            x:Name="editText"
            Grid.Row="1"
            Grid.Column="1"
            FontSize="18"
            Text="こんにちは"
            TextWrapping="Wrap"
            VerticalScrollBarVisibility="Visible" />

    </Grid>
</Window>
■拡張機能のインストール
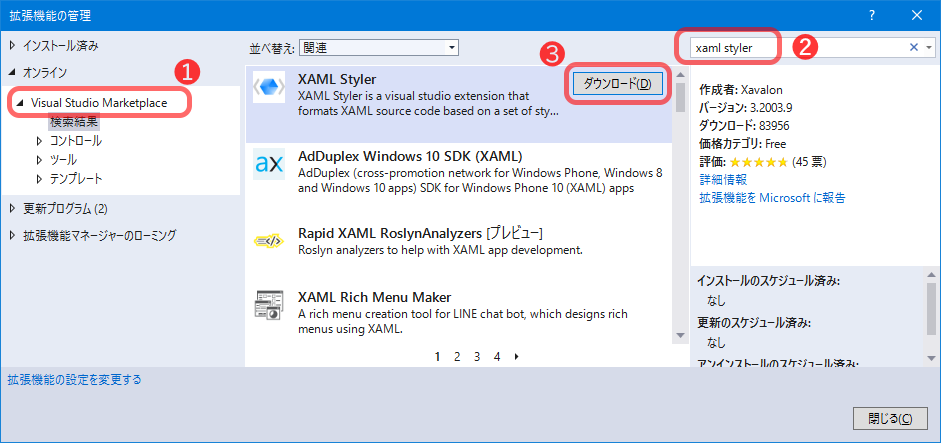
Visual Studioのメニュー、拡張機能 - 拡張機能の管理を選択します。

左の一覧でVisual Studio Marketplaceを選択し、検索ボックスにxaml stylerを入力します。
XAML Stylerのダウンロードボタンを押します。
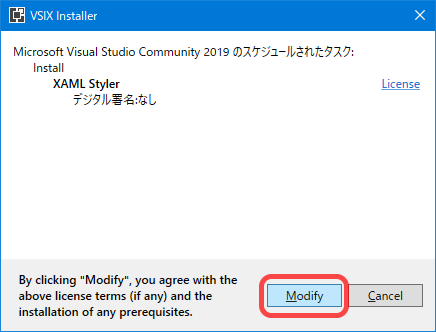
Visual Studioを終了します。
VSIX Installerの画面が出てくるのでModifyボタンを押します。
インストールが終わったらVisual Studioを起動します。
プロジェクトを開いてから拡張機能が読み込まれるまで少し時間がかかります。
拡張機能が読み込まれたら、XAMLエディター上で右クリックするとメニュー項目にFormat XAMLが出てくるので選択します。
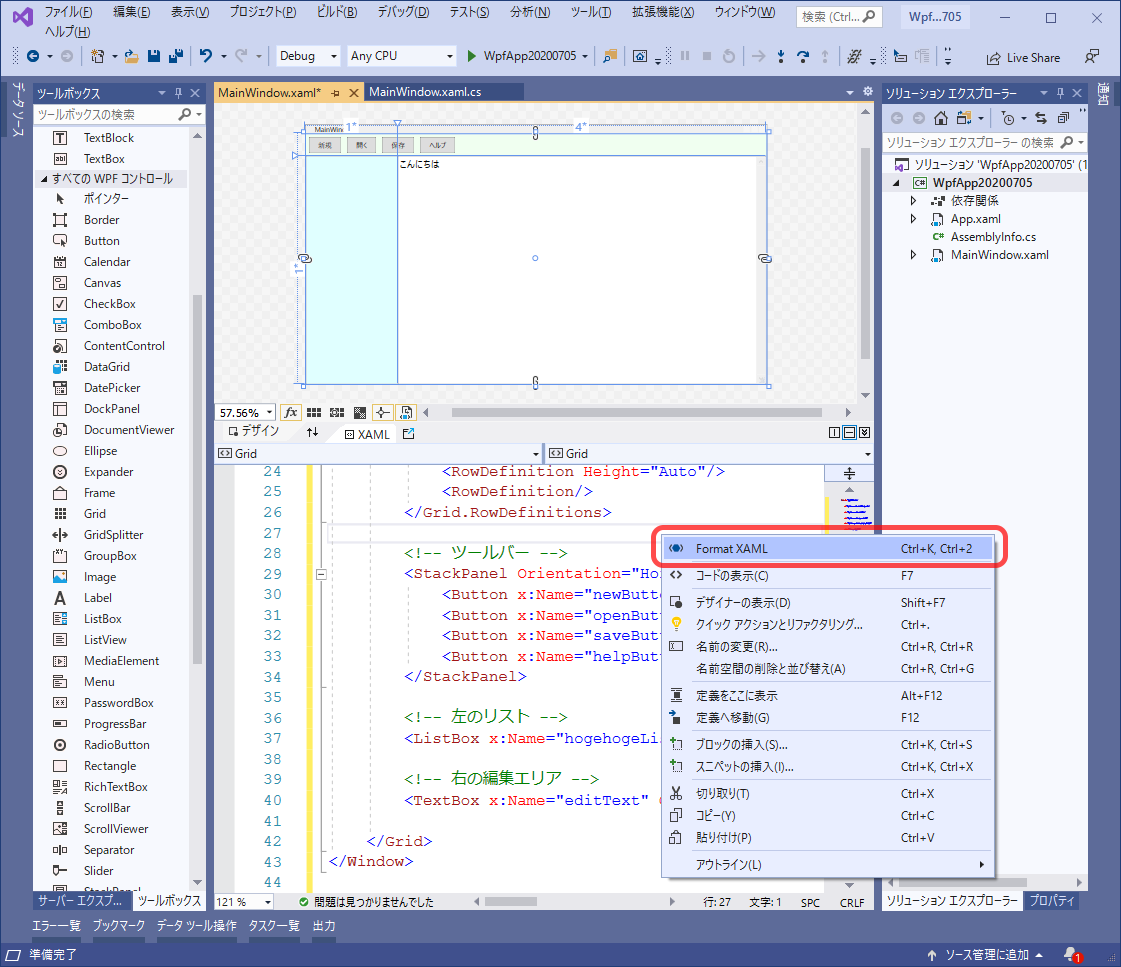
※Format XAMLを実行しなくても、Xamlファイルの保存時には自動的に整形されます。
◇設定
メニューのツール - オプションのXAML Stylerで色々設定できます。
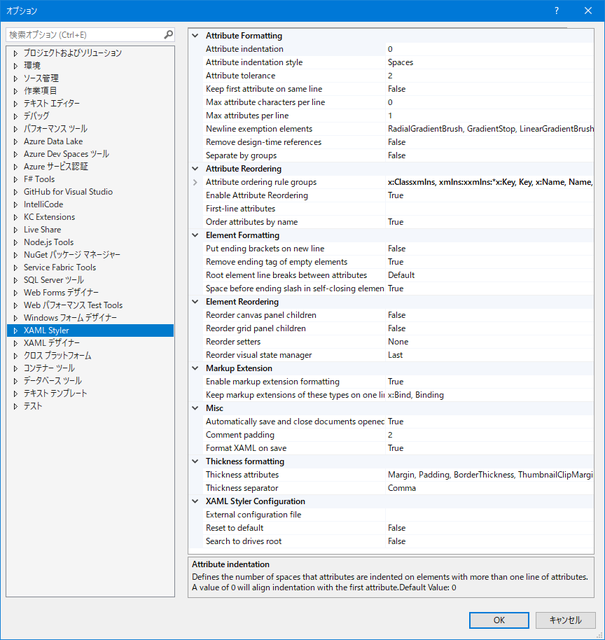
◎Attribute Formatting
属性の書式設定
| 設定項目 | 説明 |
|---|---|
| Attribute indentation | 属性のインデント |
| Attribute indentation style | 属性のインデントスタイル |
| Attribute tolerance | 1行で許容する属性の最大数 |
| Keep first attribute on same line | 最初の属性を同じ行に保持する |
| Max attribute characters per line | 開始タグの後の各行の属性の最大文字数 注)「 1 < Max attribute per line」 かつ 「2 < Attribute tolerance」の場合のみ有効 |
| Max attributes per line | 属性の数がAttribute toleranceの設定値を超えた場合、開始タグの後の各行で持つことができる属性の最大数。1未満は制限なし。 |
| Newline exemption elements | 改行除外要素 |
| Remove design-time references | デザイン時参照を削除する |
| Separate by groups | グループ別に分離 |
◎Attribute Reordering
属性の並べ替え
| 設定項目 | 説明 |
|---|---|
| Attribute ordering rule groups | 属性順序ルール グループ |
| Enable Attribute Reordering | 属性の並べ替えを有効にする |
| First-line attributes | 1行目の属性 |
| Order attributes by name | 名前で属性を並べ替える |
◎Element Formatting
要素の書式設定
| 設定項目 | 説明 |
|---|---|
| Put ending brackets on new line | 終了括弧を新しい行に配置する |
| Remove ending tag of empty elements | 空の要素の終了タグを削除する |
| Root element line breaks between attributes | 属性間のルート要素の改行 |
| Space before ending slash in self-closing elements | 空要素タグの/前の空白 |
◎Element Reordering
要素の並べ替え
| 設定項目 | 説明 |
|---|---|
| Reorder canvas panel children | Canvasパネルの子の順序を変更する |
| Reorder grid panel children | Gridパネルの子の順序を変更する |
| Reorder setters | Setterの並べ替え |
| Reorder visual state manager | VisualStateManagerの順序変更 |
◎Markup Extension
マークアップ拡張
| 設定項目 | 説明 |
|---|---|
| Enable markup extension formatting | マークアップ拡張機能の書式設定を有効にする |
| Keep markup extensions of these types on one line | これらの型のマークアップ拡張機能を1行に保持する |
◎Misc
その他
| 設定項目 | 説明 |
|---|---|
| Automatically save and close documents opened by XAML Styler | XAML Stylerによって開かれたドキュメントを自動的に保存して閉じる |
| Comment padding | コメントタグの余白数 |
| Format XAML on save | 保存時にXAMLの書式設定を行う |
◎Thickness formatting
余白・太さの書式設定
| 設定項目 | 説明 |
|---|---|
| Thickness attributes | 余白・太さの属性名 |
| Thickness separator | 区切り記号 |
◎XAML Styler Configuration
XAML Stylerの構成
| 設定項目 | 説明 |
|---|---|
| External configuration file | 外部構成ファイル |
| Reset to default | デフォルトにリセット |
| Search to drives root | ドライブのルートを検索 |
■おまけ(C#コード整形)
C#コードの整形はコードエディタ上でCtrl+K , Ctrl+D(Ctrlを押しながらK、Ctrlは押し続けたままKを離してDを押す)で出来ます。
こちらは標準機能です。
おしまい
