はじめに
Qiitaへアップロードできる画像サイズに上限はありますが、不必要に大きなファイルサイズの画像はページ表示に時間がかかるので、画像サイズはできるだけ小さくしましょう。
また、画像の幅・高さを小さくすることで記事に一度に表示できる情報量が多くなります。
画像の部分切り出し、縮小も検討しましょう。
方法1. 減色
画像データに使用されている色数を減らすことで画像ファイルの容量を減らします。
オンラインツールで画像を減色
こちらのサイトにpngまたはjpeg画像をドラッグ&ドロップすると減色した画像が出来上がるのでダウンロードするだけです。
複数ファイルをまとめてドラッグ&ドロップするとzip形式で一括ダウンロードできます。
TinyPNG – Compress PNG images while preserving transparency

こちらで知りました。
画像を圧縮したいとき、オンラインから実行できるツール - Qiita
方法2. サイズ縮小
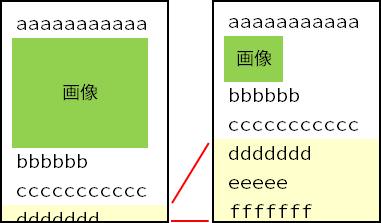
画像のサイズ(横〇〇ピクセル×縦〇〇ピクセル)を小さくすることでファイルの容量を減らします。
画像を小さくすることでその分、下の内容が見えるようになるため、記事の見通しが良くなる効果もあります。
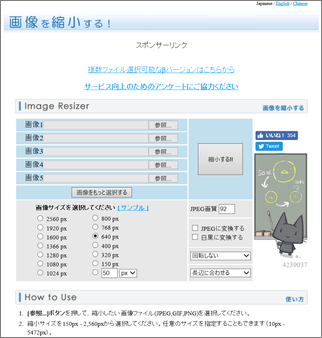
オンラインツールで画像を縮小
参照ボタンでファイルをアップロードして縮小、そしてダウンロード。
画像を縮小する!

スクリプトで縮小
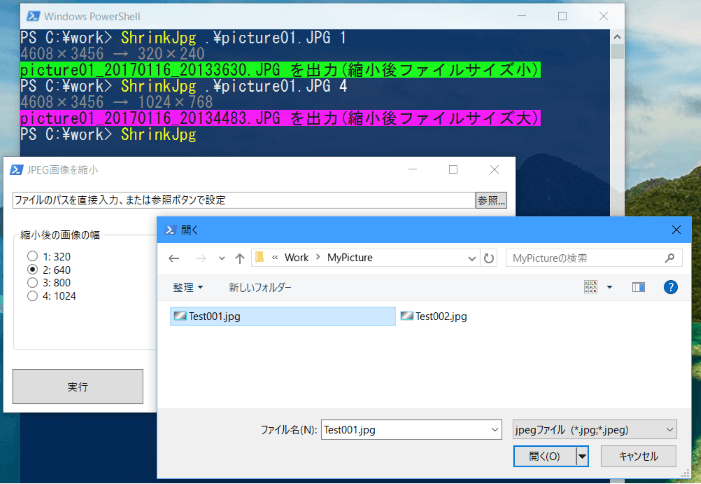
画像サイズを縮小するPowerShellスクリプトの例。
引数省略時はGUI表示。
Add-Type -AssemblyName System.Drawing

<#
.SYNOPSIS
    JPEG画像のサイズを縮小する

.DESCRIPTION
    JPEG画像のサイズを幅を指定して縮小する。
    縮小後の画像はファイル名に日時を付与して同じ場所に出力する。

.PARAMETER FilePath
    JPEG画像ファイルのパス。省略時はGUI入力モード。

.PARAMETER ShrinkFlg
    縮小フラグ。画像の幅を何ピクセルにするか1~4の数値を指定する。
    1: 320
    2: 640(既定)
    3: 800
    4:1024
    画像の高さは縦横比を維持して縮小。

.EXAMPLE
    ShrinkJpg .\image.jpg 3
    image.jpgの幅を800に縮小

.EXAMPLE
    ShrinkJpg
    GUIからファイル名と画像幅を入力
# >
function ShrinkJpg([string]$FilePath = "", [int]$ShrinkFlg = 2)
{
    [string]$Script:JpegSrcFilePath = $FilePath
    [int]$Script:JpegShrinkFlg = $ShrinkFlg

    if ($Script:JpegSrcFilePath)
    {
        # ファイルパス入力あり
    }
    else
    {
        # ファイルパス入力無し、GUIで入力
        Add-Type -AssemblyName PresentationFramework

        [xml]$xaml = @'
<Window xmlns="http://schemas.microsoft.com/winfx/2006/xaml/presentation"
xmlns:x="http://schemas.microsoft.com/winfx/2006/xaml" Title="JPEG画像を縮小"
Height="300" Width="600">
<Grid>
    <Grid.RowDefinitions>
        <RowDefinition Height="auto"/>
        <RowDefinition Height="*"/>
        <RowDefinition Height="auto"/>
    </Grid.RowDefinitions>
    <Grid.ColumnDefinitions>
        <ColumnDefinition Width="*"/>
        <ColumnDefinition Width="auto"/>
    </Grid.ColumnDefinitions>

    <TextBox Name="filePath" Text="ファイルのパスを直接入力、または参照ボタンで設定" Margin="10,10,0,10"/>
    <Button Name="refButton" Content="参照..." Grid.Column="1" Margin="0,10,10,10"/>

    <GroupBox Grid.Row="1" Grid.ColumnSpan="2" Header="縮小後の画像の幅" Margin="10" Padding="10">
        <StackPanel Name="radioPanel">
            <RadioButton Content="1: 320"/>
            <RadioButton Content="2: 640" IsChecked="True"/>
            <RadioButton Content="3: 800"/>
            <RadioButton Content="4: 1024"/>
        </StackPanel>
    </GroupBox>

    <Button Grid.Row="2" Name="execButton" Content="実行" Width="150" Height="40" HorizontalAlignment="Left" Margin="10"/>
</Grid>
</Window>
'@
        $reader = (New-Object System.Xml.XmlNodeReader $xaml)
        $window = [Windows.Markup.XamlReader]::Load($reader)

        $file_path = $window.FindName("filePath")
        $ref_button = $window.FindName("refButton")
        $radio_panel = $window.FindName("radioPanel")
        $exec_button = $window.FindName("execButton")

        # 参照ボタンの処理
        $ref_button_clicked = $ref_button.add_Click
        $ref_button_clicked.Invoke({
            $dlg = New-Object Microsoft.Win32.OpenFileDialog
            $dlg.Filter = "jpegファイル |*.jpg;*.jpeg"
            $result = $dlg.ShowDialog()
            if ($result -eq $true)
            {
                $file_path.Text = $dlg.FileName
            }
        })

        # 実行ボタンの処理
        $exec_button_clicked = $exec_button.add_Click
        $exec_button_clicked.Invoke({
            if ($file_path.Text -eq "")
            {
                [System.Windows.MessageBox]::Show("ファイルを指定してください") > $null
                return
            }

            $Script:JpegSrcFilePath = $file_path.Text

            $radio_panel.Children | ForEach-Object {
                if ($_.IsChecked -eq $true)
                {
                    $Script:JpegShrinkFlg = [int]$_.Content.ToString().Substring(0, 1)
                    $window.Close()
                }
            }
            $window.Close()
        })

        $window.ShowDialog() > $null
    }

    if ($Script:JpegSrcFilePath)
    {
        if ((Test-Path $Script:JpegSrcFilePath) -eq $false)
        {
            Write-Error "ファイルが見つかりません。`n[${Script:JpegSrcFilePath}]"
            return
        }
    }
    else
    {
        Write-Host "ファイルが指定されなかったので処理を中止します。"
        return
    }

    $Script:JpegSrcFilePath = Convert-Path $Script:JpegSrcFilePath

    # 拡張子確認
    [string]$ext = [System.IO.Path]::GetExtension($Script:JpegSrcFilePath)
    if ($ext -ine ".jpg" -and $ext -ine ".jpeg")
    {
        Write-Error "JPEGファイルを指定してください。"
        return
    }

    $img = [System.Drawing.Image]::FromFile($Script:JpegSrcFilePath)

    $encParams = New-Object System.Drawing.Imaging.EncoderParameters(1)
    $encParams.Param[0] = New-Object System.Drawing.Imaging.EncoderParameter(
        [System.Drawing.Imaging.Encoder]::Quality, 100)

    [int]$shrinkWidth = $img.Width
    [int]$shrinkHeight = $img.Height

    switch ($Script:JpegShrinkFlg)
    {
        # 縮小後の横幅
        1 { $shrinkWidth = 320 }
        2 { $shrinkWidth = 640 }
        3 { $shrinkWidth = 800 }
        4 { $shrinkWidth = 1024 }
        default { $shrinkWidth = 640 }
    }

    if ($img.Width -gt $shrinkWidth)
    {
        # 縮小後の高さ
        $shrinkHeight = $shrinkWidth / $img.Width * $img.Height
    }
    else
    {
        Write-Host "既に縮小サイズ以下です。"
        $img.Dispose()
        return
    }

    [int]$w = $img.Width
    [int]$h = $img.Height
    Write-Host "${w}×${h} → ${shrinkWidth}×${shrinkHeight}" -ForegroundColor DarkGray

    $resizeBmp = New-Object System.Drawing.Bitmap($shrinkWidth, $shrinkHeight)
    $graph = [System.Drawing.Graphics]::FromImage($resizeBmp)
    # 補完方法:高品質双三次補間(https://msdn.microsoft.com/ja-jp/library/system.drawing.drawing2d.interpolationmode.aspx)
    $graph.InterpolationMode = [System.Drawing.Drawing2D.InterpolationMode]::HighQualityBicubic

    $graph.Clear([System.Drawing.Color]::White)
    $graph.DrawImage($img, 0, 0, $shrinkWidth, $shrinkHeight)

    # 縮小後のファイル名作成
    [string]$newBasePath = Split-Path -Parent $Script:JpegSrcFilePath
    [string]$newFileName =
        [System.IO.Path]::GetFileNameWithoutExtension($Script:JpegSrcFilePath) +
        (Get-Date).ToString("_yyyyMMdd_HHmmssff") +
        $ext

    $codec = [System.Drawing.Imaging.ImageCodecInfo]::GetImageEncoders() |
        Where-Object {$_.MimeType -eq "image/jpeg"}
    [string]$newFilePath = Join-Path $newBasePath $newFileName
    $resizeBmp.Save($newFilePath, $codec, $($encParams))
    $f = Get-ChildItem -LiteralPath $newFilePath
    if ($f.Length -lt 100KB)
    {
        Write-Host "${newFileName} を出力(縮小後ファイルサイズ小)" -BackgroundColor Green -ForegroundColor Black
    }
    elseif ($f.Length -lt 300KB)
    {
        Write-Host "${newFileName} を出力(縮小後ファイルサイズ中)" -BackgroundColor Yellow -ForegroundColor Black
    }
    else
    {
        Write-Host "${newFileName} を出力(縮小後ファイルサイズ大)" -BackgroundColor Magenta -ForegroundColor Black
    }

    $resizeBmp.Dispose()
    $img.Dispose()
}

