この記事はSynamonAdventカレンダー2021の12日目の記事です。
はじめに
この記事ではUnityEditorのインスペクターを便利にしてくれるEditor拡張「NaughtyAttributes」について、自分がその実装を読み解いて理解する過程を記事にまとめてみました。
具体的な内容は以下です。
- NaughtyAttributesの機能を実現しているコア部分の処理フローの読み解いてまとめる
- 自分でオリジナルのアトリビュートをつくってみる
NaughtyAttributes
NaughtyAttributesをプロジェクトに導入すると、インスペクターを使いやすくしてくれるいくつかのアトリビュートが使えるようになります。
アトリビュートの一例を紹介します。
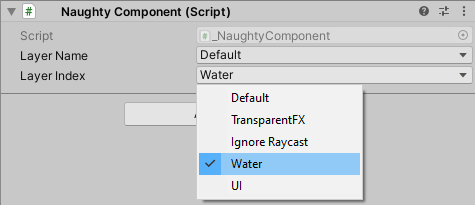
[Layer]:プロジェクトに登録されているレイヤーをプルダウンで指定できるようになる。(stringの直指定やintのインデックス指定によるヒューマンエラーを防げる)
public class NaughtyComponent : MonoBehaviour
{
	[Layer]
	public string layerName;

	[Layer]
	public int layerIndex;
}
[Button]:メソッドにつける。そのメソッドを実行できるボタンをインスペクターに表示してくれる。(引き数なし or 引き数全てにデフォルトパラメータがある場合のみ使える。)
public class NaughtyComponent : MonoBehaviour
{
	[Button]
	private void MethodOne() { }

	[Button("Button Text")]
	private void MethodTwo() { }
}

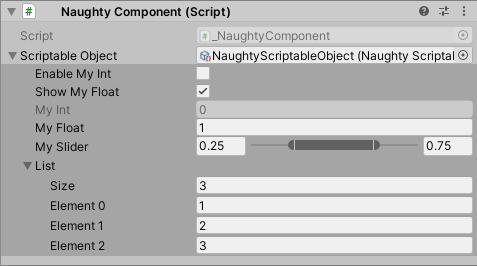
[Expandable]:ScriptableObjectにつける。ScriptableObjectの値をインスペクターに表示してくれ、その場で編集もできる。
public class NaughtyComponent : MonoBehaviour
{
	[Expandable]
	public ScriptableObject scriptableObject;
}
こんな感じの便利なアトリビュートが20個以上使えるようになります。各アトリビュートの紹介はREADMEにコード例と画像セットで書いてあるので、他のものが気になる方はリポジトリを見てみてください。またそれぞれのアトリビュートの詳細については別途ドキュメントも用意されています。
ちなみに"Naughty"というのは英語で「いたずら」「やんちゃ」的な意味らしいです。
Odinとの比較
Unityでのインスペクター拡張といえばOdin(正確にはOdinInspector)が有名なので、Odinとの比較についても少しだけ書いておきます。
Odinは有料ですが、その分機能も豊富で動作も安定していそうです。(自分は使ったことないですが。)
2021/11/27現在の価格で、Personal(収益20万ドル未満)で1シートあたり27.50米ドル買い切り(セール価格かも?)、Enterprise(収益20万ドル以上)で1シートあたり250.0米ドル/年です。
一方、NaughtyAttributesは無料ですが、2021/11/27現在、リポジトリの最終更新は2か月前で、Unity2020.3でのいくつかのアトリビュートが動作しないIssueもあがっていたりとちょっと安定性には欠けてる印象です。
なので、NaughtyAttributesとOdinを比較すると、値段と品質(機能性、安定性)がトレードオフになる関係といった感じですね。Odinを普段から使ってる人ならNaughtyAttributesを使う意味はあまりないかなと思います。
動作環境
- UnityEditor:2021.1.13f1
- NaughtyAttributes:v2.1.1
- OS:Windows10
READMEを読む
まずはREADMEを読みます。検索すれば、ライブラリの紹介を簡単にしてくれている記事、日本語で書かれている記事などがでてきます。それらは、ライブラリの雰囲気をざっくり把握するのには有効ですが、一方で情報が古かったり、記事を書いた人が注目した情報が抜粋されていて順序良くライブラリを理解していくための初手として適切でない場合があります。なので、READMEを読みます。
他の一般的なライブラリと同様に、NaughtyAttributesのREADMEにも「推奨環境」、「インストール方法」、「主要な使い方」、「使う場合の注意点」がまとまっています。
これをざーっと読みながら、全体感の把握と自分は読み解いた結果何を知りたいか定めていきます。
今回は以下2点を知りたいなと思いながらコードを読むことにしました。
- 各種アトリビュートの効果がどこでどう実現されているか理解する
- どうやればオリジナルのアトリビュートがつくれるか
各種アトリビュートの効果がどう実装されているか
各種アトリビュートの効果がどうやってインスペクターに適用されているのか調べていきます。
Editor拡張なので、Editorフォルダ内にある[CustomEditor]アトリビュートがついているクラスが処理の出発点となるでしょう。そこから処理をたどっていくのが筋が良さそうです。フォルダを見ていくと該当するクラスは1つ、NaughtyAttributes.Editor.NaughtyInspector.csです。
namespace NaughtyAttributes.Editor
{
   [CanEditMultipleObjects]
   [CustomEditor(typeof(UnityEngine.Object), true)]
   public class NaughtyInspector : UnityEditor.Editor
   {
	   (省略)
   }
}
CustomEdtiorでUnity内で扱われる全てのクラスの既定クラスであるUnityEngine.Objectを指定し、さらに第二引数をtrueにすることによって派生クラス(要はComponentとかMonoBehaviourとかScpritalbeObject)をターゲットにしています。
複数の[CustomEditor]があるわけではなく、一つのクラスで全てを上書きしてるのがポイントですね。
ちなみに、特定のMonoBehaviour派生クラスに対してNaughtyAttributesのものとは別に自作のCustomEditorを作った場合どうなるかについてはREADMEに書かれていました。
Most of the attributes are implemented using Unity's
CustomPropertyDrawer, so they will work in your custom editors. The attributes that won't work in your custom editors are the meta attributes and some drawer attributes such asReorderableList,Button,ShowNonSerializedFieldandShowNativeProperty.
If you want all of the attributes to work in your custom editors, however, you must inherit fromNaughtyInspectorand use theNaughtyEditorGUI.PropertyField_Layoutfunction instead ofEditorGUILayout.PropertyField.
抜粋して訳すと次のようなことが書いています。
- NaughtyAttributesのほとんどのアトリビュートは(
CustomPropertyDrawerを使ってるだけなので)自作のCustomEditorでも動作する。 - 一部のアトリビュートは動作しない。
- 全部のアトリビュートを自作のCsutomEditorで動作させたかったら、
NaughtyInspectorを継承しEditorGUILayout.PropertyFieldの代わりにNaughtyEditorGUI.PropertyField_Layoutを使う。
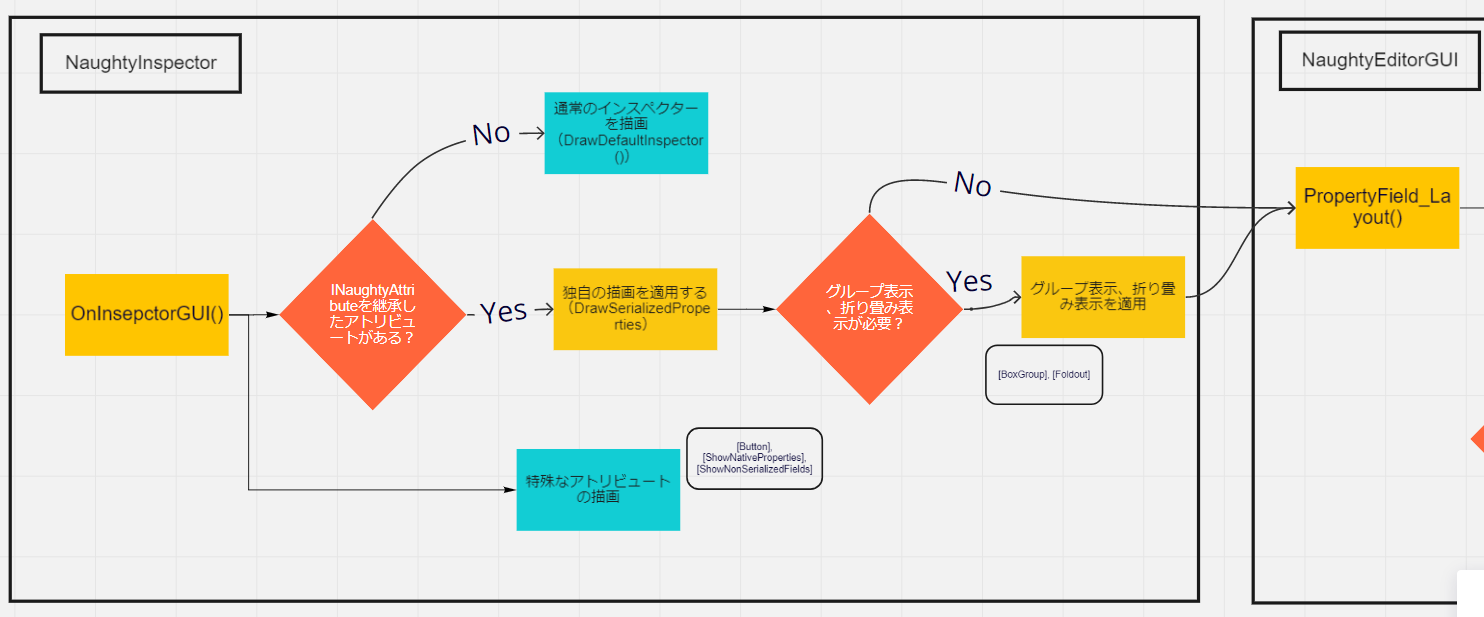
次にNaughtyInspectorのOnInspectorGUI()(カスタムインスペクターを作成する関数)を見てみます。
public override void OnInspectorGUI()
{
	GetSerializedProperties(ref _serializedProperties);

    // INaughtyAttributeを継承しているものがあるか確認し、描画方法を分岐させている。
    bool anyNaughtyAttribute = _serializedProperties.Any(p => PropertyUtility.GetAttribute<INaughtyAttribute>(p) != null);
    if (!anyNaughtyAttribute)
    {
        DrawDefaultInspector();
    }
    else
    {
        DrawSerializedProperties();
    }

    // 特別に描画されているものが3種類ある。
    DrawNonSerializedFields();
    DrawNativeProperties();
    DrawButtons();
}
このコードから次のようなことがわかります。
-
SerializedPropertiesの中にINaughtyAttributeを継承したものがあるか確認している。 -
INaughtyAttributeを継承したものがない場合は、デフォルトのインスペクターを描画させている。 INaughtyAttributeを継承したものがあるい場合は、特殊な描画をさせている。- 特別に描画されているものが3種類ある。
NonSerializedFields,NativeProperties,Buttons。
特別に描画されている3種類については、後で詳しく説明するのでここでは放置します。
上のコード内で一番重要な関数DrawSerializedProperties()の詳細を見ていきます。
protected void DrawSerializedProperties()
{
    serializedObject.Update();

    // Draw non-grouped serialized properties
    foreach (var property in GetNonGroupedProperties(_serializedProperties))
    {
        if (property.name.Equals("m_Script", System.StringComparison.Ordinal))
        {
            (省略)
        }
        else
        {
            NaughtyEditorGUI.PropertyField_Layout(property, includeChildren: true);
        }
    }

    // Draw grouped serialized properties
    foreach (var group in GetGroupedProperties(_serializedProperties))
    {
        (省略)
        NaughtyEditorGUI.PropertyField_Layout(property, includeChildren: true);
    }

    // Draw foldout serialized properties
    foreach (var group in GetFoldoutProperties(_serializedProperties))
    {
        (省略)
        NaughtyEditorGUI.PropertyField_Layout(property, includeChildren: true);
    }

    serializedObject.ApplyModifiedProperties();
}
全部書くと長いので一部のコードを省略しています。
ここでは、「グループ表示」や「折り畳み表示」をするアトリビュートがついてるものとそれ以外を分けて処理していることがわかります。分岐はさせていますが、重要な処理は最初のforeachの中にあるNaughtyEditorGUI.PropertyField_Layout(property, includeChildren: true)です。
その実装を追っていきます。クラスがNaughtyInspectorからNaughtyEditorGUIに移ります。
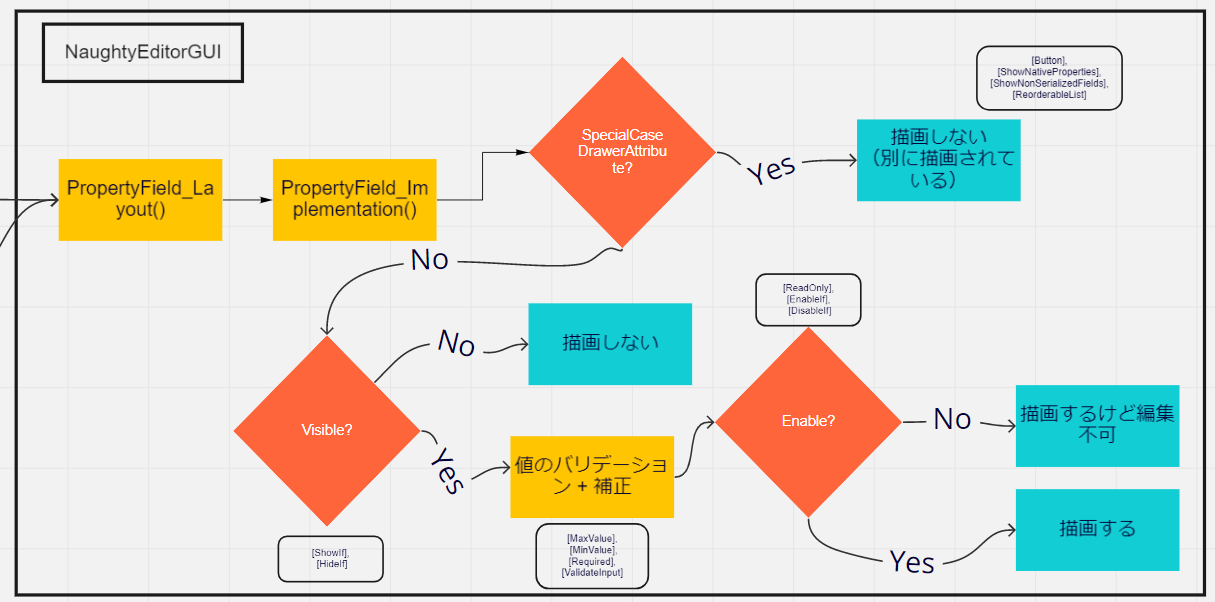
PropertyField_Layout() -> PropertyField_Implementation()と実装をたどっていきます。
private static void PropertyField_Implementation(Rect rect, SerializedProperty property, bool includeChildren, PropertyFieldFunction propertyFieldFunction)
{
    SpecialCaseDrawerAttribute specialCaseAttribute = PropertyUtility.GetAttribute<SpecialCaseDrawerAttribute>(property);
    if (specialCaseAttribute != null)
    {
        specialCaseAttribute.GetDrawer().OnGUI(rect, property);
    }
    else
    {
        // Check if visible
        bool visible = PropertyUtility.IsVisible(property);
        if (!visible)
        {
            return;
        }

        // Validate
        ValidatorAttribute[] validatorAttributes = PropertyUtility.GetAttributes<ValidatorAttribute>(property);
        foreach (var validatorAttribute in validatorAttributes)
        {
            validatorAttribute.GetValidator().ValidateProperty(property);
        }

        // Check if enabled and draw
        EditorGUI.BeginChangeCheck();
        bool enabled = PropertyUtility.IsEnabled(property);

        using (new EditorGUI.DisabledScope(!enabled))
        {
            // propertyFieldFunctionの実態はEditorGUILayout.PropertyField()。
            // つまりここで描画処理を行っている。
            propertyFieldFunction.Invoke(rect, property, PropertyUtility.GetLabel(property), includeChildren);
        }

        // Call OnValueChanged callbacks
        if (EditorGUI.EndChangeCheck())
        {
            PropertyUtility.CallOnValueChangedCallbacks(property);
        }
    }
}
結構長いですが上から順番に読んでいくとやってることは単純です。それぞれ引き数として渡されたSerialziedPropertyをに対して以下のように処理しています。
-
SpecialCaseDrawerAttributeがついている場合は専用のドロワーを使って描画する。 - Visibleかを確認し、そうでない場合は描画しない。
-
ValidatorAttribuiteがついている場合は、各Validate処理を適用する。 - Enableかを確認し、そうでない場合は編集不可(Disable)にする。
-
propertyFieldFunction.Invoke(引き数省略);の部分で描画している。
ひとつずつ順番に見ていきます。
〇SpecialCaseDrawerAttributeがついている場合は専用のドロワーを使って描画する。
SpecialCaseDrawerAttribute specialCaseAttribute = PropertyUtility.GetAttribute<SpecialCaseDrawerAttribute>(property);
if (specialCaseAttribute != null)
{
    // SpecialCaseAttributeは独自の描画の仕方をする。
    specialCaseAttribute.GetDrawer().OnGUI(rect, property);
}
SpecialCaseDrawerAttributeを継承しているアトリビュートは次の4つです。[Button], [ShowNavtiveProperty], [ShowNonSerializedField], [ReorderableList]。最初の3つは先ほど特別に描画されていることがわかったものですね。これらも他のアトリビュートを同様にINaughtyAttributeを継承していますがここで処理を分岐させられています。
〇Visibleかを確認し、そうでない場合は描画しない。
// Check if visible
bool visible = PropertyUtility.IsVisible(property);
if (!visible)
{
    return;
}
PropertyUtility.IsVisible()内では、ShowIfAttributeBaseを継承しているアトリビュートの取得と、もし取得できた場合はそれぞれの条件を満たしているかを確認しています。ShowIfAttributeBaseを継承しているアトリビュートは次の2つです。[ShowIf], [HideIf]。それぞれ引き数に与えられてる式から真偽値を判定しています。
〇ValidatorAttribuiteがついている場合は、各Validate処理を適用する。
ValidatorAttribute[] validatorAttributes = PropertyUtility.GetAttributes<ValidatorAttribute>(property);
foreach (var validatorAttribute in validatorAttributes)
{
    validatorAttribute.GetValidator().ValidateProperty(property);
}
ValidatorAttributeを継承しているアトリビュートは次の4つです。[MaxValue], [MinValue], [Required], [ValidateInput]。例えば[MaxValue]なら、インスペクターで渡された値がアトリビュートの引数に指定している値以下になっているかを確認し、もし超えていれば最大値にクランプしてくれます。
〇Enableかを確認し、そうでない場合は編集不可(Disable)にする。
bool enabled = PropertyUtility.IsEnabled(property);

using (new EditorGUI.DisabledScope(disabled: !enabled))
{
    propertyFieldFunction.Invoke(rect, property, PropertyUtility.GetLabel(property), includeChildren);
}
PropertyUtility.IsEnabled()内では、[ReadOnly]およびEnableIfAttributeBaseを継承しているアトリビュートの取得と、もし取得できた場合はそれぞれの条件の確認をしています。EnableIfAttributeBaseを継承しているアトリビュートは次の2つです。[EnableIf], [DisableIf]。それぞれ引き数に与えられてる式から真偽値を判定しています。
〇propertyFieldFunction.Invoke(引き数省略);の部分で描画している。
// propertyFieldFunctionの実態はEditorGUILayout.PropertyField()。
// つまりここで描画処理を行っている。
propertyFieldFunction.Invoke(rect, property, PropertyUtility.GetLabel(property), includeChildren);
ここでようやく描画処理にたどり着きます。
ここまでのまとめ
長々と処理を追ってきましたが、NaughtyInspector.OnInspectorGUI()が呼ばれてから描画までのフローは以下になります。各処理がどこで行われているのかがわかりました。
どうやればオリジナルのアトリビュートがつくれるか
まず既存の[Tag]アトリビュートについてその実装を確認して理解した後で、応用してオリジナルのアトリビュートをつくります。
[Tag]アトリビュートの実装
ここまで触れていませんでしたが、NaughtyAttributesは大きく3つのフォルダで構成されています。
- Core
- Editor
- Test
Coreには各アトリビュートの宣言([AttributeUsage]をつけたクラスの宣言)、Editorには各アトリビュートの実際の機能が記述されています。Testは機能の実態ではないのでここでは触れません。
[Tag]アトリビュートを例にすると次のクラスがあります。
Coreフォルダ : TagAttribute.cs
[AttributeUsage(AttributeTargets.Field, AllowMultiple = false, Inherited = true)]
public class TagAttribute : DrawerAttribute
{
    // [Tag]の場合は空。
    // 引き数を受け取るアトリビュートの場合はここでコンストラクタとプロパティを定義する。
}
シンプルに宣言がされているだけです。[Tag]にはありませんが、引き数を受け取るアトリビュートの場合はに、引数を受け取るコンストラクタ、その引き数を代入するプロパティがこのクラス内に定義されます。
Editorフォルダ : TagPropertyDrawer.cs
[CustomPropertyDrawer(typeof(TagAttribute))]
public class TagPropertyDrawer : PropertyDrawerBase
{
    protected override float GetPropertyHeight_Internal(SerializedProperty property, GUIContent label)
    {
        (省略)
    }

    protected override void OnGUI_Internal(Rect rect, SerializedProperty property, GUIContent label)
    {
        EditorGUI.BeginProperty(rect, label, property);

        if (property.propertyType == SerializedPropertyType.String)
        {
            // generate the taglist + custom tags
            List<string> tagList = new List<string>();
            tagList.Add("(None)");
            tagList.Add("Untagged");
            tagList.AddRange(UnityEditorInternal.InternalEditorUtility.tags);

            string propertyString = property.stringValue;
            int index = 0;
            // check if there is an entry that matches the entry and get the index
            // we skip index 0 as that is a special custom case
            for (int i = 1; i < tagList.Count; i++)
            {
                if (tagList[i].Equals(propertyString, System.StringComparison.Ordinal))
                {
                    index = i;
                    break;
                }
            }

            // Draw the popup box with the current selected index
            int newIndex = EditorGUI.Popup(rect, label.text, index, tagList.ToArray());

            // Adjust the actual string value of the property based on the selection
            string newValue = newIndex > 0 ? tagList[newIndex] : string.Empty;

            if (!property.stringValue.Equals(newValue, System.StringComparison.Ordinal))
            {
                property.stringValue = newValue;
            }
        }
        else
        {
            string message = string.Format("{0} supports only string fields", typeof(TagAttribute).Name);
            DrawDefaultPropertyAndHelpBox(rect, property, message, MessageType.Warning);
        }

        EditorGUI.EndProperty();
    }
}
TagPropertyDrawer はNaughtyAttributes.PropertyDrawerBaseを継承していて、その``NaughtyAttributes.ProertyDrawerBase は[UnityEditor.PropertyDrawer`](https://docs.unity3d.com/jp/current/ScriptReference/PropertyDrawer.html)を継承しています。`NaughtyAttributes.PropertyDrawerBase` は抽象クラスで、描画時の高さの計算と具体的な機能の実装を子クラスに移譲しています。
[Tag]アトリビュートの実装では、UnityEditorInternal.InternalEditorUtility.tagsを使ってTagの一覧を取得し、EditorGUI.Popup()でプルダウンとしてインスペクターに表示させる処理が書かれています。
独自アトリビュートをつくってみる
[Tag]アトリビュートの実装を確認したところで、いよいよ独自アトリビュートをつくってみます。
今回はQualityLevelをプルダウンで選択できるアトリビュートをつくってみます(QualityL
evelは通常int型でそのindexを指定する)。下のコードが動くようにするイメージです。
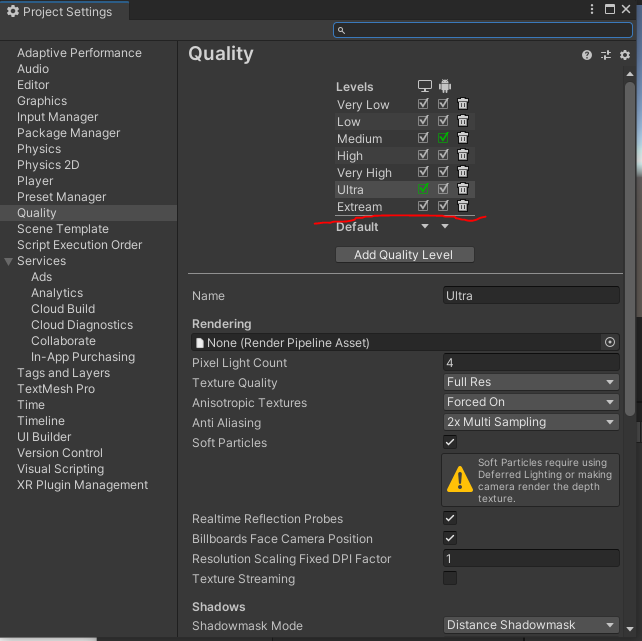
ちなみに登録されているQualityLevelの種類は、Edit > ProjectSettigs > Qualityから確認と追加・削除ができます。デフォルトで登録されているのは"Very Low", "Low", "Medium", "High", "Very High", "Ultra"の6つです。
public sealed class ProcessByQualityLevel : MonoBehaviour
{
    // QualityLevelの値をドロップダウンで指定できるアトリビュート
    [QualityLevel] [SerializeField] private int targetQualityLevel = default;

    private void Start()
    {
        Debug.Log($"Level:{targetQualityLevel}, Name:{QualitySettings.names[targetQualityLevel]}");
    }

    private void Update()
    {
        // コード例。指定したQualityLevelのとき何かしらの処理の処理を行う的なコード。
        if (targetQualityLevel == QualitySettings.GetQualityLevel())
        {
            // QualityLevelに応じた何等かの処理。
        }
    }
}

まず、アトリビュートを定義します。このとき[Tag]アトリビュートと同様にNaughtyAttributes.DrawerAttributeを継承させておきます。オプションも全て[Tag]と同じで、AttributeTargets.Field, AllowMultiple = false, Inherited = true としておきます。
[AttributeUsage(AttributeTargets.Field, AllowMultiple = false, Inherited = true)]
public class QualityLevelAttribute : DrawerAttribute
{
}
次にEditorフォルダ(Editor指定のアセンブリ)に、機能の実装を書きます。
[CustomPropertyDrawer(typeof(QualityLevelAttribute))]
public class QualitySettingPropertyDrawer : PropertyDrawerBase
{
    protected override float GetPropertyHeight_Internal(SerializedProperty property, GUIContent label)
    {
        return (property.propertyType == SerializedPropertyType.Integer)
            ? GetPropertyHeight(property)
            : GetPropertyHeight(property) + GetHelpBoxHeight();
    }

    protected override void OnGUI_Internal(Rect rect, SerializedProperty property, GUIContent label)
    {
        EditorGUI.BeginProperty(rect, label, property);

        // int型に限定
        if (property.propertyType == SerializedPropertyType.Integer)
        {
            // プルダウンでQualitySettingsに登録されている各Levelの名前を表示。
            // プルダウンで選択されたとき、選択された名前に対応するインデックスを受け取る
            int newIndex = EditorGUI.Popup(rect, label.text, property.intValue, QualitySettings.names);

            // QualitySettingsに登録されているインデックスの範囲になるようにクランプ。
            // (そもそも範囲外のインデックスはプルダウンで選べないはずではあるが一応)
            newIndex = Mathf.Clamp(newIndex, 0, QualitySettings.names.Length - 1);

            // インデックスが変化していればフィールドの値を書き換える。
            if (property.intValue != newIndex)
            {
                property.intValue = newIndex;
            }
        }
        else
        {
            string message = $"{nameof(QualityLevelAttribute)} supports only int fields";
            DrawDefaultPropertyAndHelpBox(rect, property, message, MessageType.Warning);
        }

        EditorGUI.EndProperty();
    }
}
ここでも[Tag]と同様に、NaughtyAttributes.Editor.PropertyDrawerBaseを継承させます。あとはGetPropertyHeight_Internalで高さの指定、OnGUI_Internal()でポップアップの制御をしてやります。基本は[Tag]の真似をすればOKです。
string型のTagではインデックス(int)とstringの変換などがありましたが、QualityLevelはそのままint型で代入すればよいだけなのでよりシンプルなコードで書けました。
動作確認してみます。実行すると正確な値が出力されるので、[SerializeField]にきちんと値が入っているようです。


独自のQualityLevelも定義してみます。
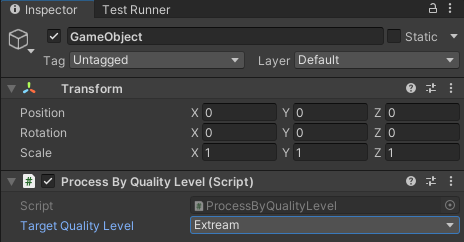

独自のQualityLevelもプルダウンで選択でき、きちんとフィールドに反映もされていました。
その他の種類のアトリビュートについて
上では[Tag]アトリビュートを真似て[QualityLevel]アトリビュートを定義してみましたが、先ほど見たように、NaughtyAttributesには他にも色んな種類のアトリビュートがあります。
- PropertyDrawer系 - [Tag], [Scene], [InputAxis], [MinMaxSlider]
- Visible制御系 - [ShowIf], [HideIf]
- Validation系 - [MaxValue], [MinValue], [Required], [ValidateInput]
- Enable制御系 - [ReadOnly], [EableIf], [DisableIf]
- その他
他の種類のアトリビュートについても読み解いた内容を書きたいところですが、長くなるのでこの記事では辞めておきます。気になる人は実装してみてください。
おわりに
今回はUnityのインスペクターを便利にしてくれるEditor拡張"NaughtyAttributes"について、そのコードを読みながら理解を深めていく過程をまとめました。
他人が読んでもわかるようにまとめるのは大変ですが、おかげで自分の理解も深まりました。
今回はQiita上に記事を書かせていただきましたが、Synamonでは普段はテックブログの方で記事をだしております。**Unity, AR, MR, VR, エンジニアリング組織といったテーマに興味がある方はぜひご覧ください。**テックブログの更新情報はSynamon公式Twitterの方でもお知らせしています。