目次
- はじめに
- 実装方法
3. 現在地の表示
4. 写真を撮った位置をピン表示 - まとめ
- 参考
はじめに
今回は、Camera Widgetを使って画像取り込みアプリを作ってみたの記事で作成した写真アプリを使って、
写真撮影時の位置情報を表示するアプリを作成します。
カメラを使って写真を撮影したい場合は↑の記事を参考にしてみてくださいね。
実装方法
撮影した画像の位置情報をfrmConfirmで表示させたいので、
frmConfirmにmapLocationという名前でMap Widgetを配置します。

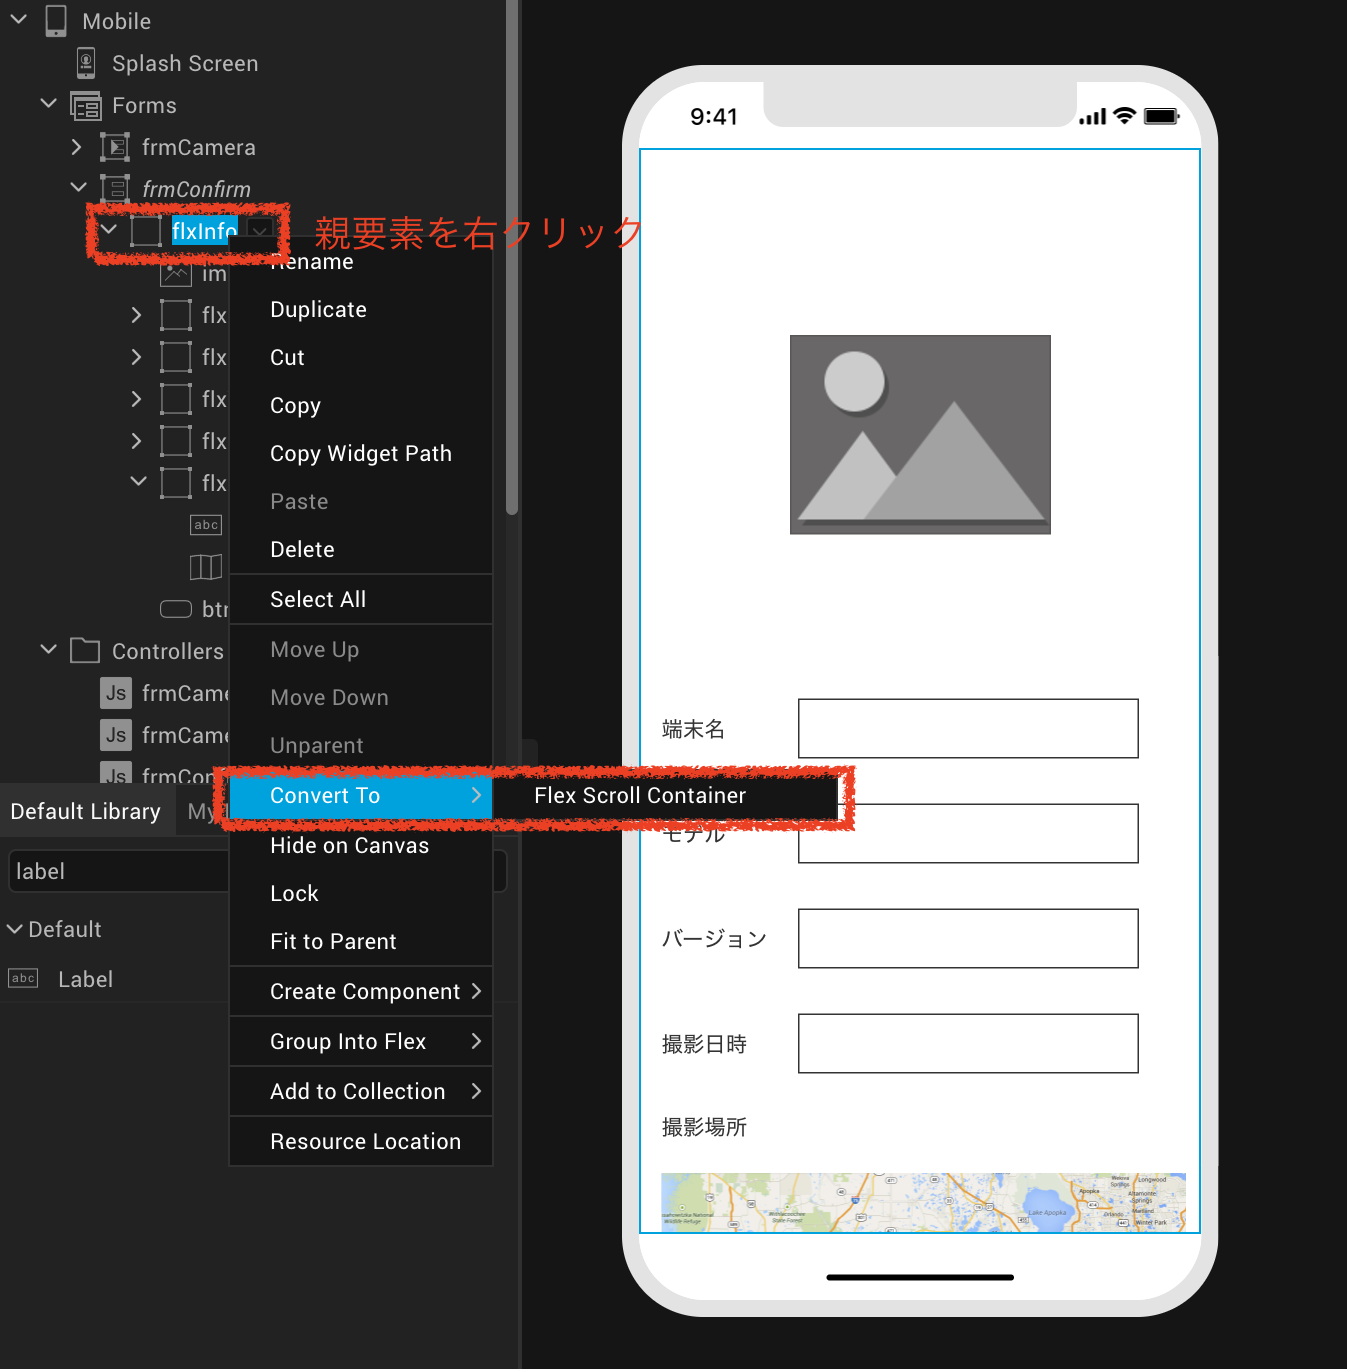
このままだと、画面が縦長になり全画面が表示できないので、
親要素のFlexContainerを右クリックして、
Convert to → Flex Scroll Containerをクリックしましょう。

こうすると、一瞬でスクロール可能なボックスに変わりました〜![]()
現在地の表示
これで画面は作成できたので、次に現在地の表示を行います。
Map Widgetで現在地を円で表示、写真を撮った位置をピンで表示させたいので、
Map Widgetを選択し、右メニューのMapタブを開いてShow Current LocationからCircleを選んでください。
ここでは、CircleとPinを選択することができます。

これで現在地の情報が円で表示されるようになりました!
写真を撮った位置をピン表示
位置情報を取得
次に、写真撮影時の位置情報を取得するために、Konyのkony.location.getCurrentPositionを活用します。
このAPIを呼ぶことによって、その時の現在地の緯度、経度などを取得することができます。
参考:https://docs.kony.com/konylibrary/visualizer/viz_api_dev_guide/content/kony.location_functions.htm
実際のコードを添付します。
今回、写真を撮影した時の位置情報を取得したいので、onCaptureアクションに処理を追加していきます。
(Camera Widgetで説明済みのものについてはここでは割愛します。)
define({
  //Type your controller code here
  imgInfo : {},

 //ユーザーが写真を撮影すると呼び出される
  onCapture : function(){
    this.getDate();
    kony.location.getCurrentPosition(this.successcallback, this.errorcallback); //現在地取得
  },

  successcallback : function(position){
    this.imgInfo = {
      "img" : this.view.camera.base64,
      "deviceName" : kony.os.deviceInfo().name,
      "deviceModel" : kony.os.deviceInfo().model,
      "deviceVersion" : kony.os.deviceInfo().version,
      "datetime" : this.getDate(),
      "lon" : position.coords.longitude, //位置情報(経度)追加
      "lat" : position.coords.latitude //位置情報(緯度)追加
    };
    kony.store.setItem("imgInfo",this.imgInfo);
  },

  errorcallback : function(positionerror) {
    var errorMesg = "Error code: " + positionerror.code;
    errorMesg = errorMesg + " message: " + positionerror.message;
    alert(errorMesg);
  },

  getDate : function(){
    //今回は説明の範囲外なので省略
  }
Mapにピンを追加する時は緯度、経度の情報があればピンを配置することができるため、
今回は緯度・経度のみの情報を取得していますが、
kony.location.getCurrentPositionでは、これ以外にも高度や位置精度や日時情報も取得が可能です。
画像データであるimgInfoに緯度・経度情報を追加することができたので、
次に取得したデータを元にマップにピンを追加していきます。
[補足]
通常は画像のExif情報を取得し表示するところですが、
今回はマップ画面で撮影場所の位置を表示したいだけなので、locationAPIを使いました。
KonyでExifを取得することもできますので、もし画像のExifを使いたい場合は以下ご参考ください。
  preShow : function(){
    this.view.camera.onCapture = this.onCaptureCallBck;
  },

  onCaptureCallBck : function(camera, metadata) {
    var dateTime = metadata["dateTime"];
    var height = metadata["height"];
    var width = metadata["width"];
    var version = metadata["exifVersion"];
    var location = metadata["location"];
    var latitude = location["latitude"];
    var longitude = location["longitude"];

    kony.print("The date and time of the image capture is:" + dateTime);
    kony.print("The height of the image is:" + height + "and the width of the image is:" + width);
    kony.print("The exif version of the image is:" + version);
    kony.print("The location of the image is:" + location);
    kony.print("The latitude of the location of the captured image is:" + latitude);
    kony.print("The longitude of the location of the captured image is:" + longitude);
  }
onCaptureCallBckのmetadataの中に撮影した画像データが入っているため、
表示したい情報を、[]内に指定して取得するようにしてください。
取得した位置情報をマップにピン表示
define({

  //Type your controller code here
  imgInfo : kony.store.getItem("imgInfo"), //LocalStorageに保存されているデータを取得

  postShow : function(){
    this.view.imgPhoto.base64 = this.imgInfo.img;
    this.view.txtDeviceName.text = this.imgInfo.deviceName;
    this.view.txtDeviceModel.text = this.imgInfo.deviceModel;
    this.view.txtDeviceVersion.text = this.imgInfo.deviceVersion;
    this.view.txtDatetime.text = this.imgInfo.datetime;
    this.addPin(); //ピン追加アクションを追加
  },

  //frmCameraで取得した位置情報を元にピンを追加するアクション
  addPin : function(){
    var pin = {
      id: "pin1",
      lat: this.imgInfo.lat, //緯度
      lon: this.imgInfo.lon, //経度
      name: "No.1", //ピンの名前
      desc: "写真撮影場所", //取得した位置の説明文
    };
    this.view.mapLocation.addPin(pin); //mapLocationは、mapWidgetの名前
  },

});
コードの説明をしていきます。
postShowにaddPinアクションを追加しました。
Map WidgetにaddPinメソッドを使うことで、マップにピンを追加することができます。
参考:https://docs.kony.com/konylibrary/visualizer/viz_widget_prog_guide/content/Map_Methods.htm#addPin
mapWidget名.addPin(pin名);と記述することで、
()内にピンの情報を記載したデータを渡すことができます。(var pin以降に記載)
今回は、1つのピンの情報のみを渡していますが、
複数の位置情報をマップに表示したい場合は、addPinsメソッドを使うことも可能です。
それでは動作を見てみましょう!
写真を撮影したあと、確認画面でマップが表示され、
現在地の円と撮影時のピンが追加されていることがわかりますね!
— Kony (@Kony12763790) May 26, 2020
また、以下のように
マップを拡大しピンをタップすると、吹き出しが現れaddPinで指定した内容が表示されます。
(一部モザイクをかけています)

これで画像データの位置情報を元にマップ表示する実装は完了です。
最後に、今回は利用しなかったMap Widgetのその他の機能についても補足しておきます。

| 機能 | 内容 |
|---|---|
| Callout Template | ふきだしのテンプレートを選択。テンプレートの作成は、TemplateタブのMapから作成可能 |
| Pin Image | ピンの画像を指定 |
| Mode | マップを表示するためのモードをOS別に選択可能 |
| Zoom | マップ初期表示時の拡大レベルを指定可能。デフォルトは4 |
| Callout Width | ふきだしの幅を指定可能 |
| Show Current Location | 現在地の表示を円またはピンで表示可能 |
| Zoom Controll | マップに拡大・縮小可能なコントローラを設置するか選択可能 |
Zoom機能については、
1~20まで設定が可能なので、より大きく表示したい場合はZoom設定を変更してみてくださいね。
まとめ
Map Widgetの説明に加えて、Map機能を使う際に必要なLocation APIについても紹介しました。
マップを表示する機能は、日頃よく使っている配車アプリやフードデリバリーアプリなど様々なアプリに用いられているので、
是非、今回紹介した機能を活用してみてくださいね!
参考
Map Widgetの説明
https://docs.kony.com/konylibrary/visualizer/viz_widget_prog_guide/content/Map.htm
Location API
https://docs.kony.com/konylibrary/visualizer/viz_api_dev_guide/content/kony.location_functions.htm
addPinメソッド
https://docs.kony.com/konylibrary/visualizer/viz_widget_prog_guide/content/Map_Methods.htm#addPin