はじめに
6か月前からpythonでAIを勉強し始ました。
pythonはもともとAI以外で仕事で使う機会が少しありましたが、
Deeplerning等に興味があり、スクールに通うことにしました。
今回は課題として画像分類モデルとWebアプリを作成したのでその過程を投稿します。
本記事の概要
本記事では人の感情分類に挑戦しております。
正答率を上げるため、学習モデルの変更、学習データの加工(高解像度化、カラー化)を試しました。
正答率が一番良かった条件でFlaskにてwebアプリを作成しました。
環境
Python 3.10.11
TensorFlow 2.10.1
作成の流れ
1.学習データの準備
2.画像の前処理
3.モデルの定義・学習・評価
4.学習モデルの変更
5.学習データの高解像度化、カラー化
6.正答率比較
7.モデルの保存
8.アプリの作成
1.学習データの準備
学習データとしてkaggleのデータセットを使用しました。

データは以下の7種類に分類されてます。
- angry:怒り
- digusted:うんざり
- fearful:恐れ
- happy:幸福
- neutral:素
- sad:悲しい
- surprised:驚き
2.画像の前処理
モジュールをインポートします。
import os
import cv2
import numpy as np
import matplotlib.pyplot as plt
from tensorflow.keras.utils import to_categorical
from tensorflow.keras.layers import Dense, Dropout, Flatten, Input, BatchNormalization
from tensorflow.keras.models import Sequential, load_model
from tensorflow.keras.applications.vgg16 import VGG16
from tensorflow.keras.models import Model, Sequential
from tensorflow.keras import optimizers
import tensorflow.keras as keras
from keras.callbacks import LearningRateScheduler
KerasのImageDataGeneratorで、画像データの水増しや加工を行います。
使用した組み合わせは
- 回転
- 反転(水平方向)
- 位置変更(垂直方向、水平方向)
- 標準化
- preprocessing_function
- 検証用データ比率
train_dir = "./train"
test_dir = "./test"
preprocess_fun = keras.applications.vgg16.preprocess_input
params = {
    'rotation_range': 5,
    'horizontal_flip': True,
    'height_shift_range': 0.1,
    'width_shift_range': 0.2,
    'rescale':1./255,
    'preprocessing_function':preprocess_fun,
    'validation_split':0.2,
}
generator = keras.preprocessing.image.ImageDataGenerator(**params)

val_params = {
    'validation_split': 0.2,
    'rescale':1./255,
    'preprocessing_function':preprocess_fun,
}

val_generator = keras.preprocessing.image.ImageDataGenerator(**val_params)
画像サイズ、バッチ数等を定義し、
トレーニンデータ、検証用データ、テストデータを作成します。
resize = 48
batch_s = 256
train_iter = generator.flow_from_directory(directory = train_dir,
                                                    target_size = (resize ,resize),
                                                    batch_size = batch_s,
                                                    shuffle  = True ,
                                                    color_mode = "rgb",
                                                    class_mode = "categorical",
                                                    subset = "training",
                                                    seed = 12
                                                   )

validation_iter = generator.flow_from_directory(directory = train_dir,
                                                         target_size = (resize ,resize),
                                                         batch_size = batch_s,
                                                         shuffle  = True,
                                                         color_mode = "rgb",
                                                         class_mode = "categorical",
                                                         subset = "validation",
                                                         seed = 12
                                                        )

test_iter = val_generator.flow_from_directory(directory = test_dir,
                                                   target_size = (resize ,resize),
                                                    batch_size = batch_s,
                                                    shuffle  = False ,
                                                    color_mode = "rgb",
                                                    class_mode = "categorical",
                                                    seed = 12
                                                  )
これでデータの前処理は終了です。
3.モデルの定義・学習・評価
モデルの定義
まずは学習済モデルVGG16を使用し、転移学習(Fine-tuning)で分類をしていきます。
VGG16を読み込み、出力層を追加します。
モデル内の重みを固定するレイヤーを指定します。
コンパイルを行い、ニューラルネットワークモデルの生成を終了します。
input_tensor = Input(shape=(resize, resize, 3))
vgg16 = VGG16(include_top=False, weights='imagenet', input_tensor=input_tensor)

#出力層の作成
top_model = Sequential()
top_model.add(Flatten(input_shape=vgg16.output_shape[1:]))
top_model.add(Dense(256, activation='relu'),kernel_regularizer = keras.regularizers.l2(0.01)))
top_model.add(BatchNormalization())
top_model.add(Dropout(0.5))
top_model.add(Dense(7, activation='softmax'))

#モデルの結合
model = Model(inputs=vgg16.input, outputs=top_model(vgg16.output))

#重みの固定
for layer in model.layers[:15]:
    layer.trainable = False
#
model.compile(loss='categorical_crossentropy',optimizer=optimizers.SGD(learning_rate=0.1),metrics=['accuracy'])
モデルの学習
モデルの学習を行います。
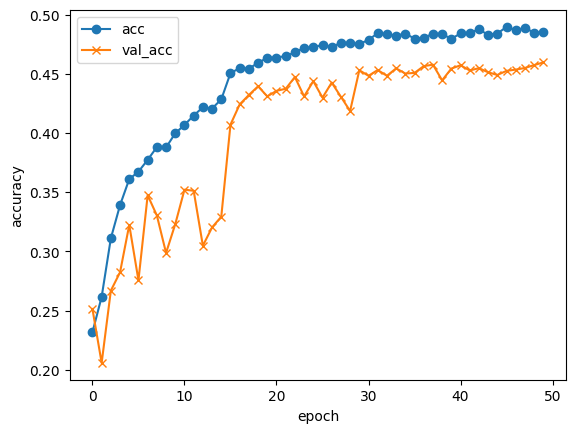
学習率をEpoch経過で徐々に下げていくようにします。
def step_decay(epoch):
    x = 0.1
    if epoch >= 15: x = 0.01
    if epoch >= 30: x = 0.001
    return x
lr_decay = LearningRateScheduler(step_decay)

history=model.fit(train_iter,batch_size=batch,validation_data=validation_iter,epochs=50,verbose=2,callbacks=[lr_decay])
モデルの評価
モデルの評価を行います。
# 精度の評価
scores = model.evaluate(est_iter, verbose=1)
#acc, val_accのプロット
plt.plot(history.history["accuracy"], label="acc", ls="-", marker="o")
plt.plot(history.history["val_accuracy"], label="val_acc", ls="-", marker="x")
plt.ylabel("accuracy")
plt.xlabel("epoch")
plt.legend(loc="best")
plt.show()
29/29 [==============================] - 2s 61ms/step - loss: 1.2147 - accuracy: 0.5677
Test loss: 1.2146960496902466
Test accuracy: 0.5677068829536438
画像サイズ、バッチサイズ、重みの固定を変更し、学習と評価を繰り返していきます。
結果は6.正答率比較でまとめて紹介します。
4.学習モデルの変更
学習モデルをDenseNet169に変更してみます。
モデルを再定義します。
input_tensor = Input(shape=(resize, resize, 3))
DenseNet169 = keras.applications.densenet.DenseNet169(include_top=False, weights='imagenet', input_tensor=input_tensor)
top_model = DenseNet169(input_tensor)
lay_add_0 = keras.layers.GlobalAveragePooling2D()(top_model)
lay_add_1 = Dense(256, activation='relu')(lay_add_0 )
lay_add_2 = Dropout(0.3)(lay_add_1)
lay_add_3 = Dense(1024, activation='relu')(lay_add_2 )
lay_add_4 = Dropout(0.5)(lay_add_3)
lay_add_5 = Dense(512, activation='relu')(lay_add_4 )
lay_add_6 = Dropout(0.5)(lay_add_5)
lay_add_7 = Dense(7, activation='softmax')(lay_add_6)

model = Model(inputs=input_tensor, outputs=lay_add_7)
DenseNetモデルの固定する重みを指定し、学習と評価を行います。
history = model.fit_generator(train_iter,validation_data=validation_iter,epochs=50,verbose=2,callbacks=[lr_decay])
for layer in DenseNet169.layers[:140]:
    layer.trainable = False
29/29 [==============================] - 4s 122ms/step - loss: 1.4196 - accuracy: 0.4798
Test loss: 1.4196346998214722
Test accuracy: 0.47979938983917236

こちらもVGG16と同様に画像サイズ、バッチサイズ、重みの固定を変更し、学習と評価を繰り返していきます。
結果は6.正答率比較でまとめて紹介します。
5.学習データの高解像度化、カラー化
高解像度化はこちらのHP https://miyashinblog.com/swinir/
カラー化はこちらのHP https://miyashinblog.com/colorization/
上記HPを参考に画像を生成します。
| 元画像(48×48) | 高解像度化(192×192) | カラーー化(48×48) |
|---|---|---|
 |
 |
 |
変更後画像を使用して学習と評価を実施します。
結果は6.正答率比較でまとめて紹介します。
6.正答率比較
結果を表にしました。
バッチサイズは各条件でメモリーエラーにならない範囲で大きく設定してます。
正答率の良化に対する効果はそれぞれ
- モデル:VGG16 < DenseNet169
- 重み固定解除比率:VGG16で低いほうが良くDenseNetで高いほうが良い。
- 画像サイズ:48×48 < 224×224
- 画像加工:なし ≒ 高解像度化 ≒ color化
DenseNet169、重み解除比率98.9%、画像加工なし、画像サイズ224×224、バッチサイズ32で正答率が一番良く、約69.25%でした。
| 番号 | モデル | 重み固定解除比率 | 画像加工 | 入力画素数 | batch size | accuracy |
|---|---|---|---|---|---|---|
| 1 | VGG16 | 48.6% | なし | 48×48 | 256 | 0.5677 |
| 2 | VGG16 | 88.3% | なし | 48×48 | 256 | 0.5316 |
| 3 | VGG16 | 63.9% | なし | 224×224 | 64 | 0.6180 |
| 4 | VGG16 | 98.8% | なし | 224×224 | 64 | 0.4125 |
| 5 | DenseNet169 | 88.5% | なし | 48×48 | 256 | 0.4936 |
| 6 | DenseNet169 | 96.1% | なし | 48×48 | 256 | 0.5988 |
| 7 | DenseNet169 | 88.5% | なし | 224×224 | 64 | 0.6422 |
| 8 | DenseNet169 | 88.5% | 高解像度化 | 224×224 | 64 | 0.6502 |
| 9 | DenseNet169 | 88.5% | color化 | 224×224 | 64 | 0.6537 |
| 10 | DenseNet169 | 96.1% | なし | 224×224 | 32 | 0.6818 |
| 11 | DenseNet169 | 98.9% | なし | 224×224 | 32 | 0.6925 |
| 12 | DenseNet169 | 98.9% | color化 | 224×224 | 32 | 0.6913 |
7.モデルの保存
一番正答率の高かった条件でモデルを保存します。
model.save('./Emotion_Detection.hdf5')
8.アプリの作成
学習したモデルを画像をアップロードして感情を判定するwebアプリに実装します。
作成アプリ
Emotion-Detection

判別精度は微妙ですが、動作は問題なさそうです。
まとめ
正答率の良化に対してモデルの選択の効果が大きかったです。
また、選択したモデルによって重みの固定比率を低くするか高くするかが逆の傾向となり、
モデルごとに変更する必要がありそうです。ここら辺の理屈がつけられるようになりたいです。
また、画素数やバッチサイズは大きいほど良い結果になっていて、
学習時間を考えて設定するのが良さそうです。
今後はモデルの選択やパラメータの選択の理解を深めてもっと正答率を上げるにはどうしたらよいか
引き続き勉強を継続し、日々精進したいと思います。