はじめに
本ページでは、
Docker上で起動中のコンテナを、コンテナイメージ化し、
DockerHubにPushするところまでをハンズオンを通して学んでいただきます。
前提条件
- ホストOS:CentOS 7
- Dockerインストール済み
- DockerHubアカウント取得済み
※DockerHubアカウントを持っていない方は、こちら から必要事項を入力して登録してください。
まずは、DockerHubにPushする元となる Dockerコンテナを起動しましょう。
1. イメージファイルの準備
DockerHubから docker pull コマンドでイメージファイルを取得します。
今回は nginx のコンテナイメージを使用します。
$ docker pull nginx:latest

latest: Pulling from library/nginx
743f2d6c1f65: Pull complete
6bfc4ec4420a: Pull complete
688a776db95f: Pull complete
Digest: sha256:23b4dcdf0d34d4a129755fc6f52e1c6e23bb34ea011b315d87e193033bcd1b68
Status: Downloaded newer image for nginx:latest
取得したDockerコンテナイメージを docker images コマンドで確認してみましょう。
$ docker images

REPOSITORY          TAG                 IMAGE ID            CREATED             SIZE
nginx               latest              53f3fd8007f7        2 weeks ago         109MB
2. Dockerコンテナの起動
コンテナイメージから、コンテナを起動します。
$ docker run -d -it --name test-nginx -p 8080:80 nginx:latest
起動したコンテナを docker ps コマンドで確認してみましょう。
$ docker ps -a

CONTAINER ID        IMAGE               COMMAND                  CREATED             STATUS              PORTS                  NAMES
9e5fa5d4fdfc        nginx:latest        "nginx -g 'daemon of…"   42 seconds ago      Up 42 seconds       0.0.0.0:8080->80/tcp   test-nginx
3. nginxコンテナに接続
ブラウザを起動して、http://<ホストのIPアドレス>:8080 にアクセスしてみましょう。

nginx が起動していることが確認できました。
4. nginxコンテナを操作
nginxコンテナにログインして index.html ファイルを書き換えてみましょう。
$ docker exec -it test-nginx /bin/bash

root@9e5fa5d4fdfc:/# cat /usr/share/nginx/html/index.html

<!DOCTYPE html>
<html>
<head>
<title>Welcome to nginx!</title>
<style>
    body {
        width: 35em;
        margin: 0 auto;
        font-family: Tahoma, Verdana, Arial, sans-serif;
    }
</style>
</head>
<body>
<h1>Welcome to nginx!</h1>
<p>If you see this page, the nginx web server is successfully installed and
working. Further configuration is required.</p>
<p>For online documentation and support please refer to
<a href="http://nginx.org/">nginx.org</a>.<br/>
Commercial support is available at
<a href="http://nginx.com/">nginx.com</a>.</p>
<p><em>Thank you for using nginx.</em></p>
</body>
</html>
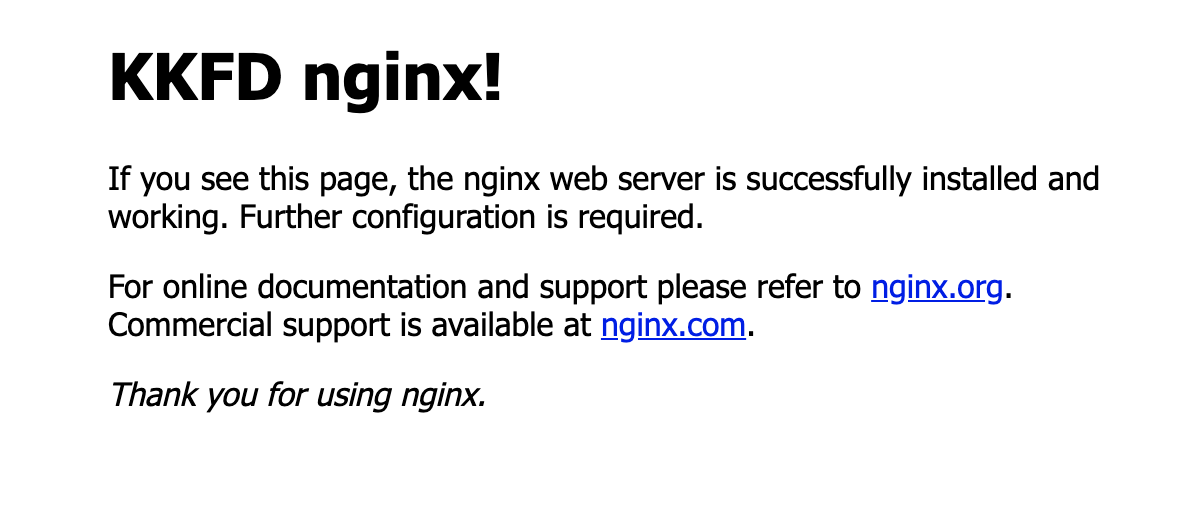
この index.html の <h1>Welcome to nginx!</h1> を、自分の名前などに書き換えましょう。
root@9e5fa5d4fdfc:/# sed -i -e "s/Welcome to/KKFD/g" /usr/share/nginx/html/index.html
再度、ブラウザを起動して、http://<ホストのIPアドレス>:8080 にアクセスすると、
表示が変わっていることが確認できます。
確認できたら、 exit コマンドでコンテナからログアウトしましょう。
root@9e5fa5d4fdfc:/# exit
さぁ、これでDockerHubにPushするコンテナができました!
続いて、このコンテナをコンテナイメージに変換しましょう。
DockerコンテナをDockerコンテナイメージに変換しましょう。
5. コンテナイメージへの変換
コンテナをコンテナイメージに変換するには、 docker commit コマンドを使います。
docker commit コマンドの使い方は下記の通りです。
$ docker commit 変換元のDockerコンテナ名 DockerHubのアカウント名/変換先のDockerコンテナイメージ名[:tag]
それでは、実際に先ほど作成した nginxコンテナをコンテナイメージに変換してみましょう。
$ docker commit test-nginx DockerHubのアカウント名/test-nginx:kkfd
docker images コマンドを入力すると、実際にコンテナイメージができていることが確認できます。
$ docker images

REPOSITORY               TAG                 IMAGE ID            CREATED             SIZE
***********/test-nginx   kkfd                1c7d5fc36af2        4 seconds ago       109MB
nginx                    latest              53f3fd8007f7        2 weeks ago         109MB
ここまでで、DockerHubにPushするDockerコンテナイメージができました!
次はいよいよDockerHubへのPushです!
Dockerコンテナイメージを、DockerHubにPushしましょう。
6. DockerHubへログイン
DockerHubにコンテナイメージをPushするためには、まずDockerHubにログインする必要があります。
事前準備にて作成したDockerHubアカウントを用いてDockerHubにログインしてみましょう。
コマンドは docker login を使用します。
Username と Password を聞かれますので、作成したアカウントでログインしてください。
$ docker login

Login with your Docker ID to push and pull images from Docker Hub. If you don't have a Docker ID, head over to https://hub.docker.com to create one.
Username: ***********
Password:
WARNING! Your password will be stored unencrypted in /root/.docker/config.json.
Configure a credential helper to remove this warning. See
https://docs.docker.com/engine/reference/commandline/login/#credentials-store

Login Succeeded
7. DockerHubへコンテナイメージをPush
いよいよDockerHubへ作成したコンテナイメージをPushします。
コンテナイメージをPushするには、 docker push コマンドを使います。
docker push コマンドの使い方は下記の通りです。
$ docker push DockerHubのアカウント名/Dockerコンテナイメージ名[:tag]
それでは、実際に先ほど作成した コンテナイメージをPushしてみましょう。
$ docker push ***********/test-nginx:kkfd

The push refers to repository [docker.io/***********/test-page]
5e070a02339c: Pushed
332fa54c5886: Pushed
6ba094226eea: Pushed
6270adb5794c: Pushed
kkfd: digest: sha256:2270a676f41a51d49586ffdf92d9debe77b02f152de5915f0e2ccfb12a34ca3a size: 1155
これで、DockerコンテナイメージをDockerHubにPushできました!
ブラウザから、DockerHubにログインしてPushされたコンテナイメージを確認してみましょう。

Pushに成功すると、このようにDockerHubにコンテナイメージが反映されます。
最後に、Pushしたコンテナイメージを再度Pullしてコンテナを起動してみましょう。
PushしたDockerコンテナイメージを起動してみましょう。
8. 既存コンテナ、既存コンテナイメージの掃除
PushしたDockerコンテナイメージをPullする前に、いったん環境をクリアしましょう。
docker rm :コンテナの削除
docker rmi:コンテナイメージの削除
$ docker stop test-nginx
$ docker rm test-nginx

$ docker ps -a

CONTAINER ID        IMAGE               COMMAND             CREATED             STATUS              PORTS               NAMES
$ docker rmi nginx ***********/test-nginx:kkfd

$ docker images

REPOSITORY          TAG                 IMAGE ID            CREATED             SIZE
これで、docker環境はクリアされました。
9. PushしたDockerコンテナイメージをPull
先ほどPushしたコンテナイメージを docker pull で pullします。
$ docker pull ***********/test-nginx:kkfd

kkfd: Pulling from ***********/test-nginx
743f2d6c1f65: Pull complete
6bfc4ec4420a: Pull complete
688a776db95f: Pull complete
c9babe9c6f7c: Pull complete
Digest: sha256:2270a676f41a51d49586ffdf92d9debe77b02f152de5915f0e2ccfb12a34ca3a
Status: Downloaded newer image for *******/test-nginx:kkfd
docker images でpullしたイメージを確認してみましょう。
$ docker images

REPOSITORY               TAG                 IMAGE ID            CREATED             SIZE
***********/test-nginx   kkfd                1c7d5fc36af2        28 minutes ago      109MB
無事に、Dockerコンテナイメージがpullできました。
10. コンテナを起動
pullしてきたDockerコンテナイメージから、コンテナを起動します。
$ docker run -d -it --name test-nginx -p 8080:80 ***********/test-nginx:kkfd
起動したコンテナを docker ps コマンドで確認してみましょう。
$ docker ps -a

CONTAINER ID        IMAGE                         COMMAND                  CREATED             STATUS              PORTS                  NAMES
7aba72530772        ***********/test-nginx:kkfd   "nginx -g 'daemon of…"   6 seconds ago       Up 4 seconds        0.0.0.0:8080->80/tcp   test-nginx
11. nginxコンテナに接続
ブラウザを起動して、http://<ホストのIPアドレス>:8080 にアクセスしてみましょう。
DockerHubにPushしたコンテナイメージが、正しく起動することを確認できました!